AWS Machine Learning
-
AWS Machine Learning wrote a new post on the site CYBERCASEMANAGER ENTERPRISES 4 months, 1 week ago
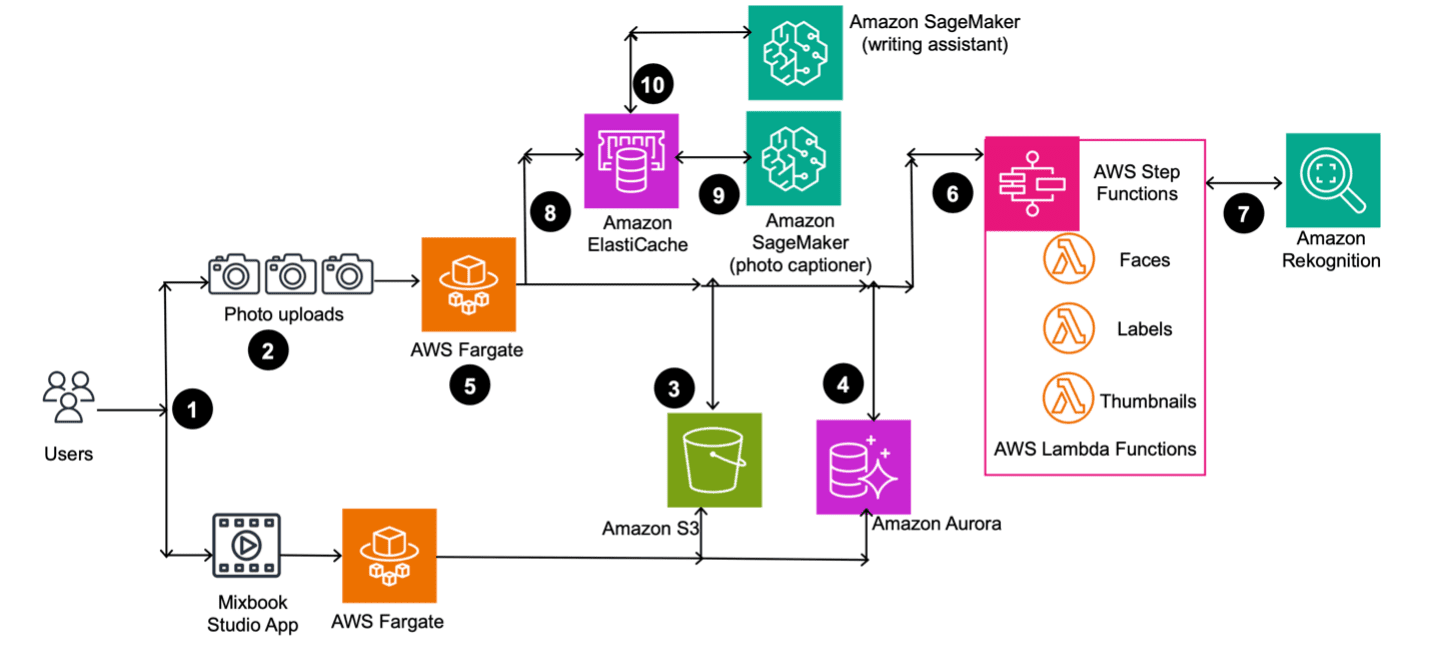
How Mixbook used generative AI to offer personalized photo book experiences
 This post is co-written with Vlad Lebedev and DJ Charles from Mixbook. […]
 -
AWS Machine Learning wrote a new post on the site CYBERCASEMANAGER ENTERPRISES 4 months, 1 week ago
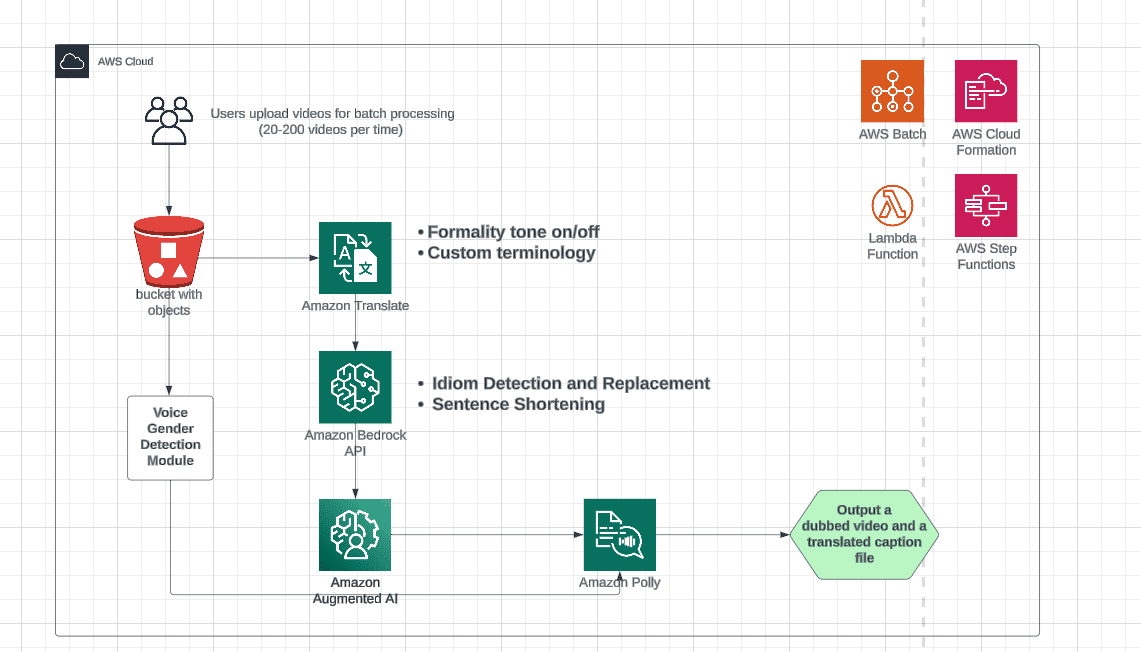
Video auto-dubbing using Amazon Translate, Amazon Bedrock, and Amazon Polly
 This post is co-written with MagellanTV and Mission Cloud. Video […]
 -
AWS Machine Learning wrote a new post on the site CYBERCASEMANAGER ENTERPRISES 4 months, 2 weeks ago
Knowledge Bases for Amazon Bedrock now supports advanced parsing, chunking, and query reformulation giving greater control of accuracy in RAG based applications
 Knowledge Bases for Amazon Bedrock is a fully managed service that helps you implement the entire Retrieval Augmented Generation (RAG) workflow from ingestion to retrieval and prompt augmentation without having to build custom integrations to data sources and manage data flows, pushing the boundaries for what you can do in your RAG workflows. However, it’s important to note that in RAG-based applications, when dealing with large or complex input text documents, such as PDFs or .txt files, querying the indexes might yield subpar results. For example, a document might have complex semantic relationships in its sections or tables that require more advanced chunking techniques to accurately represent this relationship, otherwise the retrieved chunks might not address the user query. To address these performance issues, several factors can be controlled. In this blog post, we will discuss new features in Knowledge Bases for Amazon Bedrock can improve the accuracy of responses in applications that use RAG. These include advanced data chunking options, query decomposition, and CSV and PDF parsing improvements. These features empower you to further improve the accuracy of your RAG workflows with greater control and precision. In the next section, let’s go over each of the features including their benefits. Features for improving accuracy of RAG based applications In this section we will go through the new features provided by Knowledge Bases for Amazon Bedrock to improve the accuracy of generated responses to user query. Advanced parsing Advanced parsing is the process of analyzing and extracting meaningful information from unstructured or semi-structured documents. It involves breaking down the document into its constituent parts, such as text, tables, images, and metadata, and identifying the relationships between these elements. Parsing documents is important for RAG applications because it enables the system to understand the structure and context of the information contained within the documents. There are several techniques to parse or extract data from different document formats, one of which is using foundation models (FMs) to parse the data within the documents. It’s most helpful when you have complex data within documents such as nested tables, text within images, graphical representations of text and so on, which hold important information. Using the advanced parsing option offers several benefits: Improved accuracy: FMs can better understand the context and meaning of the text, leading to more accurate information extraction and generation. Adaptability: Prompts for these parsers can be optimized on domain-specific data, enabling them to adapt to different industries or use cases. Extracting entities: It can be customized to extract entities based on your domain and use case. Complex document elements: It can understand and extract information represented in graphical or tabular format. Parsing documents using FMs are particularly useful in scenarios where the documents to be parsed are complex, unstructured, or contain domain-specific terminology. It can handle ambiguities, interpret implicit information, and extract relevant details using their ability to understand semantic relationships, which is essential for generating accurate and relevant responses in RAG applications. These parsers might incur additional fees, see the pricing details before using this parser selection. In Knowledge Bases for Amazon Bedrock, we provide our customers the option to use FMs for parsing complex documents such as .pdf files with nested tables or text within images. From the AWS Management Console for Amazon Bedrock, you can start creating a knowledge base by choosing Create knowledge base. In Step 2: Configure data source, select Advanced (customization) under Chunking & parsing configurations, as shown in the following image. You can select one of the two models (Anthropic Claude 3 Sonnet or Haiku) currently available for parsing the documents. If you want to customize the way the FM will parse your documents, you can optionally provide instructions based on your document structure, domain, or use case. Based on your configuration, the ingestion process will parse and chunk documents, enhancing the overall response accuracy. We will now explore advanced data chunking options, namely semantic and hierarchical chunking which splits the documents into smaller units, organizes and store chunks in a vector store, which can improve the quality of chunks during retrieval. Advanced data chunking options The objective shouldn’t be to chunk data merely for the sake of chunking, but rather to transform it into a format that facilitates anticipated tasks and enables efficient retrieval for future value extraction. Instead of inquiring, “How should I chunk my data?”, the more pertinent question should be, “What is the most optimal approach to use to transform the data into a form the FM can use to accomplish the designated task?”[1] To achieve this goal, we introduced two new data chunking options within Knowledge Bases for Amazon Bedrock in addition to the fixed chunking, no chunking, and default chunking options: Semantic chunking: Segments your data based on its semantic meaning, helping to ensure that the related information stays together in logical chunks. By preserving contextual relationships, your RAG model can retrieve more relevant and coherent results. Hierarchical chunking: Organizes your data into a hierarchical structure, allowing for more granular and efficient retrieval based on the inherent relationships within your data. Let’s do a deeper dive on each of these techniques. Semantic chunking Semantic chunking analyzes the relationships within a text and divides it into meaningful and complete chunks, which are derived based on the semantic similarity calculated by the embedding model. This approach preserves the information’s integrity during retrieval, helping to ensure accurate and contextually appropriate results. By focusing on the text’s meaning and context, semantic chunking significantly improves the quality of retrieval. It should be used in scenarios where maintaining the semantic integrity of the text is crucial. From the console, you can start creating a knowledge base by choosing Create knowledge base. In Step 2: Configure data source, select Advanced (customization) under the Chunking & parsing configurations and then select Semantic chunking from the Chunking strategy drop down list, as shown in the following image. Details for the parameters that you need to configure. Max buffer size for grouping surrounding sentences: The number of sentences to group together when evaluating semantic similarity. If you select a buffer size of 1, it will include the sentence previous, sentence target, and sentence next while grouping the sentences. Recommended value of this parameter is 1. Max token size for a chunk: The maximum number of tokens that a chunk of text can contain. It can be minimum of 20 up to a maximum of 8,192 based on the context length of the embeddings model. For example, if you’re using the Cohere Embeddings model, the maximum size of a chunk can be 512. The recommended value of this parameter is 300. Breakpoint threshold for similarity between sentence groups: Specify (by a percentage threshold) how similar the groups of sentences should be when semantically compared to each other. It should be a value between 50 and 99. The recommended value of this parameter is 95. Knowledge Bases for Amazon Bedrock first divides documents into chunks based on the specified token size. Embeddings are created for each chunk, and similar chunks in the embedding space are combined based on the similarity threshold and buffer size, forming new chunks. Consequently, the chunk size can vary across chunks. Although this method is more computationally intensive than fixed-size chunking, it can be beneficial for chunking documents where contextual boundaries aren’t clear—for example, legal documents or technical manuals.[2] Example: Consider a legal document discussing various clauses and sub-clauses. The contextual boundaries between these sections might not be obvious, making it challenging to determine appropriate chunk sizes. In such cases, the dynamic chunking approach can be advantageous, because it can automatically identify and group related content into coherent chunks based on the semantic similarity among neighboring sentences. Now that you understand the concept of semantic chunking, including when to use it, let’s do a deeper dive into hierarchical chunking. Hierarchical chunking With hierarchical chunking, you can organize your data into a hierarchical structure, allowing for more granular and efficient retrieval based on the inherent relationships within your data. Organizing your data into a hierarchical structure enables your RAG workflow to efficiently navigate and retrieve information from complex, nested datasets. From the console, start creating a knowledge base by choose Create knowledge base. Configure data source, select Advanced (customization) under the Chunking & parsing configurations and then select Hierarchical chunking from the Chunking strategy drop-down list, as shown in the following image. The following are some parameters that you need to configure. Max parent token size: This is the maximum number of tokens that a parent chunk can contain. The value can range from 1 to 8,192 and is independent of the context length of the embeddings model because the parent chunk isn’t embedded. The recommended value of this parameter is 1,500. Max child token size: This is the maximum number of tokens that a child token can contain. The value can range from 1 to 8,192 based on the context length of the embeddings model. The recommended value of this parameter is 300. Overlap tokens between chunks: This is the percentage overlap between child chunks. Parent chunk overlap depends on the child token size and child percentage overlap that you specify. The recommended value for this parameter is 20 percent of the max child token size value. After the documents are parsed, the first step is to chunk the documents based on the parent and child chunking size. The chunks are then organized into a hierarchical structure, where parent chunk (higher level) represents larger chunks (for example, documents or sections), and child chunks (lower level) represent smaller chunks (for example, paragraphs or sentences). The relationship between the parent and child chunks are maintained. This hierarchical structure allows for efficient retrieval and navigation of the corpus. Some of the benefits include: Efficient retrieval: The hierarchical structure allows faster and more targeted retrieval of relevant information; first by performing semantic search on the child chunk and then returning the parent chunk during retrieval. By replacing the children chunks with the parent chunk, we provide large and comprehensive context to the FM. Context preservation: Organizing the corpus in a hierarchical manner helps preserve the contextual relationships between chunks, which can be beneficial for generating coherent and contextually relevant text. Note: In hierarchical chunking, we return parent chunks and semantic search is performed on children chunks, therefore, you might see less number of search results returned as one parent can have multiple children. Hierarchical chunking is best suited for complex documents that have a nested or hierarchical structure, such as technical manuals, legal documents, or academic papers with complex formatting and nested tables. You can combine the FM parsing discussed previously to parse the documents and select hierarchical chunking to improve the accuracy of generated responses. By organizing the document into a hierarchical structure during the chunking process, the model can better understand the relationships between different parts of the content, enabling it to provide more contextually relevant and coherent responses. Now that you understand the concepts for semantic and hierarchical chunking, in case you want to have more flexibility, you can use a Lambda function for adding custom processing logic to chunks such as metadata processing or defining your custom logic for chunking. In the next section, we discuss custom processing using Lambda function provided by Knowledge bases for Amazon Bedrock. Custom processing using Lambda functions For those seeking more control and flexibility, Knowledge Bases for Amazon Bedrock now offers the ability to define custom processing logic using AWS Lambda functions. Using Lambda functions, you can customize the chunking process to align with the unique requirements of your RAG application. Furthermore, you can extend it beyond chunking, because Lambda can also be used to streamline metadata processing, which can help unlock additional avenues for efficiency and precision. You can begin by writing a Lambda function with your custom chunking logic or use any of the chunking methodologies provided by your favorite open source framework such as LangChain and LLamaIndex. Make sure to create the Lambda layer for the specific open source framework. After writing and testing the Lambda function, you can start creating a knowledge base by choosing Create knowledge base, in Step 2: Configure data source, select Advanced (customization) under the Chunking & parsing configurations and then select corresponding lambda function from Select Lambda function drop down, as shown in the following image: From the drop down, you can select any Lambda function created in the same AWS Region, including the verified version of the Lambda function. Next, you will provide the Amazon Simple Storage Service (Amazon S3) path where you want to store the input documents to run your Lambda function on and to store the output of the documents. So far, we have discussed advanced parsing using FMs and advanced data chunking options to improve the quality of your search results and accuracy of the generated responses. In the next section, we will discuss some optimizations that have been added to Knowledge Bases for Amazon Bedrock to improve the accuracy of parsing .csv files. Metadata customization for .csv files Knowledge Bases for Amazon Bedrock now offers an enhanced .csv file processing feature that separates content and metadata. This update streamlines the ingestion process by allowing you to designate specific columns as content fields and others as metadata fields. Consequently, it reduces the number of required files and enables more efficient data management, especially for large .csv file datasets. Moreover, the metadata customization feature introduces a dynamic approach to storing additional metadata alongside data chunks from .csv files. This contrasts with the current static process of maintaining metadata. This customization capability unlocks new possibilities for data cleaning, normalization, and enrichment processes, enabling augmentation of your data. To use the metadata customization feature, you need to provide metadata files alongside the source .csv files, with the same name as the source data file and a .csv.metadata.json suffix. This metadata file specifies the content and metadata fields of the source .csv file. Here’s an example of the metadata file content: { “metadataAttributes”: { “docSpecificMetadata1”: “docSpecificMetadataVal1”, “docSpecificMetadata2”: “docSpecificMetadataVal2” }, “documentStructureConfiguration”: { “type”: “RECORD_BASED_STRUCTURE_METADATA”, “recordBasedStructureMetadata”: { “contentFields”: [ { “fieldName”: “String” } ], “metadataFieldsSpecification”: { “fieldsToInclude”: [ { “fieldName”: “String” } ], “fieldsToExclude”: [ { “fieldName”: “String” } ] } } } } Use the following steps to experiment with the .csv file improvement feature: Upload the .csv file and corresponding .csv.metadata.json file in the same Amazon S3 prefix. Create a knowledge base using either the console or the Amazon Bedrock SDK. Start ingestion using either the console or the SDK. Retrieve API and RetrieveAndGenerate API can be used to query the structured .csv file data using either the console or the SDK. Query reformulation Often, input queries can be complex with many questions and complex relationships. With such complex prompts, the resulting query embeddings might have some semantic dilution, resulting in retrieved chunks that might not address such a multi-faceted query resulting in reduced accuracy along with a less than desirable response from your RAG application. Now with query reformulation supported by Knowledge Bases for Amazon Bedrock, we can take a complex input query and break it into multiple sub-queries. These sub-queries will then separately go through their own retrieval steps to find relevant chunks. In this process, the subqueries having less semantic complexity might find more targeted chunks. These chunks will then be pooled and ranked together before passing them to the FM to generate a response. Example: Consider the following complex query to a financial document for the fictitious company Octank asking about multiple unrelated topics: “Where is the Octank company waterfront building located and how does the whistleblower scandal hurt the company and its image?” We can decompose the query into multiple subqueries: Where is the Octank Waterfront building located? What is the whistleblower scandal involving Octank? How did the whistleblower scandal affect Octank’s reputation and public image? Now, we have more targeted questions that might help retrieve chunks from the knowledge base from more semantically relevant sections of the documents without some of the semantic dilution that can occur from embedding multiple asks in a single complex query. Query reformulation can be enabled in the console after creating a knowledge base by going to Test Knowledge Base Configurations and turning on Break down queries under Query modifications. Query reformulation can also be enabled during runtime using the RetrieveAndGenerateAPI by adding an additional element to the KnowledgeBaseConfiguration as follows: “orchestrationConfiguration”: { “queryTransformationConfiguration”: { “type”: “QUERY_DECOMPOSITION” } } Query reformulation is another tool that might help increase accuracy for complex queries that you might encounter in production, giving you another way to optimize for the unique interactions your users might have with your application. Conclusion With the introduction of these advanced features, Knowledge Bases for Amazon Bedrock solidifies its position as a powerful and versatile solution for implementing RAG workflows. Whether you’re dealing with complex queries, unstructured data formats, or intricate data organizations, Knowledge Bases for Amazon Bedrock empowers you with the tools and capabilities to unlock the full potential of your knowledge base. By using advanced data chunking options, query decomposition, and .csv file processing, you have greater control over the accuracy and customization of your retrieval processes. These features not only help improve the quality of your knowledge base, but also can facilitate more efficient and effective decision-making, enabling your organization to stay ahead in the ever-evolving world of data-driven insights. Embrace the power of Knowledge Bases for Amazon Bedrock and unlock new possibilities in your retrieval and knowledge management endeavors. Stay tuned for more exciting updates and features from the Amazon Bedrock team as they continue to push the boundaries of what’s possible in the realm of knowledge bases and information retrieval. For more detailed information, code samples, and implementation guides, see the Amazon Bedrock documentation and AWS blog posts. For additional resources, see: Knowledge bases for Amazon Bedrock Use RAG to improve responses in generative AI application Amazon Bedrock Knowledge Base – Samples for building RAG workflows References: [1] LlamaIndex: Chunking Strategies for Large Language Models. Part — 1 [2] How to Choose the Right Chunking Strategy for Your LLM Application About the authors Sandeep Singh is a Senior Generative AI Data Scientist at Amazon Web Services, helping businesses innovate with generative AI. He specializes in Generative AI, Artificial Intelligence, Machine Learning, and System Design. He is passionate about developing state-of-the-art AI/ML-powered solutions to solve complex business problems for diverse industries, optimizing efficiency and scalability. Mani Khanuja is a Tech Lead – Generative AI Specialists, author of the book Applied Machine Learning and High Performance Computing on AWS, and a member of the Board of Directors for Women in Manufacturing Education Foundation Board. She leads machine learning projects in various domains such as computer vision, natural language processing, and generative AI. She speaks at internal and external conferences such AWS re:Invent, Women in Manufacturing West, YouTube webinars, and GHC 23. In her free time, she likes to go for long runs along the beach. Chris Pecora is a Generative AI Data Scientist at Amazon Web Services. He is passionate about building innovative products and solutions while also focused on customer-obsessed science. When not running experiments and keeping up with the latest developments in generative AI, he loves spending […]
 -
AWS Machine Learning wrote a new post on the site CYBERCASEMANAGER ENTERPRISES 4 months, 2 weeks ago
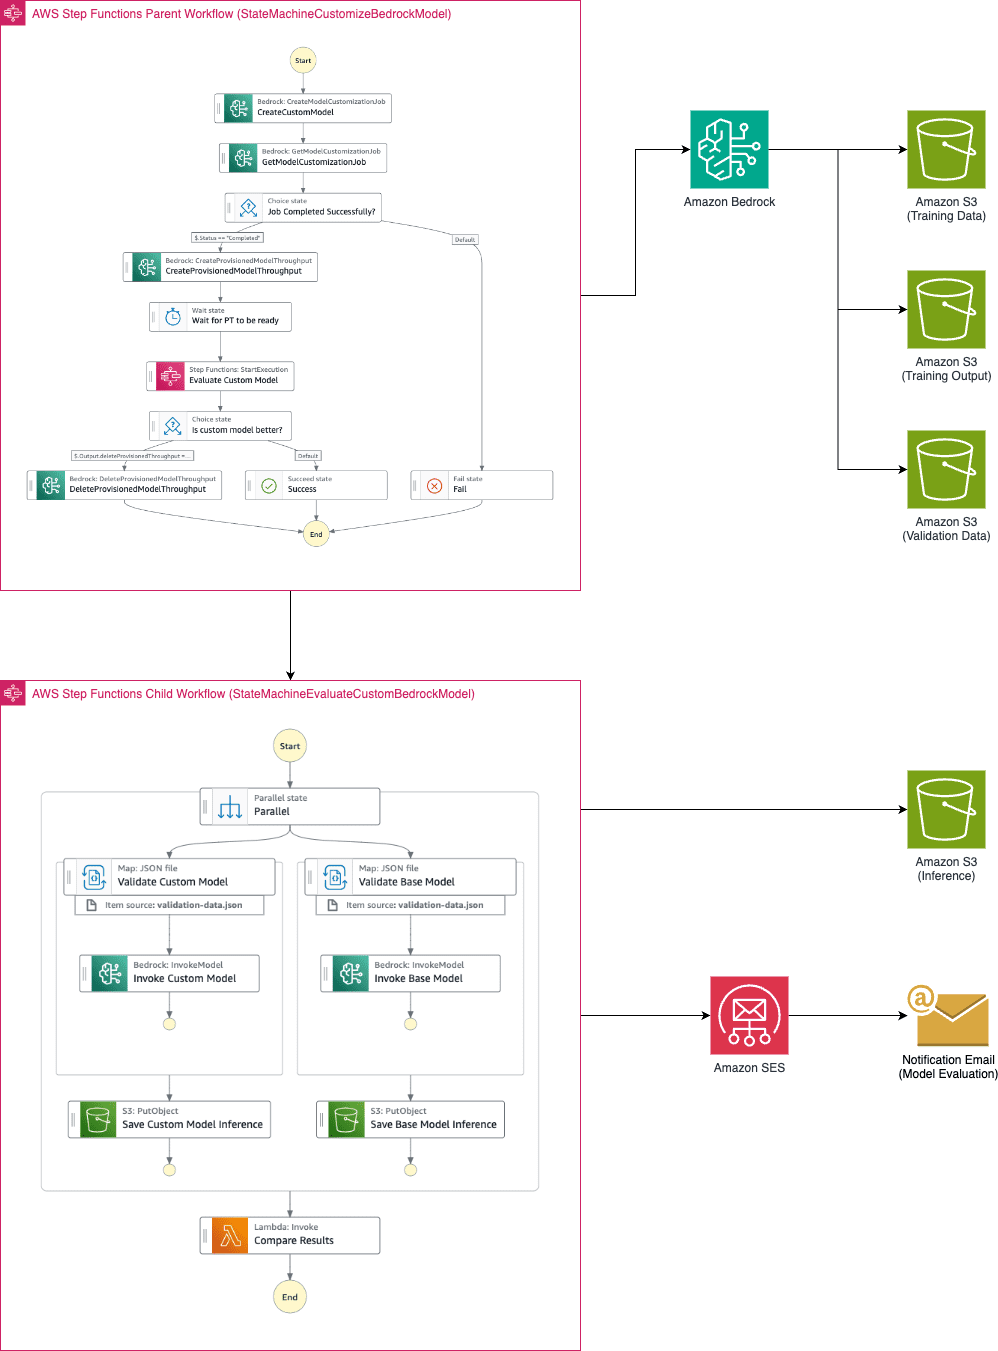
Automating model customization in Amazon Bedrock with AWS Step Functions workflow
 Large language models have become indispensable in generating […]
 -
AWS Machine Learning wrote a new post on the site CYBERCASEMANAGER ENTERPRISES 4 months, 2 weeks ago
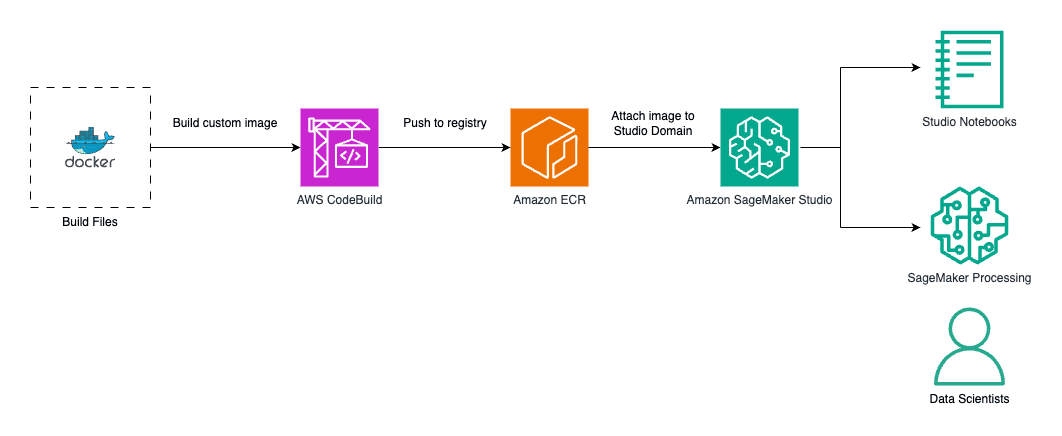
Create custom images for geospatial analysis with Amazon SageMaker Distribution in Amazon SageMaker Studio
 Amazon SageMaker Studio provides a […]
 -
AWS Machine Learning wrote a new post on the site CYBERCASEMANAGER ENTERPRISES 4 months, 2 weeks ago
-
AWS Machine Learning wrote a new post on the site CYBERCASEMANAGER ENTERPRISES 4 months, 2 weeks ago
Improve RAG accuracy with fine-tuned embedding models on Amazon SageMaker
 Retrieval Augmented Generation (RAG) is a popular paradigm that provides […]
 -
AWS Machine Learning wrote a new post on the site CYBERCASEMANAGER ENTERPRISES 4 months, 2 weeks ago
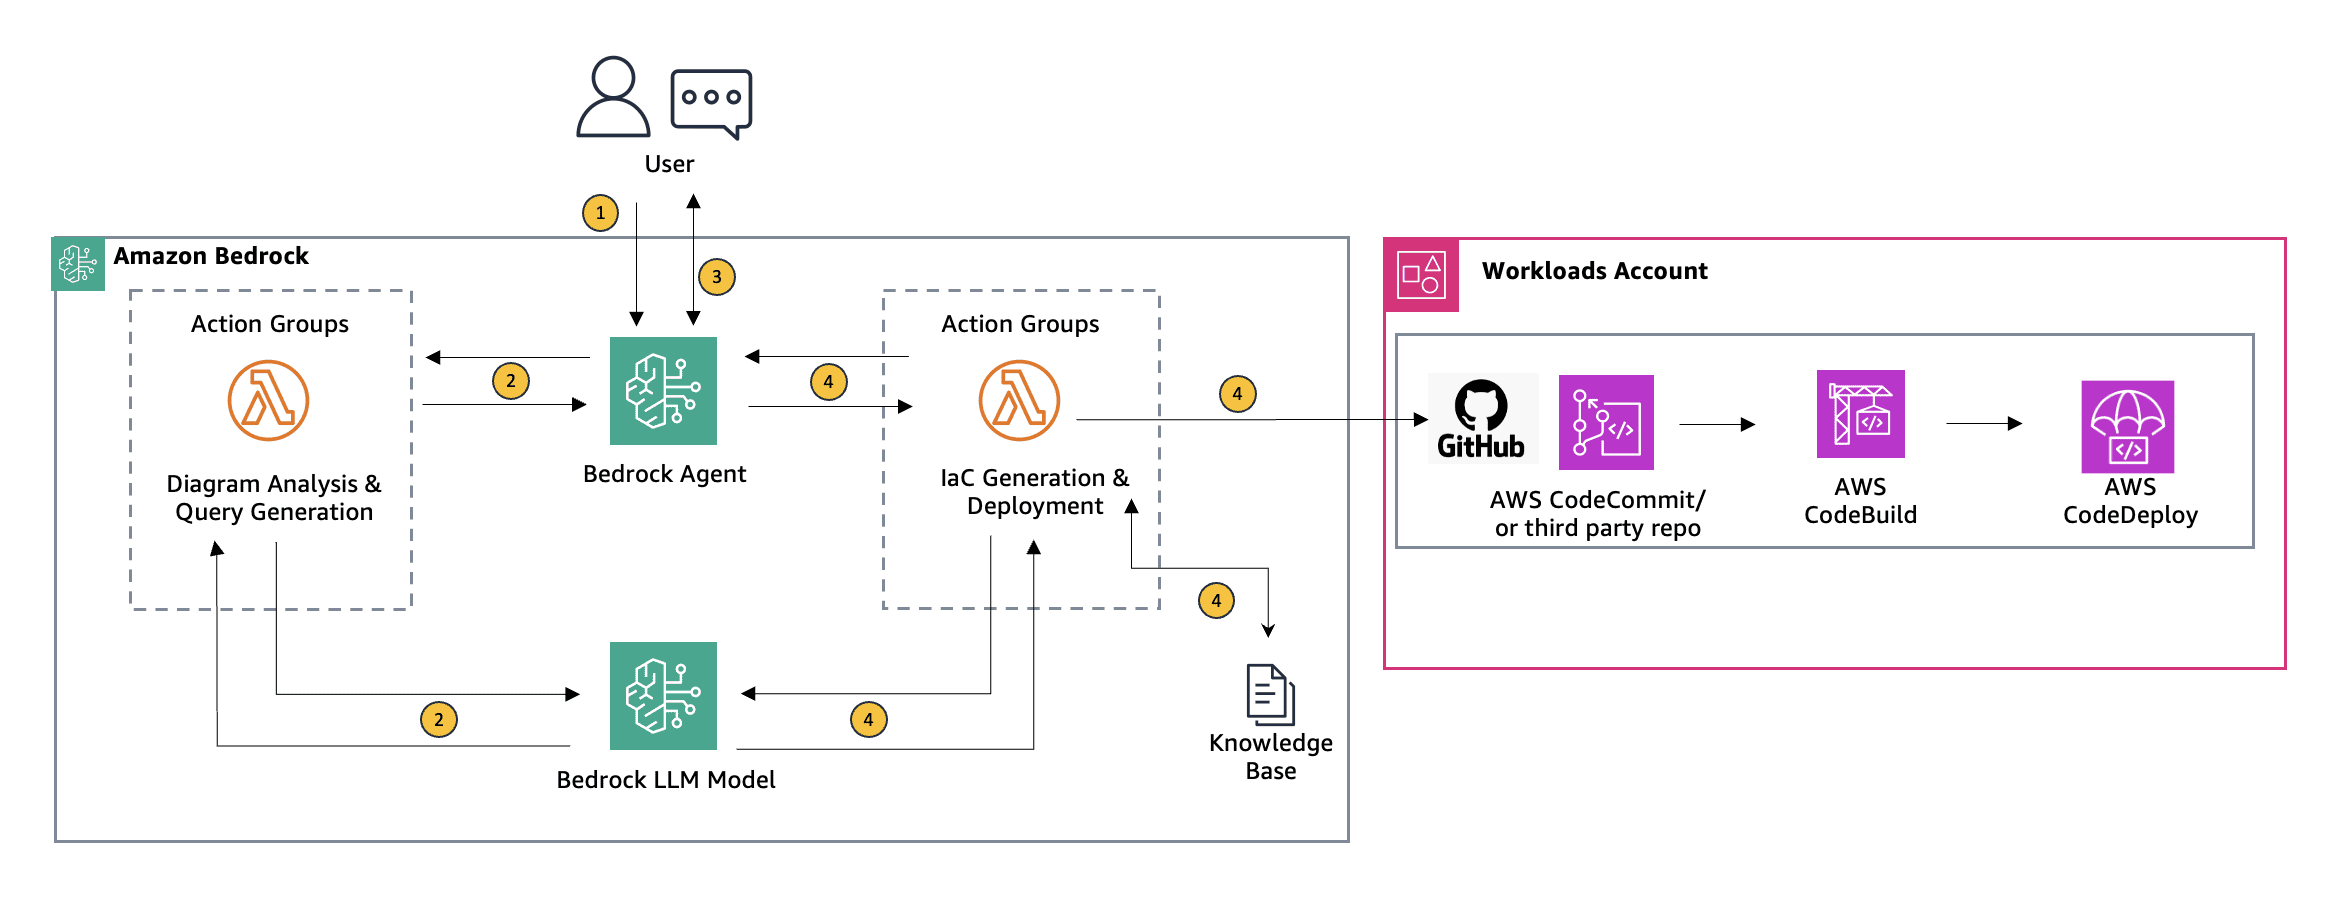
Using Agents for Amazon Bedrock to interactively generate infrastructure as code
 In the diverse toolkit available for deploying cloud […]
 -
AWS Machine Learning wrote a new post on the site CYBERCASEMANAGER ENTERPRISES 4 months, 2 weeks ago
Achieve up to ~2x higher throughput while reducing costs by ~50% for generative AI inference on Amazon SageMaker with the new inference optimization toolkit – Part 1
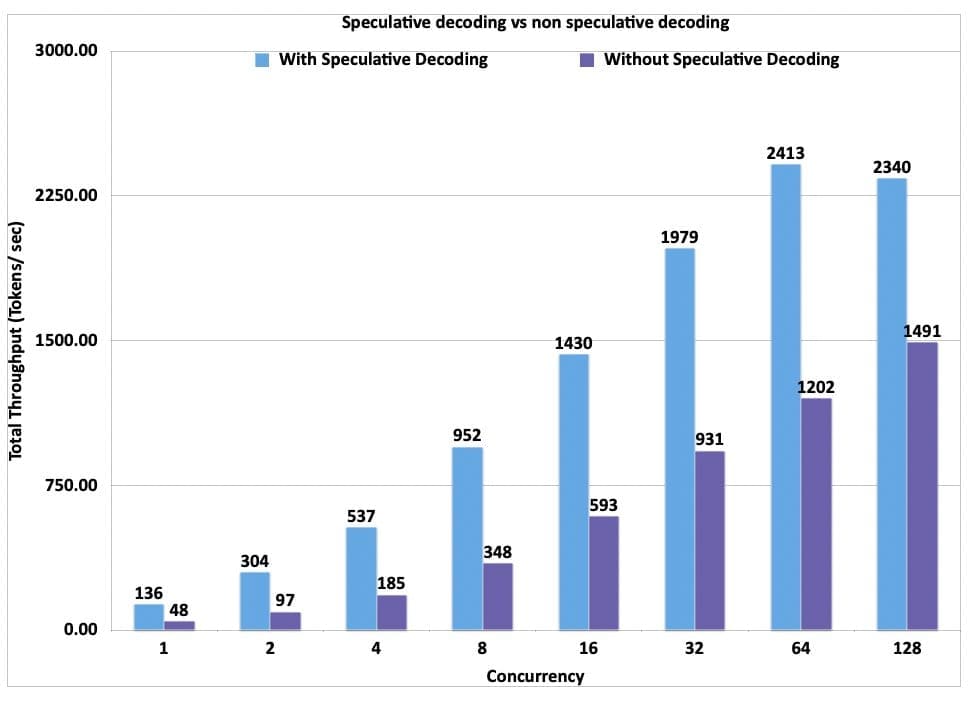
 Today, Amazon SageMaker announced a new inference optimization toolkit that helps you reduce the time it takes to optimize generative artificial intelligence (AI) models from months to hours, to achieve best-in-class performance for your use case. With this new capability, you can choose from a menu of optimization techniques, apply them to your generative AI models, validate performance improvements, and deploy the models in just a few clicks. By employing techniques such as speculative decoding, quantization, and compilation, Amazon SageMaker’s new inference optimization toolkit delivers up to ~2x higher throughput while reducing costs by up to ~50% for generative AI models such as Llama 3, Mistral, and Mixtral models. For example, with a Llama 3-70B model, you can achieve up to ~2400 tokens/sec on a ml.p5.48xlarge instance v/s ~1200 tokens/sec previously without any optimization. Additionally, the inference optimization toolkit significantly reduces the engineering costs of applying the latest optimization techniques, because you don’t need to allocate developer resources and time for research, experimentation, and benchmarking before deployment. You can now focus on your business objectives instead of the heavy lifting involved in optimizing your models. In this post, we discuss the benefits of this new toolkit and the use cases it unlocks. Benefits of the inference optimization toolkit “Large language models (LLMs) require expensive GPU-based instances for hosting, so achieving a substantial cost reduction is immensely valuable. With the new inference optimization toolkit from Amazon SageMaker, based on our experimentation, we expect to reduce deployment costs of our self-hosted LLMs by roughly 30% and to reduce latency by up to 25% for up to 8 concurrent requests” said FNU Imran, Machine Learning Engineer, Qualtrics. Today, customers try to improve price-performance by optimizing their generative GenAI models with techniques such as speculative decoding, quantization, and compilation. Speculative decoding achieves speedup by predicting and computing multiple potential next tokens in parallel, thereby reducing the overall runtime, without loss in accuracy. Quantization reduces the memory requirements of the model by using a lower-precision data type to represent weights and activations. Compilation optimizes the model to deliver the best-in-class performance on the chosen hardware type, without loss in accuracy. However, it takes months of developer time to optimally implement generative AI optimization techniques—you need to go through a myriad of open source documentation, iteratively prototype different techniques, and benchmark before finalizing on the deployment configurations. Additionally, there’s a lack of compatibility across techniques and various open source libraries, making it difficult to stack different techniques for best price-performance. The inference optimization toolkit helps address these challenges by making the process simpler and more efficient. You can select from a menu of latest model optimization techniques and apply them to your models. You can also select a combination of techniques to create an optimization recipe for their models. Then you can run benchmarks using your custom data to evaluate the impact of the techniques on the output quality and the inference performance in just a few clicks. SageMaker will do the heavy lifting of provisioning the required hardware to run the optimization recipe using the most efficient set of deep learning frameworks and libraries, and provide compatibility with target hardware so that the techniques can be efficiently stacked together. You can now deploy popular models like Llama 3 and Mistral available on Amazon SageMaker JumpStart with accelerated inference techniques within minutes, either using the Amazon SageMaker Studio UI or the Amazon SageMaker Python SDK. A number of preset serving configurations are exposed for each model, along with precomputed benchmarks that provide you with different options to pick between lower cost (higher concurrency) or lower per-user latency. Using the new inference optimization toolkit, we benchmarked the performance and cost impact of different optimization techniques. The toolkit allowed us to evaluate how each technique affected throughput and overall cost-efficiency for our question answering use case. Speculative decoding Speculative decoding is an inference technique that aims to speed up the decoding process of large and therefore slow LLMs for latency-critical applications without compromising the quality of the generated text. The key idea is to use a smaller, less powerful, but faster language model called the draft model to generate candidate tokens that are then validated by the larger, more powerful, but slower target model. At each iteration, the draft model generates multiple candidate tokens. The target model verifies the tokens and if it finds a particular token is not acceptable, it rejects it and regenerates that itself. Therefore, the larger model may be doing both verification and some small amount of token generation. The smaller model is significantly faster than the larger model. It can generate all the tokens quickly and then send batches of these tokens to the target models for verification. The target models evaluate them all in parallel, significantly speeding up the final response generation (verification is faster than auto-regressive token generation). For a more detailed understanding, refer to the paper from DeepMind, Accelerating Large Language Model Decoding with Speculative Sampling. With the new inference optimization toolkit from SageMaker, you get out-of-the-box support for speculative decoding from SageMaker that has been tested for performance at scale for various popular open models. SageMaker offers a pre-built draft model that you can use out of the box, eliminating the need to invest time and resources in building your own draft model from scratch. If you prefer to use your own custom draft model, SageMaker also supports this option, providing flexibility to accommodate your specific custom draft models. The following graph showcases the throughput (tokens per second) for a Llama3-70B model deployed on a ml.p5.48xlarge using speculative decoding provided through SageMaker compared to a deployment without speculative decoding. While the results below use a ml.p5.48xlarge, you can also look at exploring deploying Llama3-70 with speculative decoding on a ml.p4d.24xlarge. The dataset used for these benchmarks is based on a curated version of the OpenOrca question answering use case, where the payloads are between 500–1,000 tokens with mean 622 with respect to the Llama 3 tokenizer. All requests set the maximum new tokens to 250. Given the increase in throughput that is realized with speculative decoding, we can also see the blended price difference when using speculative decoding vs. when not using speculative decoding. Here we have calculated the blended price as a 3:1 ratio of input to output tokens. The blended price is defined as follows: Total throughput (tokens per second) = (1/(p50 inter token latency)) x concurrency Blended price ($ per 1 million tokens) = (1−(discount rate)) × (instance per hour price) ÷ ((total token throughput per second)×60×60÷10^6)) ÷ 4 Check out the following notebook to learn how to enable speculative decoding using the optimization toolkit for a pre-trained SageMaker JumpStart model. The following are not supported when using the SageMaker provided draft model for speculative decoding: If you have fine-tuned your model outside of SageMaker JumpStart The custom inference script is not supported when using SageMaker draft models Local testing Inference components Quantization Quantization is one of the most popular model compression methods to reduce your memory footprint and accelerate inference. By using a lower-precision data type to represent weights and activations, quantizing LLM weights for inference provides four main benefits: Reduced hardware requirements for model serving – A quantized model can be served using less expensive and more available GPUs or even made accessible on consumer devices or mobile platforms. Increased space for the KV cache – This enables larger batch sizes and sequence lengths. Faster decoding latency – Because the decoding process is memory bandwidth bound, less data movement from reduced weight sizes directly improves decoding latency, unless offset by dequantization overhead. A higher compute-to-memory access ratio (through reduced data movement) – This is also known as arithmetic intensity. This allows for fuller utilization of available compute resources during decoding. For quantization, the inference optimization toolkit from SageMaker provides compatibility and supports Activation-aware Weight Quantization (AWQ) for GPUs. AWQ is an efficient and accurate low-bit (INT3/4) post-training weight-only quantization technique for LLMs, supporting instruction-tuned models and multi-modal LLMs. By quantizing the model weights to INT4 using AWQ, you can deploy larger models (like Llama 3 70B) on ml.g5.12xlarge, which is 79.88% cheaper than ml.p4d.24xlarge based on the 1 year SageMaker Savings Plan rate. The memory footprint of INT4 weights is four times smaller than that of native half-precision weights (35 GB vs. 140 GB for Llama 3 70B). The following graph compares the throughput of an AWQ quantized Llama 3 70B instruct model on ml.g5.12xlarge against a Llama 3 70B instruct model on ml.p4d.24xlarge.There could be implications to the accuracy of the AWQ quantized model due to compression. Having said that, the price-performance is better on ml.g5.12xlarge and the throughput per instance is lower. You can add additional instances to your SageMaker endpoint according to your use case. We can see the cost savings realized in the following blended price graph. In the following graph, we have calculated the blended price as a 3:1 ratio of input to output tokens. In addition, we applied the 1 year SageMaker Savings Plan rate for the instances. Refer to the following notebook to learn more about how to enable AWQ quantization and speculative decoding using the optimization toolkit for a pre-trained SageMaker JumpStart model. If you want to deploy a fine-tuned model with SageMaker JumpStart using speculative decoding, refer to the following notebook. Compilation Compilation optimizes the model to extract the best available performance on the chosen hardware type, without any loss in accuracy. For compilation, the SageMaker inference optimization toolkit provides efficient loading and caching of optimized models to reduce model loading and auto scaling time by up to 40–60 % for Llama 3 8B and 70B. Model compilation enables running LLMs on accelerated hardware, such as GPUs or custom silicon like AWS Trainium and AWS Inferentia, while simultaneously optimizing the model’s computational graph for optimal performance on the target hardware. On Trainium and AWS Inferentia, the Neuron Compiler ingests deep learning models in various formats such as PyTorch and safetensors, and then optimizes them to run efficiently on Neuron devices. When using the Large Model Inference (LMI) Deep Learning Container (DLC), the Neuron Compiler is invoked from within the framework and creates compiled artifacts. These compiled artifacts are unique for a combination of input shapes, precision of the model, tensor parallel degree, and other framework- or compiler-level configurations. Although the compilation process avoids overhead during inference and enables optimized inference, it can take a lot of time. To avoid re-compiling every time a model is deployed onto a Neuron device, SageMaker introduces the following features: A cache of pre-compiled artifacts – This includes popular models like Llama 3, Mistral, and more for Trainium and AWS Inferentia 2. When using an optimized model with the compilation config, SageMaker automatically uses these cached artifacts when the configurations match. Ahead-of-time compilation – The inference optimization toolkit enables you to compile your models with the desired configurations before deploying them on SageMaker. The following graph illustrates the improvement in model loading time when using pre-compiled artifacts with the SageMaker LMI DLC. The models were compiled with a sequence length of 8,192 and a batch size of 8, with Llama 3 8B deployed on an inf2.48xlarge (tensor parallel degree = 24) and Llama 3 70B on a trn1.32xlarge (tensor parallel degree = 32). Refer to the following notebook for more information on how to enable Neuron compilation using the optimization toolkit for a pre-trained SageMaker JumpStart model. Pricing For compilation and quantization jobs, SageMaker will optimally choose the right instance type, so you don’t have to spend time and effort. You will be charged based on the optimization instance used. To learn model, see Amazon SageMaker pricing. For speculative decoding, there is no optimization involved; QuickSilver will package the right container and parameters for the deployment. Therefore, there are no additional costs to you. Conclusion Refer to Achieve up to 2x higher throughput while reducing cost by up to 50% for GenAI inference on SageMaker with new inference optimization toolkit: user guide – Part 2 blog to learn to get started with the inference optimization toolkit when using SageMaker inference with SageMaker JumpStart and the SageMaker Python SDK. You can use the inference optimization toolkit on any supported models on SageMaker JumpStart. For the full list of supported models, refer to Optimize model inference with Amazon SageMaker. About the authors Raghu Ramesha is a Senior GenAI/ML Solutions Architect Marc Karp is a Senior ML Solutions Architect Ram Vegiraju is a Solutions Architect Pierre Lienhart is a Deep Learning Architect Pinak Panigrahi is a Senior Solutions Architect Annapurna ML Rishabh Ray Chaudhury is a Se […]
 -
AWS Machine Learning wrote a new post on the site CYBERCASEMANAGER ENTERPRISES 4 months, 2 weeks ago
Achieve up to ~2x higher throughput while reducing costs by up to ~50% for generative AI inference on Amazon SageMaker with the new inference optimization toolkit – Part 2
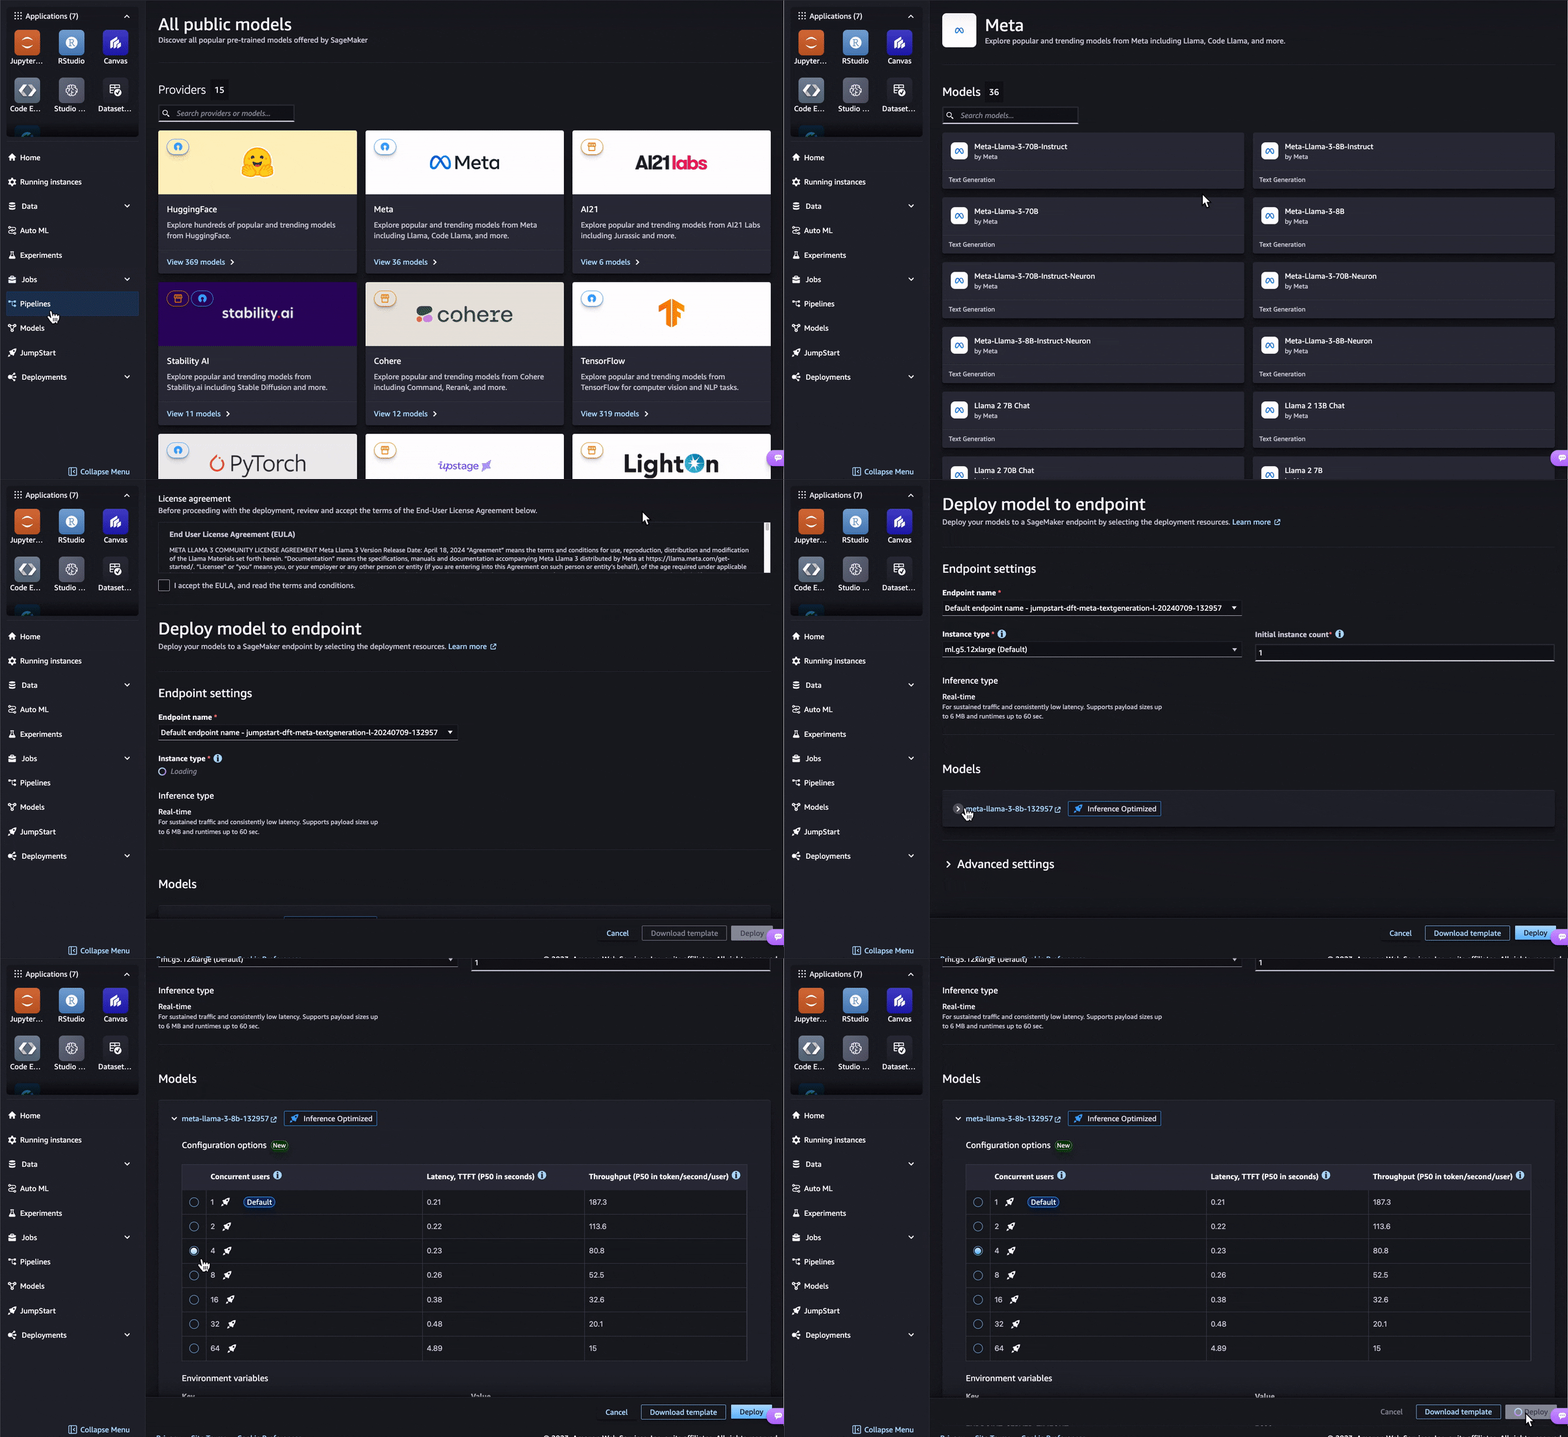
 As generative artificial intelligence (AI) inference becomes increasingly critical for businesses, customers are seeking ways to scale their generative AI operations or integrate generative AI models into existing workflows. Model optimization has emerged as a crucial step, allowing organizations to balance cost-effectiveness and responsiveness, improving productivity. However, price-performance requirements vary widely across use cases. For chat applications, minimizing latency is key to offer an interactive experience, whereas real-time applications like recommendations require maximizing throughput. Navigating these trade-offs poses a significant challenge to rapidly adopt generative AI, because you must carefully select and evaluate different optimization techniques. To overcome these challenges, we are excited to introduce the inference optimization toolkit, a fully managed model optimization feature in Amazon SageMaker. This new feature delivers up to ~2x higher throughput while reducing costs by up to ~50% for generative AI models such as Llama 3, Mistral, and Mixtral models. For example, with a Llama 3-70B model, you can achieve up to ~2400 tokens/sec on a ml.p5.48xlarge instance v/s ~1200 tokens/sec previously without any optimization. This inference optimization toolkit uses the latest generative AI model optimization techniques such as compilation, quantization, and speculative decoding to help you reduce the time to optimize generative AI models from months to hours, while achieving the best price-performance for your use case. For compilation, the toolkit uses the Neuron Compiler to optimize the model’s computational graph for specific hardware, such as AWS Inferentia, enabling faster runtimes and reduced resource utilization. For quantization, the toolkit utilizes Activation-aware Weight Quantization (AWQ) to efficiently shrink the model size and memory footprint while preserving quality. For speculative decoding, the toolkit employs a faster draft model to predict candidate outputs in parallel, enhancing inference speed for longer text generation tasks. To learn more about each technique, refer to Optimize model inference with Amazon SageMaker. For more details and benchmark results for popular open source models, see Achieve up to ~2x higher throughput while reducing costs by up to ~50% for generative AI inference on Amazon SageMaker with the new inference optimization toolkit – Part 1. In this post, we demonstrate how to get started with the inference optimization toolkit for supported models in Amazon SageMaker JumpStart and the Amazon SageMaker Python SDK. SageMaker JumpStart is a fully managed model hub that allows you to explore, fine-tune, and deploy popular open source models with just a few clicks. You can use pre-optimized models or create your own custom optimizations. Alternatively, you can accomplish this using the SageMaker Python SDK, as shown in the following notebook. For the full list of supported models, refer to Optimize model inference with Amazon SageMaker. Using pre-optimized models in SageMaker JumpStart The inference optimization toolkit provides pre-optimized models that have been optimized for best-in-class cost-performance at scale, without any impact to accuracy. You can choose the configuration based on the latency and throughput requirements of your use case and deploy in a single click. Taking the Meta-Llama-3-8b model in SageMaker JumpStart as an example, you can choose Deploy from the model page. In the deployment configuration, you can expand the model configuration options, select the number of concurrent users, and deploy the optimized model. Deploying a pre-optimized model with the SageMaker Python SDK You can also deploy a pre-optimized generative AI model using the SageMaker Python SDK in just a few lines of code. In the following code, we set up a ModelBuilder class for the SageMaker JumpStart model. ModelBuilder is a class in the SageMaker Python SDK that provides fine-grained control over various deployment aspects, such as instance types, network isolation, and resource allocation. You can use it to create a deployable model instance, converting framework models (like XGBoost or PyTorch) or Inference Specs into SageMaker-compatible models for deployment. Refer to Create a model in Amazon SageMaker with ModelBuilder for more details. sample_input = { “inputs”: “Hello, I’m a language model,”, “parameters”: {“max_new_tokens”:128, “do_sample”:True} } sample_output = [ { “generated_text”: “Hello, I’m a language model, and I’m here to help you with your English.” } ] schema_builder = SchemaBuilder(sample_input, sample_output) builder = ModelBuilder( model=”meta-textgeneration-llama-3-8b”, # JumpStart model ID schema_builder=schema_builder, role_arn=role_arn, ) List the available pre-benchmarked configurations with the following code: builder.display_benchmark_metrics() Choose the appropriate instance_type and config_name from the list based on your concurrent users, latency, and throughput requirements. In the preceding table, you can see the latency and throughput across different concurrency levels for the given instance type and config name. If config name is lmi-optimized, that means the configuration is pre-optimized by SageMaker. Then you can call .build() to run the optimization job. When the job is complete, you can deploy to an endpoint and test the model predictions. See the following code: # set deployment config with pre-configured optimization bulder.set_deployment_config( instance_type=”ml.g5.12xlarge”, config_name=”lmi-optimized” ) # build the deployable model model = builder.build() # deploy the model to a SageMaker endpoint predictor = model.deploy(accept_eula=True) # use sample input payload to test the deployed endpoint predictor.predict(sample_input) Using the inference optimization toolkit to create custom optimizations In addition to creating a pre-optimized model, you can create custom optimizations based on the instance type you choose. The following table provides a full list of available combinations. In the following sections, we explore compilation on AWS Inferentia first, and then try the other optimization techniques for GPU instances. Instance Types Optimization Technique Configurations AWS Inferentia Compilation Neuron Compiler GPUs Quantization AWQ GPUs Speculative Decoding SageMaker provided or Bring Your Own (BYO) draft model Compilation from SageMaker JumpStart For compilation, you can select the same Meta-Llama-3-8b model from SageMaker JumpStart and choose Optimize on the model page. In the optimization configuration page, you can choose ml.inf2.8xlarge for your instance type. Then provide an output Amazon Simple Storage Service (Amazon S3) location for the optimized artifacts. For large models like Llama 2 70B, for example, the compilation job can take more than an hour. Therefore, we recommend using the inference optimization toolkit to perform ahead-of-time compilation. That way, you only need to compile one time. Compilation using the SageMaker Python SDK For the SageMaker Python SDK, you can configure the compilation by changing the environment variables in the .optimize() function. For more details on compilation_config, refer to LMI NeuronX ahead-of-time compilation of models tutorial. compiled_model = builder.optimize( instance_type=”ml.inf2.8xlarge”, accept_eula=True, compilation_config={ “OverrideEnvironment”: { “OPTION_TENSOR_PARALLEL_DEGREE”: “2”, “OPTION_N_POSITIONS”: “2048”, “OPTION_DTYPE”: “fp16”, “OPTION_ROLLING_BATCH”: “auto”, “OPTION_MAX_ROLLING_BATCH_SIZE”: “4”, “OPTION_NEURON_OPTIMIZE_LEVEL”: “2”, } }, output_path=f”s3://{output_bucket_name}/compiled/” ) # deploy the compiled model to a SageMaker endpoint predictor = compiled_model.deploy(accept_eula=True) # use sample input payload to test the deployed endpoint predictor.predict(sample_input) Quantization and speculative decoding from SageMaker JumpStart For optimizing models on GPU, ml.g5.12xlarge is the default deployment instance type for Llama-3-8b. You can choose quantization, speculative decoding, or both as optimization options. Quantization uses AWQ to reduce the model’s weights to low-bit (INT4) representations. Finally, you can provide an output S3 URL to store the optimized artifacts. With speculative decoding, you can improve latency and throughput by either using the SageMaker provided draft model or bringing your own draft model from the public Hugging Face model hub or upload from your own S3 bucket. After the optimization job is complete, you can deploy the model or run further evaluation jobs on the optimized model. On the SageMaker Studio UI, you can choose to use the default sample datasets or provide your own using an S3 URI. At the time of writing, the evaluate performance option is only available through the Amazon SageMaker Studio UI. Quantization and speculative decoding using the SageMaker Python SDK The following is the SageMaker Python SDK code snippet for quantization. You just need to provide the quantization_config attribute in the .optimize() function. optimized_model = builder.optimize( instance_type=”ml.g5.12xlarge”, accept_eula=True, quantization_config={ “OverrideEnvironment”: { “OPTION_QUANTIZE”: “awq” } }, output_path=f”s3://{output_bucket_name}/quantized/” ) # deploy the optimized model to a SageMaker endpoint predictor = optimized_model.deploy(accept_eula=True) # use sample input payload to test the deployed endpoint predictor.predict(sample_input) For speculative decoding, you can change to a speculative_decoding_config attribute and configure SageMaker or a custom model. You may need to adjust the GPU utilization based on the sizes of the draft and target models to fit them both on the instance for inference. optimized_model = builder.optimize( instance_type=”ml.g5.12xlarge”, accept_eula=True, speculative_decoding_config={ “ModelProvider”: “sagemaker” } # speculative_decoding_config={ # “ModelProvider”: “custom”, # use S3 URI or HuggingFace model ID for custom draft model # note: using HuggingFace model ID as draft model requires HF_TOKEN in environment variables # “ModelSource”: “s3://custom-bucket/draft-model”, # } ) # deploy the optimized model to a SageMaker endpoint predictor = optimized_model.deploy(accept_eula=True) # use sample input payload to test the deployed endpoint predictor.predict(sample_input) Conclusion Optimizing generative AI models for inference performance is crucial for delivering cost-effective and responsive generative AI solutions. With the launch of the inference optimization toolkit, you can now optimize your generative AI models, using the latest techniques such as speculative decoding, compilation, and quantization to achieve up to ~2x higher throughput and reduce costs by up to ~50%. This helps you achieve the optimal price-performance balance for your specific use cases with just a few clicks in SageMaker JumpStart or a few lines of code using the SageMaker Python SDK. The inference optimization toolkit significantly simplifies the model optimization process, enabling your business to accelerate generative AI adoption and unlock more opportunities to drive better business outcomes. To learn more, refer to Optimize model inference with Amazon SageMaker and Achieve up to ~2x higher throughput while reducing costs by up to ~50% for generative AI inference on Amazon SageMaker with the new inference optimization toolkit – Part 1. About the Authors James Wu is a Senior AI/ML Specialist Solutions Architect Saurabh Trikande is a Senior Product Manager Rishabh Ray Chaudhury is a Senior Product Manager Kumara Swami Borra is a Front End Engineer Alwin (Qiyun) Zhao is a Senior Software Development Enginee […]
 -
AWS Machine Learning wrote a new post on the site CYBERCASEMANAGER ENTERPRISES 4 months, 2 weeks ago
Fine-tune Anthropic’s Claude 3 Haiku in Amazon Bedrock to boost model accuracy and quality
 Frontier large language models (LLMs) like Anthropic […]
 -
AWS Machine Learning wrote a new post on the site CYBERCASEMANAGER ENTERPRISES 4 months, 2 weeks ago
A progress update on our commitment to safe, responsible generative AI
 Responsible AI is a longstanding commitment at Amazon. From the outset, we […]
 -
AWS Machine Learning wrote a new post on the site CYBERCASEMANAGER ENTERPRISES 4 months, 2 weeks ago
-
AWS Machine Learning wrote a new post on the site CYBERCASEMANAGER ENTERPRISES 4 months, 2 weeks ago
Streamline generative AI development in Amazon Bedrock with Prompt Management and Prompt Flows (preview)
 Today, we’re excited to introduce two p […]
 -
AWS Machine Learning wrote a new post on the site CYBERCASEMANAGER ENTERPRISES 4 months, 2 weeks ago
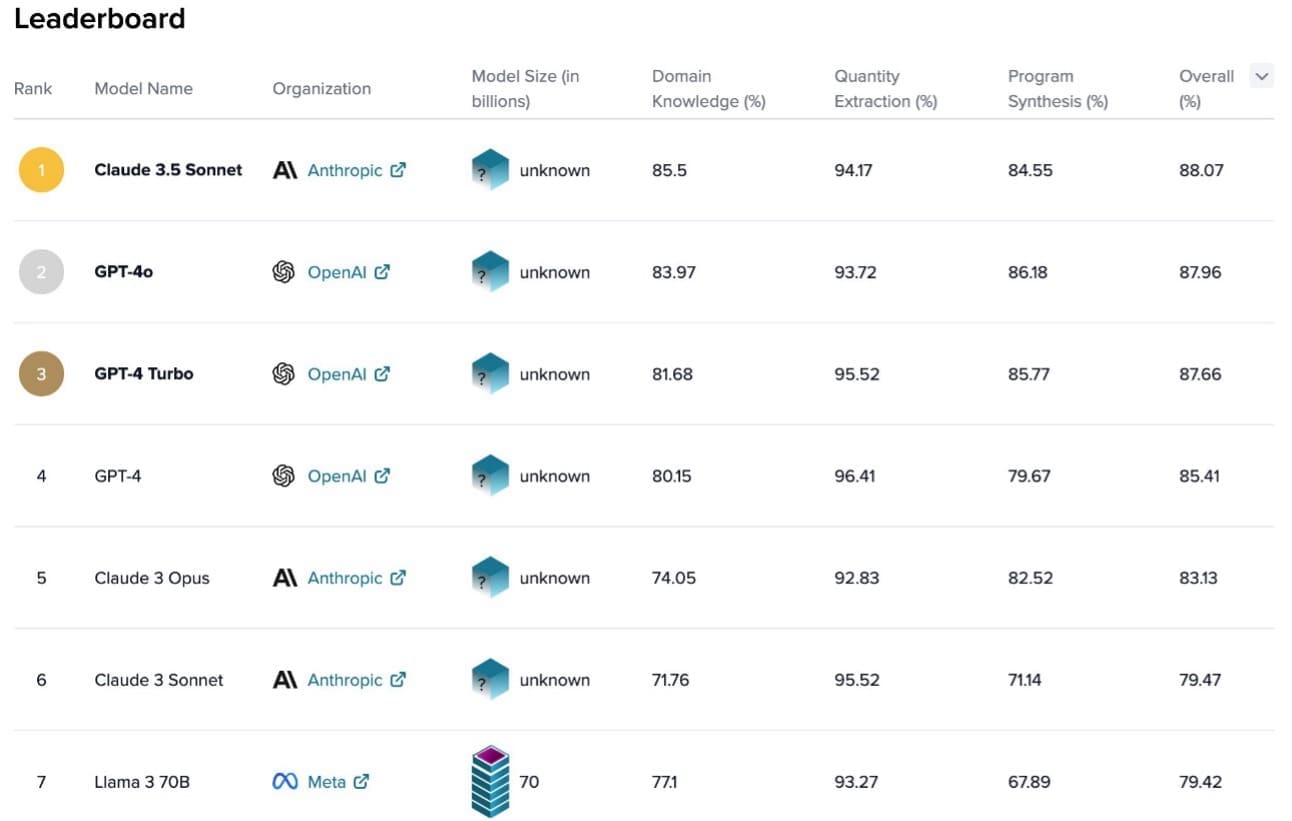
Anthropic Claude 3.5 Sonnet ranks number 1 for business and finance in S&P AI Benchmarks by Kensho
 Anthropic Claude 3.5 Sonnet currently ranks at the […]
 -
AWS Machine Learning wrote a new post on the site CYBERCASEMANAGER ENTERPRISES 4 months, 2 weeks ago
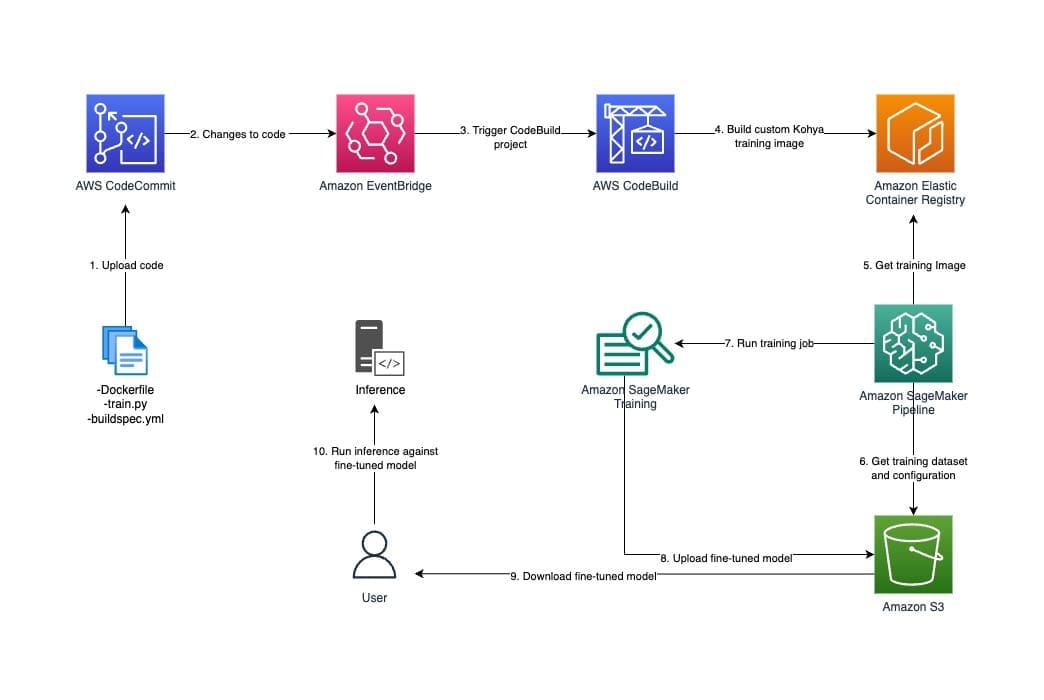
Generate unique images by fine-tuning Stable Diffusion XL with Amazon SageMaker
 Stable Diffusion XL by Stability AI is a high-quality text-to-image […]
 -
AWS Machine Learning wrote a new post on the site CYBERCASEMANAGER ENTERPRISES 4 months, 2 weeks ago
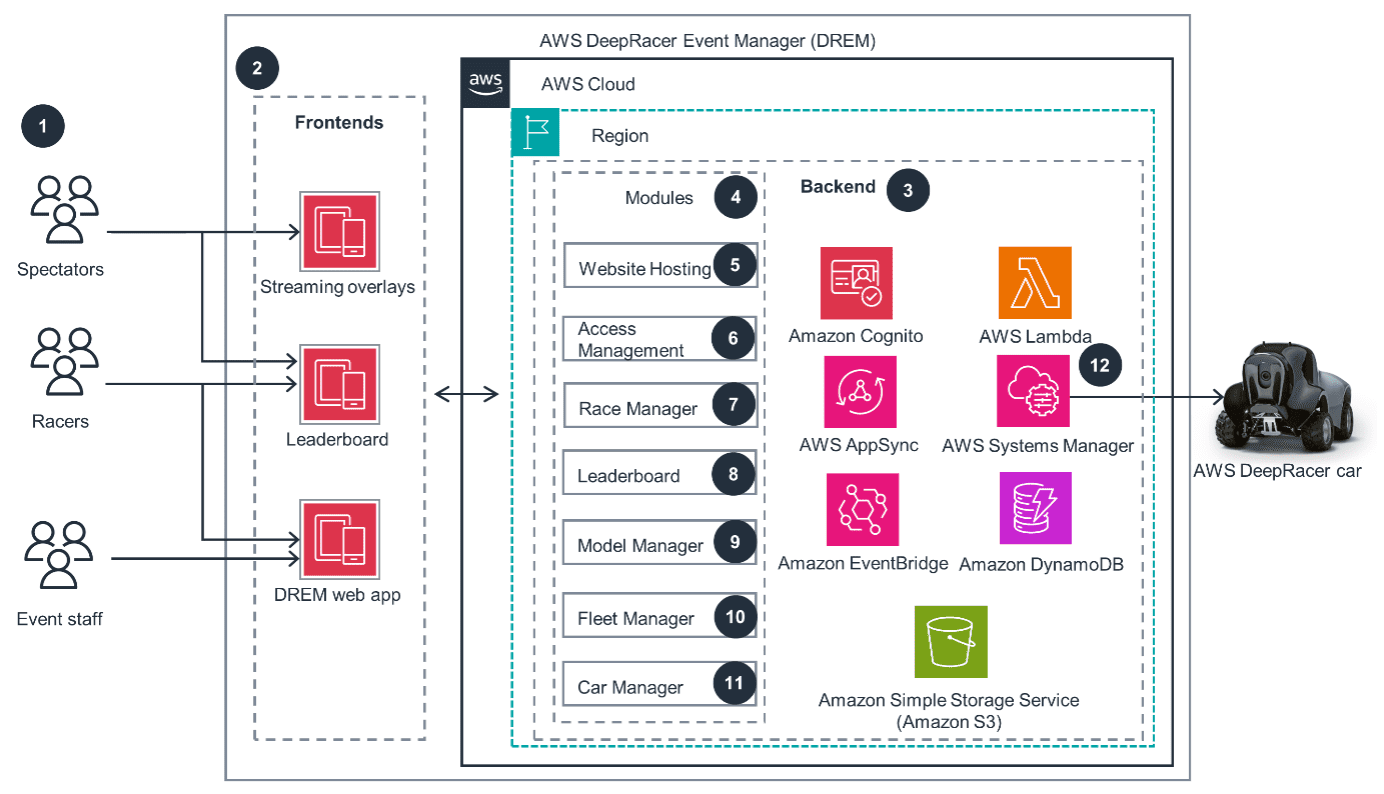
Eviden scales AWS DeepRacer Global League using AWS DeepRacer Event Manager
 Eviden is a next-gen technology leader in data-driven, trusted, and […]
 -
AWS Machine Learning wrote a new post on the site CYBERCASEMANAGER ENTERPRISES 4 months, 2 weeks ago
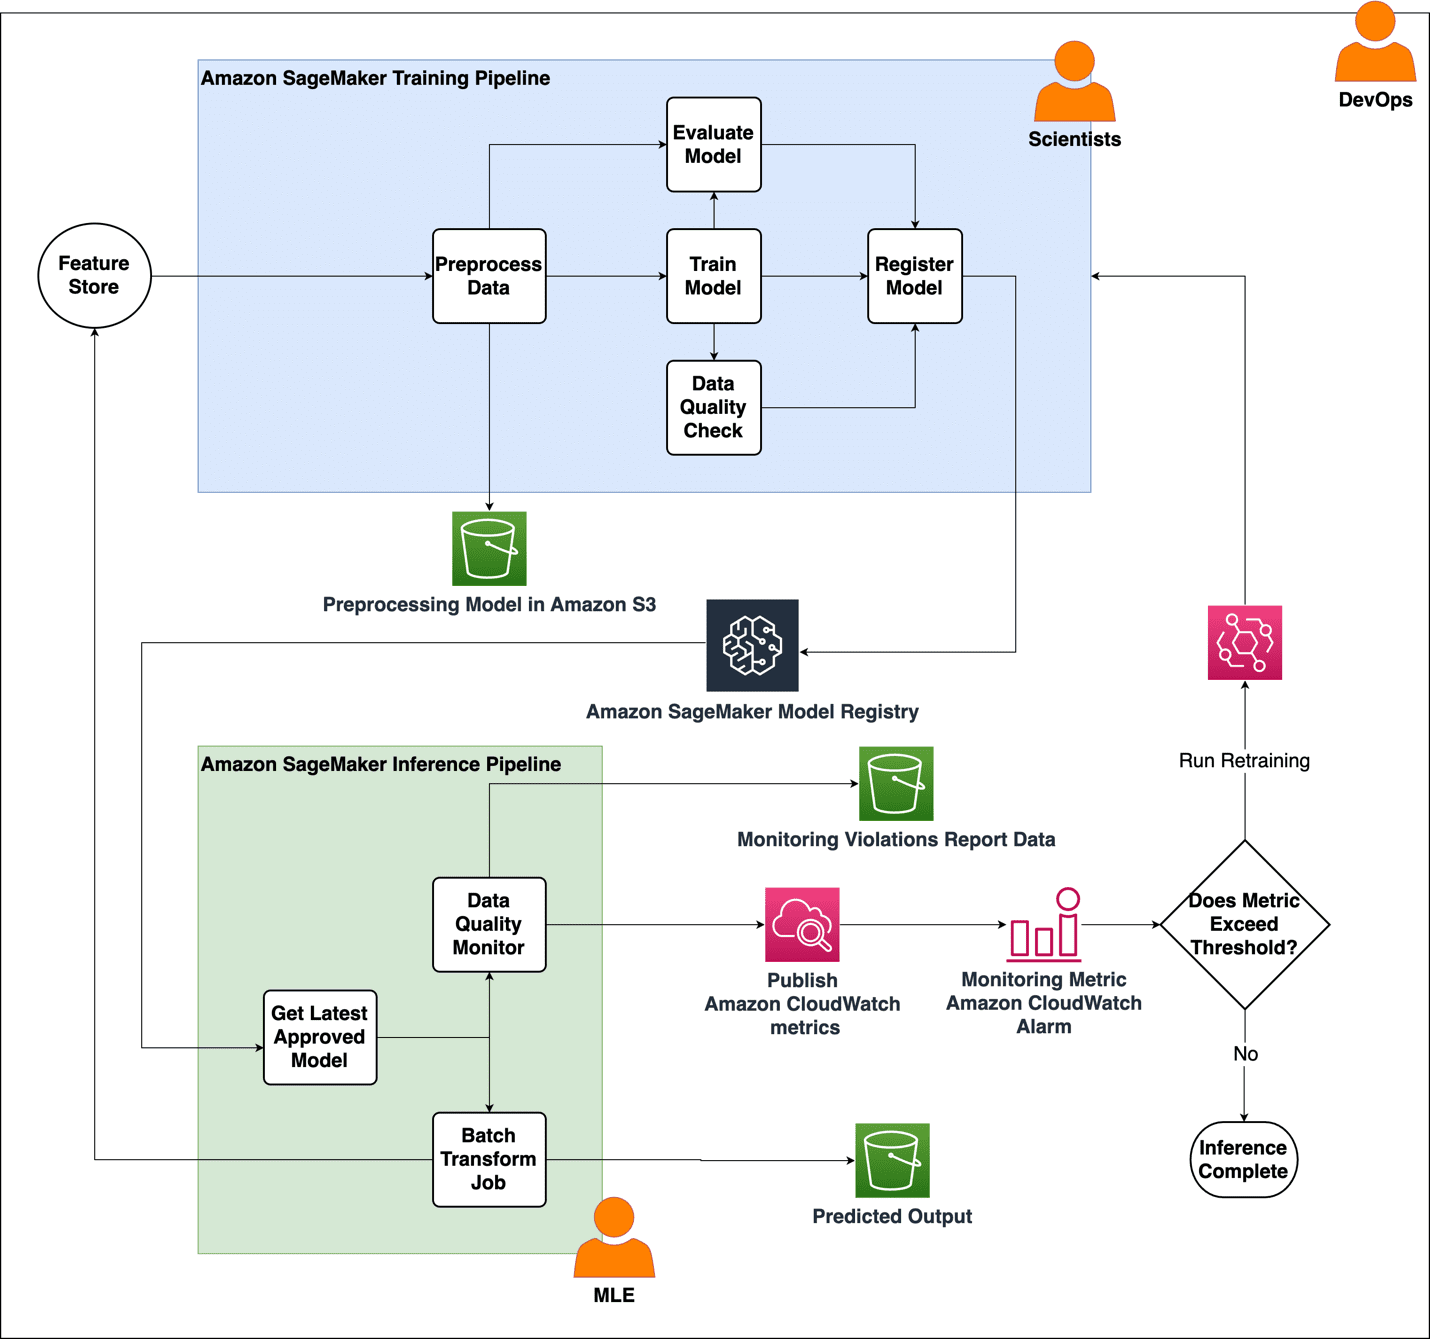
The Weather Company enhances MLOps with Amazon SageMaker, AWS CloudFormation, and Amazon CloudWatch
 This blog post is co-written with Qaish […]
 -
AWS Machine Learning wrote a new post on the site CYBERCASEMANAGER ENTERPRISES 4 months, 3 weeks ago
Improve productivity when processing scanned PDFs using Amazon Q Business
 Amazon Q Business is a generative AI-powered assistant that can answer […]
 -
AWS Machine Learning wrote a new post on the site CYBERCASEMANAGER ENTERPRISES 4 months, 3 weeks ago
Prompt engineering techniques and best practices: Learn by doing with Anthropic’s Claude 3 on Amazon Bedrock
 You have likely already had the […]
 - Load More

