Fine-tune your Amazon Titan Image Generator G1 model using Amazon Bedrock model customization
Amazon Titan lmage Generator G1 is a cutting-edge text-to-image model, available via Amazon Bedrock, that is able to understand prompts describing multiple objects in various contexts and captures these relevant details in the images it generates. It is available in US East (N. Virginia) and US West (Oregon) AWS Regions and can perform advanced image editing tasks such as smart cropping, in-painting, and background changes. However, users would like to adapt the model to unique characteristics in custom datasets that the model is not already trained on. Custom datasets can include highly proprietary data that is consistent with your brand guidelines or specific styles such as a previous campaign. To address these use cases and generate fully personalized images, you can fine-tune Amazon Titan Image Generator with your own data using custom models for Amazon Bedrock.
From generating images to editing them, text-to-image models have broad applications across industries. They can enhance employee creativity and provide the ability to imagine new possibilities simply with textual descriptions. For example, it can aid design and floor planning for architects and allow faster innovation by providing the ability to visualize various designs without the manual process of creating them. Similarly, it can aid in design across various industries such as manufacturing, fashion design in retail, and game design by streamlining the generation of graphics and illustrations. Text-to-image models also enhance your customer experience by allowing for personalized advertising as well as interactive and immersive visual chatbots in media and entertainment use cases.
In this post, we guide you through the process of fine-tuning the Amazon Titan Image Generator model to learn two new categories: Ron the dog and Smila the cat, our favorite pets. We discuss how to prepare your data for the model fine-tuning task and how to create a model customization job in Amazon Bedrock. Finally, we show you how to test and deploy your fine-tuned model with Provisioned Throughput.
 |
 |
| Ron the dog | Smila the cat |
Evaluating model capabilities before fine-tuning a job
Foundation models are trained on large amounts of data, so it is possible that your model will work well enough out of the box. That’s why it’s good practice to check if you actually need to fine-tune your model for your use case or if prompt engineering is sufficient. Let’s try to generate some images of Ron the dog and Smila the cat with the base Amazon Titan Image Generator model, as shown in the following screenshots.
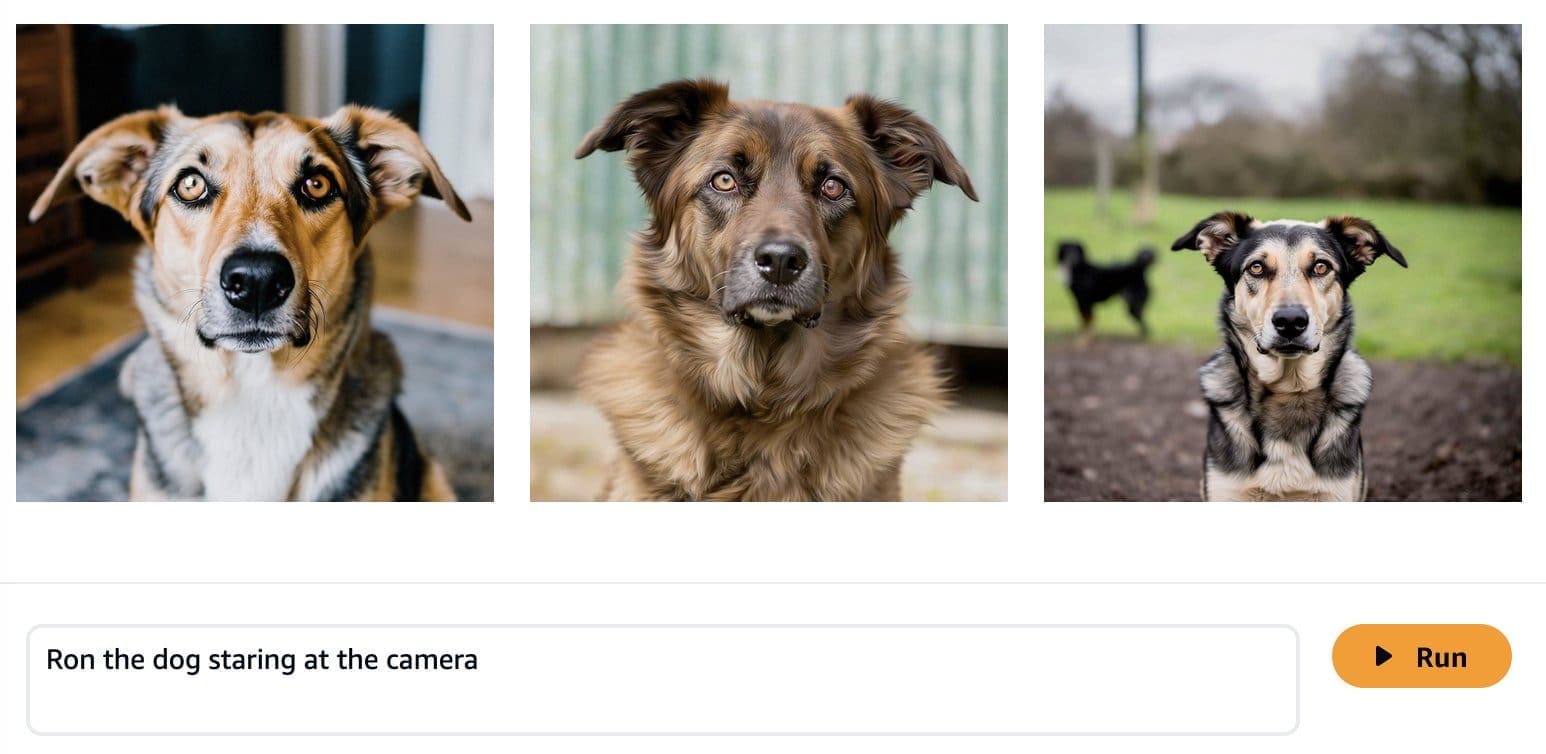
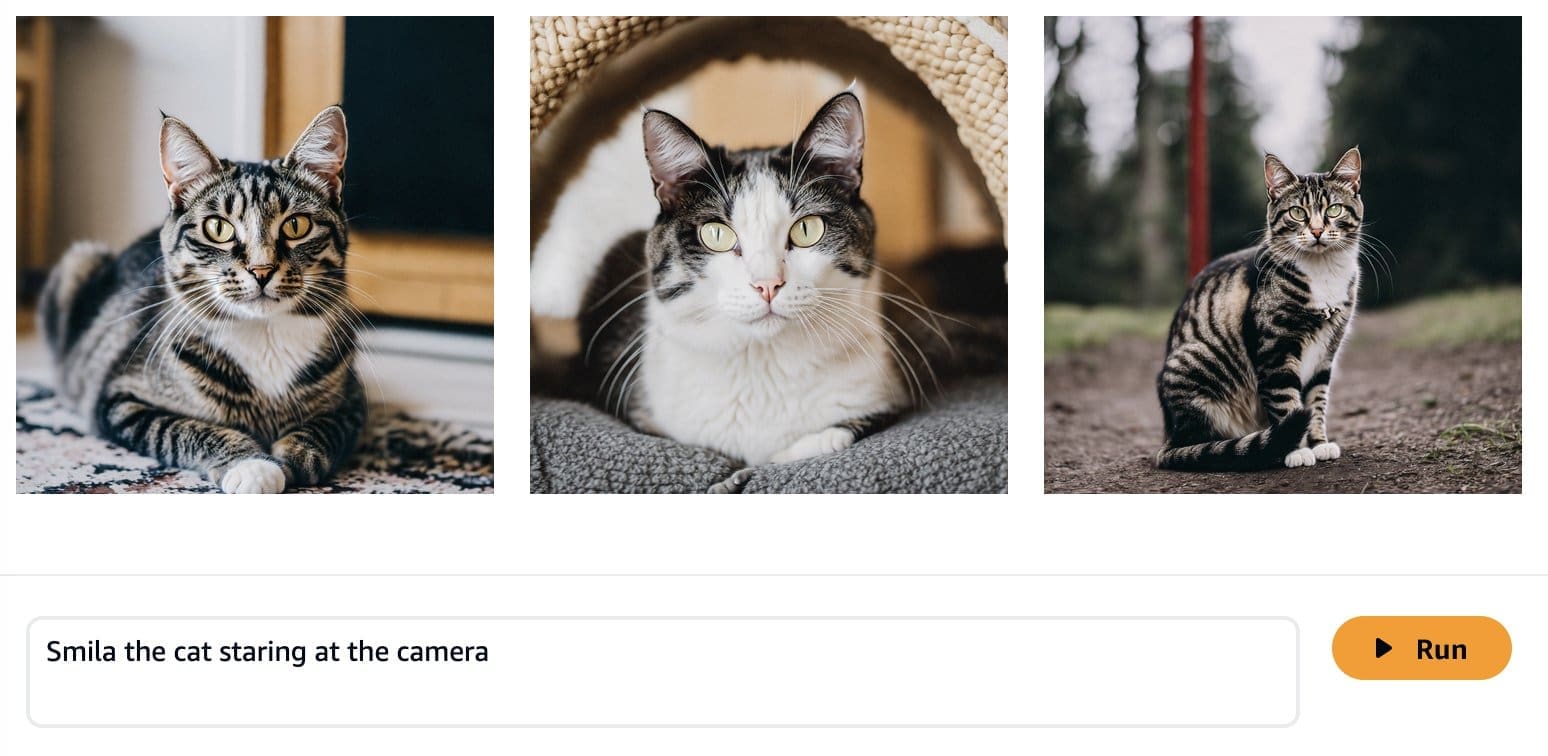
As expected, the out-of-the-box model does not know Ron and Smila yet, and the generated outputs show different dogs and cats. With some prompt engineering, we can provide more details to get closer to the look of our favorite pets.
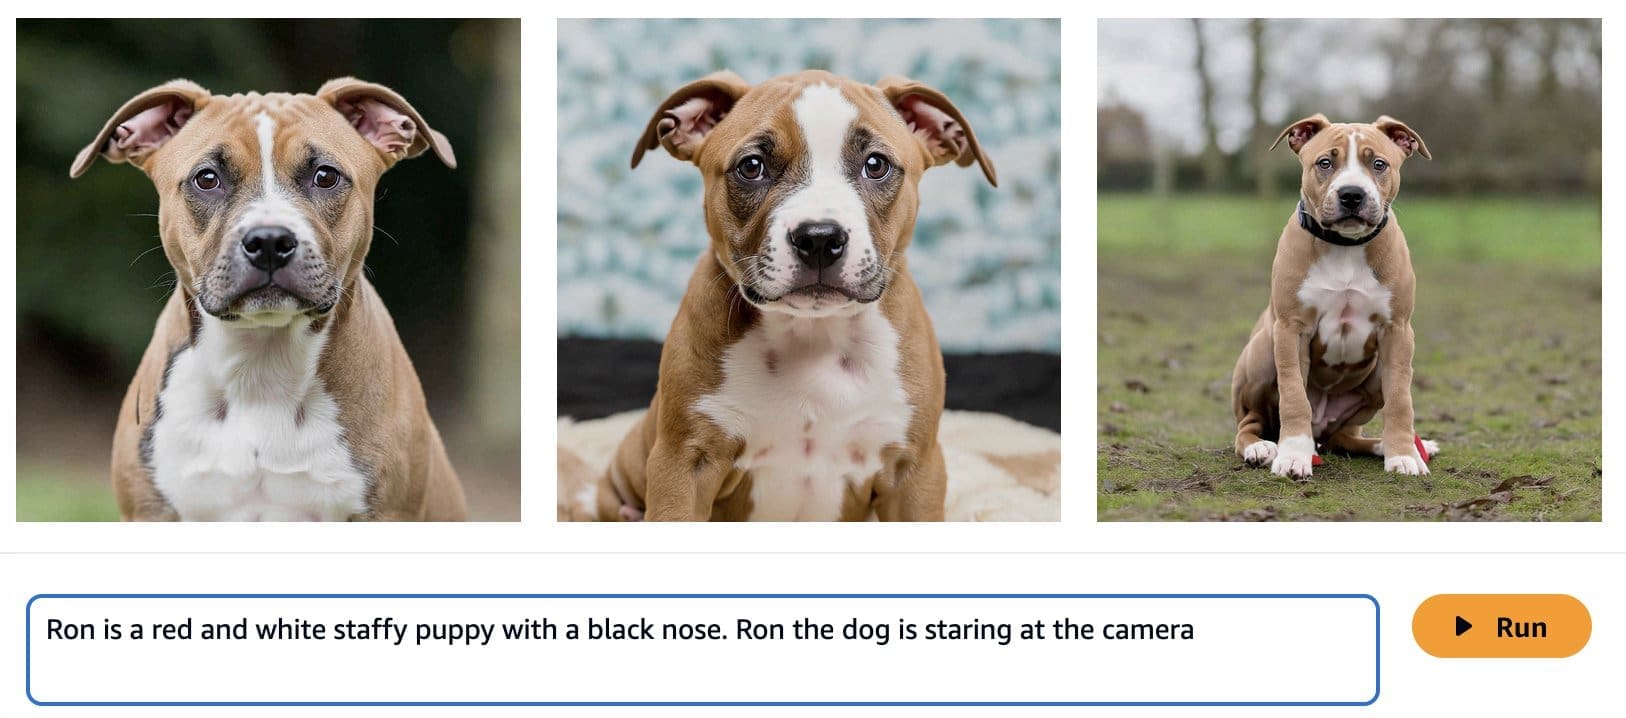
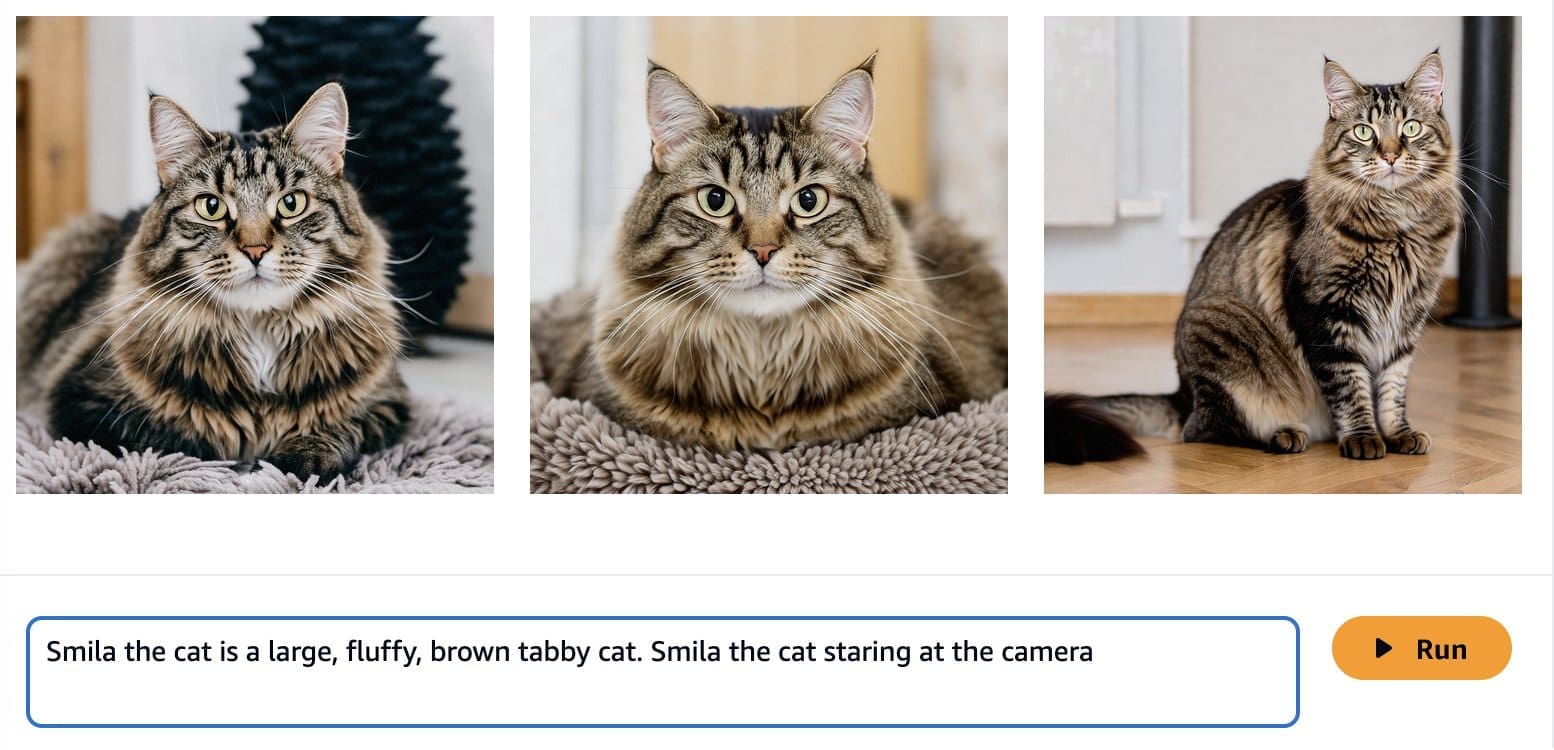
Although the generated images are more similar to Ron and Smila, we see that the model is not able to reproduce the full likeness of them. Let’s now start a fine-tuning job with the photos from Ron and Smila to get consistent, personalized outputs.
Fine-tuning Amazon Titan Image Generator
Amazon Bedrock provides you with a serverless experience for fine-tuning your Amazon Titan Image Generator model. You only need to prepare your data and select your hyperparameters, and AWS will handle the heavy lifting for you.
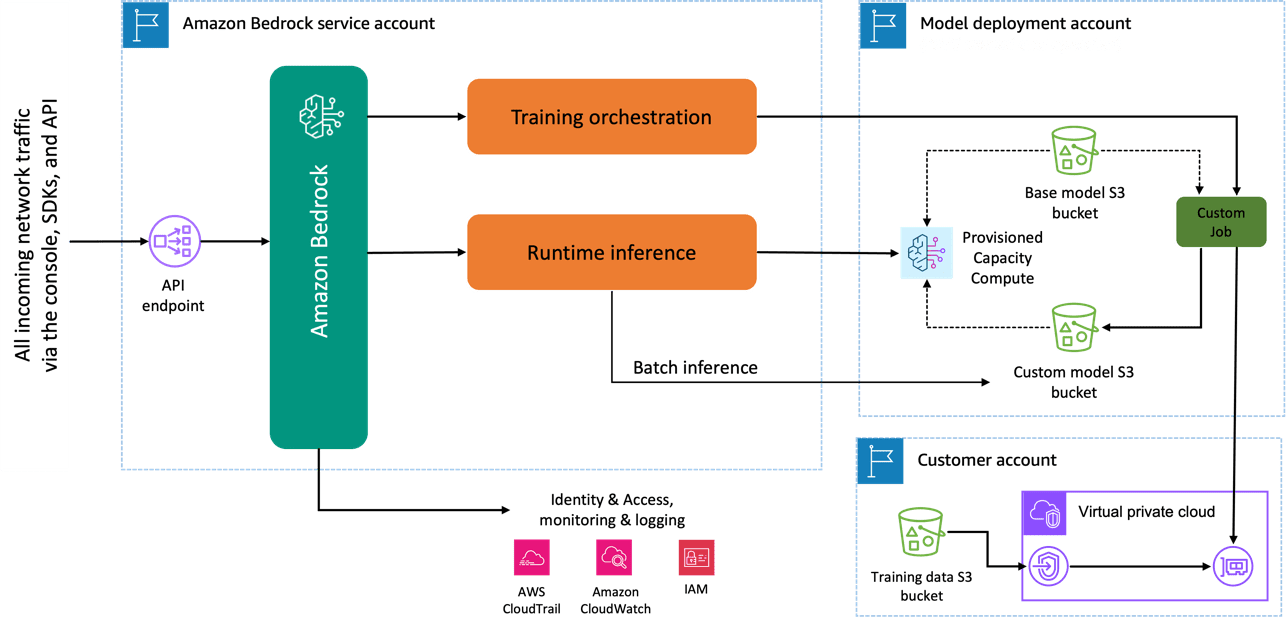
When you use the Amazon Titan Image Generator model to fine-tune, a copy of this model is created in the AWS model development account, owned and managed by AWS, and a model customization job is created. This job then accesses the fine-tuning data from a VPC and the amazon Titan model has its weights updated. The new model is then saved to an Amazon Simple Storage Service (Amazon S3) located in the same model development account as the pre-trained model. It can now be used for inference only by your account and is not shared with any other AWS account. When running inference, you access this model via a provisioned capacity compute or directly, using batch inference for Amazon Bedrock. Independently from the inference modality chosen, your data remains in your account and is not copied to any AWS owned account or used to improve the Amazon Titan Image Generator model.
The following diagram illustrates this workflow.
Data privacy and network security
Your data used for fine-tuning including prompts, as well as the custom models, remain private in your AWS account. They are not shared or used for model training or service improvements, and aren’t shared with third-party model providers. All the data used for fine-tuning is encrypted in transit and at rest. The data remains in the same Region where the API call is processed. You can also use AWS PrivateLink to create a private connection between the AWS account where your data resides and the VPC.
Data preparation
Before you can create a model customization job, you need to prepare your training dataset. The format of your training dataset depends on the type of customization job you are creating (fine-tuning or continued pre-training) and the modality of your data (text-to-text, text-to-image, or image-to-embedding). For the Amazon Titan Image Generator model, you need to provide the images that you want to use for the fine-tuning and a caption for each image. Amazon Bedrock expects your images to be stored on Amazon S3 and the pairs of images and captions to be provided in a JSONL format with multiple JSON lines.
Each JSON line is a sample containing an image-ref, the S3 URI for an image, and a caption that includes a textual prompt for the image. Your images must be in JPEG or PNG format. The following code shows an example of the format:
{"image-ref": "s3://bucket/path/to/image001.png", "caption": "
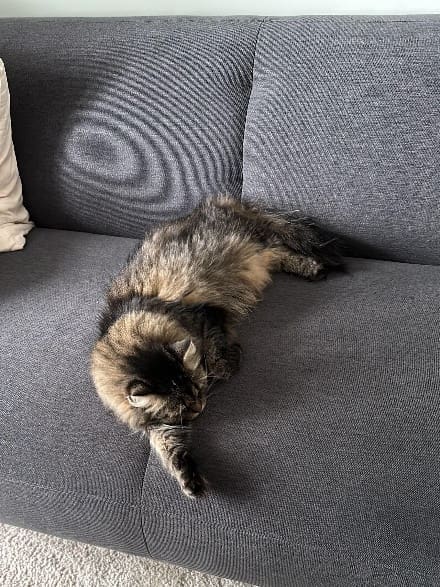
Because “Ron” and “Smila” are names that could also be used in other contexts, such as a person’s name, we add the identifiers “Ron the dog” and “Smila the cat” when creating the prompt to fine-tune our model. Although it’s not a requirement for the fine-tuning workflow, this additional information provides more contextual clarity for the model when it is being customized for the new classes and will avoid the confusion of ‘“Ron the dog” with a person called Ron and “Smila the cat” with the city Smila in Ukraine. Using this logic, the following images show a sample of our training dataset.
 |
 |
 |
| Ron the dog laying on a white dog bed | Ron the dog sitting on a tile floor | Ron the dog laying on a car seat |
 |
 |
 |
| Smila the cat lying on a couch | Smila the cat staring at the camera laying on a couch | Smila the cat laying in a pet carrier |
When transforming our data to the format expected by the customization job, we get the following sample structure:
{"image-ref": "
After we have created our JSONL file, we need to store it on an S3 bucket to start our customization job. Amazon Titan Image Generator G1 fine-tuning jobs will work with 5–10,000 images. For the example discussed in this post, we use 60 images: 30 of Ron the dog and 30 of Smila the cat. In general, providing more varieties of the style or class you are trying to learn will improve the accuracy of your fine-tuned model. However, the more images you use for fine-tuning, the more time will be required for the fine-tuning job to complete. The number of images used also influence the pricing of your fine-tuned job. Refer to Amazon Bedrock Pricing for more information.
Fine-tuning Amazon Titan Image Generator
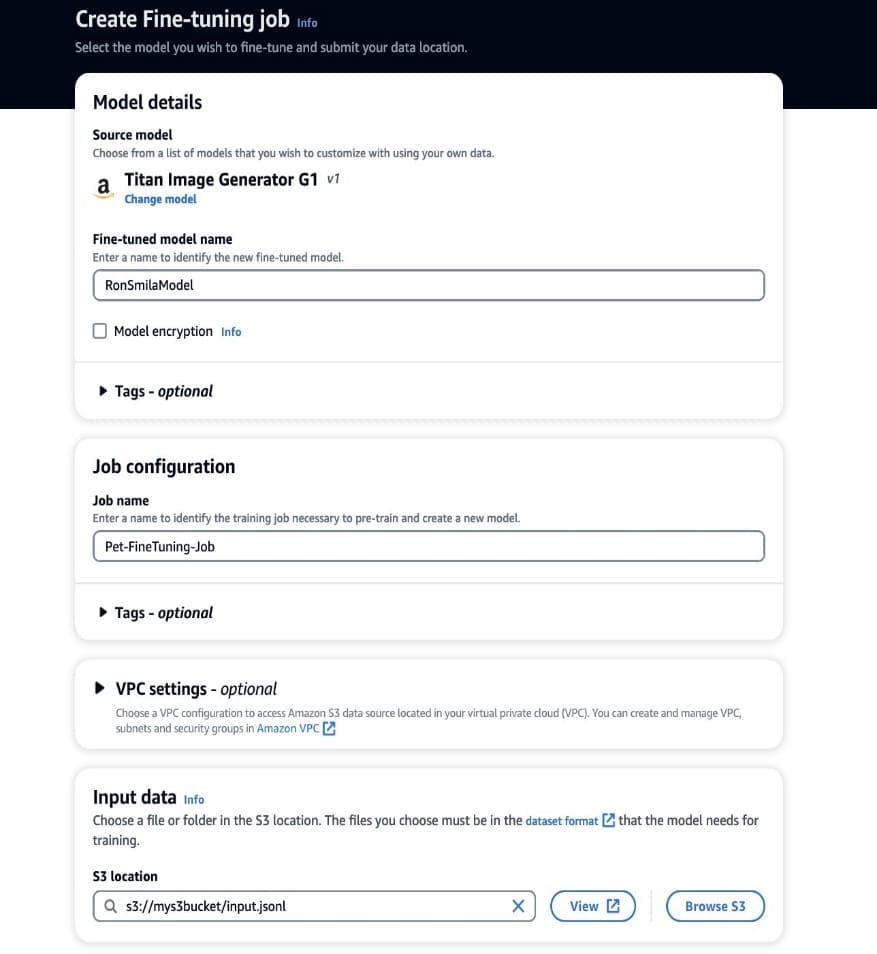
Now that we have our training data ready, we can begin a new customization job. This process can be done both via the Amazon Bedrock console or APIs. To use the Amazon Bedrock console, complete the following steps:
- On the Amazon Bedrock console, choose Custom models in the navigation pane.
- On the Customize model menu, choose Create fine-tuning job.
- For Fine-tuned model name, enter a name for your new model.
- For Job configuration, enter a name for the training job.
- For Input data, enter the S3 path of the input data.

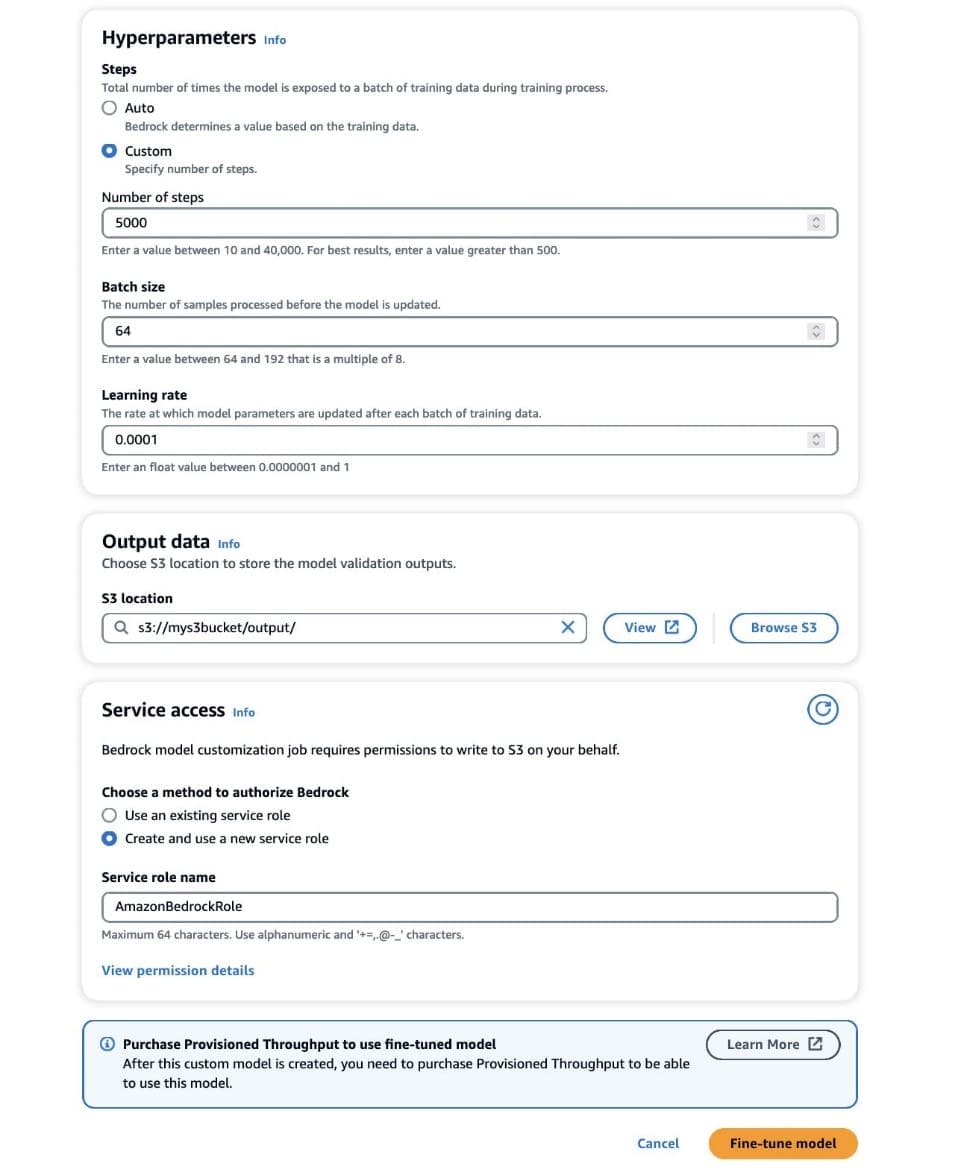
- In the Hyperparameters section, provide values for the following:
- Number of steps – The number of times the model is exposed to each batch.
- Batch size – The number of samples processed before updating the model parameters.
- Learning rate – The rate at which the model parameters are updated after each batch. The choice of these parameters depends on a given dataset. As a general guideline, we recommend you start by fixing the batch size to 8, the learning rate to 1e-5, and set the number of steps according to the number of images used, as detailed in the following table.
| Number of images provided | 8 | 32 | 64 | 1,000 | 10,000 |
| Number of steps recommended | 1,000 | 4,000 | 8,000 | 10,000 | 12,000 |
If the results of your fine-tuning job are not satisfactory, consider increasing the number of steps if you don’t observe any signs of the style in generated images, and decreasing the number of steps if you observe the style in the generated images but with artifacts or blurriness. If the fine-tuned model fails to learn the unique style in your dataset even after 40,000 steps, consider increasing the batch size or the learning rate.
- In the Output data section, enter the S3 output path where the validation outputs, including the periodically recorded validation loss and accuracy metrics, are stored.
- In the Service access section, generate a new AWS Identity and Access Management (IAM) role or choose an existing IAM role with the necessary permissions to access your S3 buckets.
This authorization enables Amazon Bedrock to retrieve input and validation datasets from your designated bucket and store validation outputs seamlessly in your S3 bucket.
- Choose Fine-tune model.

With the correct configurations set, Amazon Bedrock will now train your custom model.
Deploy the fine-tuned Amazon Titan Image Generator with Provisioned Throughput
After you create custom model, Provisioned Throughput allows you to allocate a predetermined, fixed rate of processing capacity to the custom model. This allocation provides a consistent level of performance and capacity for handling workloads, which results in better performance in production workloads. The second advantage of Provisioned Throughput is cost control, because standard token-based pricing with on-demand inference mode can be difficult to predict at large scales.
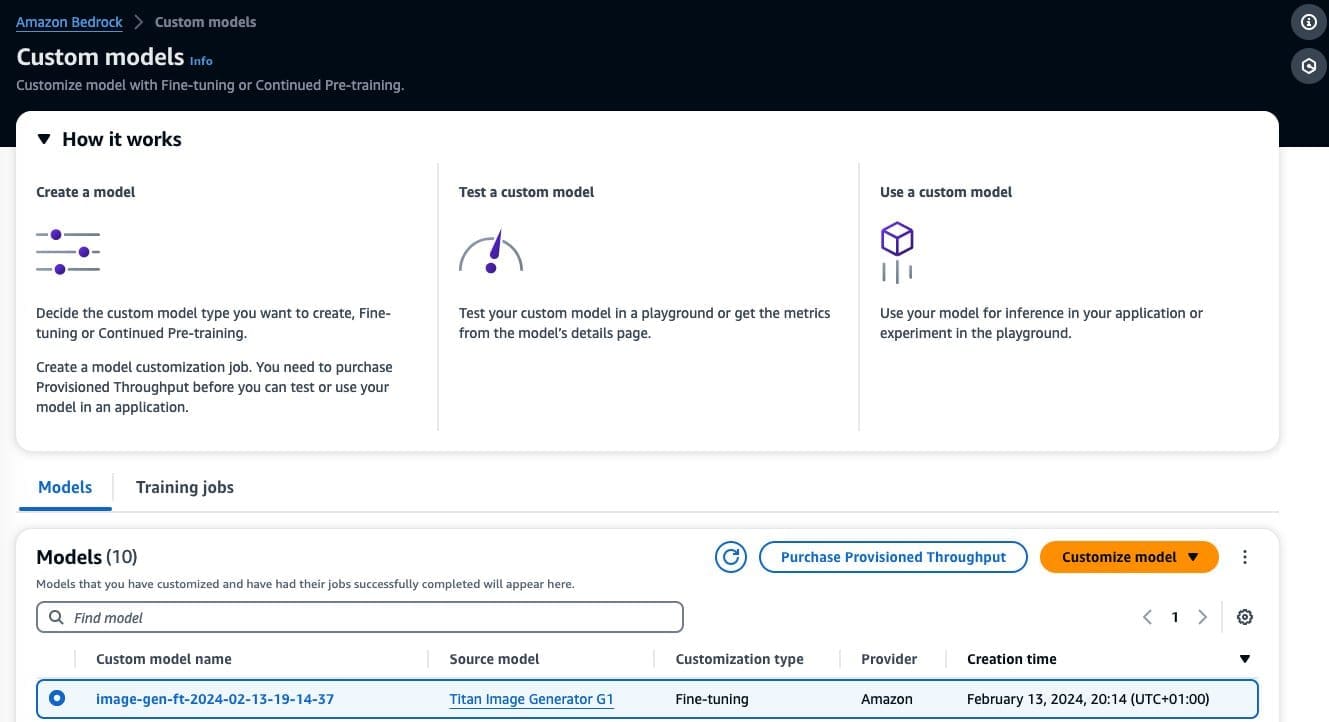
When the fine tuning of your model is complete, this model will appear on the Custom models’ page on the Amazon Bedrock console.
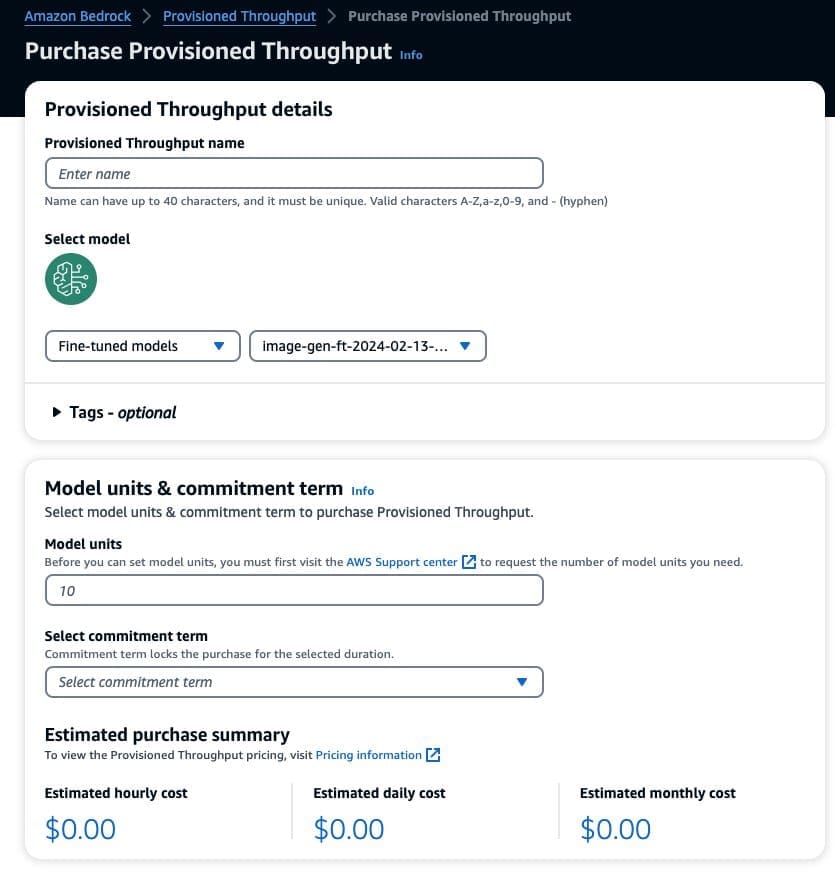
To purchase Provisioned Throughput, select the custom model that you just fine-tuned and choose Purchase Provisioned Throughput.
This prepopulates the selected model for which you want to purchase Provisioned Throughput. For testing your fine-tuned model before deployment, set model units to a value of 1 and set the commitment term to No commitment. This quickly lets you start testing your models with your custom prompts and check if the training is adequate. Moreover, when new fine-tuned models and new versions are available, you can update the Provisioned Throughput as long as you update it with other versions of the same model.
Fine-tuning results
For our task of customizing the model on Ron the dog and Smila the cat, experiments showed that the best hyperparameters were 5,000 steps with a batch size of 8 and a learning rate of 1e-5.
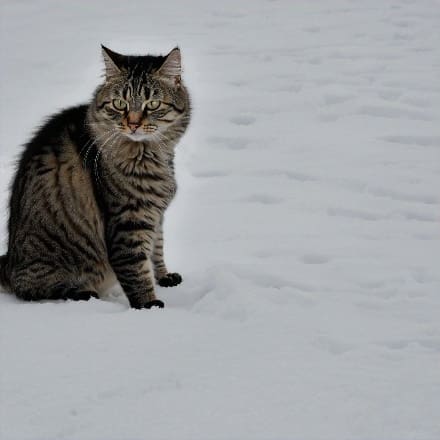
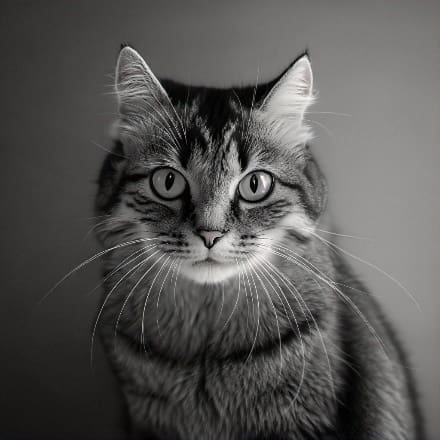
The following are some examples of the images generated by the customized model.
 |
 |
 |
| Ron the dog wearing a superhero cape | Ron the dog on the moon | Ron the dog in a swimming pool with sunglasses |
 |
 |
 |
| Smila the cat on the snow | Smila the cat in black and white staring at the camera | Smila the cat wearing a Christmas hat |
Conclusion
In this post, we discussed when to use fine-tuning instead of engineering your prompts for better-quality image generation. We showed how to fine-tune the Amazon Titan Image Generator model and deploy the custom model on Amazon Bedrock. We also provided general guidelines on how to prepare your data for fine-tuning and set optimal hyperparameters for more accurate model customization.
As a next step, you can adapt the following example to your use case to generate hyper-personalized images using Amazon Titan Image Generator.
About the Authors
 Maira Ladeira Tanke is a Senior Generative AI Data Scientist at AWS. With a background in machine learning, she has over 10 years of experience architecting and building AI applications with customers across industries. As a technical lead, she helps customers accelerate their achievement of business value through generative AI solutions on Amazon Bedrock. In her free time, Maira enjoys traveling, playing with her cat Smila, and spending time with her family someplace warm.
 Dani Mitchell is an AI/ML Specialist Solutions Architect at Amazon Web Services. He is focused on computer vision use cases and helping customers across EMEA accelerate their ML journey.
 Bharathi Srinivasan is a Data Scientist at AWS Professional Services, where she loves to build cool things on Amazon Bedrock. She is passionate about driving business value from machine learning applications, with a focus on responsible AI. Outside of building new AI experiences for customers, Bharathi loves to write science fiction and challenge herself with endurance sports.
 Achin Jain is an Applied Scientist with the Amazon Artificial General Intelligence (AGI) team. He has expertise in text-to-image models and is focused on building the Amazon Titan Image Generator.

Leave a Reply