Import data from Google Cloud Platform BigQuery for no-code machine learning with Amazon SageMaker Canvas
In the modern, cloud-centric business landscape, data is often scattered across numerous clouds and on-site systems. This fragmentation can complicate efforts by organizations to consolidate and analyze data for their machine learning (ML) initiatives.
This post presents an architectural approach to extract data from different cloud environments, such as Google Cloud Platform (GCP) BigQuery, without the need for data movement. This minimizes the complexity and overhead associated with moving data between cloud environments, enabling organizations to access and utilize their disparate data assets for ML projects.
We highlight the process of using Amazon Athena Federated Query to extract data from GCP BigQuery, using Amazon SageMaker Data Wrangler to perform data preparation, and then using the prepared data to build ML models within Amazon SageMaker Canvas, a no-code ML interface.
SageMaker Canvas allows business analysts to access and import data from over 50 sources, prepare data using natural language and over 300 built-in transforms, build and train highly accurate models, generate predictions, and deploy models to production without requiring coding or extensive ML experience.
Solution overview
The solution outlines two main steps:
- Set up Amazon Athena for federated queries from GCP BigQuery, which enables running live queries in GCP BigQuery directly from Athena
- Import the data into SageMaker Canvas from BigQuery using Athena as an intermediate
After the data is imported into SageMaker Canvas, you can use the no-code interface to build ML models and generate predictions based on the imported data.
You can use SageMaker Canvas to build the initial data preparation routine and generate accurate predictions without writing code. However, as your ML needs evolve or require more advanced customization, you may want to transition from a no-code environment to a code-first approach. The integration between SageMaker Canvas and Amazon SageMaker Studio allows you to operationalize the data preparation routine for production-scale deployments. For more details, refer to Seamlessly transition between no-code and code-first machine learning with Amazon SageMaker Canvas and Amazon SageMaker Studio
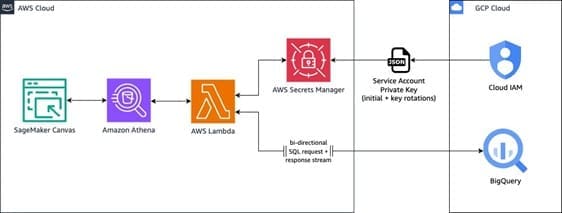
The overall architecture, as seen below, demonstrates how to use AWS services to seamlessly access and integrate data from a GCP BigQuery data warehouse into SageMaker Canvas for building and deploying ML models.
The workflow includes the following steps:
- Within the SageMaker Canvas interface, the user composes a SQL query to run against the GCP BigQuery data warehouse. SageMaker Canvas relays this query to Athena, which acts as an intermediary service, facilitating the communication between SageMaker Canvas and BigQuery.
- Athena uses the Athena Google BigQuery connector, which uses a pre-built AWS Lambda function to enable Athena federated query capabilities. This Lambda function retrieves the necessary BigQuery credentials (service account private key) from AWS Secrets Manager for authentication purposes.
- After authentication, the Lambda function uses the retrieved credentials to query BigQuery and obtain the desired result set. It parses this result set and sends it back to Athena.
- Athena returns the queried data from BigQuery to SageMaker Canvas, where you can use it for ML model training and development purposes within the no-code interface.
This solution offers the following benefits:
- Seamless integration – SageMaker Canvas empowers you to integrate and use data from various sources, including cloud data warehouses like BigQuery, directly within its no-code ML environment. This integration eliminates the need for additional data movement or complex integrations, enabling you to focus on building and deploying ML models without the overhead of data engineering tasks.
- Secure access – The use of Secrets Manager makes sure BigQuery credentials are securely stored and accessed, enhancing the overall security of the solution.
- Scalability – The serverless nature of the Lambda function and the ability in Athena to handle large datasets make this solution scalable and able to accommodate growing data volumes. Additionally, you can use multiple queries to partition the data to source in parallel.
In the next sections, we dive deeper into the technical implementation details and walk through a step-by-step demonstration of this solution.
Dataset
The steps outlined in this post provide an example of how to import data into SageMaker Canvas for no-code ML. In this example, we demonstrate how to import data through Athena from GCP BigQuery.
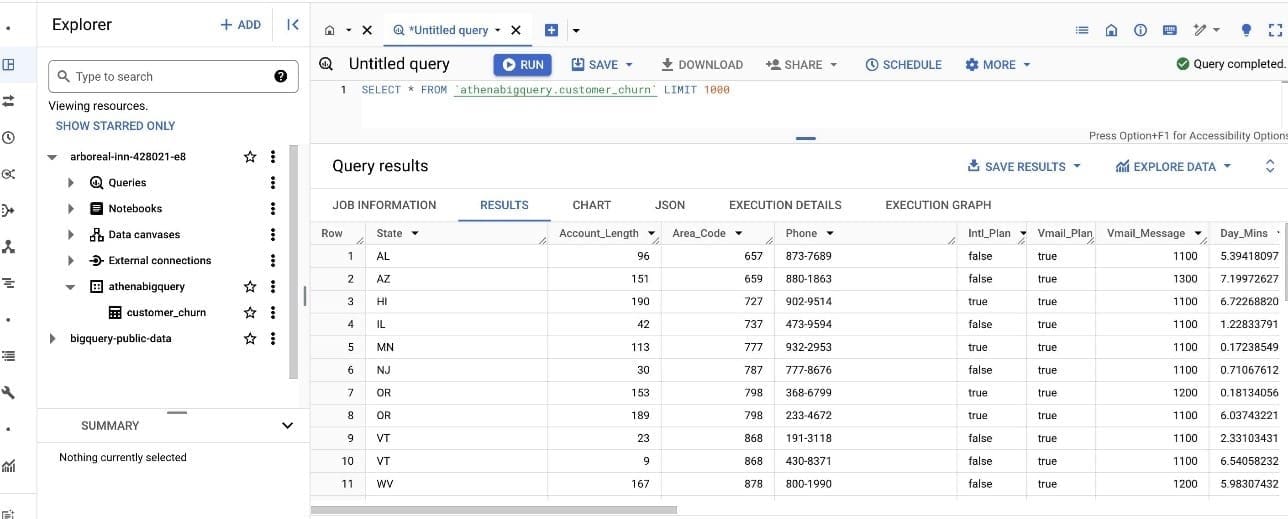
For our dataset, we use a synthetic dataset from a telecommunications mobile phone carrier. This sample dataset contains 5,000 records, where each record uses 21 attributes to describe the customer profile. The Churn column in the dataset indicates whether the customer left service (true/false). This Churn attribute is the target variable that the ML model should aim to predict.
The following screenshot shows an example of the dataset on the BigQuery console.
Prerequisites
Complete the following prerequisite steps:
- Create a service account in GCP and a service account key.
- Download the private key JSON file.
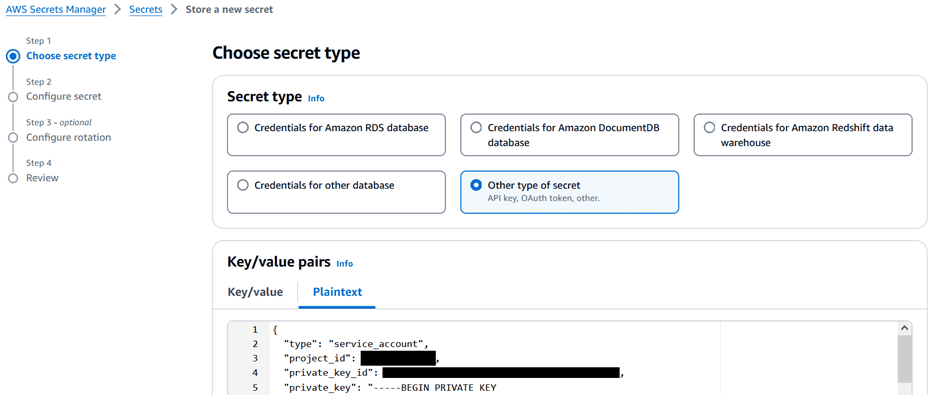
- Store the JSON file in Secrets Manager:
- On the Secrets Manager console, choose Secrets in the navigation pane, then choose Store a new secret.
- For Secret type¸ select Other type of secret.
- Copy the contents of the JSON file and enter it under Key/value pairs on the Plaintext tab.
- If you don’t have a SageMaker domain already created, create it along with the user profile. For instructions, see Quick setup to Amazon SageMaker.
- Make sure the user profile has permission to invoke Athena by confirming that the AWS Identity and Access Management (IAM) role has
glue:GetDatabaseandathena:GetDataCatalogpermission on the resource. See the following example:
Register the Athena data source connector
Complete the following steps to set up the Athena data source connector:
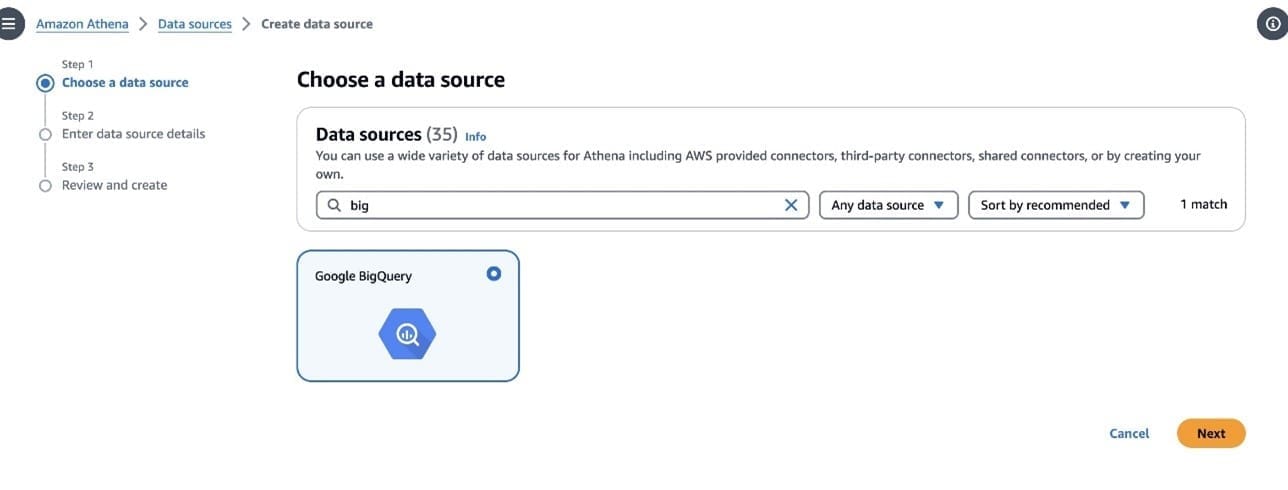
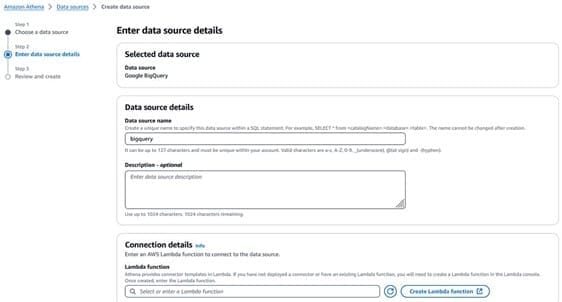
- On the Athena console, choose Data sources in the navigation pane.
- Choose Create data source.
- On the Choose a data source page, search for and select Google BigQuery, then choose Next.
- On the Enter data source details page, provide the following information:
- For Data source name¸ enter a name.
- For Description, enter an optional description.
- For Lambda function, choose Create Lambda function to configure the connection.
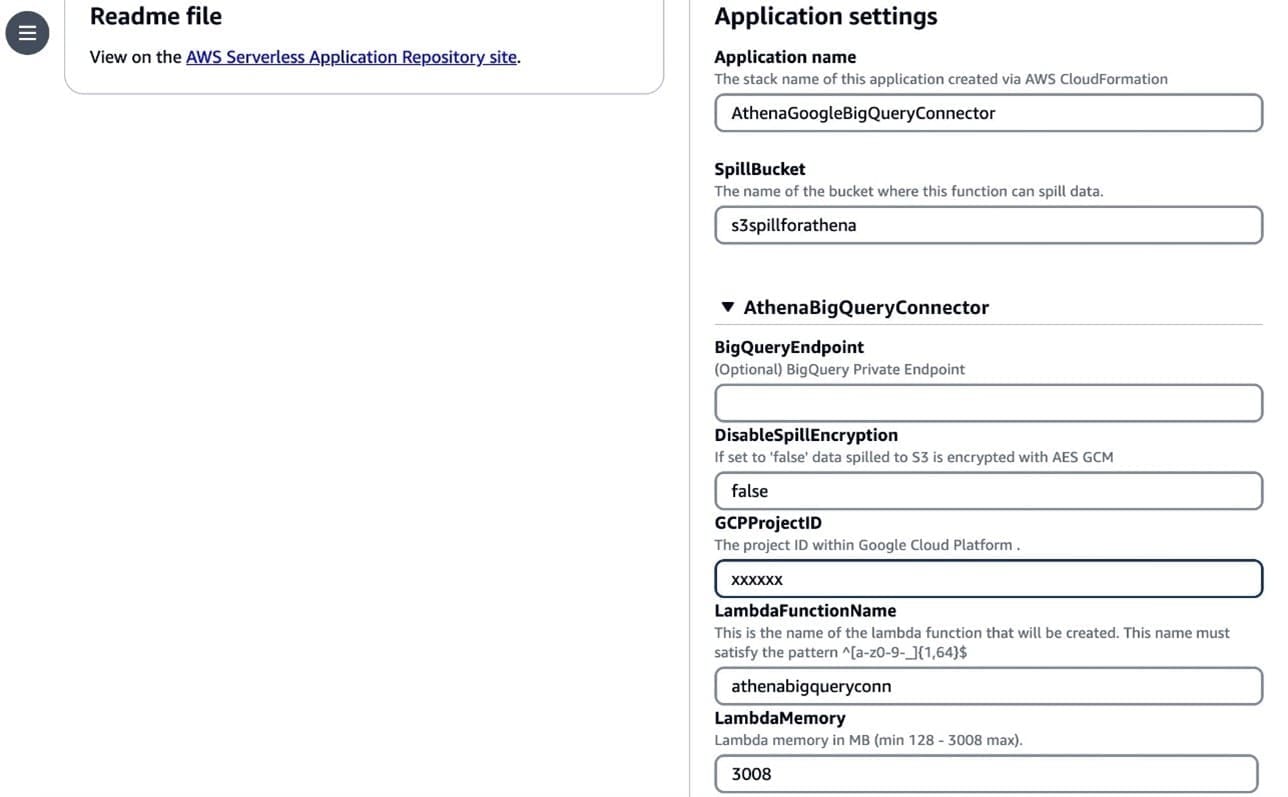
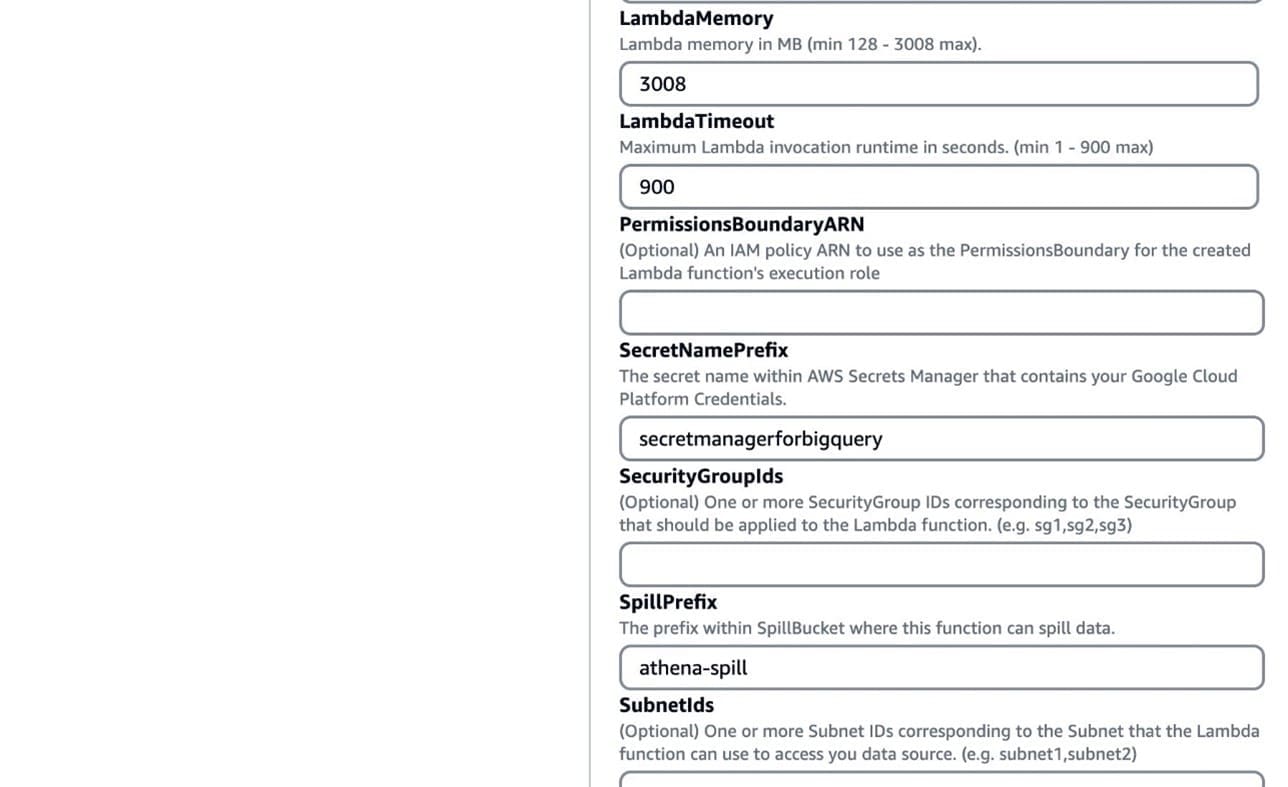
- Under Application settings¸ enter the following details:
- For SpillBucket, enter the name of the bucket where the function can spill data.
- For GCPProjectID, enter the project ID within GCP.
- For LambdaFunctionName, enter the name of the Lambda function that you’re creating.
- For SecretNamePrefix, enter the secret name stored in Secrets Manager that contains GCP credentials.
- Choose Deploy.
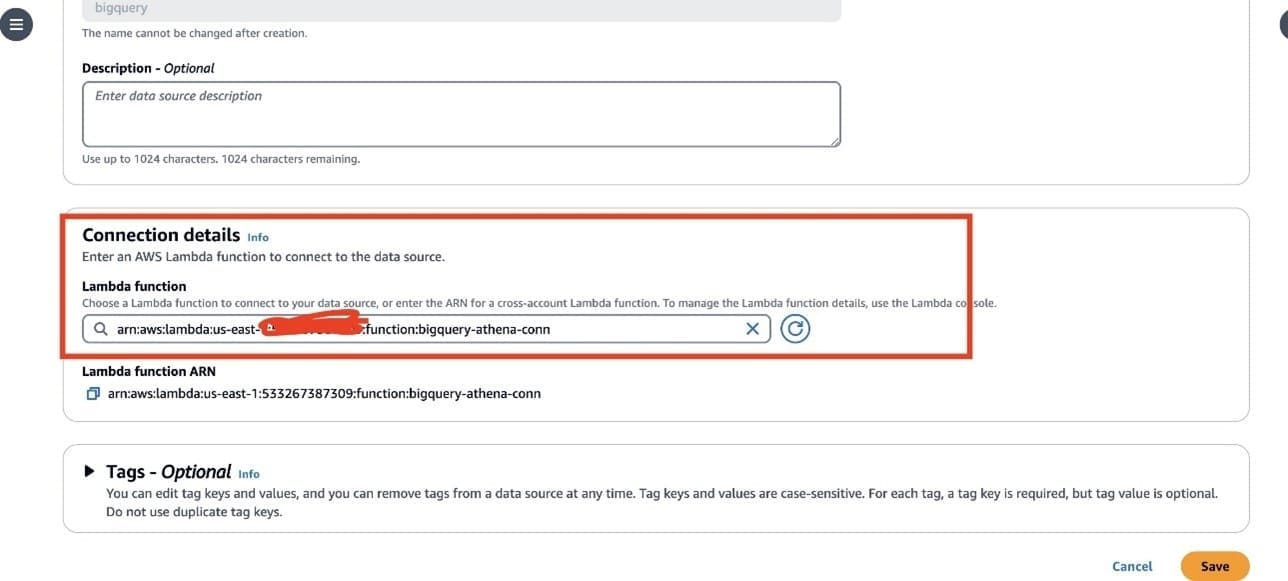
You’re returned to the Enter data source details page.
- In the Connection details section, choose the refresh icon under Lambda function.
- Choose the Lambda function you just created. The ARN of the Lambda function is displayed.
- Optionally, for Tags, add key-value pairs to associate with this data source.
For more information about tags, see Tagging Athena resources.
- Choose Next.
- On the Review and create page, review the data source details, then choose Create data source.
The Data source details section of the page for your data source shows information about your new connector. You can now use the connector in your Athena queries. For information about using data connectors in queries, see Running federated queries.
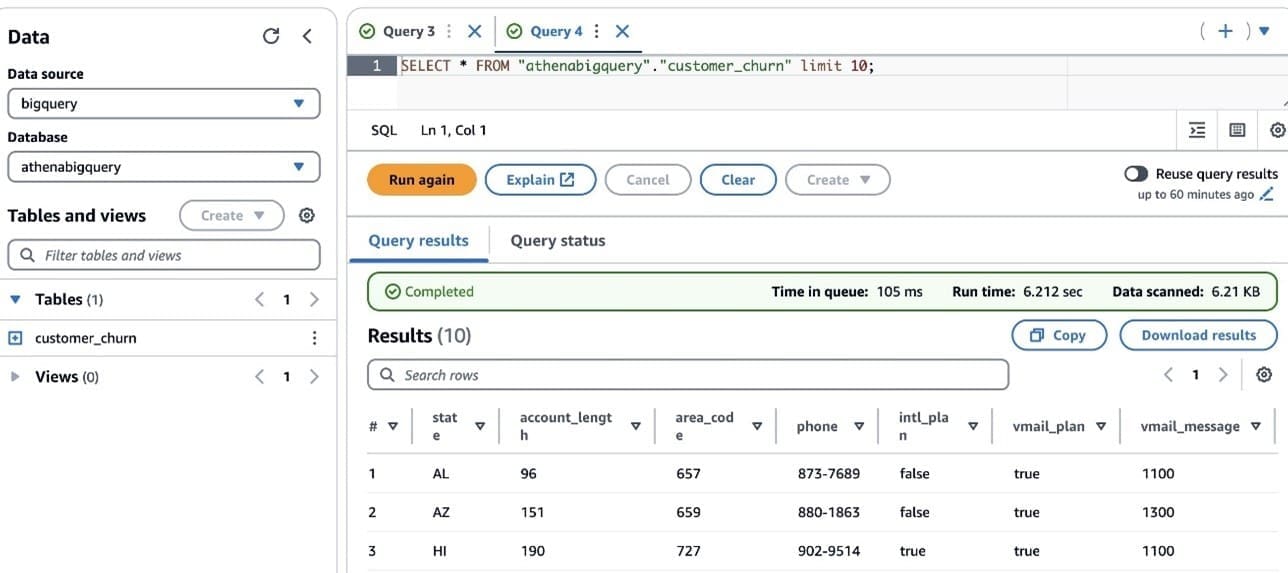
To query from Athena, launch the Athena SQL editor and choose the data source you created. You should be able to run live queries against the BigQuery database.
Connect to SageMaker Canvas with Athena as a data source
To import data from Athena, complete the following steps:
- On the SageMaker Canvas console, choose Data Wrangler in the navigation pane.
- Choose Import data and prepare.
- Select the Tabular
- Choose Athena as the data source.
SageMaker Data Wrangler in SageMaker Canvas allows you to prepare, featurize, and analyze your data. You can integrate a SageMaker Data Wrangler data preparation flow into your ML workflows to simplify and streamline data preprocessing and feature engineering using little to no coding.
- Choose an Athena table in the left pane from AwsDataCatalog and drag and drop the table into the right pane.
- Choose Edit in SQL and enter the following SQL query:
In the preceding query, bigquery is the data source name created in Athena, athenabigquery is the database name, and customer_churn is the table name.
- Choose Run SQL to preview the dataset and when you’re satisfied with the data, choose Import.
When working with ML, it’s crucial to randomize or shuffle the dataset. This step is essential because you may have access to millions or billions of data points, but you don’t necessarily need to use the entire dataset for training the model. Instead, you can limit the data to a smaller subset specifically for training purposes. After you’ve shuffled and prepared the data, you can begin the iterative process of data preparation, feature evaluation, model training, and ultimately hosting the trained model.
- You can process or export your data to a location that is suitable for your ML workflows. For example, you can export the transformed data as a SageMaker Canvas dataset and create an ML model from it.
- After you export your data, choose Create model to create an ML model from your data.
The data is imported into SageMaker Canvas as a dataset from the specific table in Athena. You can now use this dataset to create a model.
Train a model
After your data is imported, it shows up on the Datasets page in SageMaker Canvas. At this stage, you can build a model. To do so, complete the following steps:
- Select your dataset and choose Create a model.
- For Model name, enter your model name (for this post,
my_first_model).
SageMaker Canvas enables you to create models for predictive analysis, image analysis, and text analysis.
- Because we want to categorize customers, select Predictive analysis for Problem type.
- Choose Create.
On the Build page, you can see statistics about your dataset, such as the percentage of missing values and mode of the data.
- For Target column, choose a column that you want to predict (for this post,
churn).
SageMaker Canvas offers two types of models that can generate predictions. Quick build prioritizes speed over accuracy, providing a model in 2–15 minutes. Standard build prioritizes accuracy over speed, providing a model in 30 minutes–2 hours.
- For this example, choose Quick build.
After the model is trained, you can analyze the model accuracy.
The Overview tab shows us the column impact, or the estimated importance of each column in predicting the target column. In this example, the Night_calls column has the most significant impact in predicting if a customer will churn. This information can help the marketing team gain insights that lead to taking actions to reduce customer churn. For example, we can see that both low and high CustServ_Calls increase the likelihood of churn. The marketing team can take actions to help prevent customer churn based on these learnings. Examples include creating a detailed FAQ on websites to reduce customer service calls, and running education campaigns with customers on the FAQ that can keep engagement up.
Generate predictions
On the Predict tab, you can generate both batch predictions and single predictions. Complete the following steps to generate a batch prediction:
- Download the following sample inference dataset for generating predictions.
- To test batch predictions, choose Batch prediction.
SageMaker Canvas allows you to generate batch predictions either manually or automatically on a schedule. To learn how to automate batch predictions on a schedule, refer to Manage automations.
- For this post, choose Manual.
- Upload the file you downloaded.
- Choose Generate predictions.
After a few seconds, the prediction is complete, and you can choose View to see the prediction.
Optionally, choose Download to download a CSV file containing the full output. SageMaker Canvas will return a prediction for each row of data and the probability of the prediction being correct.
Optionally, you can deploy your models to an endpoint to make predictions. For more information, refer to Deploy your models to an endpoint.
Clean up
To avoid future charges, log out of SageMaker Canvas.
Conclusion
In this post, we showcased a solution to extract the data from BigQuery using Athena federated queries and a sample dataset. We then used the extracted data to build an ML model using SageMaker Canvas to predict customers at risk of churning—without writing code. SageMaker Canvas enables business analysts to build and deploy ML models effortlessly through its no-code interface, democratizing ML across the organization. This enables you to harness the power of advanced analytics and ML to drive business insights and innovation, without the need for specialized technical skills.
For more information, see Query any data source with Amazon Athena’s new federated query and Import data from over 40 data sources for no-code machine learning with Amazon SageMaker Canvas. If you’re new to SageMaker Canvas, refer to Build, Share, Deploy: how business analysts and data scientists achieve faster time-to-market using no-code ML and Amazon SageMaker Canvas.
About the authors
 Amit Gautam is an AWS senior solutions architect supporting enterprise customers in the UK on their cloud journeys, providing them with architectural advice and guidance that helps them achieve their business outcomes.
 Sujata Singh is an AWS senior solutions architect supporting enterprise customers in the UK on their cloud journeys, providing them with architectural advice and guidance that helps them achieve their business outcomes.



Leave a Reply