Discover insights from your Amazon Aurora PostgreSQL database using the Amazon Q Business connector
Amazon Aurora PostgreSQL-Compatible Edition is a fully managed, PostgreSQL-compatible, ACID-aligned relational database engine that combines the speed, reliability, and manageability of Amazon Aurora with the simplicity and cost-effectiveness of open source databases. Aurora PostgreSQL-Compatible is a drop-in replacement for PostgreSQL and makes it simple and cost-effective to set up, operate, and scale your new and existing PostgreSQL deployments, freeing you to focus on your business and applications.
Effective data management and performance optimization are critical aspects of running robust and scalable applications. Aurora PostgreSQL-Compatible, a managed relational database service, has become an indispensable part of many organizations’ infrastructure to maintain the reliability and efficiency of their data-driven applications. However, extracting valuable insights from the vast amount of data stored in Aurora PostgreSQL-Compatible often requires manual efforts and specialized tooling. Users such as database administrators, data analysts, and application developers need to be able to query and analyze data to optimize performance and validate the success of their applications. Generative AI provides the ability to take relevant information from a data source and deliver well-constructed answers back to the user.
Building a generative AI-based conversational application that is integrated with the data sources that contain relevant content requires time, money, and people. You first need to build connectors to the data sources. Next, you need to index this data to make it available for a Retrieval Augmented Generation (RAG) approach, where relevant passages are delivered with high accuracy to a large language model (LLM). To do this, you need to select an index that provides the capabilities to index the content for semantic and vector search, build the infrastructure to retrieve and rank the answers, and build a feature-rich web application. You also need to hire and staff a large team to build, maintain, and manage such a system.
Amazon Q Business is a fully managed generative AI-powered assistant that can answer questions, provide summaries, generate content, and securely complete tasks based on data and information in your enterprise systems. Amazon Q Business can help you get fast, relevant answers to pressing questions, solve problems, generate content, and take action using the data and expertise found in your company’s information repositories, code, and enterprise systems (such as an Aurora PostgreSQL database, among others). Amazon Q provides out-of-the-box data source connectors that can index content into a built-in retriever and uses an LLM to provide accurate, well-written answers. A data source connector is a component of Amazon Q that helps integrate and synchronize data from multiple repositories into one index.
Amazon Q Business offers multiple prebuilt connectors to a large number of data sources, including Aurora PostgreSQL-Compatible, Atlassian Confluence, Amazon Simple Storage Service (Amazon S3), Microsoft SharePoint, Salesforce, and helps you create your generative AI solution with minimal configuration. For a full list of Amazon Q Business supported data source connectors, see Amazon Q Business connectors.
In this post, we walk you through configuring and integrating Amazon Q for Business with Aurora PostgreSQL-Compatible to enable your database administrators, data analysts, application developers, leadership, and other teams to quickly get accurate answers to their questions related to the content stored in Aurora PostgreSQL databases.
Use cases
After you integrate Amazon Q Business with Aurora PostgreSQL-Compatible, users can ask questions directly from the database content. This enables the following use cases:
- Natural language search – Users can search for specific data, such as records or entries, using conversational language. This makes it straightforward to find the necessary information without needing to remember exact keywords or filters.
- Summarization – Users can request a concise summary of the data matching their search query, helping them quickly understand key points without manually reviewing each record.
- Query clarification – If a user’s query is ambiguous or lacks sufficient context, Amazon Q Business can engage in a dialogue to clarify the intent, making sure the user receives the most relevant and accurate results.
Overview of the Amazon Q Business Aurora (PostgreSQL) connector
A data source connector is a mechanism for integrating and synchronizing data from multiple repositories into one container index. Amazon Q Business offers multiple data source connectors that can connect to your data sources and help you create your generative AI solution with minimal configuration.
A data source is a data repository or location that Amazon Q Business connects to in order to retrieve your data stored in the database. After the PostgreSQL data source is set up, you can create one or multiple data sources within Amazon Q Business and configure them to start indexing data from your Aurora PostgreSQL database. When you connect Amazon Q Business to a data source and initiate the sync process, Amazon Q Business crawls and adds documents from the data source to its index.
Types of documents
Let’s look at what are considered as documents in the context of the Amazon Q Business Aurora (PostgreSQL) connector. A document is a collection of information that consists of a title, the content (or the body), metadata (data about the document), and access control list (ACL) information to make sure answers are provided from documents that the user has access to.
The Amazon Q Business Aurora (PostgreSQL) connector supports crawling of the following entities as a document:
- Table data in a single database
- View data in a single database
Each row in a table and view is considered a single document.
The Amazon Q Business Aurora (PostgreSQL) connector also supports field mappings. Field mappings allow you to map document attributes from your data sources to fields in your Amazon Q index. This includes both reserved or default field mappings created automatically by Amazon Q, as well as custom field mappings that you can create and edit.
Refer to Aurora (PostgreSQL) data source connector field mappings for more information.
ACL crawling
Amazon Q Business supports crawling ACLs for document security by default. Turning off ACLs and identity crawling is no longer supported. In preparation for connecting Amazon Q Business applications to AWS IAM Identity Center, enable ACL indexing and identity crawling for secure querying and re-sync your connector. After you turn ACL and identity crawling on, you won’t be able to turn them off.
If you want to index documents without ACLs, make sure the documents are marked as public in your data source.
When you connect a database data source to Amazon Q, Amazon Q crawls user and group information from a column in the source table. You specify this column on the Amazon Q console or using the configuration parameter as part of the CreateDataSource operation.
If you activate ACL crawling, you can use that information to filter chat responses to your end-user’s document access level.
The following are important considerations for a database data source:
- You can only specify an allow list for a database data source. You can’t specify a deny list.
- You can only specify groups. You can’t specify individual users for the allow list.
- The database column should be a string containing a semicolon delimited list of groups.
Refer to How Amazon Q Business connector crawls Aurora (PostgreSQL) ACLs for more information.
Solution overview
In the following sections, we demonstrate how to set up the Amazon Q Business Aurora (PostgreSQL) connector. This connector allows you to query your Aurora PostgreSQL database using Amazon Q using natural language. Then we provide examples of how to use the AI-powered chat interface to gain insights from the connected data source.
After the configuration is complete, you can configure how often Amazon Q Business should synchronize with your Aurora PostgreSQL database to keep up to date with the database content. This enables you to perform complex searches and retrieve relevant information quickly and efficiently, leading to intelligent insights and informed decision-making. By centralizing search functionality and seamlessly integrating with other AWS services, the connector enhances operational efficiency and productivity, while enabling organizations to use the full capabilities of the AWS landscape for data management, analytics, and visualization.
Prerequisites
For this walkthrough, you should have the following prerequisites:
- An AWS account where you can follow the instructions mentioned below
- An Amazon Aurora PostgreSQL database.
- Your Aurora PostgreSQL-Compatible authentication credentials in an AWS Secrets Manager
- Your Aurora PostgreSQL database user name and password. As a best practice, provide Amazon Q with read-only database credentials.
- Your database host URL, port, and instance. You can find this information on the Amazon RDS console.
Create an Amazon Q Business application
In this section, we walk through the configuration steps for the Amazon Q Business Aurora (PostgreSQL) connector. For more information, see Creating an Amazon Q Business application environment. Complete the following steps to create your application:
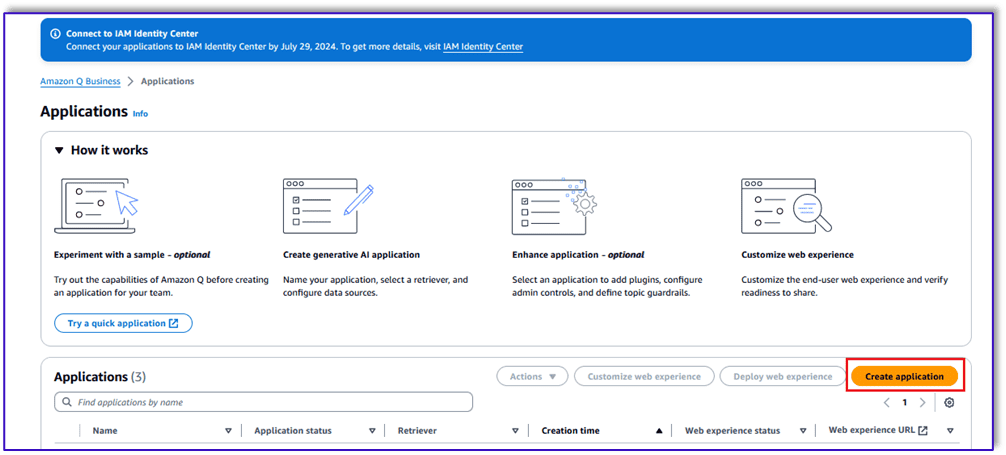
- On the Amazon Q Business console, choose Applications in the navigation pane.
- Choose Create application.
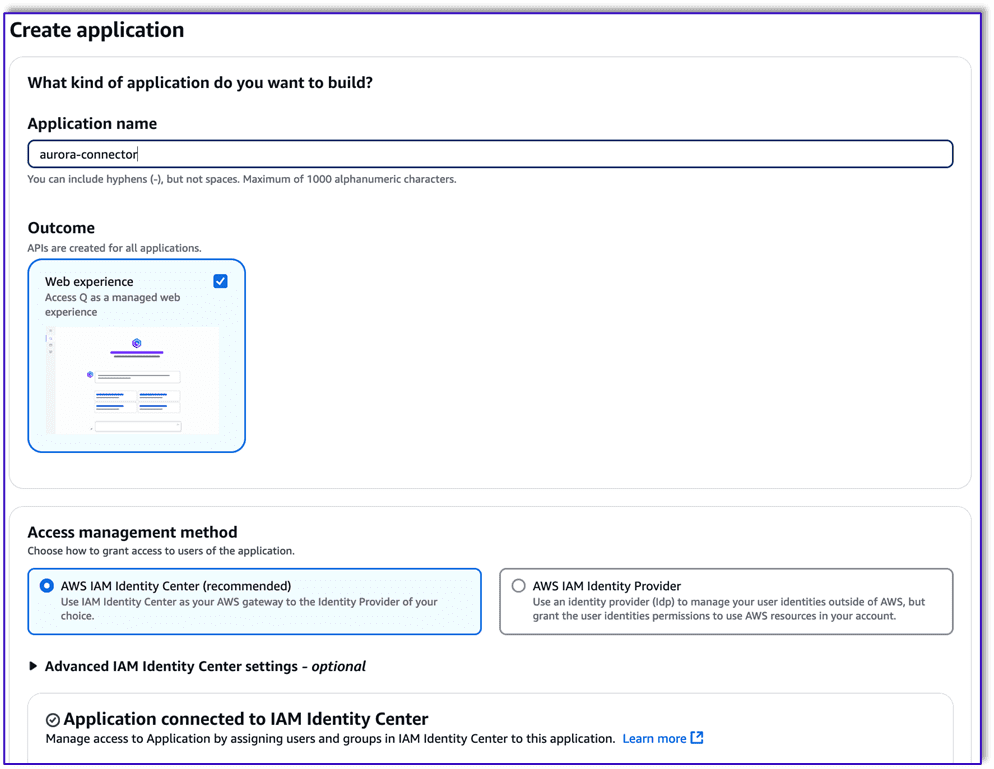
- For Application name¸ enter a name (for example,
aurora-connector). - For Access management method, select AWS IAM Identity Center.
- For Advanced IAM Identity Center settings, enable Enable cross-region calls to allow Amazon Q Business to connect to an AWS IAM Identity Center instance that exists in an AWS Region not already supported by Amazon Q Business. For more information, see Creating a cross-region IAM Identity Center integration.
- Then, you will see the following options based on whether you have an IAM Identity Center instance already configured, or need to create one.
- If you don’t have an IAM Identity Center instance configured, you see the following:
- The Region your Amazon Q Business application environment is in.
- Specify tags for IAM Identity Center – Add tags to keep track of your IAM Identity Center instance.
- Create IAM Identity Center – Select to create an IAM Identity Center instance. Depending on your setup, you may be prompted to create an account instance or an organization instance, or both. The console will display an ARN for your newly created resource after it’s created.
- If you have both an IAM Identity Center organization instance and an account instance configured, your instances will be auto-detected, and you see the following options:
-
- Organization instance of IAM Identity Center – Select this option to manage access to Amazon Q Business by assigning users and groups from the IAM Identity Center directory for your organization. If you have an IAM Identity Center organization instance configured, your organization instance will be auto-detected.
- Account instance of IAM Identity Center – Select this option to manage access to Amazon Q Business by assigning existing users and groups from your IAM Identity Center directory. If you have an IAM Identity Center account instance configured, your account instance will be auto-detected.
- The Region your Amazon Q Business application environment is in.
- IAM Identity Center – The ARN for your IAM Identity Center instance.
-
- If you don’t have an IAM Identity Center instance configured, you see the following:
If your IAM Identity Center instance is configured in a Region Amazon Q Business isn’t available in, and you haven’t activated cross-Region IAM Identity Center calls, you will see a message saying that a connection is unavailable with an option to Switch Region. When you allow a cross-Region connection between Amazon Q Business and IAM Identity Center using Advanced IAM Identity Center settings, your cross-Region IAM Identity Center instance will be auto-detected by Amazon Q Business.
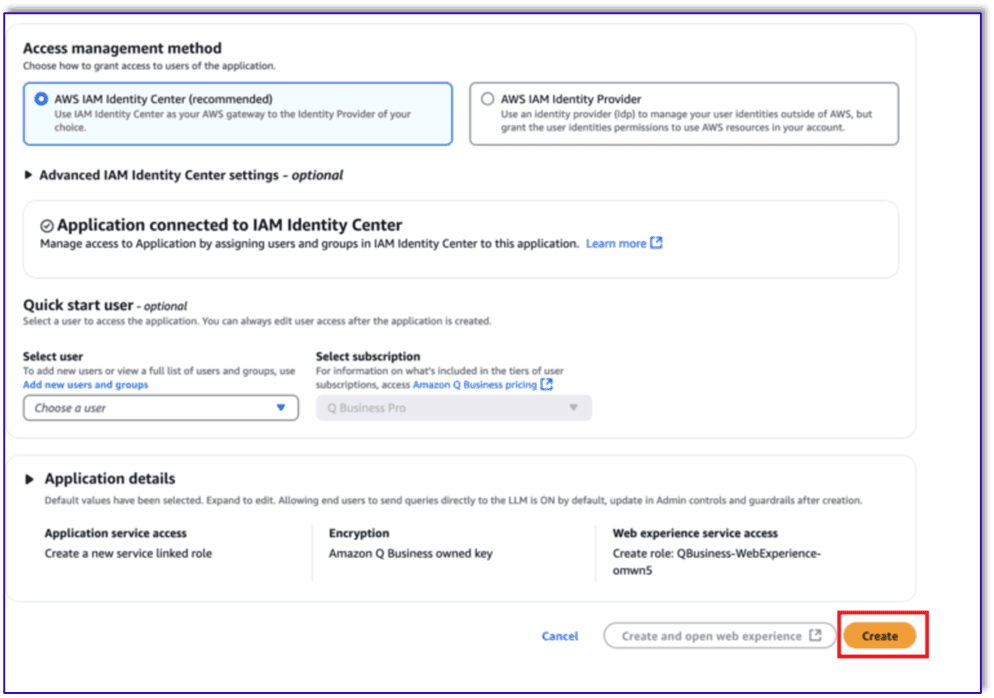
- Keep everything else as default and choose Create.
Create an Amazon Q Business retriever
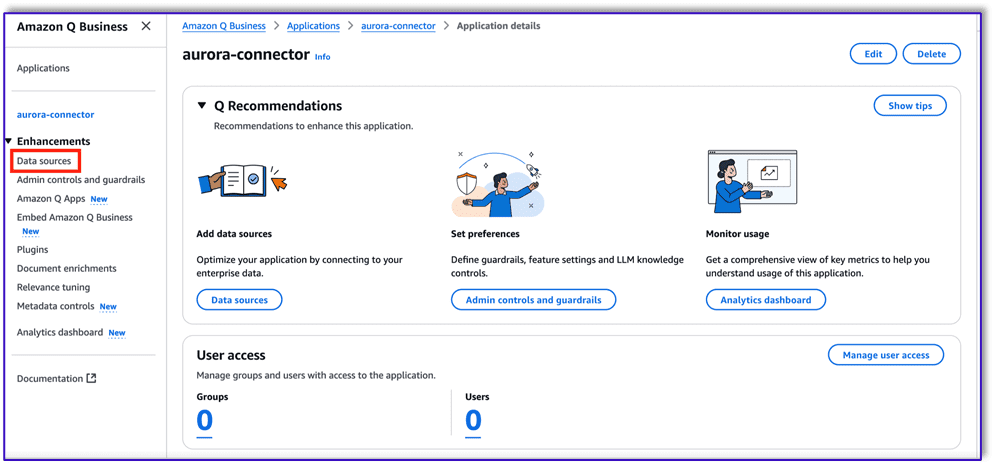
After you create the application, you can create a retriever. Complete the following steps:
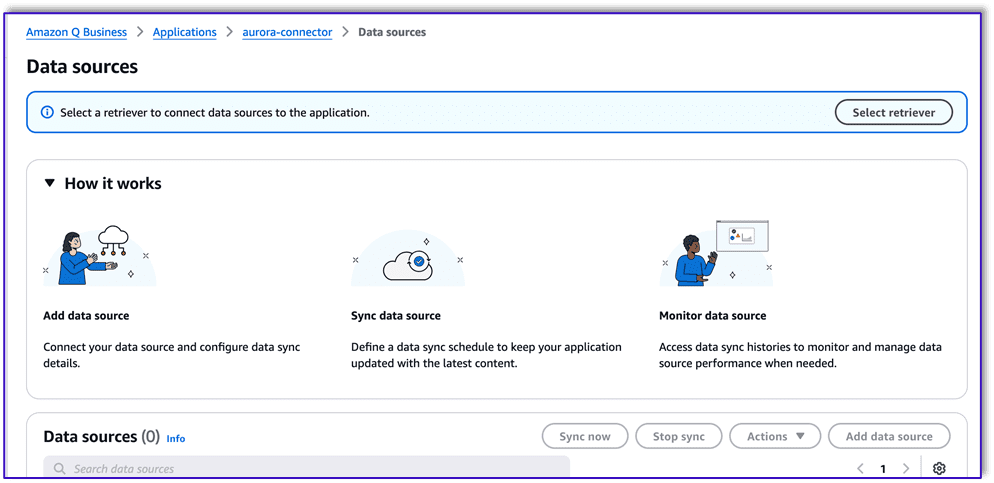
- On the application page, choose Data sources in the navigation pane.
- Choose Select retriever.
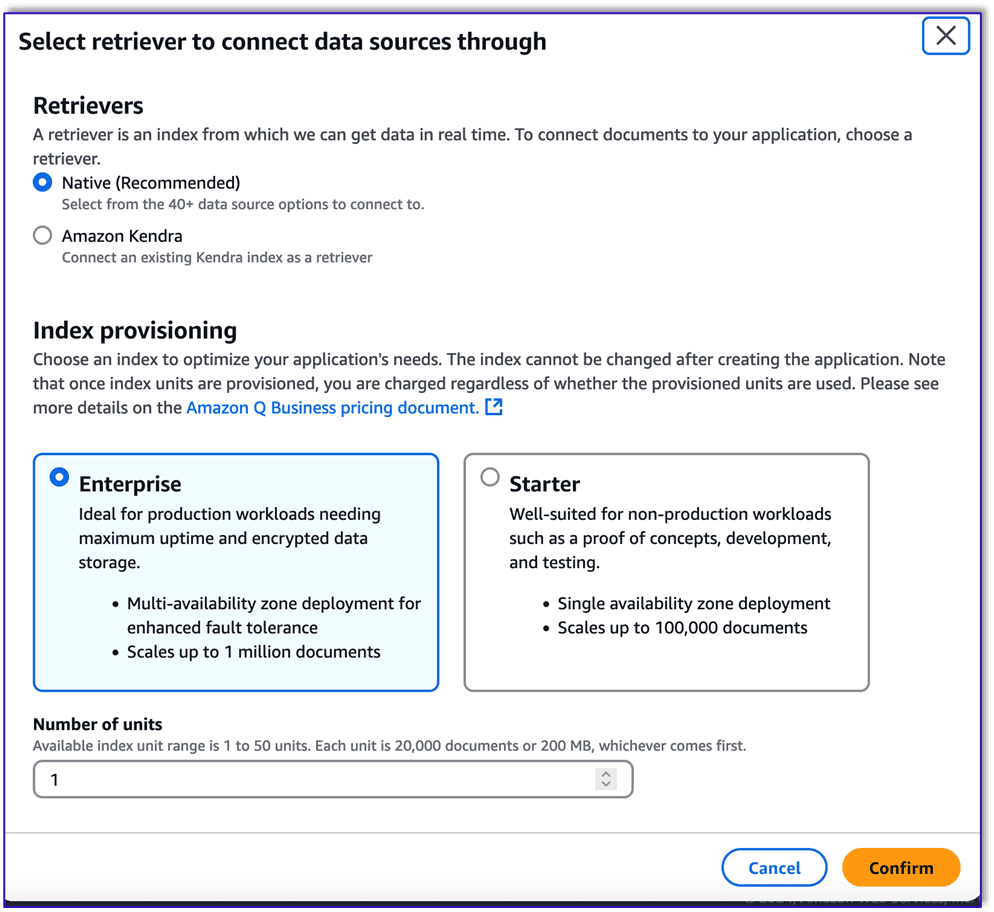
- For Retrievers, select your type of retriever. For this post, we select Native.
- For Index provisioning¸ select your index type. For this post, we select Enterprise.
- For Number of units, enter a number of index units. For this post, we use 1 unit, which can read up to 20,000 documents. This limit applies to the connectors you configure for this retriever.
- Choose Confirm.
Connect data sources
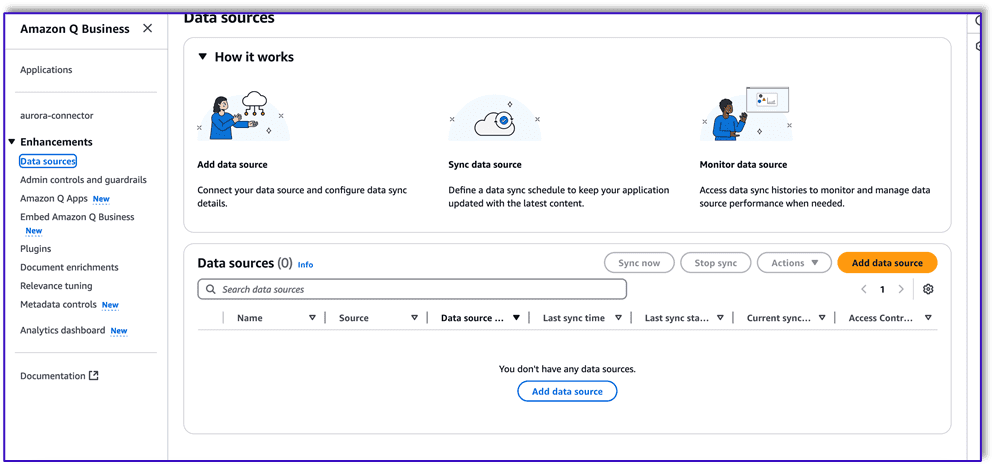
After you create the retriever, complete the following steps to add a data source:
- On the Data sources page, choose Add data source.
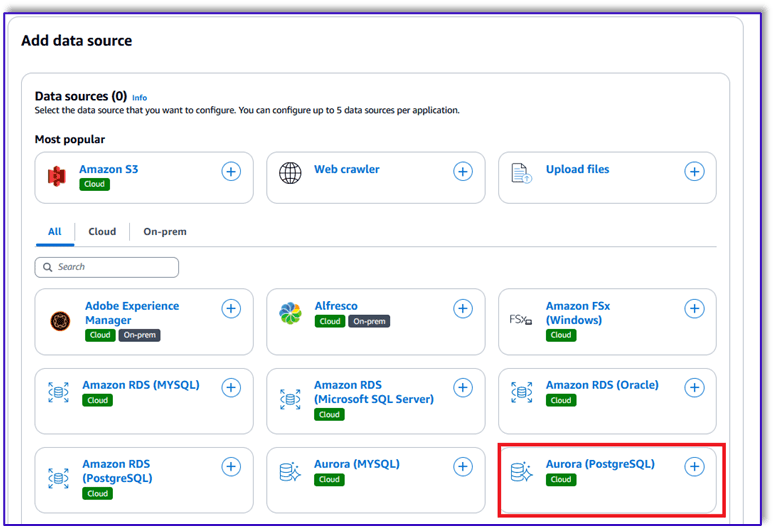
- Choose your data source. For this post, we choose Aurora (PostgreSQL).
You can configure up to 50 data sources per application.
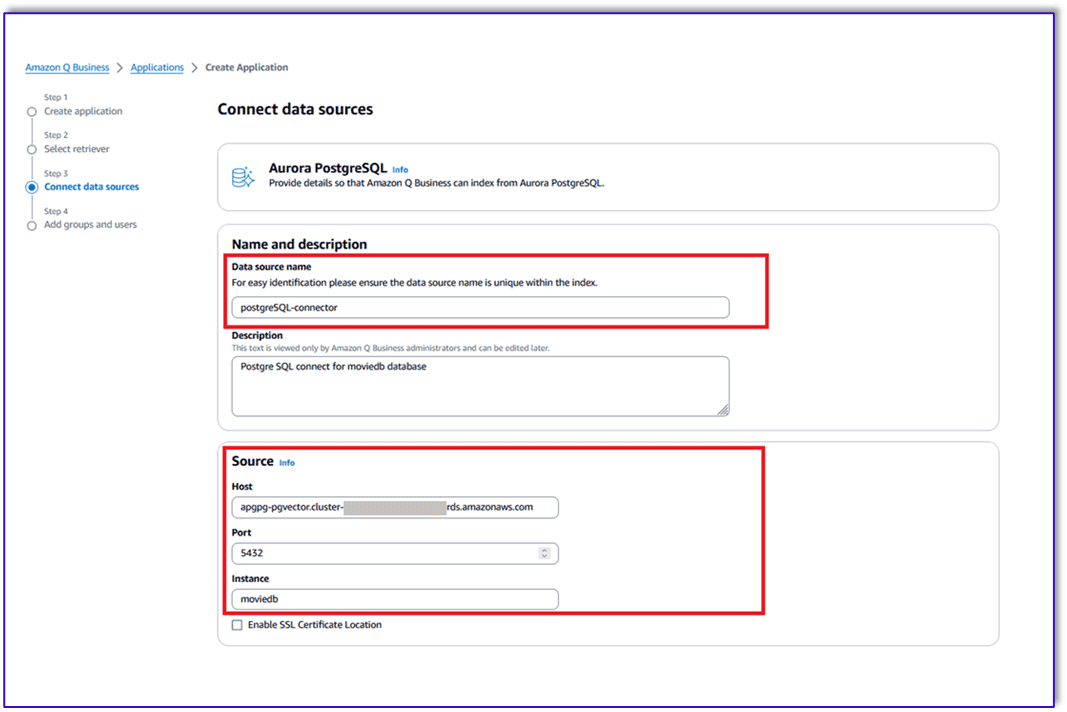
- Under Name and description, enter a data source name. Your name can include hyphens (-) but not spaces. The name has a maximum of 1,000 alphanumeric characters.
- Under Source, enter the following information:
- For Host, enter the database host URL, for example
http://instance URL.region.rds.amazonaws.com. - For Port, enter the database port, for example
5432. - For Instance, enter the name of the database that you want to connect with and where tables and views are created, for example
postgres.
- For Host, enter the database host URL, for example
- If you enable SSL Certificate Location, enter the Amazon S3 path to your SSL certificate file.
- For Authorization, Amazon Q Business crawls ACL information by default to make sure responses are generated only from documents your end-users have access to. See Authorization for more details.
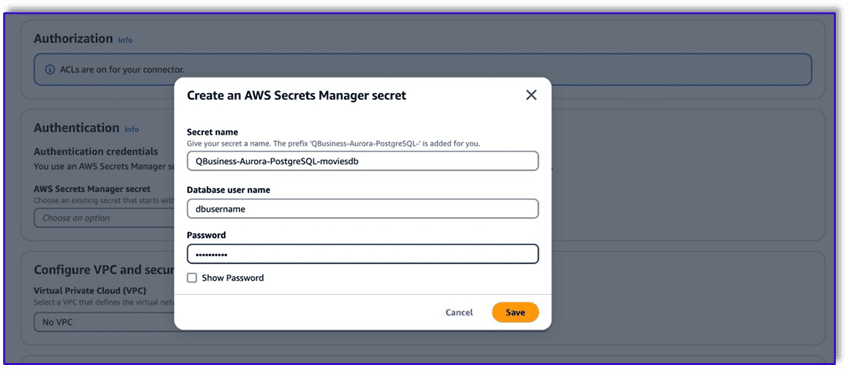
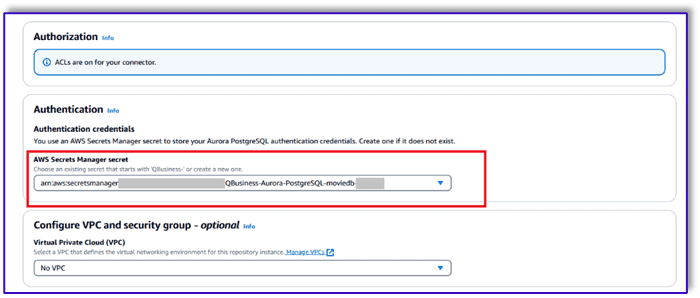
- Under Authentication, if you have an existing Secrets Manager secret that has the database user name and password, you can use it; otherwise, enter the following information for your new secret:
- For Secret name, enter a name for your secret.
- For Database user name and Password, enter the authentication credentials you copied from your database.
- Choose Save.
- For Configure VPC and security group, choose whether you want to use a virtual private cloud (VPC). For more information, see Virtual private cloud. If you do, enter the following information:
- For Virtual Private Cloud (VPC), choose the VPC where Aurora PostgreSQL-Compatible is present.
- For Subnets, choose up to six repository subnets that define the subnets and IP ranges the repository instance uses in the selected VPC.
- For VPC security groups, choose up to 10 security groups that allow access to your data source.
Make sure the security group allows incoming traffic from Amazon Elastic Compute Cloud (Amazon EC2) instances and devices outside your VPC. For databases, security group instances are required.
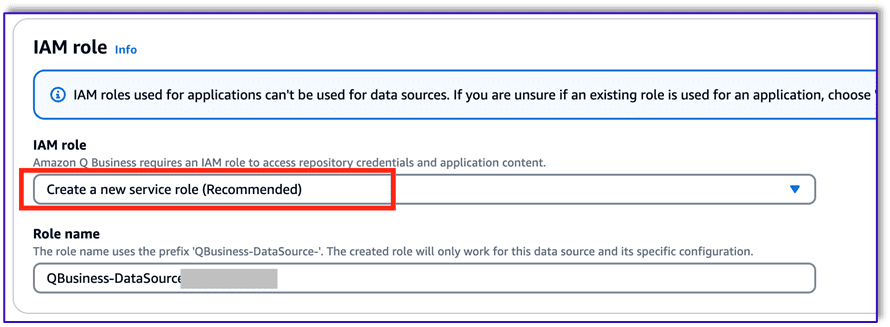
- Keep the default setting for IAM role (Create a new service role) and a new role name is generated automatically. For more information, see IAM role for Aurora (PostgreSQL) connector.
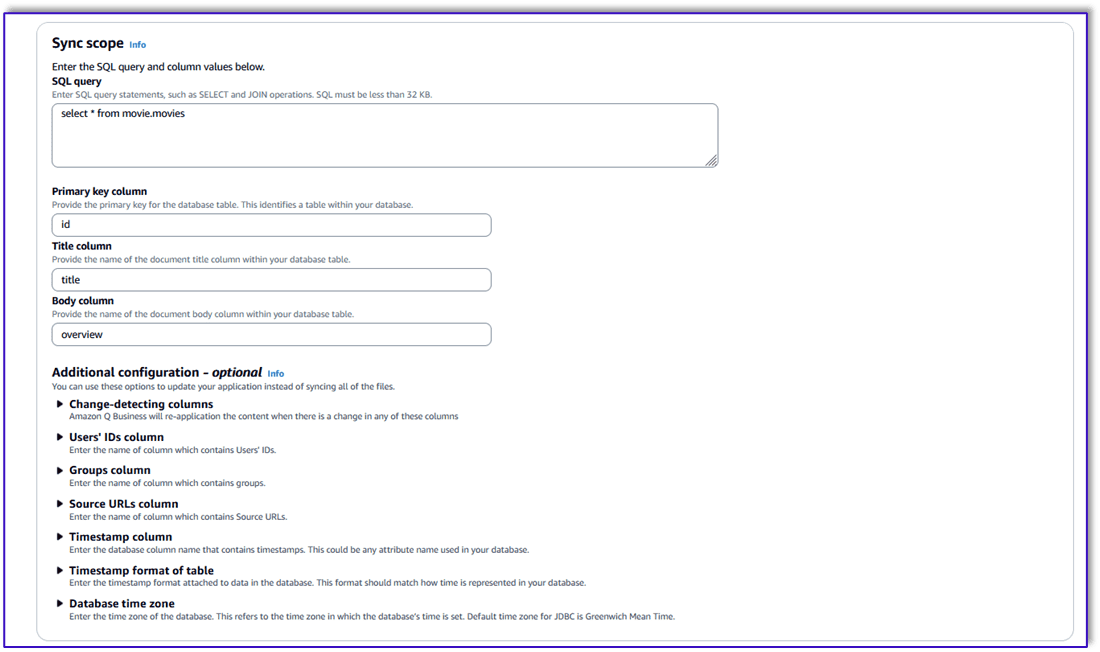
- Under Sync scope, enter the following information:
- For SQL query, enter SQL query statements like SELECT and JOIN operations. SQL queries must be less than 1,000 characters and not contain any semi-colons (;). Amazon Q will crawl database content that matches your query.
- For Primary key column, enter the primary key for the database table. This identifies a table row within your database table. Each row in a table and view is considered a single document.
- For Title column, enter the name of the document title column in your database table.
- For Body column, enter the name of the document body column in your database table.
- Under Additional configuration, configure the following settings:
- For Change-detecting columns, enter the names of the columns that Amazon Q will use to detect content changes. Amazon Q will re-index content when there is a change in these columns.
- For Users’ IDs column, enter the name of the column that contains user IDs to be allowed access to content.
- For Groups column, enter the name of the column that contains groups to be allowed access to content.
- For Source URLs column, enter the name of the column that contains source URLs to be indexed.
- For Timestamp column, enter the name of the column that contains timestamps. Amazon Q uses timestamp information to detect changes in your content and sync only changed content.
- For Timestamp format of table, enter the name of the column that contains timestamp formats to use to detect content changes and re-sync your content.
- For Database time zone, enter the name of the column that contains time zones for the content to be crawled.
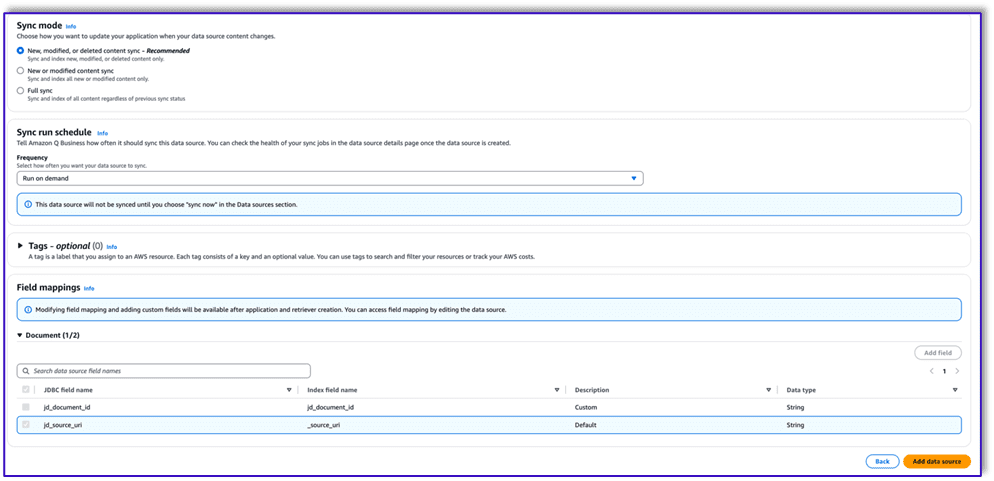
- Under Sync mode, choose how you want to update your index when your data source content changes. When you sync your data source with Amazon Q for the first time, content is synced by default. For more details, see Sync mode.
- New, modified, or deleted content sync – Sync and index new, modified, or deleted content only.
- New or modified content sync – Sync and index new or modified content only.
- Full sync – Sync and index content regardless of previous sync status.
- Under Sync run schedule, for Frequency, choose how often Amazon Q will sync with your data source. For more details, see Sync run schedule.
- Under Tags, add tags to search and filter your resources or track your AWS costs. See Tags for more details.
- Under Field mappings, you can list data source document attributes to map to your index fields. Add the fields from the Data source details page after you finish adding your data source. For more information, see Field mappings. You can choose from two types of fields:
- Default – Automatically created by Amazon Q on your behalf based on common fields in your data source. You can’t edit these.
- Custom – Automatically created by Amazon Q on your behalf based on common fields in your data source. You can edit these. You can also create and add new custom fields.
- Once done click on the Add data source button.
- When the data source state is Active, choose Sync now.
Add groups and users
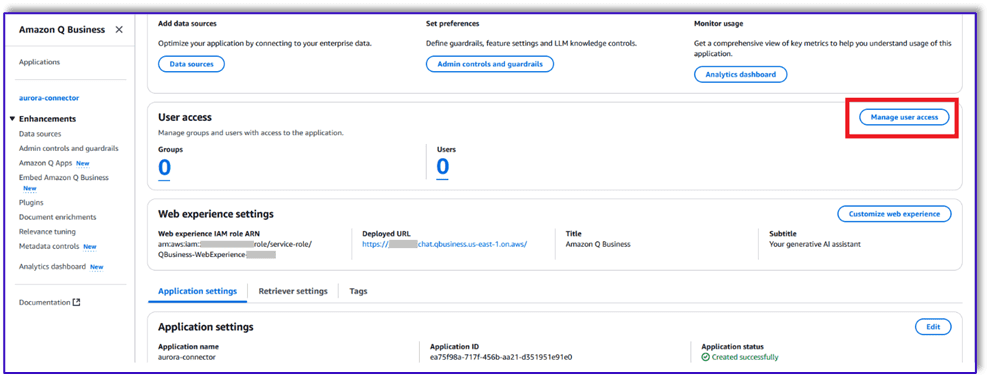
After you add the data source, you can add users and groups in the Amazon Q Business application to query the data ingested from data source. Complete the following steps:
- On your application page, choose Manage user access.
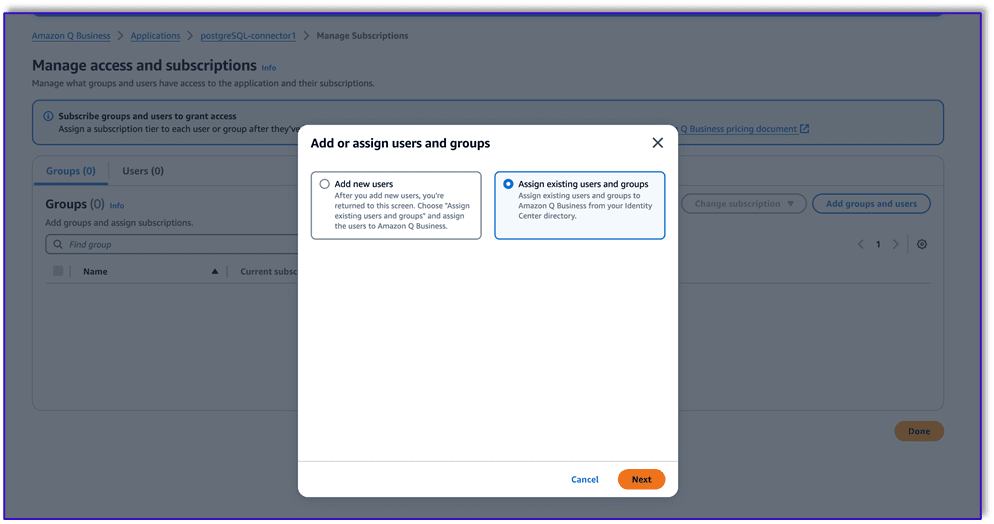
- Choose to add new users or assign existing users:
- Select Add new users to create new users in IAM Identity Center.
- Select Assign existing users and groups if you already have users and groups in IAM Identity Center. For this post, we select this option.
- Choose Next.
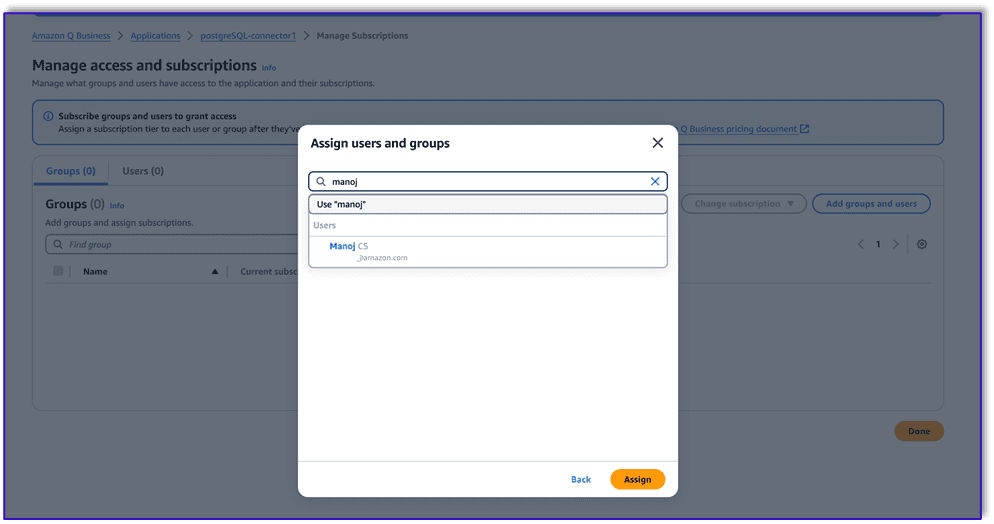
- Search for the users or groups you want to assign and choose Assign to add them to the application.
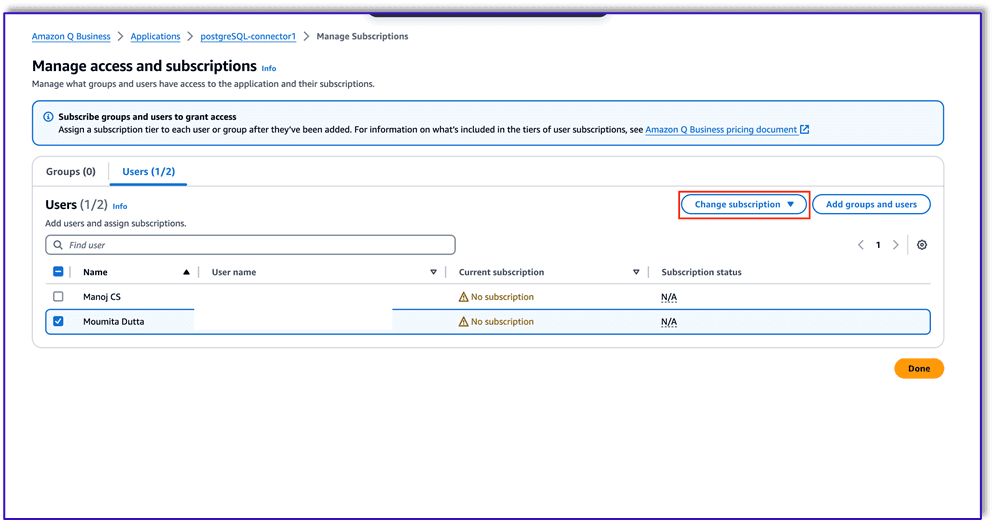
- After the users are added, choose Change subscription to assign either the Business Lite or Business Pro subscription plan.
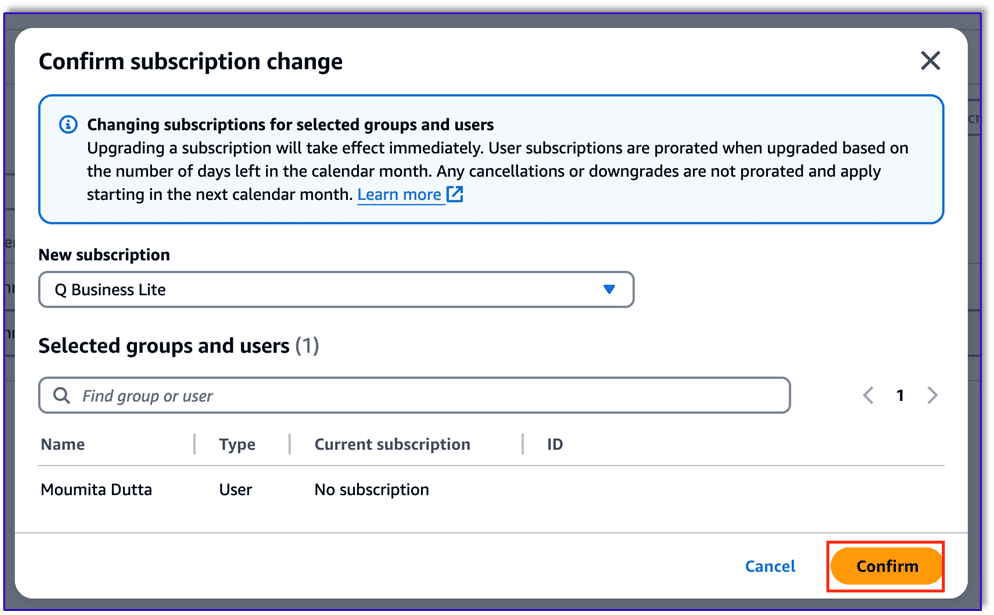
- Choose Confirm to confirm your subscription choice.
Test the solution
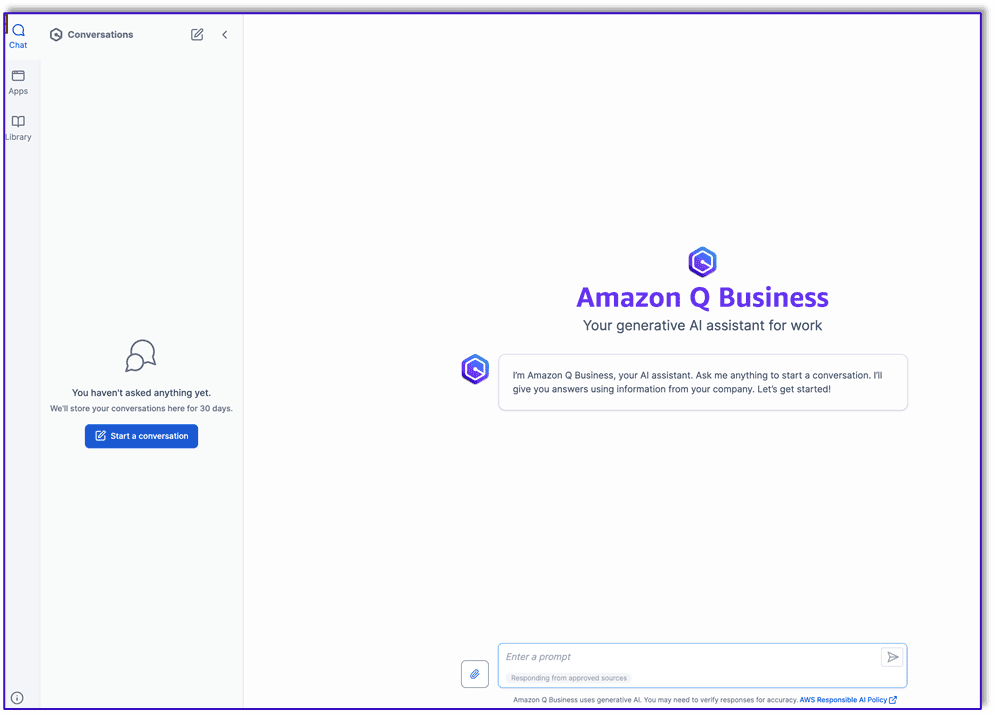
To access the Amazon Q Business Web Experience, navigate to the Web experience settings tab and choose the link for Deployed URL.
You will need to authenticate with the IAM Identity Center user details before you’re redirected to the chat interface.
Our data source is the Aurora PostgreSQL database, which contains a Movie table. We have indexed this to our Amazon Q Business application, and we will ask questions related to this data. The following screenshot shows a sample of the data in this table.
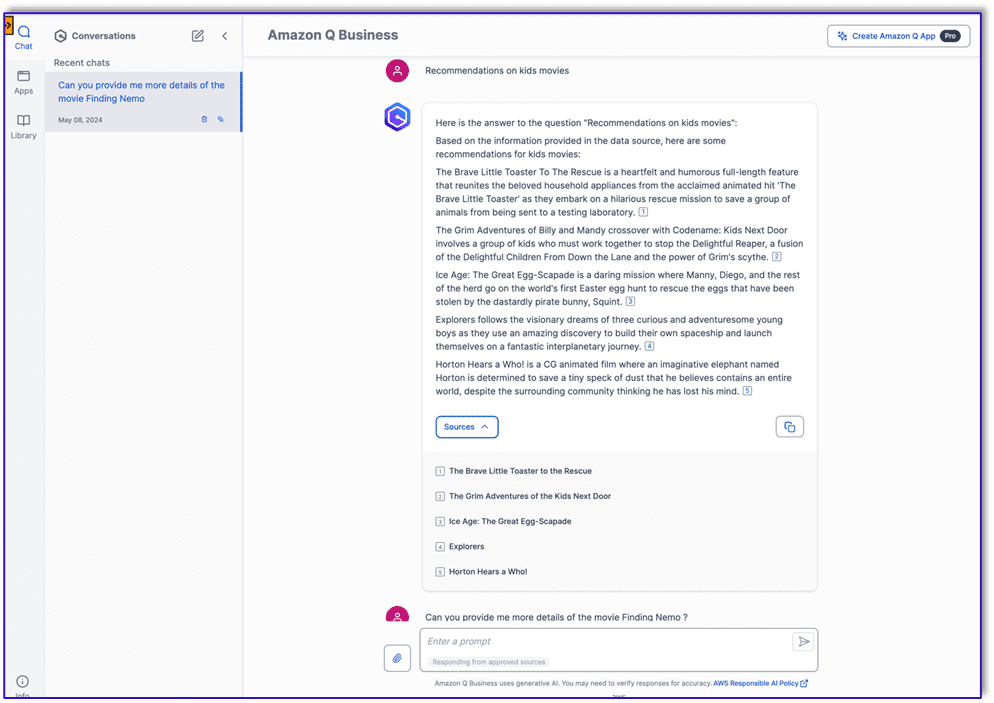
For the first query, we ask Amazon Q Business to provide recommendations for kids’ movies in natural language, and it queries the indexed data to provide the response shown in the following screenshot.
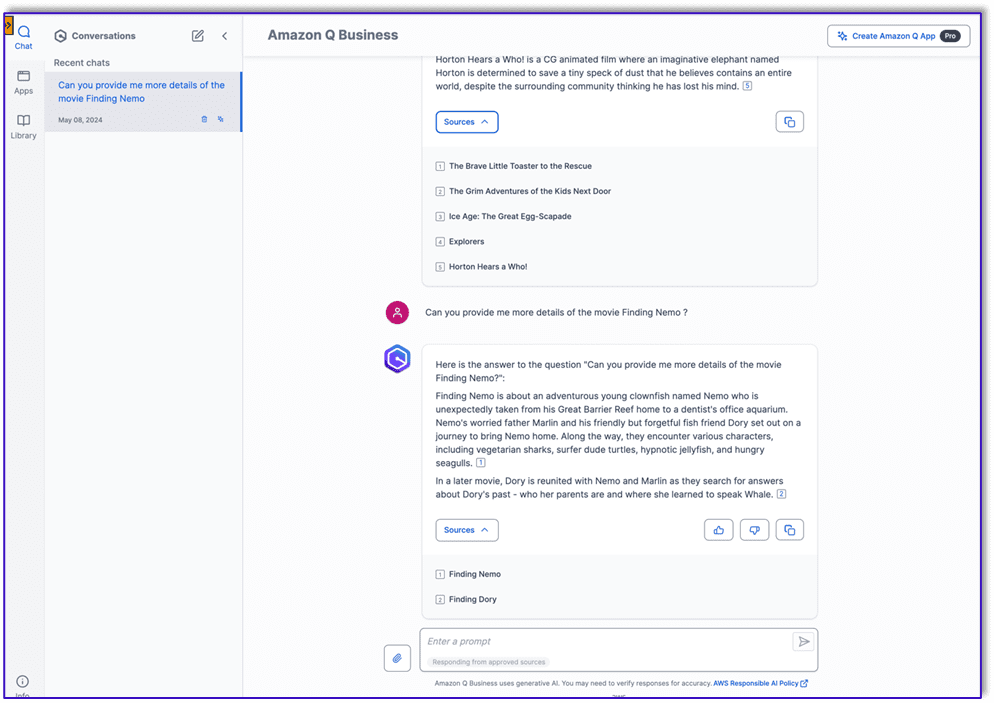
For the second query, we ask Amazon Q Business to provide more details of a specific movie in natural language. It uses the indexed data from the column of our table to provide the response.
Frequently asked questions
In this section, we provide guidance to frequently asked questions.
Amazon Q Business is unable to answer your questions
If you get the response “Sorry, I could not find relevant information to complete your request,” this may be due to a few reasons:
- No permissions – ACLs applied to your account don’t allow you to query certain data sources. If this is the case, reach out to your application administrator to make sure your ACLs are configured to access the data sources. You can go to the Sync History tab to view the sync history, and then choose the View Report link, which opens an Amazon CloudWatch Logs Insights query that provides additional details like the ACL list, metadata, and other useful information that might help with troubleshooting. For more details, see Introducing document-level sync reports: Enhanced data sync visibility in Amazon Q Business.
- Data connector sync failed – Your data connector may have failed to sync information from the source to the Amazon Q Business application. Verify the data connector’s sync run schedule and sync history to confirm the sync is successful.
If none of these reasons apply to your use case, open a support case and work with your technical account manager to get this resolved.
How to generate responses from authoritative data sources
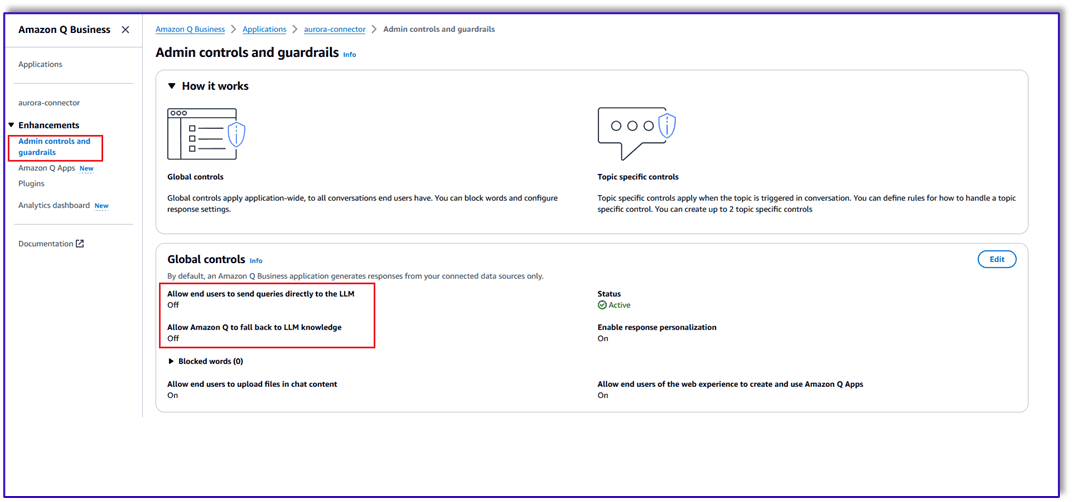
If you want Amazon Q Business to only generate responses from authoritative data sources, you can configure this using the Amazon Q Business application global controls under Admin controls and guardrails.
- Log in to the Amazon Q Business console as an Amazon Q Business application administrator.
- Navigate to the application and choose Admin controls and guardrails in the navigation pane.
- Choose Edit in the Global controls section to set these options.
For more information, refer to Admin controls and guardrails in Amazon Q Business.
Amazon Q Business responds using old (stale) data even though your data source is updated
Each Amazon Q Business data connector can be configured with a unique sync run schedule frequency. Verifying the sync status and sync schedule frequency for your data connector reveals when the last sync ran successfully. Your data connector’s sync run schedule could be set to sync at a scheduled time of day, week, or month. If it’s set to run on demand, the sync has to be manually invoked. When the sync run is complete, verify the sync history to make sure the run has successfully synced new issues. Refer to Sync run schedule for more information about each option.
Using different IdPs such as Okta, Entra ID, or Ping Identity
For more information about how to set up Amazon Q Business with other identity providers (IdPs) as your SAML 2.0-aligned IdP, see Creating an Amazon Q Business application using Identity Federation through IAM.
Limitations
For more details about limitations your Amazon Q Business Aurora (PostgreSQL) connector, see Known limitations for the Aurora (PostgreSQL) connector.
Clean up
To avoid incurring future charges and to clean up unused roles and policies, delete the resources you created:
- If you created a Secrets Manager secret to store the database password, delete the secret.
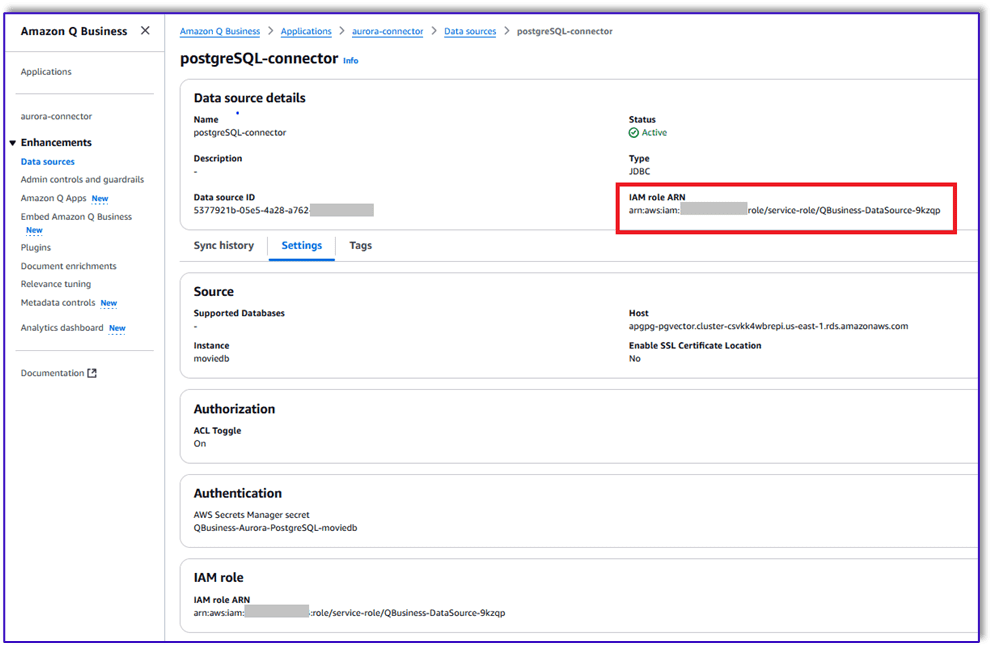
- Delete the data source IAM role. You can find the role ARN on the data source page.
- Delete the Amazon Q application:
- On the Amazon Q console, choose Applications in the navigation pane.
- Select your application and on the Actions menu, choose Delete.
- To confirm deletion, enter delete in the field and choose Delete.
- Wait until you get the confirmation message; the process can take up to 15 minutes.
- Delete your IAM Identity Center instance.
Conclusion
Amazon Q Business unlocks powerful generative AI capabilities, allowing you to gain intelligent insights from your Aurora PostgreSQL-Compatible data through natural language querying and generation. By following the steps outlined in this post, you can seamlessly connect your Aurora PostgreSQL database to Amazon Q Business and empower your developers and end-users to interact with structured data in a more intuitive and conversational manner.
To learn more about the Amazon Q Business Aurora (PostgreSQL) connector, refer to Connecting Amazon Q Business to Aurora (PostgreSQL) using the console.
About the Authors
 Moumita Dutta is a Technical Account Manager at Amazon Web Services. With a focus on financial services industry clients, she delivers top-tier enterprise support, collaborating closely with them to optimize their AWS experience. Additionally, she is a member of the AI/ML community and serves as a generative AI expert at AWS. In her leisure time, she enjoys gardening, hiking, and camping.
 Manoj CS is a Solutions Architect at AWS, based in Atlanta, Georgia. He specializes in assisting customers in the telecommunications industry to build innovative solutions on the AWS platform. With a passion for generative AI, he dedicates his free time to exploring this field. Outside of work, Manoj enjoys spending quality time with his family, gardening, and traveling.
 Gopal Gupta is a Software Development Engineer at Amazon Web Services. With a passion for software development and expertise in this domain, he designs and develops highly scalable software solutions.





Leave a Reply