
Manage Amazon SageMaker HyperPod Spaces directly from SageMaker Studio
We recently introduced the ability to create and manage Amazon SageMaker Spaces on Amazon SageMaker HyperPod EKS clusters directly from the Amazon SageMaker Studio UI. Data scientists and machine learning (ML) engineers can now launch JupyterLab and Code Editor environments on HyperPod clusters without leaving their browser or using command-line tools, reducing the time from cluster access to productive development to a few clicks.
Background
Amazon SageMaker HyperPod provides purpose-built infrastructure for foundation model (FM) training and inference at scale. With Amazon Elastic Kubernetes Service (Amazon EKS) orchestration, teams can run distributed training jobs across hundreds of accelerators with built-in resiliency and automatic fault recovery. In addition to training, HyperPod extends this EKS orchestrated infrastructure to serve low-latency, scalable inference for multi-billion-parameter foundation models.
Earlier this year, we launched Amazon SageMaker Spaces for HyperPod, an add-on ML developers can use to create interactive development environments directly on HyperPod EKS clusters. Organizations could then maximize their GPU investments by running interactive workloads alongside training jobs and model deployment on the same infrastructure, with support for fractional GPU allocations.
Previously, creating and managing Spaces relied primarily on the HyperPod CLI or kubectl commands. While this approach provides powerful, granular control for infrastructure administrators, data scientists who prefer a visual interface can now use this new SageMaker Studio capability to bypass command-line tools and focus entirely on model development.
What’s new
With this new capability, data scientists can now create, configure, start, stop, and open Spaces directly from SageMaker Studio. The new IDE and Notebooks tab on the HyperPod cluster detail page provides a complete user interface for Space management, eliminating the need for CLI tools for day-to-day Space operations.
Key capabilities available through Studio include:
- Create Spaces with configurable compute, namespaces, storage, HyperPod Task Governance for compute quota management and image settings through a guided form.
- View all Spaces in a searchable table showing name, application type, status, access type, storage, GPU, and vCPU allocations.
- Start and stop Spaces with a single selection to clear up compute resources when Spaces aren’t used.
- Open Spaces directly in the browser (JupyterLab or Code Editor) or connect through a remote IDE of your choice (for example, VS Code).
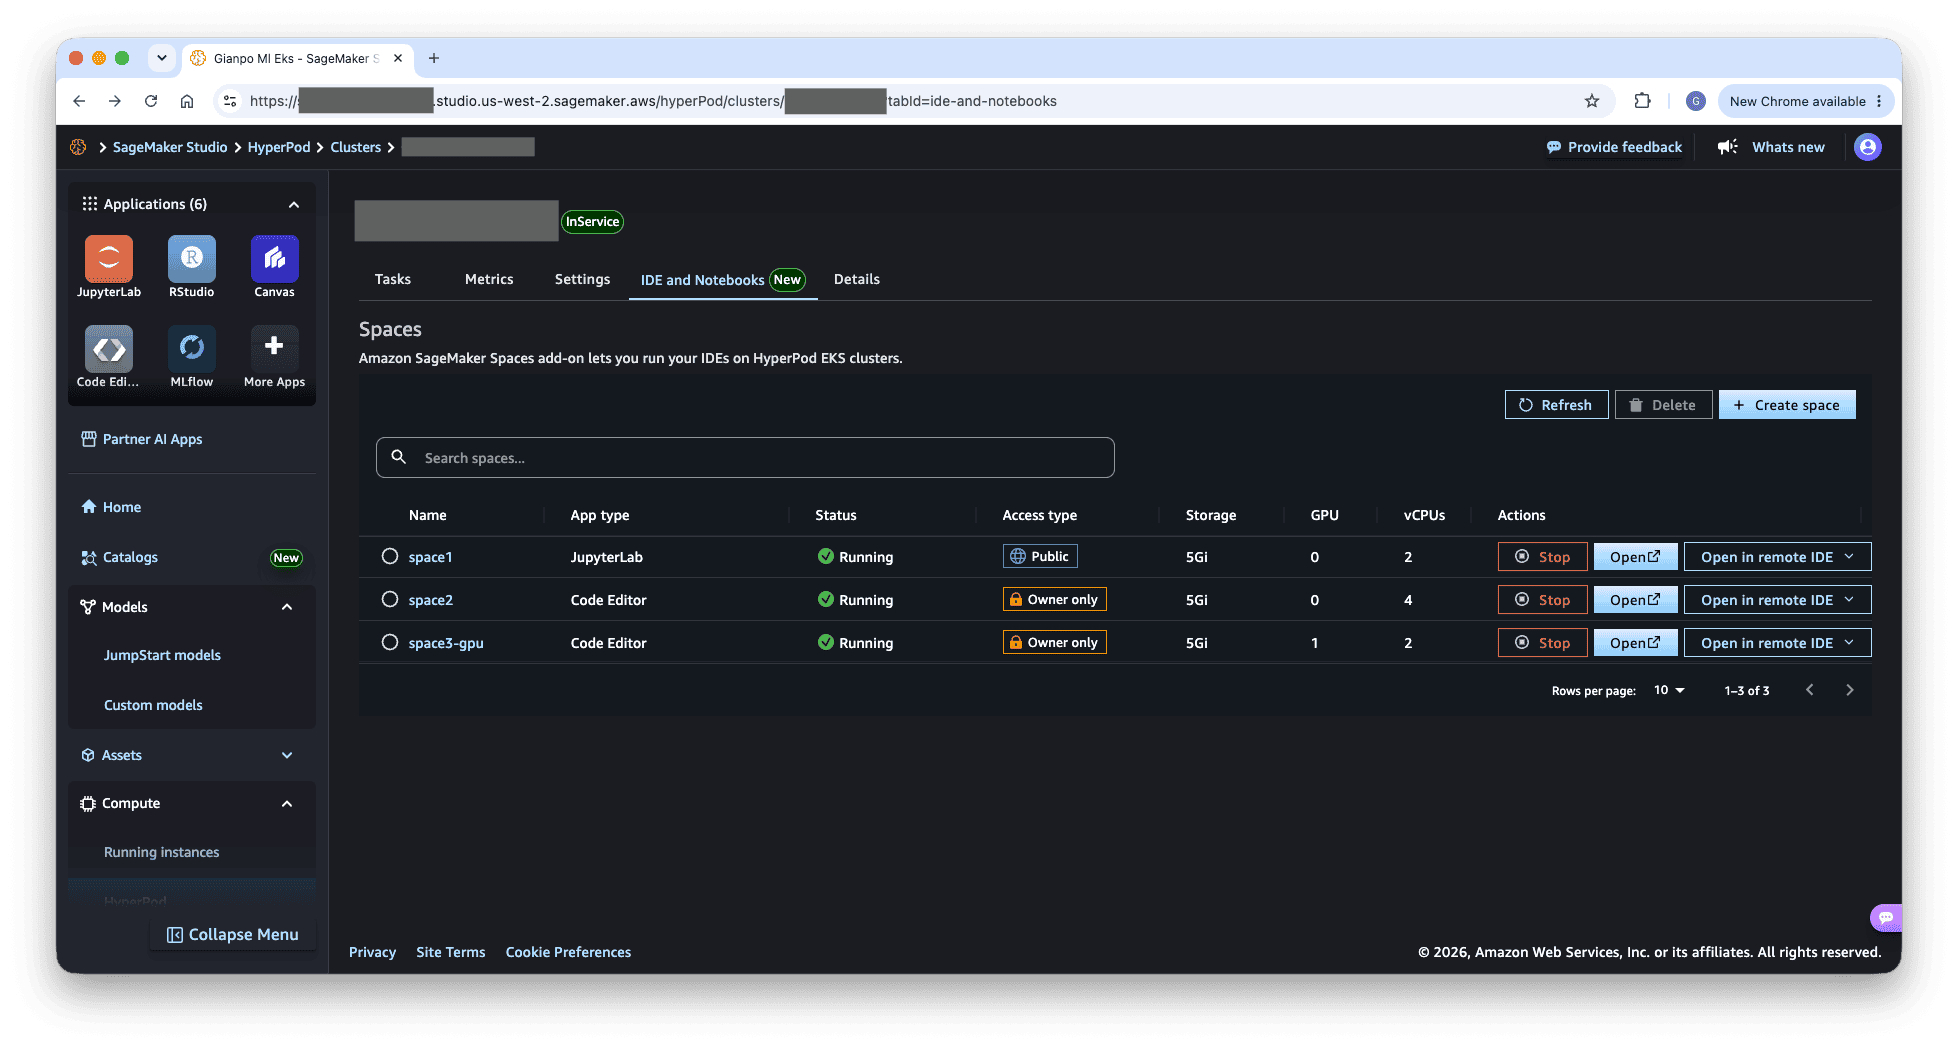
Figure 1: The IDE and Notebooks tab on the HyperPod cluster detail page shows all Spaces with their status, compute allocation, and quick actions to stop, open, or open in a remote IDE
Getting started
Setup involves two roles: administrators prepare the cluster, and data scientists create and open Spaces. The following sections cover each.
For administrators
Administrators install the SageMaker Spaces add-on on their HyperPod EKS cluster using either the Quick install (one-click with optimized defaults) or Custom install option (required to set up web UI access) from their SageMaker HyperPod EKS cluster’s IDE and Notebooks tab. After it’s installed, the administrator can configure namespaces, create Space templates, and manage access through EKS access entries.
The following is a one-time setup that administrators must do:
- Install the Spaces add-on: From the Amazon SageMaker AI console, open your HyperPod cluster, go to the IDE and Notebooks tab, and choose either Quick install or Custom install (Custom install is required to enable web browser access). See the AWS documentation for full instructions.
- Configure EKS access entries: Attach the three managed policies
AmazonSagemakerHyperpodSpacePolicy,AmazonSagemakerHyperpodUserClusterPolicy, andAmazonSagemakerHyperpodSpaceTemplatePolicyto the AWS Identity and Access Management (IAM) roles used by your data scientists. - Enable per-user identity propagation on the Studio domain: If your Studio domain was created before the SageMaker Studio and HyperPod Spaces integration was rolled out, you must enable per-user identity propagation to the HyperPod EKS cluster. This ensures each Studio user’s actions on the cluster (create, stop or delete Space) are attributed to their user profile in EKS access entries and AWS CloudTrail. Furthermore, this identity mapping enforces strict Space ownership. It tracks which user created the environment and determines whether the Space is private or shared across the SageMaker Studio domain.
Run the following command once per Studio domain:
After updating the domain, verify that the following command returns “USER_IDENTITY”:
Existing running apps are unaffected. Users pick up the new setting on their next sign-in.
- Optionally turn on additional capabilities: Enable any of the capabilities from the following Optional capabilities table.
For data scientists
After the add-on is installed and access is configured, data scientists navigate to their HyperPod cluster in SageMaker Studio under Compute → HyperPod and select the IDE and Notebooks tab to see the Spaces management interface (see Figure 1). Learn more about creating and managing Spaces: Create and manage Spaces on HyperPod.
After the Space status shows Running (typically a few minutes on a cold cluster, approximately 30–40 seconds with over-provisioning), choose Open to launch JupyterLab or Code Editor in your browser (Figures 2 and 3), or Open in VS Code to connect from your local editor through SSH-over-SSM (Figure 4).
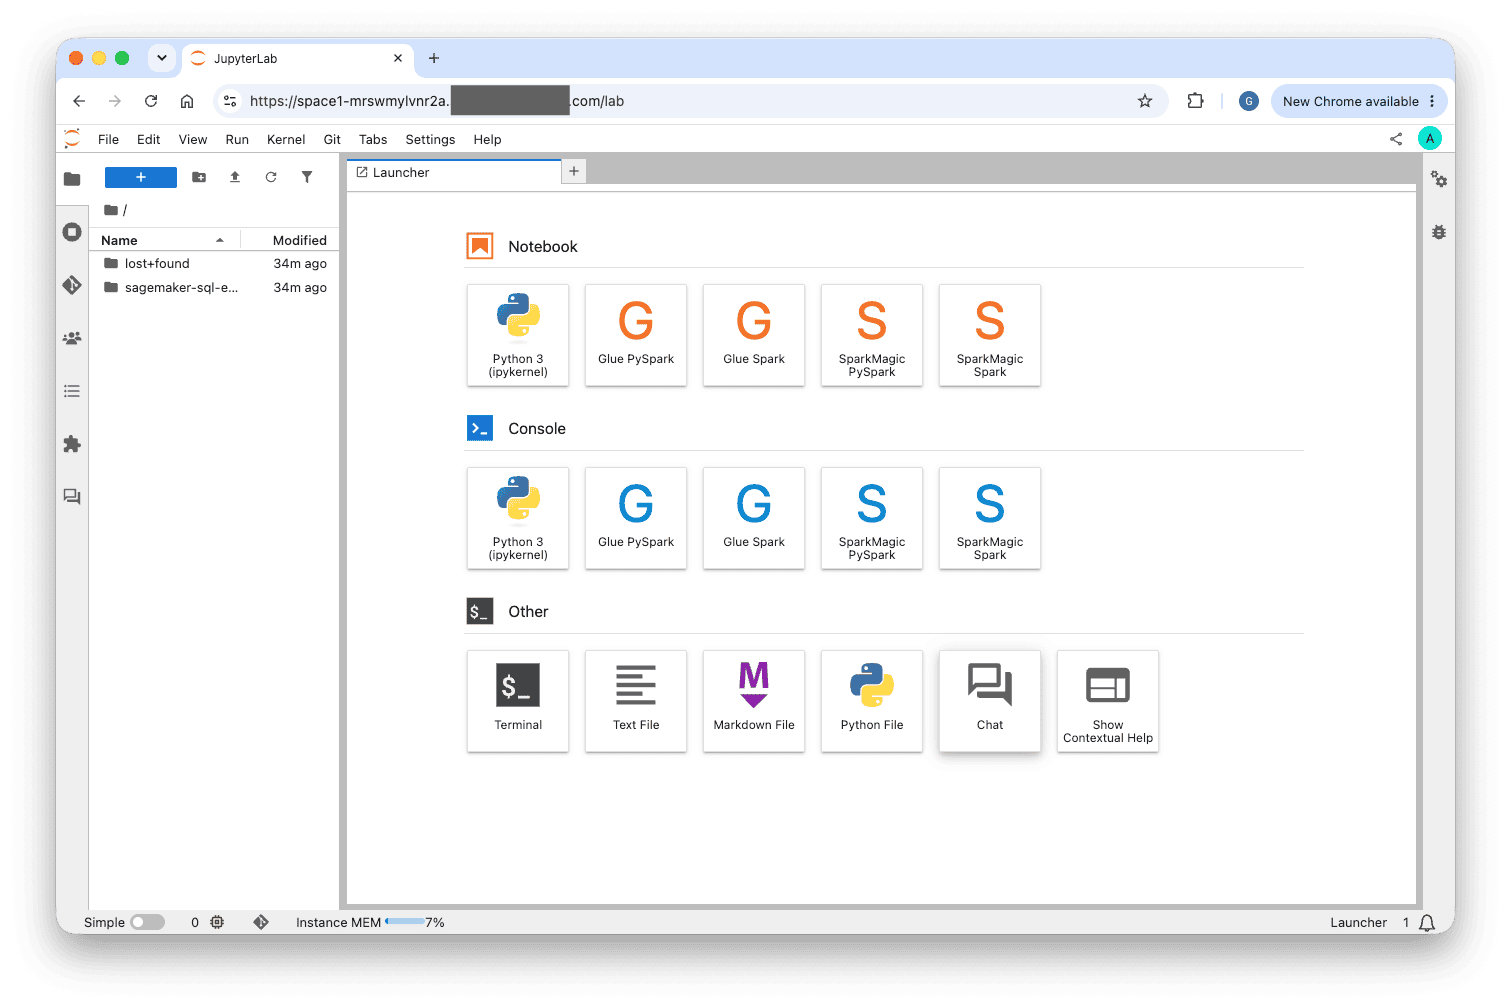
Figure 2: A JupyterLab Space accessed through the web browser, showing the Launcher with available notebook kernels, consoles, and terminal access
Working in a JupyterLab Space
After you open a JupyterLab Space, you get a fully configured development environment with access to:
- Python 3 notebooks with ipykernel.
- Glue PySpark and Glue Spark consoles.
- SparkMagic PySpark and Spark kernels.
- Terminal access for running commands.
- File browser with persistent storage.
- Built-in chat and contextual help.
Your work persists on the attached Amazon Elastic Block Store (Amazon EBS) volume, so you can stop and restart Spaces without losing progress.
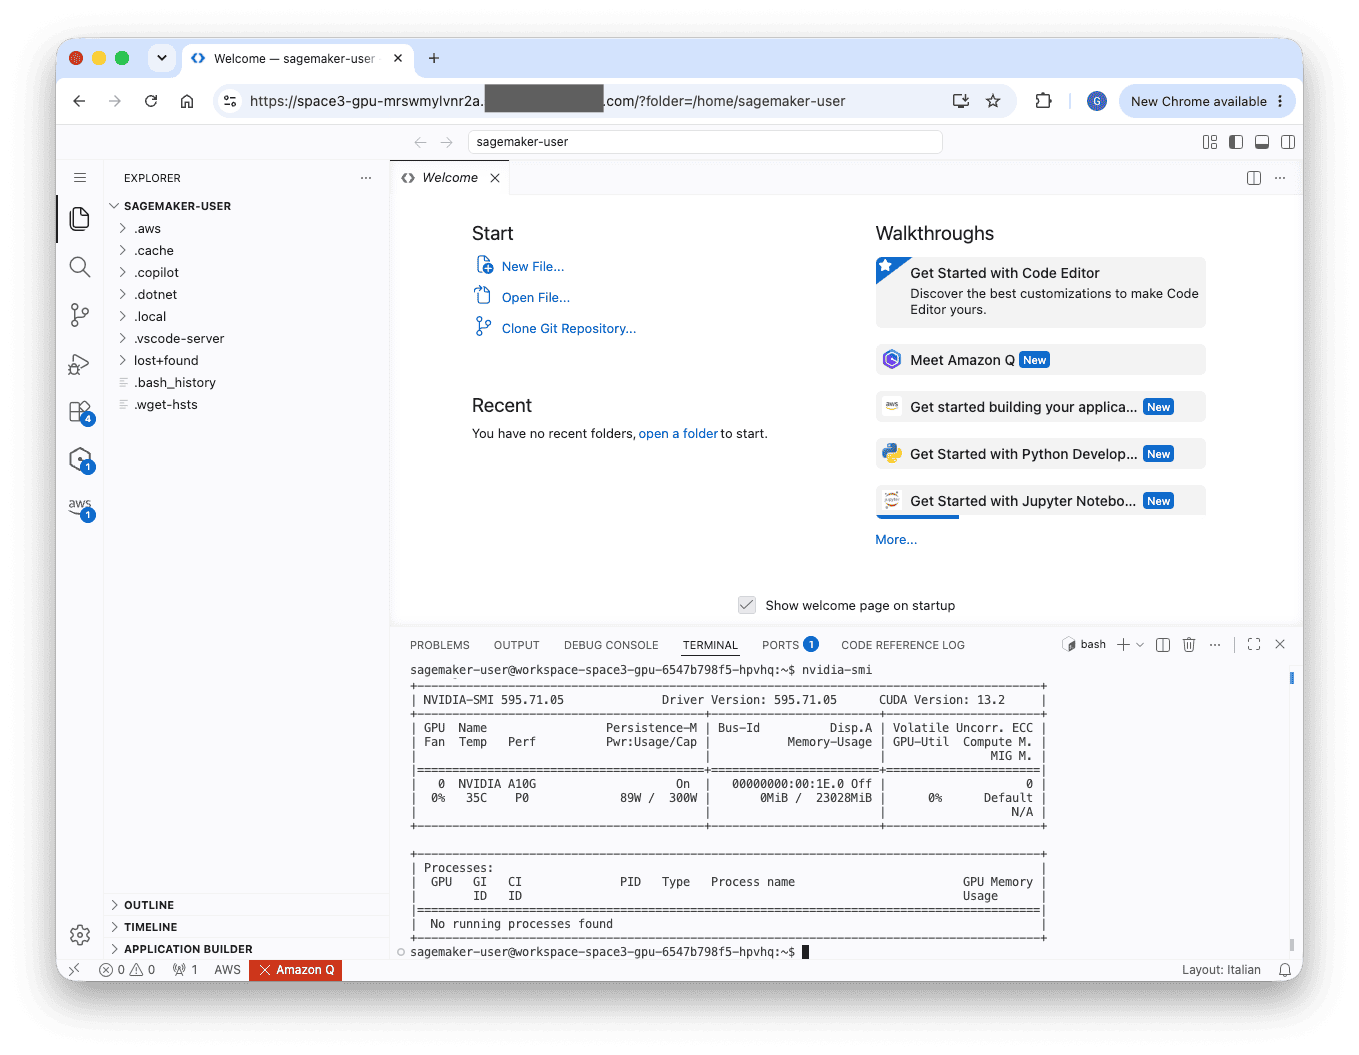
Figure 3: A Code Editor Space running on HyperPod, showing the VS Code-style web interface with file explorer, editor, and integrated terminal
Working in a Code Editor Space
For developers who prefer a VS Code-style experience in the browser, Code Editor Spaces provide a lightweight, web-based IDE with:
- Full file editing with syntax highlighting and IntelliSense.
- Integrated terminal for running shell commands, submitting training jobs, or interacting with cluster resources.
- Extension support for language servers, linters, and formatters.
- Git integration for version control workflows.
- Direct access to the cluster file system and mounted Amazon FSx volumes.
Code Editor Spaces are well-suited for writing and debugging training scripts, managing experiment configurations, and working with code repositories, all without leaving the browser.
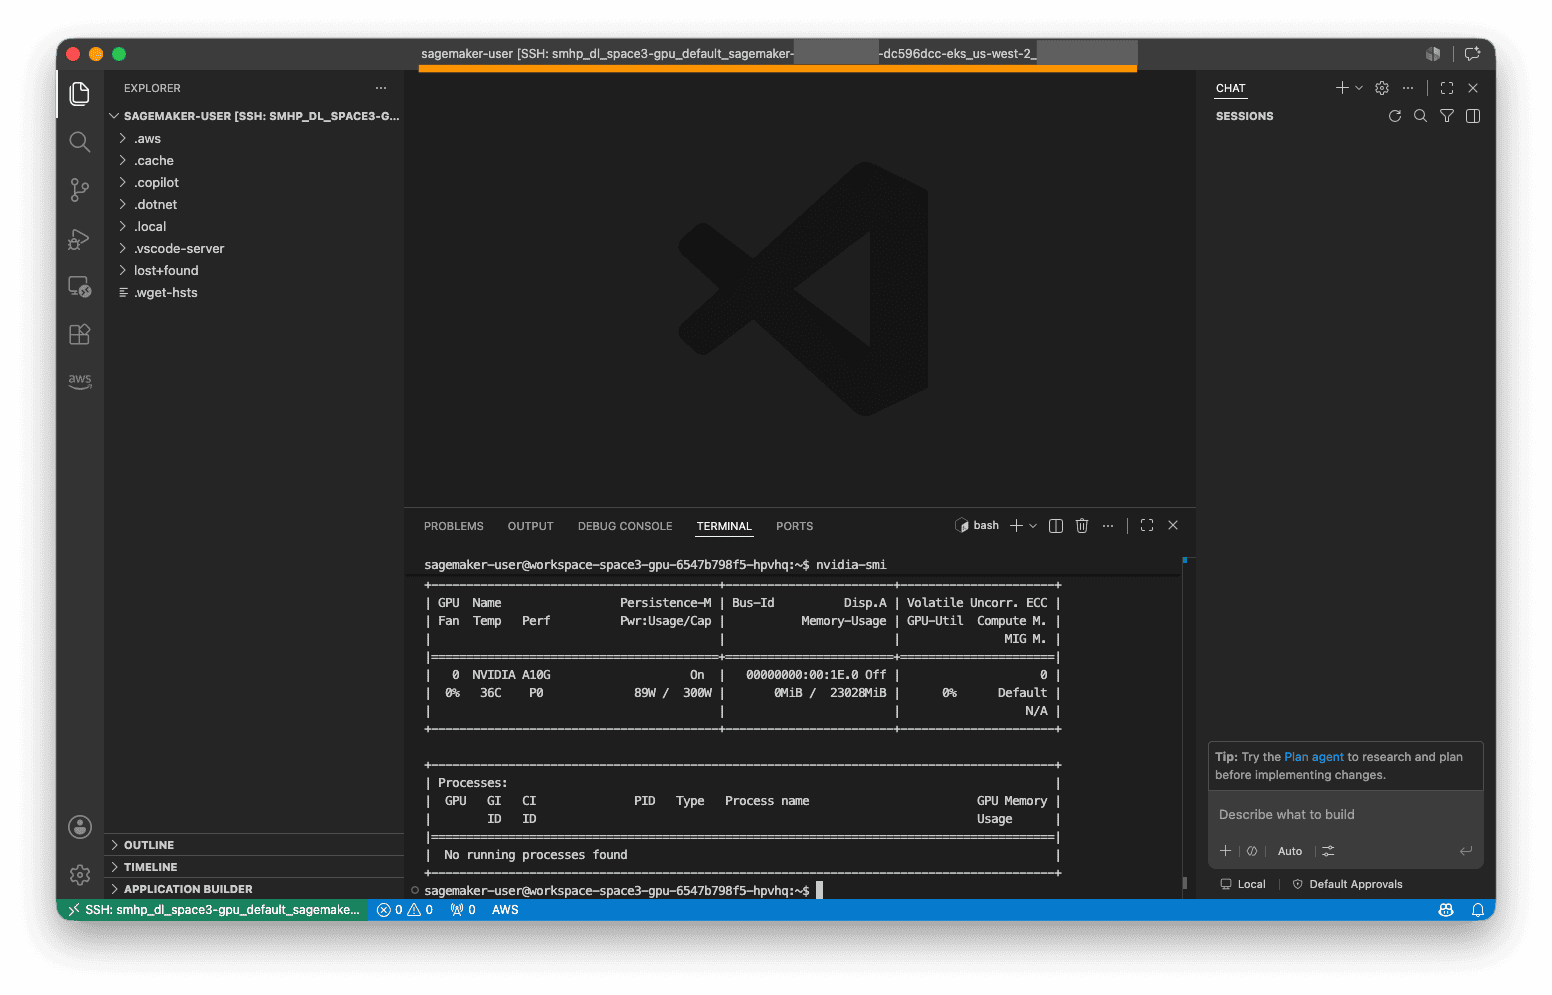
Figure 4: A local VS Code instance connected remotely to a HyperPod Space, showing the remote connection indicator and full IDE capabilities running on cluster compute
Remote IDE connection (VS Code)
Choose Open in VS Code from the Spaces table to connect your local Visual Studio Code to the Space running on HyperPod. This uses SSH-over-SSM tunneling internally, providing a secure connection without requiring you to manage SSH keys or expose port 22.
You get the full power of your local VS Code environment, including extensions, themes, and keybindings, while executing code on HyperPod cluster compute.
You can also connect using the AWS Toolkit for Visual Studio Code, which lists your Spaces under SageMaker AI > HyperPod, and you can start, stop, and connect to Spaces directly from the toolkit panel.
Optional capabilities
Every capability that follows is optional and composable. Enable any combination that fits your team’s needs.
| Capability | Description |
| Web browser access | AWS Application Load Balancer and custom DNS through Amazon Route 53 to route browser traffic to Spaces. Not required for remote IDE (VS Code over SSM) access. |
| Space templates | Admin-defined templates that pre-configure compute, images, storage, and lifecycle scripts for consistent Space configurations across teams. |
| Task Governance | Namespace-level compute quotas, queues, and priority-based admission through Kueue for multi-tenant clusters. |
| Karpenter autoscaling | Dynamic node scale-up/down based on Space demand. |
| Karpenter over-provisioning | Pre-warmed nodes with pre-pulled images that drop Space startup from 5–7 minutes to approximately 30–40 seconds. See the following Pro tip section. |
| Persistent volumes (EFS / FSx) | Shared user directories and team datasets that persist across Spaces. |
| Custom images (ECR) | Team-specific runtimes and libraries baked into container images hosted in Amazon Elastic Container Registry (Amazon ECR). |
| Idle shutdown | Auto-terminate inactive Spaces to protect against runaway compute cost. |
| NVIDIA MIG | Fractional GPU allocation for cost-efficient interactive workloads on A100/H100 hardware. |
Pro tip: Reduce Space startup time with node over-provisioning
By default, SageMaker Spaces on HyperPod EKS clusters using Karpenter autoscaling incur a cold-start delay of 5–7 minutes the first time a Space is created on a scale-to-zero cluster, dominated by:
- Amazon Elastic Compute cloud (Amazon EC2) instance launch.
- Kubernetes node registration.
- SageMaker Distribution (SMD) image pull.
For latency-sensitive interactive workloads (JupyterLab, Code Editor), you can maintain a pool of pre-warmed, image-cached nodes using the standard Kubernetes over-provisioning pattern. This drops Space startup time from minutes to around 30–40 seconds.
How it works
- A low-priority (
-1000) placeholder Deployment keeps one Kubernetes pod on each warm node. These pods request the same CPU/memory a real Space would. - An
initContaineron each placeholder pre-pulls the SageMaker Distribution image onto the node when Karpenter provisions it. - When a user creates a Space (default priority
0), the Kubernetes scheduler preempts the placeholder (priority-1000). The Space then lands on the already-warm, image-cached node in a couple of seconds, with no image pull and no node launch wait. - Karpenter provisions a replacement node for the displaced placeholder in the background.
Learn more about Pro tip deployment: Overprovisioning for HyperPod Spaces.
Verified startup latencies on ml.m5.12xlarge (24 vCPU allocatable, 2 vCPU placeholder, 8 GiB placeholder memory) with the sagemaker-distribution:latest-cpu SMD image, which is about 3.5 GB:
| Path | Latency |
| Space fits alongside placeholder (coexist) | ~14 s |
| Space preempts placeholder | ~35 s |
| Cold start (no warm pool) | 5-7 min |
Note: These numbers are CPU-only. GPU Spaces need their own placeholder Deployment requesting nvidia.com/gpu with the GPU image pre-pulled. Otherwise, GPU nodes stay cold, and at roughly 10 GB the GPU image costs far more to pull than the 3.5 GB CPU image.
Note: Each warm node holds one EC2 instance in the Running state. For on-demand nodes, this is an extra cost of keeping the warm nodes up and running.
For more information about installing the HyperPod Spaces add-on and getting started, see the AWS documentation.
Pricing
Configuring the SageMaker Spaces add-on doesn’t incur additional charges. You pay for the underlying HyperPod cluster compute consumed by your Spaces, and a per-hour charge for the AWS Systems Manager Advanced On-Premises Instance used for SSH-over-SSM remote connectivity. See AWS Systems Manager pricing for details.
If you use the over-provisioning described earlier, note that there’s an added cost for warm nodes. Depending on the instance type and size, these nodes stay in the running state waiting to provision Spaces.
Conclusion
Managing HyperPod Spaces with SageMaker Studio bridges the gap between data scientists and high-performance compute infrastructure. Teams can now go from cluster access to a running JupyterLab or Code Editor environment in minutes, without needing to learn CLI tools or Kubernetes concepts. Combined with features like HyperPod Task Governance, fractional GPU support, and idle shutdown, organizations can provide self-service access to shared clusters while maintaining cost control and resource fairness.
To get started, navigate to your HyperPod EKS cluster in the SageMaker AI console and select the IDE and Notebooks tab. For more information, see the SageMaker HyperPod Spaces documentation.
About the authors
 Shared by: AWS Machine Learning
October 6, 2026
Shared by: AWS Machine Learning
October 6, 2026
Leave a Reply