
Generate unique images by fine-tuning Stable Diffusion XL with Amazon SageMaker
Stable Diffusion XL by Stability AI is a high-quality text-to-image deep learning model that allows you to generate professional-looking images in various styles. Managed versions of Stable Diffusion XL are already available to you on Amazon SageMaker JumpStart (see Use Stable Diffusion XL with Amazon SageMaker JumpStart in Amazon SageMaker Studio) and Amazon Bedrock (see Stable Diffusion XL in Amazon Bedrock), allowing you to produce creative content in minutes. The base version of Stable Diffusion XL 1.0 assists with the creative process using generic subjects in the image, which enables use cases such as game character design, creative concept generation, film storyboarding, and image upscaling. However, for use cases that require generating images with a unique subject, you can fine-tune Stable Diffusion XL with a custom dataset by using a custom training container with Amazon SageMaker. With this personalized image generation model, you can incorporate your custom subject into the powerful image generation process that is provided by the Stable Diffusion XL base model.
In this post, we provide step-by-step instructions to create a custom, fine-tuned Stable Diffusion XL model using SageMaker to generate unique images. This automated solution helps you get started quickly by providing all the code and configuration necessary to generate your unique images—all you need is images of your subject. This is useful for use cases across various domains such as media and entertainment, games, and retail. Examples include using your custom subject for marketing material for film, character creation for games, and brand-specific images for retail. To explore more AI use cases, visit the AI Use Case Explorer.
Solution overview
The solution is composed of three logical parts:
- The first part creates a Docker container image with the necessary framework and configuration for the training container.
- The second part uses the training container to perform model training on your dataset, and outputs a fine-tuned custom Low-Rank Adaptation (LoRA) model. LoRA is an efficient fine-tuning method that doesn’t require adjusting the base model parameters. Instead, it adds a smaller number of parameters that are applied to the base model temporarily.
- The third part takes the fine-tuned custom model and allows you to generate creative and unique images.
The following diagram illustrates the solution architecture.
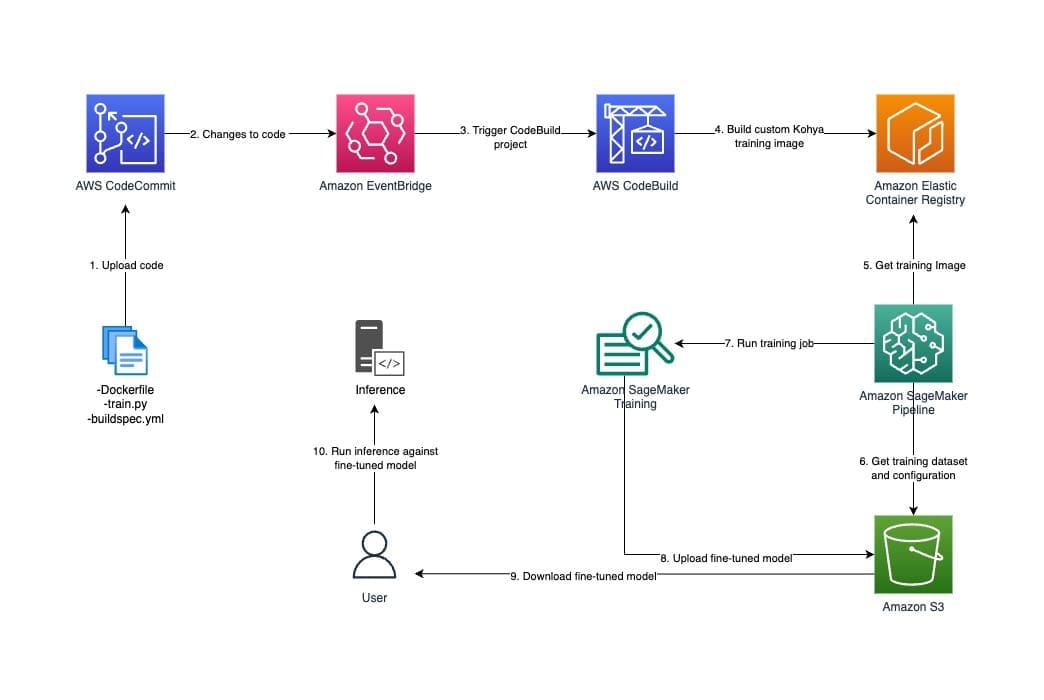
The workflow to create the training container consists of the following services:
- SageMaker uses Docker containers throughout the ML lifecycle. SageMaker is flexible and allows you to bring your own container to use for model development, training, and inference. For this post, we build a custom container with the appropriate dependencies that will perform the fine-tuning.
- Kohya SS is a framework that allows you to train Stable Diffusion models. Kohya SS works with different host environments. This solution uses the Docker on Linux environment option. Kohya SS can be used with a GUI. However, this solution uses the equivalent GUI parameters as a pre-configured TOML file to automate the entire Stable Diffusion XL fine-tuning process.
- AWS CodeCommit is a fully managed source control service that hosts private Git repositories. We use CodeCommit to store the code that is necessary to build the training container (Dockerfile, buildspec.yml), and the training script (
train.py) that is invoked when model training is initiated. - Amazon EventBridge is a serverless event bus, used to receive, filter, and route events. EventBridge captures any changes to the CodeCommit repository files, and invokes a new Docker container image to be built.
- Amazon Elastic Container Registry (Amazon ECR) is a fully managed container hosting registry. We use it to store the custom training container image.
- AWS CodeBuild is a fully managed continuous integration service that compiles source code, runs tests, and produces deployable software packages. We use it to build the custom training container image. CodeBuild then pushes this image to Amazon ECR.
Various methods exist to fine-tune your model. Compared to methods that require training a new full model, the LoRA fine-tuning method doesn’t modify the original model. Instead, think of it as a layer on top of the base model. Not having to train and produce a full model for each subject has its advantages. This lowers the compute requirements for training, reduces the storage size of the models, and decreases the training time required, making the process more cost-effective at scale. In this post, we demonstrate how to create a LoRA model, based on the Stable Diffusion XL 1.0 base model, using your own subject.
The training workflow uses the following services and features:
- Amazon Simple Storage Service (Amazon S3) is a highly durable and scalable object store. Your custom dataset and configuration file will be uploaded to Amazon S3, and then retrieved by the custom Docker container to train on those images.
- Amazon SageMaker Model Training is a feature of SageMaker that allows you to standardize and manage your training jobs at scale, without the need to manage infrastructure. When the container starts up as part of a training job, the
train.pyfile is invoked. When the training process is complete, the output model that resides in the/opt/ml/modeldirectory is automatically uploaded to the S3 bucket specified in the training job configuration. - Amazon SageMaker Pipelines is a workflow orchestration service that allows you to automate ML processes, from data preprocessing to model monitoring. This allows you to initiate a training pipeline, taking in as input the Amazon S3 location of your dataset and configuration file, ECR container image, and infrastructure specifications for the training job.
Now you’re ready to prompt your fine-tuned model to generate unique images. SageMaker gives you the flexibility to bring your own container for inference. You can use SageMaker hosting services with your own custom inference container to configure an inference endpoint. However, to demonstrate the Automatic1111 Stable Diffusion UI, we show you how to run inference on an Amazon Elastic Compute Cloud (Amazon EC2) instance (or locally on your own machine).
This solution fully automates the creation of a fine-tuned LoRA model with Stable Diffusion XL 1.0 as the base model. In the following sections, we discuss how to satisfy the prerequisites, download the code, and use the Jupyter notebook in the GitHub repository to deploy the automated solution using an Amazon SageMaker Studio environment.
The code for this end-to-end solution is available in the GitHub repository.
Prerequisites
This solution has been tested in the AWS Region us-west-2, but applies to any Region where these services are available. Make sure you have the following prerequisites:
Download the necessary code in SageMaker Studio
In this section, we walk through the steps to download the necessary code in SageMaker Studio and set up your notebook.
Navigate to the terminal in SageMaker Studio JupyterLab
Complete the following steps to open the terminal:
- Log in to your AWS account and open the SageMaker Studio console.
- Select your user profile and choose Open Studio to open SageMaker Studio.
- Choose JupyterLab to open the JupyterLab application. This environment is where you will run the commands.
- If you already have a space created, choose Run to open the space.
- If you don’t have a space, choose Create JupyterLab space. Enter a name for the space and choose Create space. Leave the default values and choose Run space.
- When the environment shows a status of Running, choose Open JupyterLab to open the new space.
- In the JupyterLab Launcher window, choose Terminal.
Download the code to your SageMaker Studio environment
Run the following commands from the terminal. For this post, you check out just the required directories of the GitHub repo (so you don’t have to download the entire repository).
If successful, you should see the output Your branch is up to date with 'origin/main'.
Open the notebook in SageMaker Studio JupyterLab
Complete the following steps to open the notebook:
- In JupyterLab, choose File Browser in the navigation pane.
- Navigate to the project directory named
amazon-sagemaker-examples/use-cases/text-to-image-fine-tuning. - Open the Jupyter notebook named
kohya-ss-fine-tuning.ipynb. - Choose your runtime kernel (it’s set to use Python 3 by default).
- Choose Select.
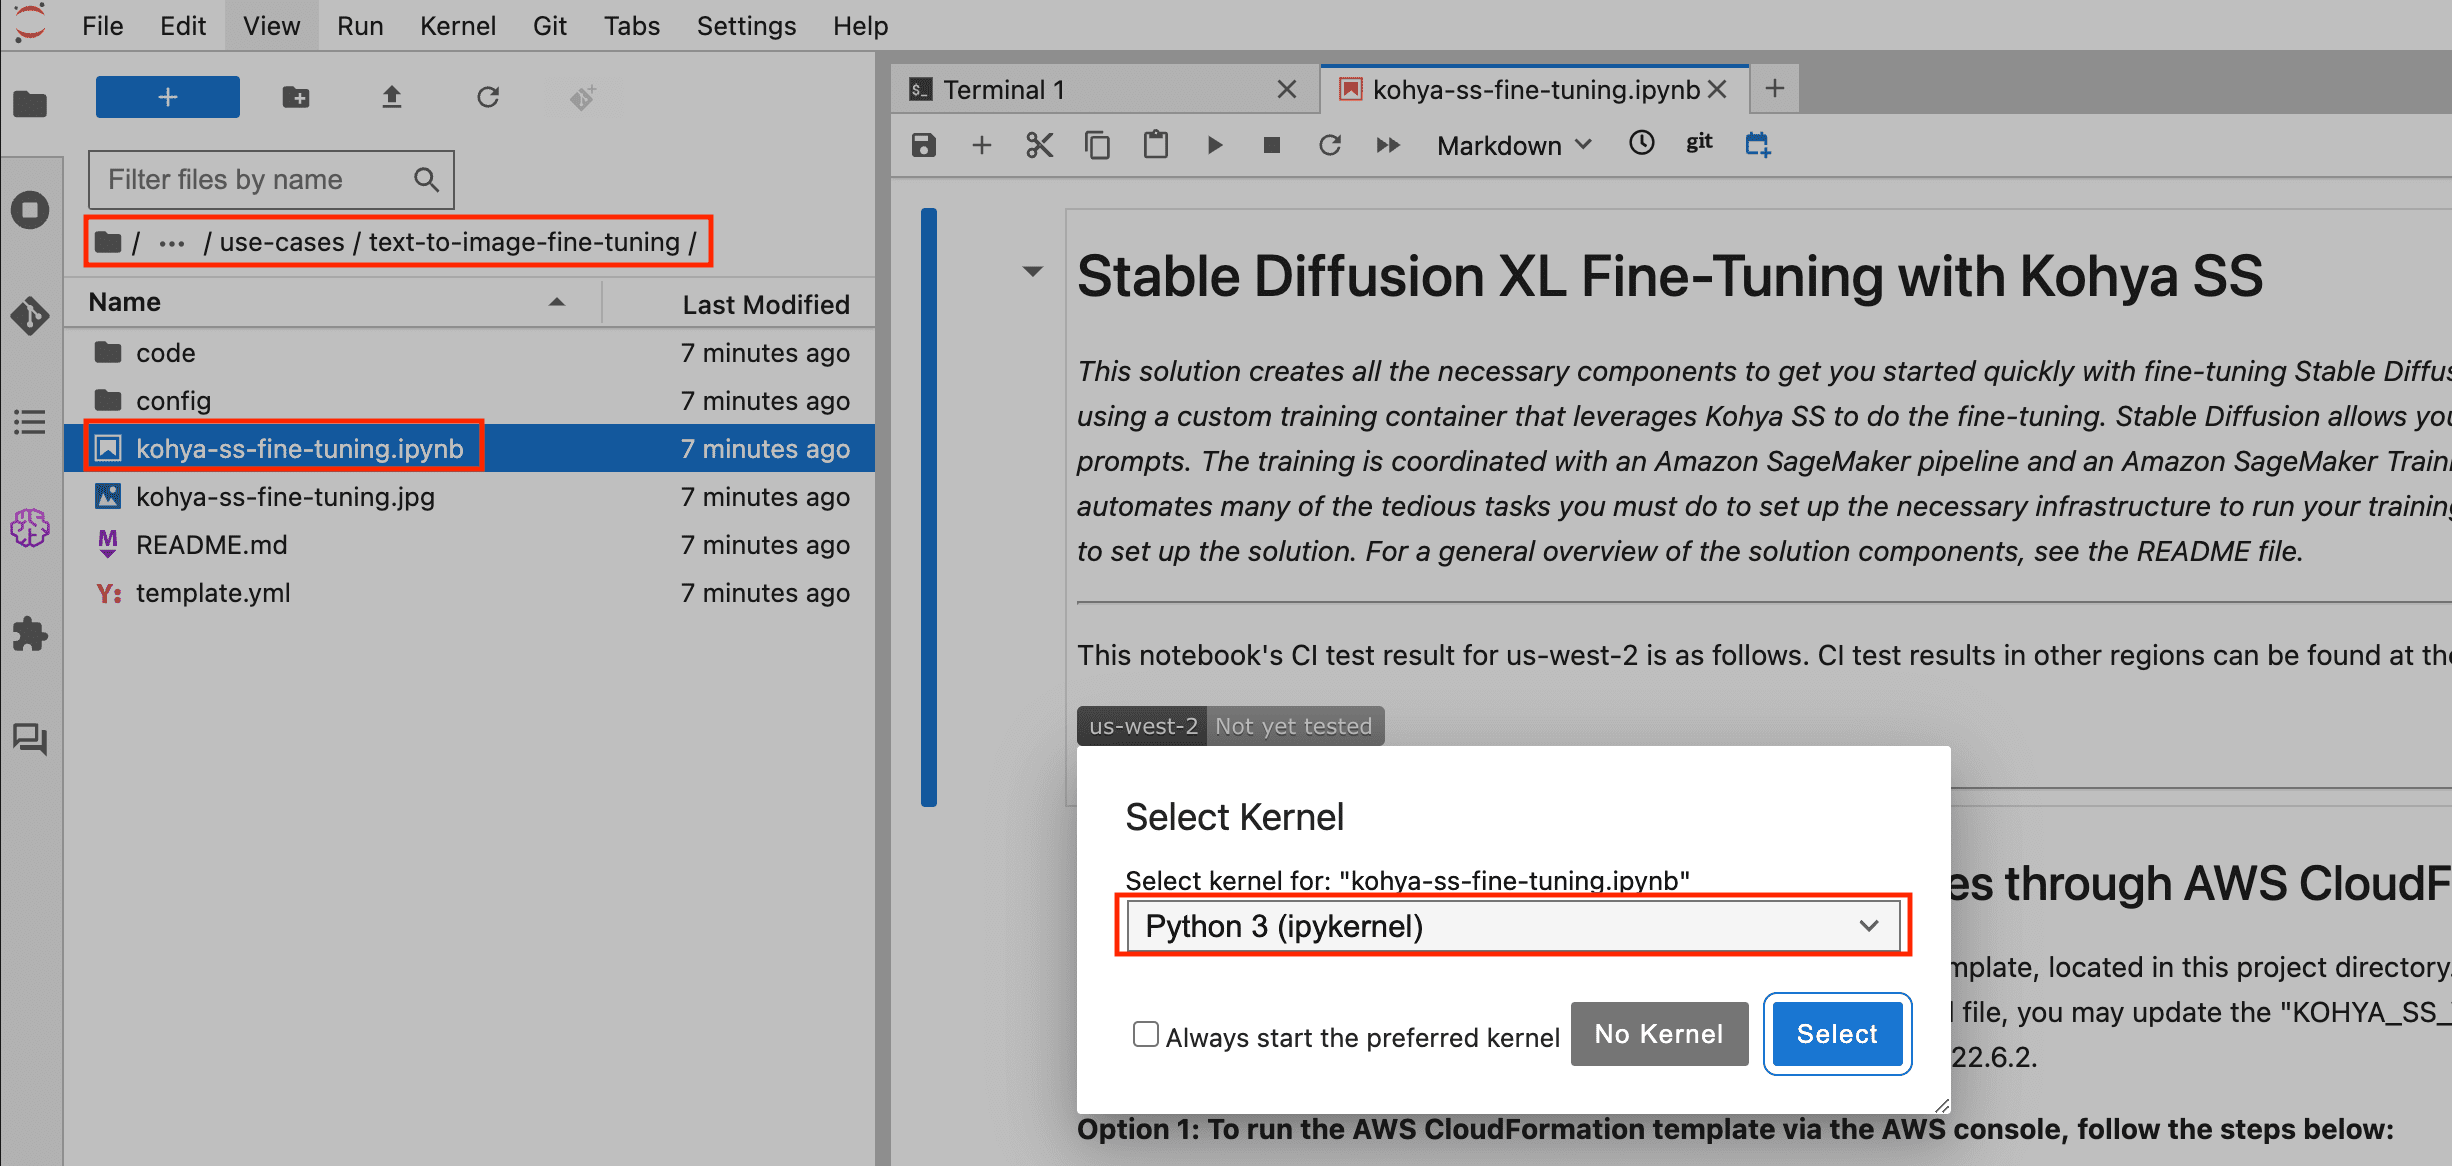
You now have a kernel that is ready to run commands. In the following steps, we use this notebook to create the necessary resources.
Train a custom Stable Diffusion XL model
In this section, we walk through the steps to train a custom Stable Diffusion XL model.
Set up AWS infrastructure with AWS CloudFormation
For your convenience, an AWS CloudFormation template has been provided to create the necessary AWS resources. Before you create the resources, configure AWS Identity and Access Management (IAM) permissions for your SageMaker IAM role. This role is used by the SageMaker environment, and grants permissions to run certain actions. As with all permissions, make sure you follow the best practice of only granting the permissions necessary to perform your tasks.
- On the IAM console, choose Roles in the navigation pane.
- Choose the role named
AmazonSageMaker-ExecutionRole-. This should be the role that is assigned to your domain. - In the Permissions policies section, choose the policy named
AmazonSageMaker-ExecutionPolicy-. - Choose Edit to edit the customer managed policy.
- Add the following permissions to the policy, then choose Next.
- Choose Save changes to confirm your added permissions.
You now have the proper permissions to run commands in your SageMaker environment.
- Navigate back to your notebook named
kohya-ss-fine-tuning.ipynbin your JupyterLab environment. - In the notebook step labeled Step One – Create the necessary resources through AWS CloudFormation, run the code cell to create the CloudFormation stack.
Wait for the CloudFormation stack to finish creating before moving on. You can monitor the status of the stack creation on the AWS CloudFormation console. This step should take about 2 minutes.
Set up your custom images and fine-tuning configuration file
In this section, you first upload your fine-tuning configuration file to Amazon S3. The configuration file is specific to the Kohya program. Its purpose is to specify the configuration settings programmatically rather than manually using the Kohya GUI.
This file is provided with opinionated values. You can modify the configuration file with different values if desired. For information about what the parameters mean, refer to LoRA training parameters. You will need to experiment to achieve the desired result. Some parameters rely on underlying hardware and GPU (for example, mixed_precision=bf16 or xformers). Make sure your training instance has the proper hardware configuration to support the parameters you select.
You also need to upload a set of images to Amazon S3. If you don’t have your own dataset and decide to use images from public sources, make sure to adhere to copyright and license restrictions.
The structure of the S3 bucket is as follows:
bucket/0001-dataset/kohya-sdxl-config.toml
bucket/0001-dataset/ (images and caption files go here)
bucket/0002-dataset/kohya-sdxl-config.toml
bucket/0002-dataset/ (images and captions files go here)
...
The asset-folder-name uses a special naming convention, which is defined later in this post. Each xxxx-dataset prefix can contain separate datasets with different config file contents. Each pipeline takes a single dataset as input. The config file and asset folder will be downloaded by the SageMaker training job during the training step.
Complete the following steps:
- Navigate back to your notebook named
kohya-ss-fine-tuning.ipynbin your JupyterLab environment. - In the Notebook step labeled Step Two – Upload the fine-tuning configuration file, run the code cell to upload the config file to Amazon S3.
- Verify that you have an S3 bucket named
sagemaker-kohya-ss-fine-tuning-, with a0001-datasetprefix containing thekohya-sdxl-config.tomlfile.
Next, you create an asset folder and upload your custom images and caption files to Amazon S3. The asset-folder-name must be named according to the required naming convention. This naming convention is what defines the number of repetitions and the trigger word for the prompt. The trigger word is what identifies your custom subject. For example, a folder name of 60_dwjz signifies 60 repetitions with the trigger prompt word dwjz. Consider using initials or abbreviations of your subject for the trigger word so it doesn’t collide with existing words. For example, if your subject is a tiger, you could use the trigger word tgr. More repetitions don’t always translate to better results. Experiment to achieve your desired result.
- On the S3 console, navigate to the bucket named
sagemaker-kohya-ss-fine-tuning-. - Choose the prefix named
0001-dataset. - Choose Create folder.
- Enter a folder name for your assets using the naming convention (for example,
60_dwjz) and choose Create folder. - Choose the prefix. This is where your images and caption files go.
- Choose Upload.
- Choose Add files, choose your image files, then choose Upload.
When selecting images to use, favor quality over quantity. Some preprocessing of your image assets might be beneficial, such as cropping a person if you are fine-tuning a human subject. For this example, we used approximately 30 images for a human subject with great results. Most of them were high resolution, and cropped to include the human subject only—head and shoulders, half body, and full body images were included but not required.
Optionally, you can use caption files to assist your model in understanding your prompts better. Caption files have the .caption extension, and its contents describe the image (for example, dwjz wearing a vest and sunglasses, serious facial expression, headshot, 50mm). The image file names should match the corresponding (optional) caption file names. Caption files are highly encouraged. Upload your caption files to the same prefix as your images.
At the end of your upload, your S3 prefix structure should look similar to the following:
bucket/0001-dataset/kohya-sdxl-config.toml
bucket/0001-dataset/60_dwjz/
bucket/0001-dataset/60_dwjz/1.jpg
bucket/0001-dataset/60_dwjz/1.caption
bucket/0001-dataset/60_dwjz/2.jpg
bucket/0001-dataset/60_dwjz/2.caption
...
There are many variables to fine-tuning, and as of this writing there are no definitive recommendations for generating great results. To achieve good results, include enough steps in the training, good resolution assets, and enough images.
Set up the required code
The code required for this solution is provided and will be uploaded to the CodeCommit repository that was created by the CloudFormation template. This code is used to build the custom training container. Any updates to the code in this repository will invoke the container image to be built and pushed to Amazon ECR through an EventBridge rule.
The code consists of the following components:
- buildspec.yml – Creates the container image by using the GitHub repository for Kohya SS, and pushes the training image to Amazon ECR
- Dockerfile – Used to override the Dockerfile in the Kohya SS project, which is slightly modified to be used with SageMaker training
- train.py – Initiates the Kohya SS program to do the fine-tuning, and is invoked when the SageMaker training job runs
Complete the following steps to create the training container image:
- Navigate back to your notebook named
kohya-ss-fine-tuning.ipynbin your JupyterLab environment. - In the step labeled Step Three – Upload the necessary code to the AWS CodeCommit repository, run the code cell to upload the required code to the CodeCommit repository.
This event will initiate the process that creates the training container image and uploads the image to Amazon ECR.
- On the CodeBuild console, locate the project named
kohya-ss-fine-tuning-build-container.
Latest build status should display as In progress. Wait for the build to finish and the status to change to Succeeded. The build takes about 15 minutes.
A new training container image is now available in Amazon ECR. Every time you make a change to the code in the CodeCommit repository, a new container image will be created.
Initiate the model training
Now that you have a training container image, you can use SageMaker Pipelines with a training step to train your model. SageMaker Pipelines enables you to build powerful multi-step pipelines. There are many step types provided for you to extend and orchestrate your workflows, allowing you to evaluate models, register models, consider conditional logic, run custom code, and more. The following steps are used in this pipeline:
- Condition step – Evaluate input parameters. If successful, proceed with the training step. If not successful, proceed with the fail step. This step validates that the training volume size is at least 50 GB. You could extend this logic to only allow specific instance types, to only allow specific training containers, and add other guardrails if applicable.
- Training Step – Run a SageMaker training job, given the input parameters.
- Fail step – Stop the pipeline and return an error message.
Complete the following steps to initiate model training:
- On the SageMaker Studio console, in the navigation pane, choose Pipelines.
- Choose the pipeline named
kohya-ss-fine-tuning-pipeline. - Choose Create to create a pipeline run.
- Enter a name, description (optional), and any desired parameter values.
- You can keep the default settings of using the
0001-datasetfor the input data and an ml.g5.8xlarge instance type for training. - Choose Create to invoke the pipeline.

- Choose the current pipeline run to view its details.
- In the graph, choose the pipeline step named TrainNewFineTunedModel to access the pipeline run information.
The Details tab displays metadata, logs, and the associated training job. The Overview tab displays the output model location in Amazon S3 when training is complete (note this Amazon S3 location for use in later steps). SageMaker processes the training output by uploading the model in the /opt/ml/model directory of the training container to Amazon S3, in the location specified by the training job.
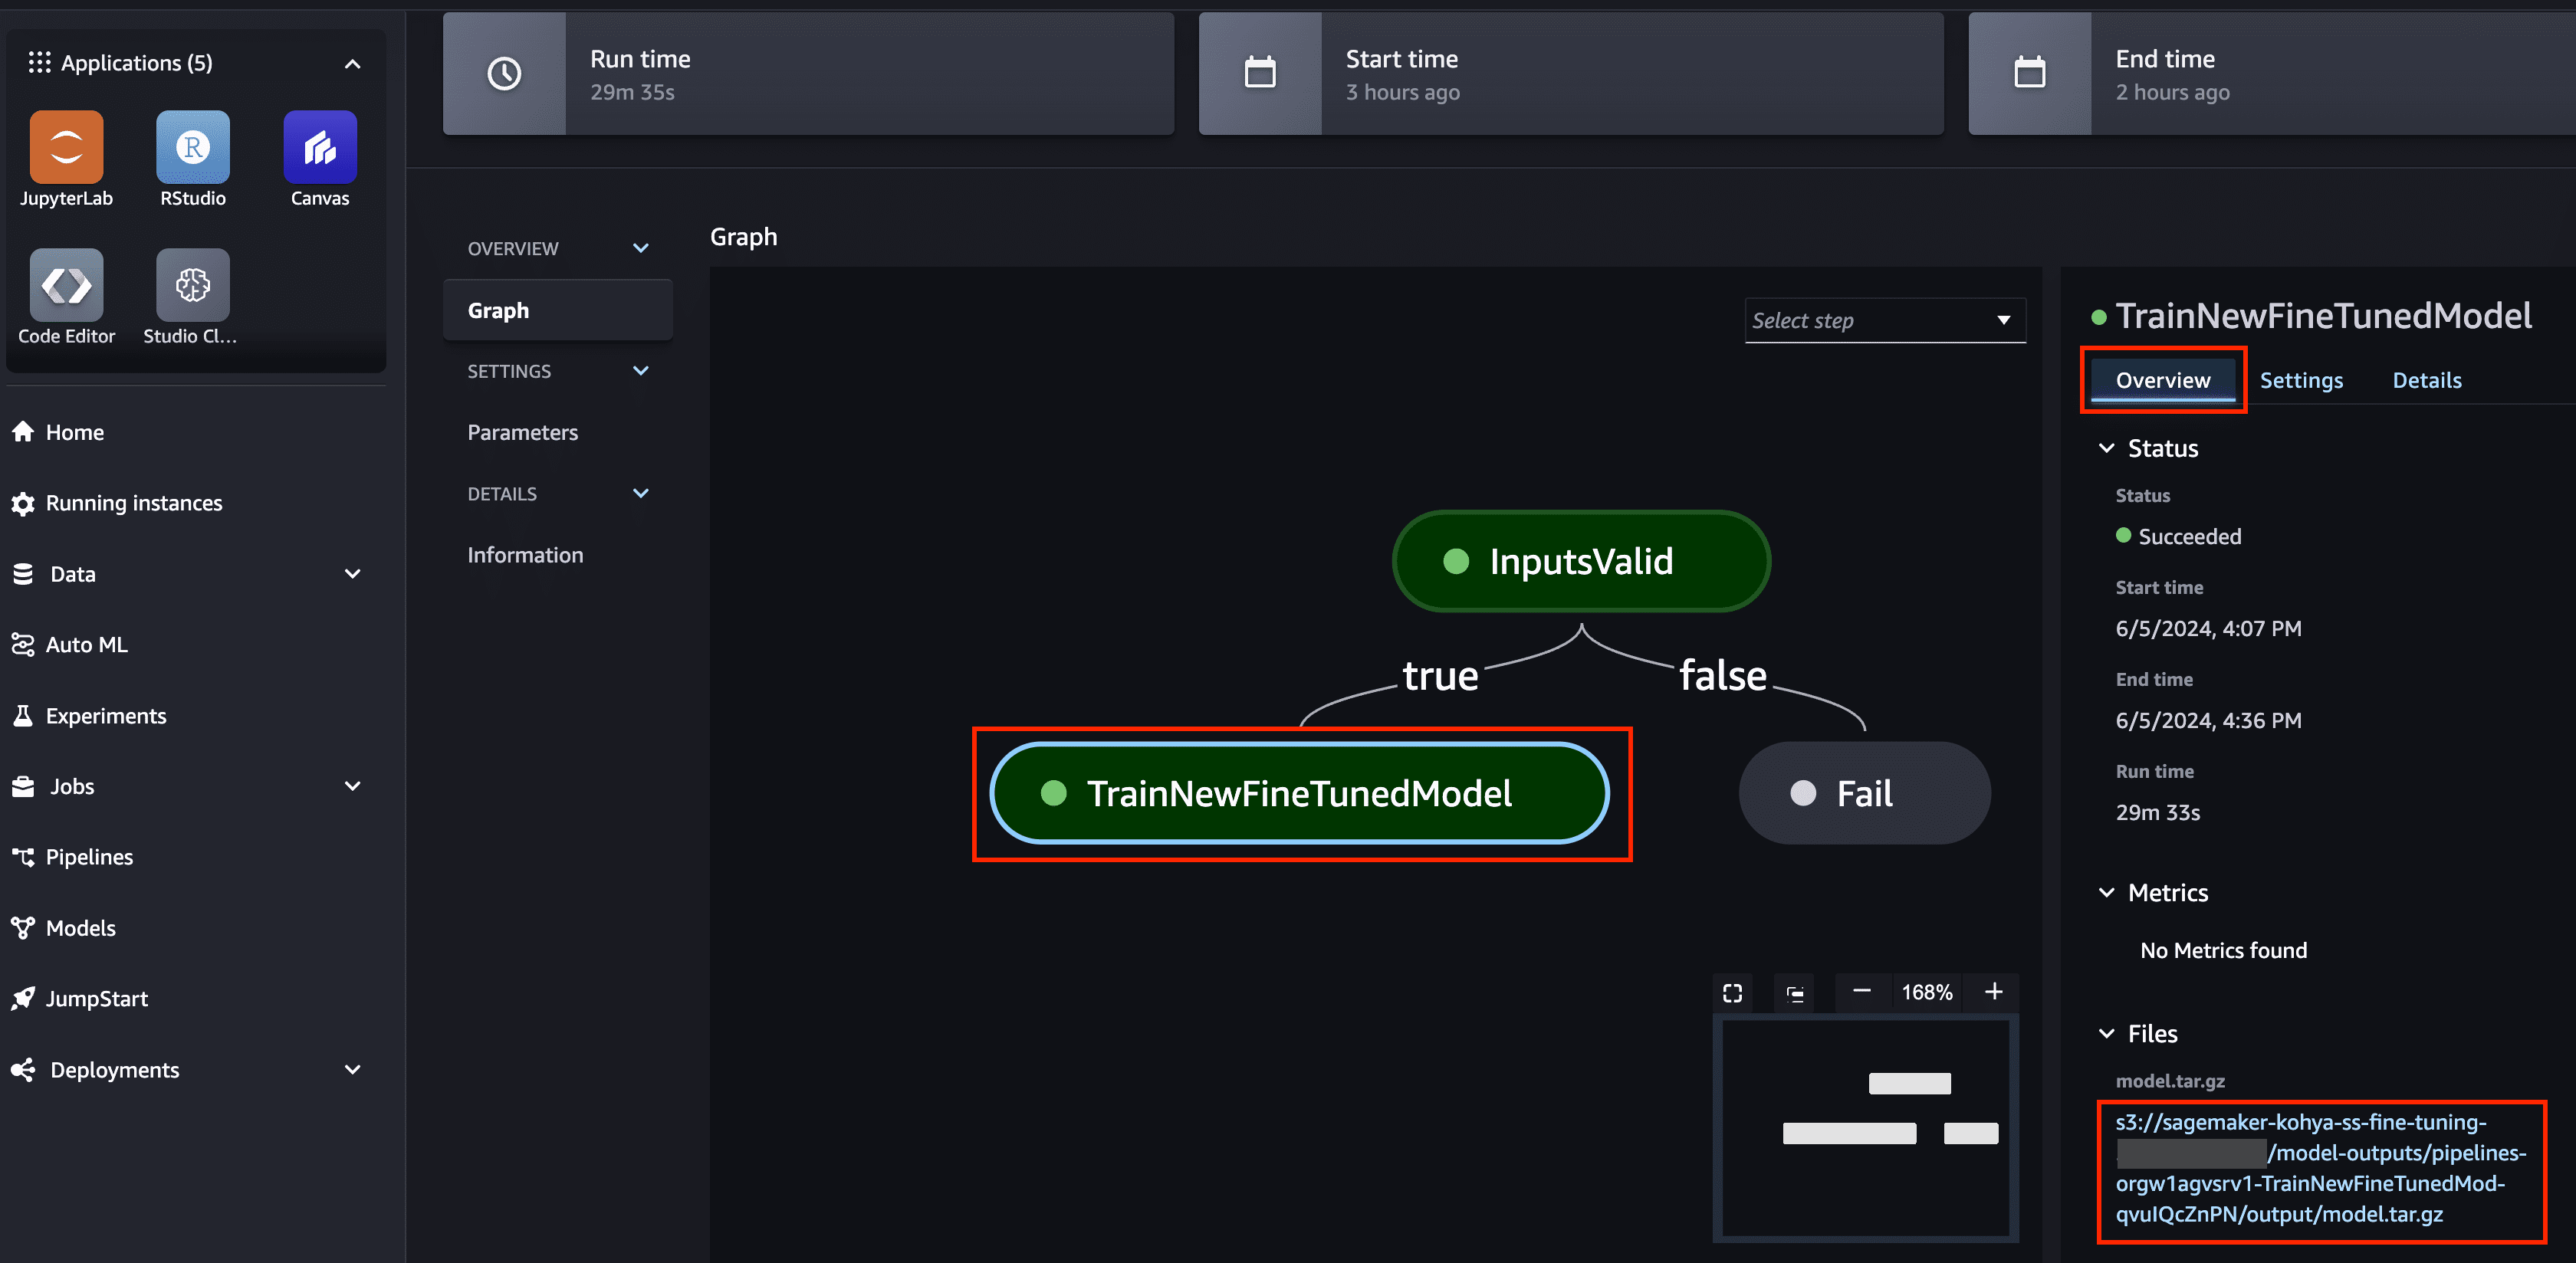
Wait for the pipeline status to show as Succeeded before proceeding to the next step.
Run inference on a custom Stable Diffusion XL model
There are many options for model hosting. For this post, we demonstrate how to run inference with Automatic1111 Stable Diffusion web UI running on an EC2 instance. This tool enables you to use various image generation features through a user interface. It’s a straightforward way to learn the parameters available in a visual format and experiment with supplementary features. For this reason, we demonstrate using this tool as part of this post. However, you can also use SageMaker to host an inference endpoint, and you have the option to use your own custom inference container.
Install the Automatic1111 Stable Diffusion web UI on Amazon EC2
Complete the following steps to install the web UI:
- Create an EC2 Windows instance and connect to it. For instructions, see Get started with Amazon EC2.
- Choose Windows Server 2022 Base Amazon Machine Image, a g5.8xlarge instance type, a key pair, and 100 GiB of storage. Alternatively, you can use your local machine.
- Install NVIDIA drivers to enable the GPU. This solution has been tested with the Data Center Driver for Windows version 551.78.
- Install the Automatic1111 Stable Diffusion web UI using the instructions in the Automatic Installation on Windows section in the GitHub repo. This solution has been tested with version 1.9.3. The last step of installation will ask you to run
webui-user.bat, which will install and launch the Stable Diffusion UI in a web browser.
- Download the Stable Diffusion XL 1.0 Base model from Hugging Face.
- Move the downloaded file
sd_xl_base_1.0.safetensorsto the directory../stable-diffusion-webui/models/Stable-diffusion/. - Scroll to the bottom of the page and choose Reload UI.
- Choose
sd_xl_base_1.0.safetensorson the Stable Diffusion checkpoint dropdown menu. - Adjust the default Width and Height values to 1024 x 1024 for better results.
- Experiment with the remaining parameters to achieve your desired result. Specifically, try adjusting the settings for Sampling method, Sampling steps, CFG Scale, and Seed.
The input prompt is extremely important to achieve great results. You can add extensions to assist with your creative workflow. This style selector extension is great at supplementing prompts.
- To install this extension, navigate to the Extensions tab, choose Install from URL, enter the style selector extension URL, and choose Install.
- Reload the UI for changes to take effect.
You will notice a new section called SDXL Styles, which you can select from to add to your prompts.
- Download the fine-tuned model that was created by the SageMaker pipeline training step.
The model is stored in Amazon S3 with the file name model.tar.gz.
- You can use the Share with a presigned URL option to share as well.

- Unzip the contents of the
model.tar.gzfile (twice) and copy thecustom_lora_model.safetensorsLoRA model file to the directory../stable-diffusion-webui/models/Lora. - Choose the Refresh icon on the Lora tab to verify that your
custom_lora_modelis available.
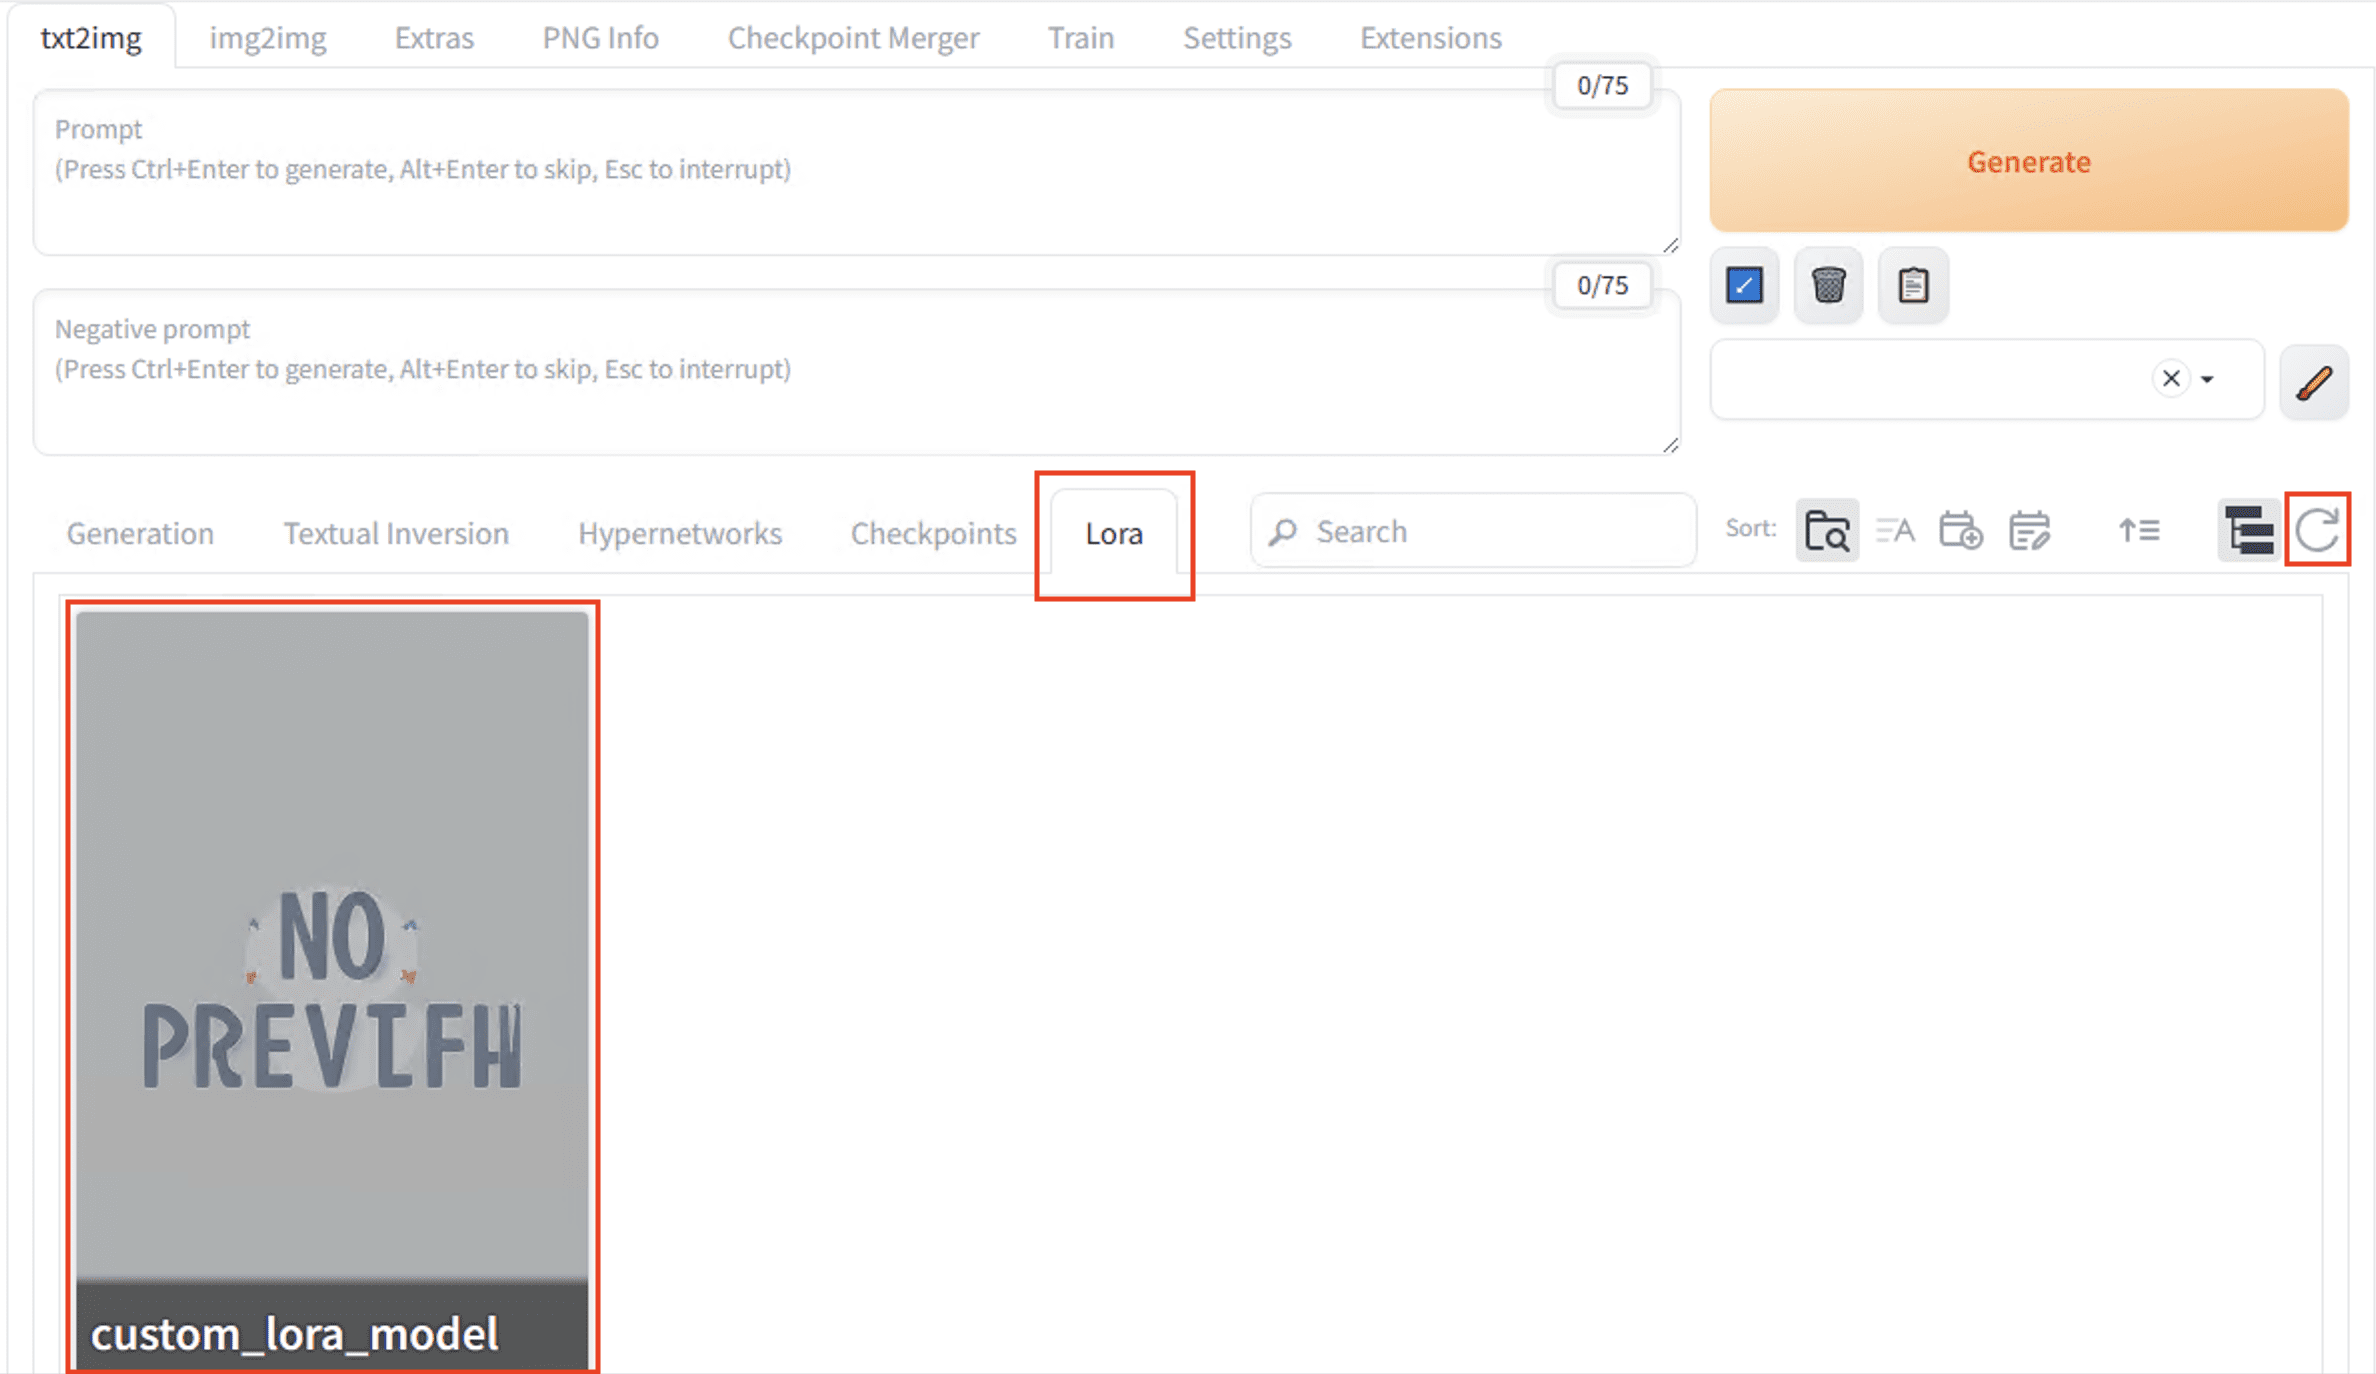
- Choose
custom_lora_model, and it will populate the prompt input box with the text - Append a prompt to the text (see examples in the next section).
- You can decrease or increase the multiplier of your LoRA model by changing the
1value. This adjusts the influence of your LoRA model accordingly. - Choose Generate to run inference against your fine-tuned LoRA model.
Example results
These results are from a fine-tuned model trained on 39 high-resolution images of the author, using the provided code and configuration files in this solution. Caption files were written for each of these images, using the trigger word aallzz.
 |
Prompt: concept art Negative Prompt: photo, photorealistic, realism, anime, abstract, glitch Sampler: DPM2 Sampling Steps: 90 CFG Scale: 8.5 Width/Height: 1024×1024 |
 |
Prompt: cinematic film still Negative Prompt: anime, cartoon, graphic, painting, graphite, abstract, glitch, mutated, disfigured Sampler: DPM2 Sampling Steps: 70 CFG Scale: 8 Width/Height: 1024×1024 |
 |
Prompt: concept art Negative Prompt: photo, photorealistic, realism, glitch, mutated, disfigured, glasses Sampler: DPM2 Sampling Steps: 100 CFG Scale: 9 Width/Height: 1024×1024 |
 |
Prompt: concept art Negative Prompt: photo, photorealistic, realism, glitch, mutated, disfigured, glasses, hat Sampler: DPM2 Sampling Steps: 100 CFG Scale: 10 Width/Height: 1024×1024 |
 |
Prompt: cinematic photo Negative Prompt: drawing, painting, crayon, sketch, graphite, impressionist, noisy, blurry, soft, deformed, glitch, mutated, disfigured, glasses, hat Sampler: DPM2 Sampling Steps: 100 CFG Scale: 9.5 Width/Height: 1024×1024 |
Clean up
To avoid incurring charges, delete the resources you created as part of this solution:
- Delete the objects in your S3 bucket. You must delete the objects before deleting the stack.
- Delete your container image in Amazon ECR. You must delete the image before deleting the stack.
- On the AWS CloudFormation console, delete the stack named
kohya-ss-fine-tuning-stack. - If you created an EC2 instance for running inference, stop or delete the instance.
- Stop or delete your SageMaker Studio instances, applications, and spaces.
Conclusion
Congratulations! You have successfully fine-tuned a custom LoRA model to be used with Stable Diffusion XL 1.0. We created a custom training Docker container, fine-tuned a custom LoRA model to be used with Stable Diffusion XL, and used the resulting model to generate creative and unique images. The end-to-end training solution was fully automated with a CloudFormation template to help you get started quickly. Now, try creating a custom model with your own subject. To explore more AI use cases, visit the AI Use Case Explorer.
About the Author
 Alen Zograbyan is a Sr. Solutions Architect at Amazon Web Services. He currently serves media and entertainment customers, and has expertise in software engineering, DevOps, security, and AI/ML. He has a deep passion for learning, teaching, and photography.
Leave a Reply