
Building automations to accelerate remediation of AWS Security Hub control findings using Amazon Bedrock and AWS Systems Manager
Several factors can make remediating security findings challenging. First, the sheer volume and complexity of findings can overwhelm security teams, leading to delays in addressing critical issues. Findings often require a deep understanding of AWS services and configurations and require many cycles for validation, making it more difficult for less experienced teams to remediate issues effectively. Some findings might require coordination across multiple teams or departments, leading to communication challenges and delays in implementing fixes. Finally, the dynamic nature of cloud environments means that new security findings can appear rapidly and constantly, requiring a more effective and scalable solution to remediate findings.
In this post, we will harness the power of generative artificial intelligence (AI) and Amazon Bedrock to help organizations simplify and effectively manage remediations of AWS Security Hub control findings. By using Agents for Amazon Bedrock with action groups and Knowledge Bases for Amazon Bedrock, you can now create automations with AWS Systems Manager Automation (for services that support automations with AWS Systems Manager) and deploy them into AWS accounts. Thus, by following a programmatic continuous integration and development (CI/CD) approach, you can scale better and remediate security findings promptly.
Solution overview
This solution follows prescriptive guidance for automating remediation for AWS Security Hub standard findings. Before delving into the deployment, let’s review the key steps of the solution architecture, as shown in the following figure.
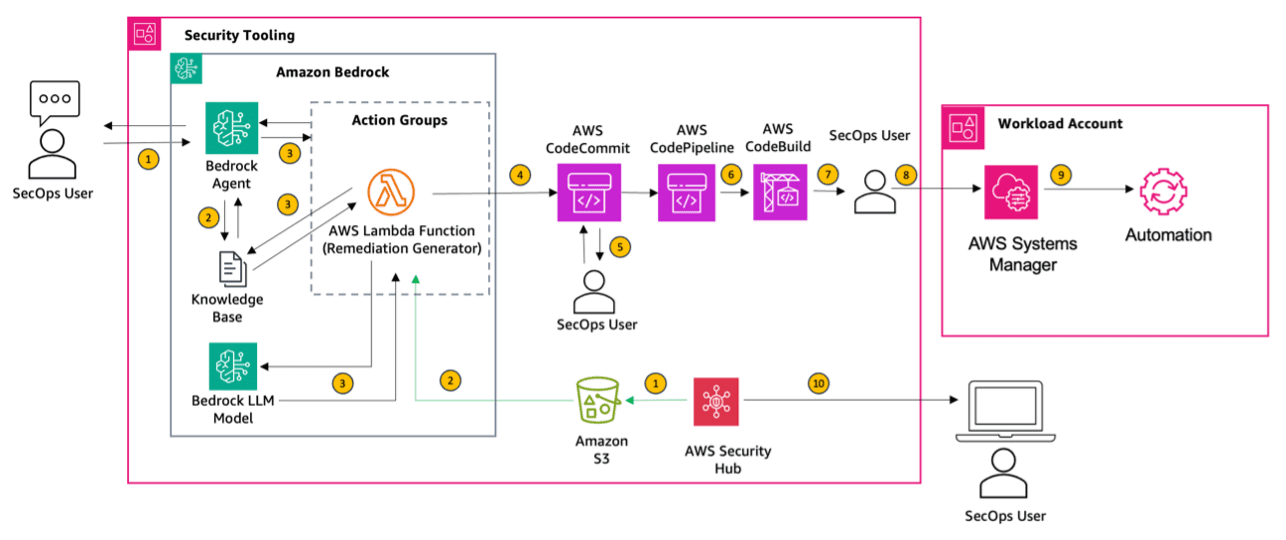
Figure 1 : AWS Security Hub control remediation using Amazon Bedrock and AWS Systems Manager
- A SecOps user uses the Agents for Amazon Bedrock chat console to enter their responses. For instance, they might specify “Generate an automation for remediating the finding, database migration service replication instances should not be public.” Optionally, if you’re already aggregating findings in Security Hub, you can export them to an Amazon Simple Storage Service (Amazon S3) bucket and still use our solution for remediation.
- On receiving the request, the agent invokes the large language model (LLM) with the provided context from a knowledge base. The knowledge base contains an Amazon S3 data source with AWS documentation. The data is converted into embeddings using the Amazon Titan Embeddings G1 model and stored in an Amazon OpenSearch vector database.
- Next, the agent passes the information to an action group that invokes an AWS Lambda function. The Lambda function is used to generate the Systems Manager automation document.
- The output from the Lambda function is published to a AWS CodeCommit repository.
- Next, the user validates the template file that is generated as an automation for a particular service. In this case, the user will navigate to the document management system (DMS) folder and validate the template file. Once the file has been validated, the user places the template file into a new deploy folder in the repo.
- This launches AWS CodePipeline to invoke a build job using AWS CodeBuild. Validation actions are run on the template.
- Amazon Simple Notification Service (Amazon SNS) notification is sent to the SecOps user to approve changes for deployment.
- Once changes are approved, the CloudFormation template is generated that creates an SSM automation document
- If an execution role is provided, via AWS CloudFormation stack set, SSM automation document is executed across specified workload accounts.
- If an execution role is not provided, SSM automation document is deployed only to the current account.
- SSM automation document is executed to remediate the finding.
- The user navigates to AWS Security Hub service via AWS management console and validates the compliance status of the control (For example, DMS.1).
In this post, we focus on remediation of two example security findings:
- Amazon S3 general purpose buckets should require requests to use SSL
- AWS Database Migration Service replication instances should not be public
The example findings demonstrate the two potential paths the actions group can take for remediation. It also showcases the capabilities of action groups with Retrieval Augmented Generation (RAG) and how you can use Knowledge Bases for Amazon Bedrock to automate security remediation.
For the first finding, AWS has an existing Systems Manager runbook to remediate the S3.5 finding. The solution uses the existing runbook (through a knowledge base) and renders an AWS CloudFormation template as automation.
The second finding has no AWS provided runbook or playbook. The solution will generate a CloudFormation template that creates an AWS Systems Manager document to remediate the finding.
Prerequisites
Below are the prerequisites that are needed before you can deploy the solution.
- An AWS account with the necessary permissions to access and configure the required services in a specific AWS Region (AWS Security Hub, Amazon S3, AWS CodeCommit, AWS CodePipeline, AWS CodeBuild, AWS Systems Manager, AWS Lambda, Amazon OpenSearch service).
- Access to Anthropic Claude 3 Sonnet LLM model granted in the AWS account.
- AWS Config is enabled in the account. Ensure that the configuration recorder is configured to record all resources in your AWS account.
- Security Hub is enabled in the account. Integrate other AWS security services, such as AWS Config to aggregate their findings in Security Hub.
- Understanding of general key terms:
Deployment steps
There are five main steps in order to deploy the solution.
Step 1: Configure a knowledge base
Configuring a knowledge base enables your Amazon Bedrock agents to access a repository of information for AWS account provisioning. Follow these steps to set up your knowledge base.
Prepare the data sources:
- Create an S3 bucket that will store the knowledge base data sources. Such as,
KnowledgeBaseDataSource-. - Define the data source. For this solution, we’re using three AWS documentation guides in PDF that covers all AWS provided automations through runbooks or playbooks. Upload files from the data-source folder in the Git repository to the newly created S3 bucket from previous step.
Create the knowledge base:
- Access the Amazon Bedrock console. Sign in and go directly to the Knowledge Base section.
- Name your knowledge base. Choose a clear and descriptive name that reflects the purpose of your knowledge base, such as
AWSAutomationRunbooksPlaybooks. - Select an AWS Identity and Access Management (IAM) role. Assign a preconfigured IAM role with the necessary permissions. It’s typically best to let Amazon Bedrock create this role for you to ensure it has the correct permissions.
- Choose the default embeddings model. The Amazon Titan Embeddings G1 is a text model that is preconfigured and ready to use, simplifying the process.
- Choose the Quick create a new vector store. Allow Amazon Bedrock to create and manage the vector store for you in OpenSearch Service.
- Review and finalize. Double-check all entered information for accuracy. Pay special attention to the S3 bucket URI and IAM role details.
Note: After successful creation, copy the knowledge base ID because you will need to reference it in the next step.
Sync the data source:
- Select the newly created knowledge base.
- In the Data source section, choose Sync to begin data ingestion.
- When data ingestion completes, a green success banner appears if it is successful.
Step 2: Configure the Amazon Bedrock agent
- Open the Amazon Bedrock console, select Agents in the left navigation panel, then choose Create Agent.
- Enter agent details including an agent name and description (optional).
- Under Agent resource role section, select Create and use a new service role. This IAM service role gives your agent access to required services, such as Lambda.
- In the Select model section, choose Anthropic and Claude 3 Sonnet.
- To automate remediation of Security Hub findings using Amazon Bedrock agents, attach the following instruction to the agent:
“You are an AWS security expert, tasked to help customer remediate security related findings.Inform the customer what your objective is. Gather relevant information such as finding ID or finding title so that you can perform your task. With the information given, you will attempt to find an automated remediation of the finding and provide it to the customer as IaC.” - Select the newly created agent and take note of the Agent ARN in the Agent Overview section. You will be required to input this as a parameter in the next step.
Step 3: Deploy the CDK project
- Download the CDK project repository containing the solution’s infrastructure code. You can find the code from GitHub repository.
- To work with a new project, create and activate a virtual environment. This allows the project’s dependencies to be installed locally in the project folder, instead of globally. Create a new virtual environment:
python -m venv .venv. Activate the environment: source.venv/bin/activate - Install dependencies from requirements.txt:
pip install -r requirements.txt - Before deploying the solution, you need to bootstrap your AWS environment for CDK. Run the following command to bootstrap your environment:
cdk bootstrap aws:/// - Navigate to the downloaded CDK project directory and open the
cdk.jsonfile. Update the following parameters in the file:KB_ID:Provide the ID of the Amazon Bedrock knowledge base you set up manually in the prerequisites.BEDROCK_AGENT_ARN:The Amazon Bedrock agent Amazon Resource Name (ARN) that was created in Step 2.NOTIFICATION_EMAILS:Enter an email address for pipeline approval notifications.CFN_EXEC_ROLE_NAME:(Optional) IAM role that will be used by CloudFormation to deploy templates into the workload accounts.WORKLOAD_ACCOUNTS:(Optional) Specify a space-separated list of AWS account IDs where the CloudFormation templates will be deployed.“.”
- Run the following command to synthesize the CDK app and generate the CloudFormation template:
cdk synth - Finally, deploy the solution to your AWS environment using the following command:
cdk deploy --all. This command will deploy all the necessary resources, including the Lambda function, the CodeCommit repository, the CodePipeline, and the Amazon SNS notification. - After the deployment is complete, verify that all the resources were created successfully. You can check the outputs of the CDK deployment to find the necessary information, such as the CodeCommit repository URL, Lambda function name, and the Amazon SNS topic ARN.
Step 4: Configure the agent action groups
Create an action group linked to the Lambda function that was created in the CDK app. This action group is launched by the agent after the user inputs the Security Hub finding ID or finding title, and outputs a CloudFormation template in the Code Commit repository.
Step 5: Add the action groups to the agent
- Enter
securityhubremediationas the Action group name andSecurity Hub Remediationsas the Description. - Under Action group type, select Define with API schemas.
- For Action group invocation, choose Select an existing Lambda function.
- From the dropdown, select the Lambda function that was created in Step 3.
- In Action group schema, choose Select an existing API schema. Provide a link to the Amazon S3 URI of the schema with the API description, structure, and parameters for the action group. APIs manage the logic for receiving user inputs and launching the Lambda functions for account creation and customization. For more information, see Action group OpenAPI schemas.
Note: For this solution, openapischema.json is provided to you in the Git repository. Upload the JSON into the S3 bucket created in Step 1 and reference the S3 URI when selecting the API schema in this step.
Testing
In order to validate the solution, follow the below steps :
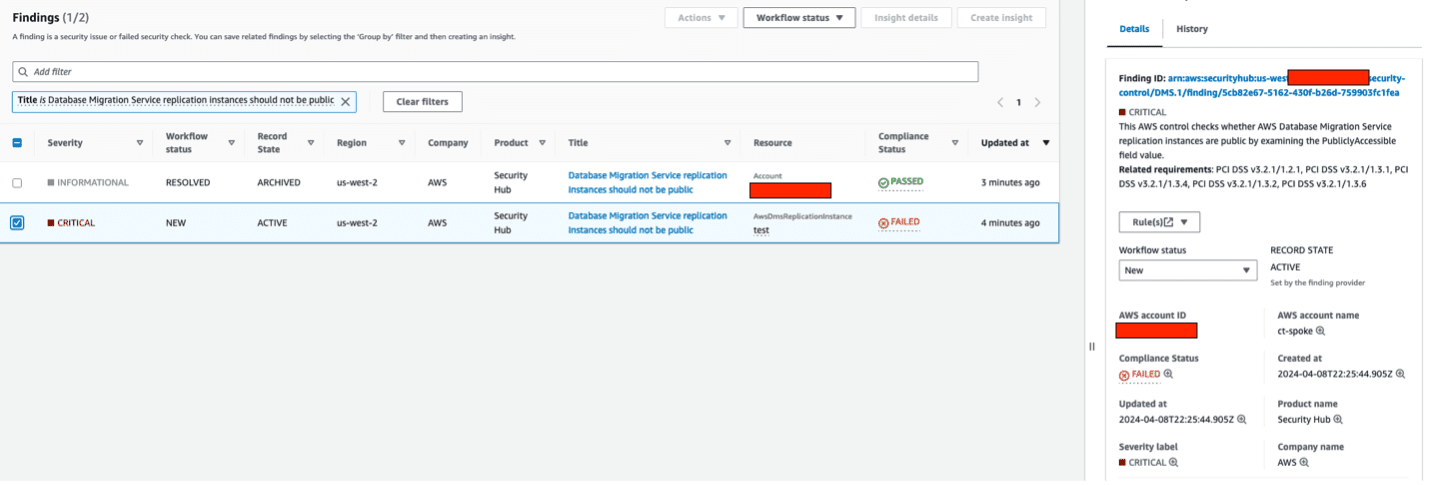
Step 1: Sign in to AWS Security Hub console.
- Select a Security Hub Finding.
- For testing the solution, look for a finding that has a status of FAILED.
- Copy the finding title – ” Database Migration Service replication instance should not be public”. This is shown in Figure 2.

Figure 2 : AWS Security Hub finding title
Step 2: Sign in to the Amazon Bedrock console.
- Select the agent.
- As you begin to interact with the agent, it will ask you for a Security Hub finding title to remediate.
- Enter a Security Hub finding title. For example, “Database migration service replication instances should not be public”.
- Review the resulting CloudFormation template published to the CodeCommit repository provisioned as part of the deployment.
If a finding already has an AWS remediation runbook available, the agent will output its details. That is, it will not create a new runbook. When automation through a Systems Manager runbook isn’t possible, the agent will output a message similar to “Unable to automate remediation for this finding.” An example Bedrock Agent interaction is shown in Figure 3.
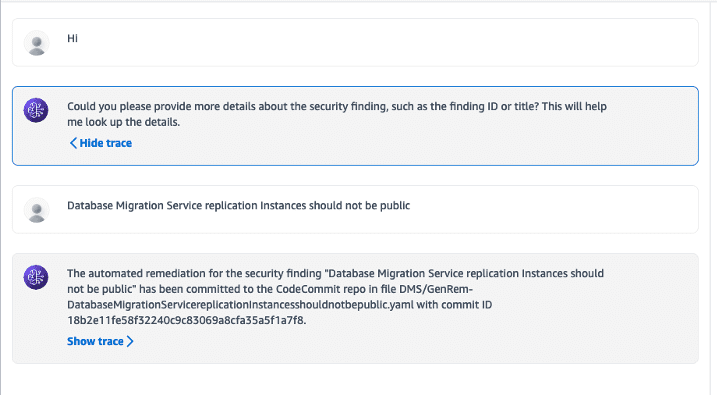
Figure 3 : An example Bedrock Agent Interaction
Step 3: For the new runbooks, validate the template file and parameters
- Check if the template requires any parameters to be passed.
- If required, create a new file parameter file with the following naming convention:
-params.json - For example:
DatabaseMigrationServicereplicationinstanceshouldnotbepublic-params.json
Step 4: Stage files for deployment
- Create new folder named
deployin the CodeCommit repository. - Create a new folder path
deploy/parameters/in the CodeCommit repository. - Upload the YAML template file to the newly created
deployfolder. - Upload the params JSON file to
deploy/parameters. - The structure of the deploy folder should be as follows:
Note: Bedrock_Generated_Template_Name refers to the name of the YAML file that has been output by Amazon Bedrock. Commit of the file will invoke the pipeline. An example Bedrock generated YAML file is shown in Figure 4.

Figure 4 : An example Bedrock generated YAML file
Step 5: Approve the pipeline
- Email will be sent through Amazon SNS during the manual approval stage. Approve the pipeline to continue the build.
- Systems Manager automation will be built using CloudFormation in the workload account.
Step 6: Validate compliance status
- Sign in to the Security Hub console and validate the compliance status of the finding ID or title.
- Verify that the compliance status has been updated to reflect the successful remediation of the security issue. This is shown in Figure 5.
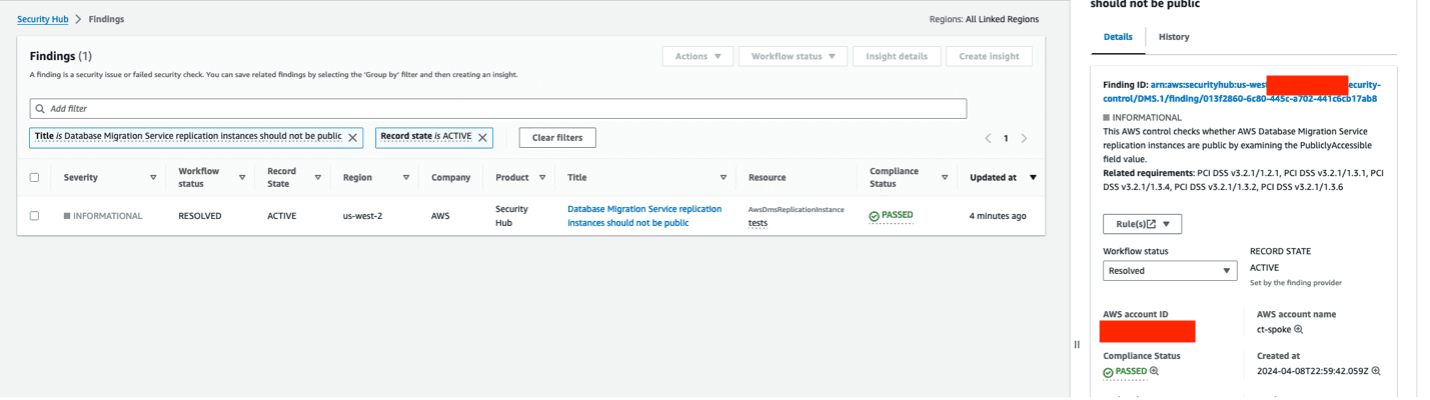
Figure 5 : Validation of successful remediation of AWS Security Hub control finding
Cleanup
To avoid unnecessary charges, delete the resources created during testing. To delete the resources, perform the following steps:
- Delete the knowledge base
- Open the Amazon Bedrock console.
- From the left navigation pane, choose Knowledge base.
- To delete a source, either choose the radio button next to the source and select Delete or choose the Name of the source and then select Delete in the top right corner of the details page.
- Review the warnings for deleting a knowledge base. If you accept these conditions, enter “delete” in the input box and choose Delete to confirm.
- Empty and delete the S3 bucket data source for the knowledge base.
- Delete the agent
- In the Amazon Bedrock console, choose Agents from the navigation pane.
- Select the radio button next to the agent to delete.
- A modal window will pop up warning you about the consequences of deletion. Enter delete in the input box and choose Delete to confirm.
- A blue banner will inform you that the agent is being deleted. When deletion is complete, a green success banner will appear.
- Delete all the other resources
- Use
cdk destroy -allto delete the app and all stacks associated with it.
- Use
Conclusion
The integration of generative AI for remediating security findings is an effective approach, allowing SecOps teams to scale better and remediate findings in a timely manner. Using the generative AI capabilities of Amazon Bedrock alongside AWS services such as AWS Security Hub and automation, a capability of AWS Systems Manager, allows organizations to quickly remediate security findings by building automations that align with best practices while minimizing development effort. This approach not only streamlines security operations but also embeds a CI/CD approach for remediating security findings.
The solution in this post equips you with a plausible pattern of AWS Security Hub and AWS Systems Manager integrated with Amazon Bedrock, deployment code, and instructions to help remediate security findings efficiently and securely according to AWS best practices.
Ready to start your cloud migration process with generative AI in Amazon Bedrock? Begin by exploring the Amazon Bedrock User Guide to understand how you can use Amazon Bedrock to streamline your organization’s cloud journey. For further assistance and expertise, consider using AWS Professional Services to help you accelerate remediating AWS Security Hub findings and maximize the benefits of Amazon Bedrock.
About the Authors
 Shiva Vaidyanathan is a Principal Cloud Architect at AWS. He provides technical guidance for customers ensuring their success on AWS. His primary expertise include Migrations, Security, GenAI and works towards making AWS cloud adoption simpler for everyone. Prior to joining AWS, he has worked on several NSF funded research initiatives on performing secure computing in public cloud infrastructures. He holds a MS in Computer Science from Rutgers University and a MS in Electrical Engineering from New York University.
 Huzaifa Zainuddin is a Senior Cloud Infrastructure Architect at AWS, specializing in designing, deploying, and scaling cloud solutions for a diverse range of clients. With a deep expertise in cloud infrastructure and a passion for leveraging the latest AWS technologies, he is eager to help customers embrace generative AI by building innovative automations that drive operational efficiency. Outside of work, Huzaifa enjoys traveling, cycling, and exploring the evolving landscape of AI.
Leave a Reply