Deploy a serverless web application to edit images using Amazon Bedrock
Generative AI adoption among various industries is revolutionizing different types of applications, including image editing. Image editing is used in various sectors, such as graphic designing, marketing, and social media. Users rely on specialized tools for editing images. Building a custom solution for this task can be complex. However, by using various AWS services, you can quickly deploy a serverless solution to edit images. This approach can give your teams access to image editing foundation models (FMs) using Amazon Bedrock.
Amazon Bedrock is a fully managed service that makes FMs from leading AI startups and Amazon available through an API, so you can choose from a wide range of FMs to find the model that’s best suited for your use case. Amazon Bedrock is serverless, so you can get started quickly, privately customize FMs with your own data, and integrate and deploy them into your applications using AWS tools without having to manage infrastructure.
Amazon Titan Image Generator G1 is an AI FM available with Amazon Bedrock that allows you to generate an image from text, or upload and edit your own image. Some of the key features we focus on include inpainting and outpainting.
This post introduces a solution that simplifies the deployment of a web application for image editing using AWS serverless services. We use AWS Amplify, Amazon Cognito, Amazon API Gateway, AWS Lambda, and Amazon Bedrock with the Amazon Titan Image Generator G1 model to build an application to edit images using prompts. We cover the inner workings of the solution to help you understand the function of each service and how they are connected to give you a complete solution. At the time of writing this post, Amazon Titan Image Generator G1 comes in two versions; for this post, we use version 2.
Solution overview
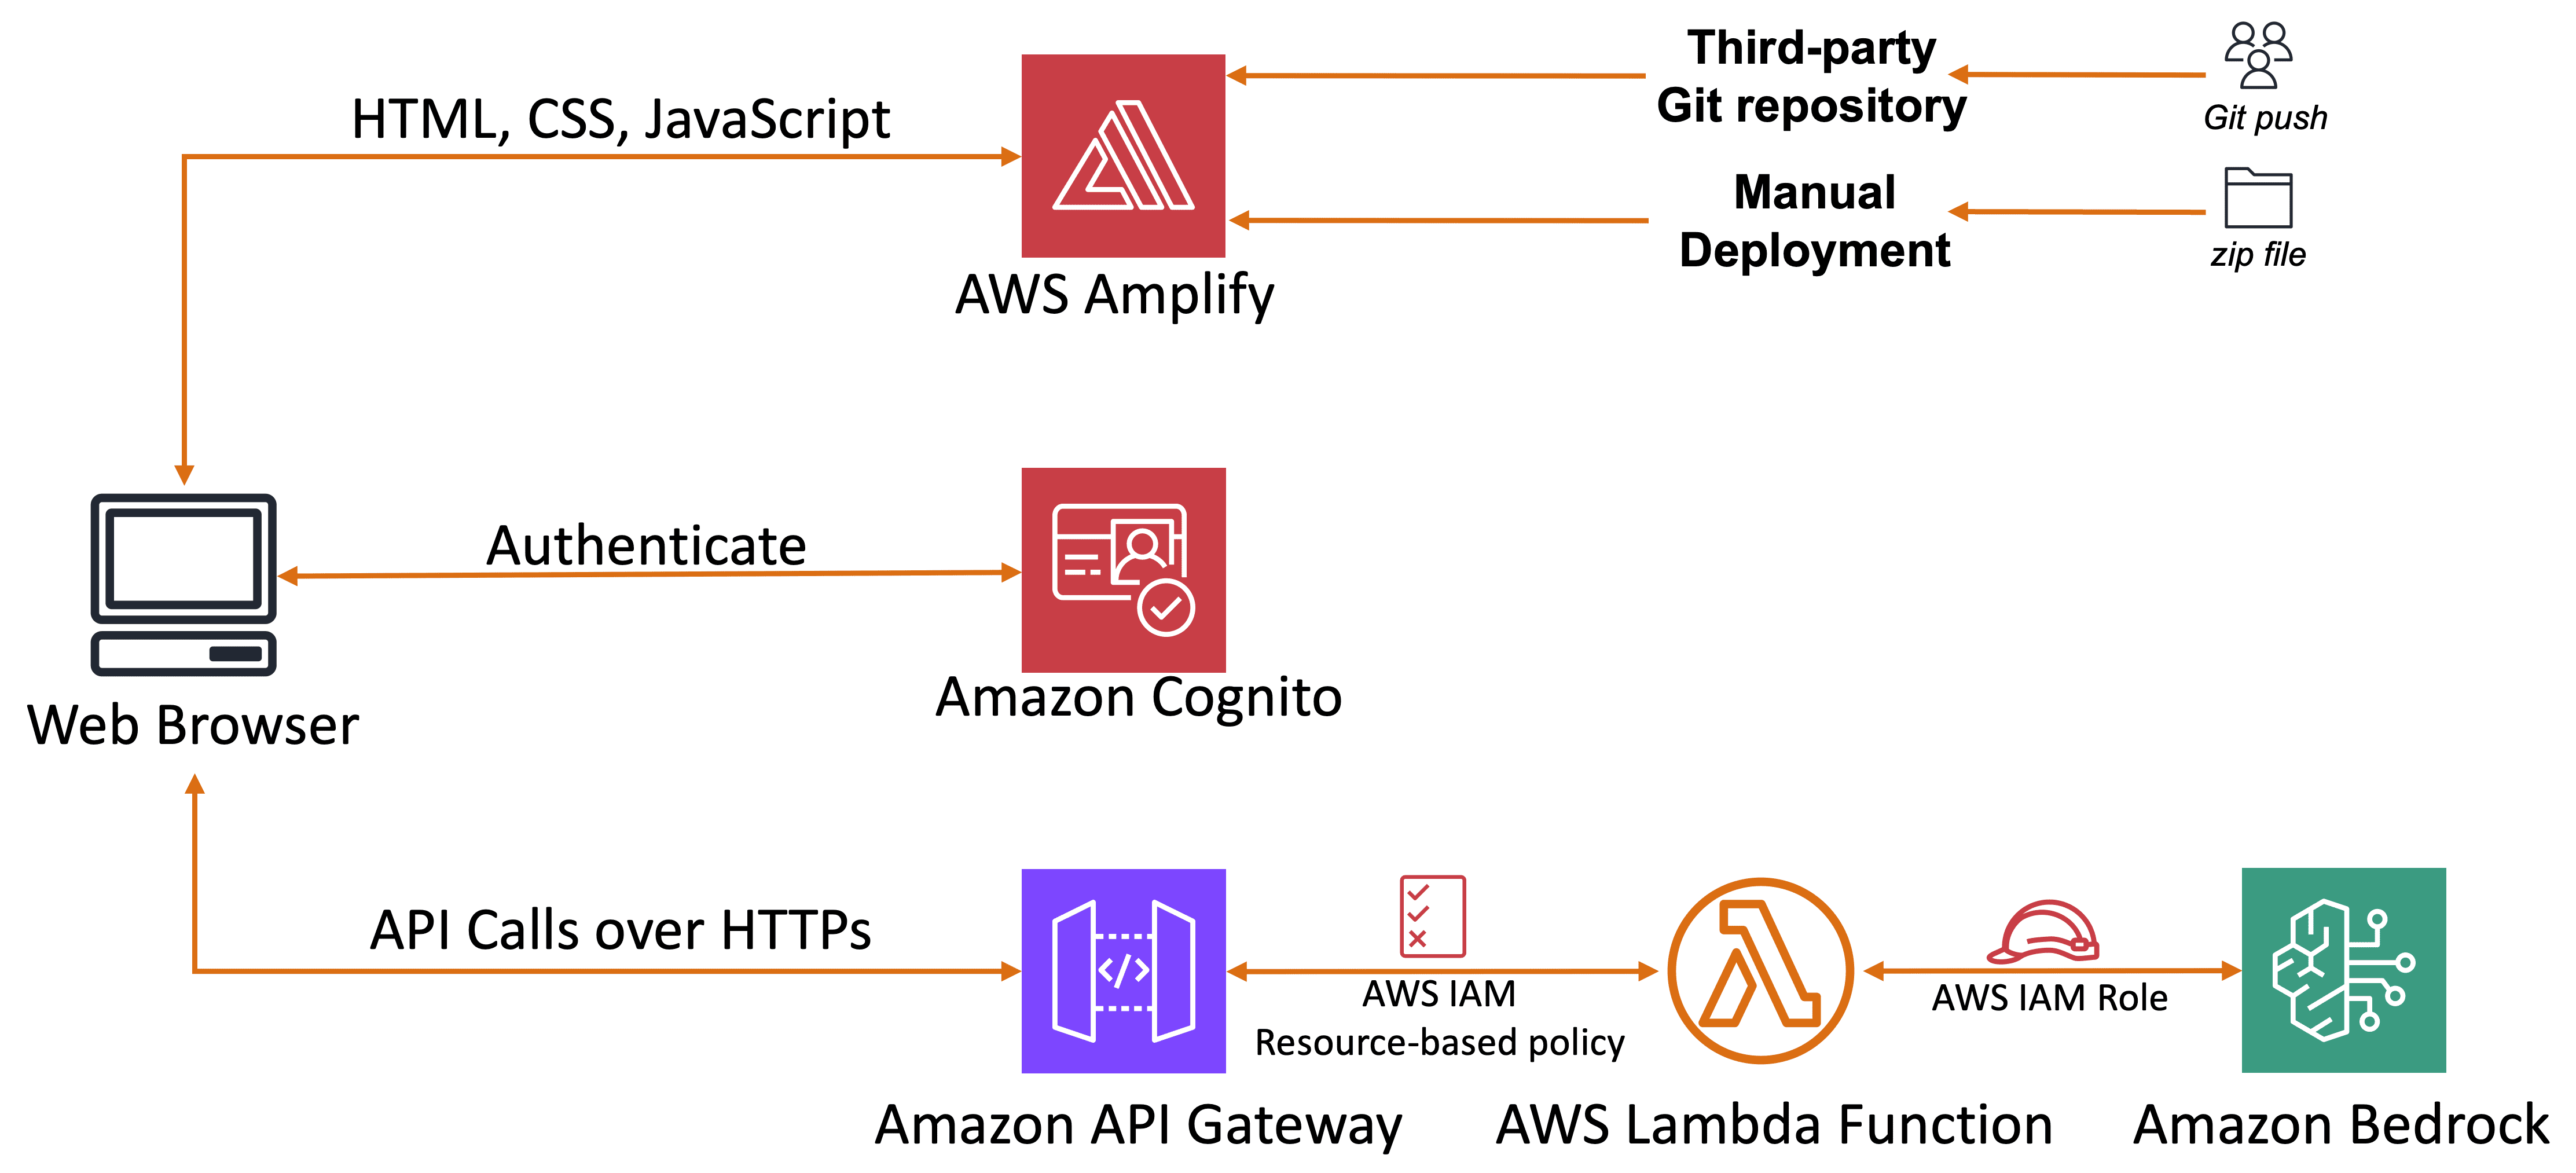
The following diagram provides an overview and highlights the key components. The architecture uses Amazon Cognito for user authentication and Amplify as the hosting environment for our frontend application. A combination of API Gateway and a Lambda function is used for our backend services, and Amazon Bedrock integrates with the FM model, enabling users to edit the image using prompts.
Prerequisites
You must have the following in place to complete the solution in this post:
- An AWS account
- FM access in Amazon Bedrock for Amazon Titan Image Generator G1 v2 in the same AWS Region where you will deploy this solution
- The accompanying AWS CloudFormation template downloaded from the aws-samples GitHub repo.
Deploy solution resources using AWS CloudFormation
When you run the AWS CloudFormation template, the following resources are deployed:
- Amazon Cognito resources:
- User pool:
CognitoUserPoolforImageEditApp - App client:
ImageEditApp
- User pool:
- Lambda resources:
- Function:
-ImageEditBackend-
- Function:
- AWS Identity Access Management (IAM) resources:
- IAM role:
-ImageEditBackendRole- - IAM inline policy:
AmazonBedrockAccess(this policy allows Lambda to invoke Amazon Bedrock FMamazon.titan-image-generator-v2:0)
- IAM role:
- API Gateway resources:
- Rest API:
ImageEditingAppBackendAPI - Methods:
- OPTIONS – Added header mapping for CORS
- POST – Lambda integration
- Authorization: Through Amazon Cognito using
CognitoAuthorizer
- Rest API:
After you deploy the CloudFormation template, copy the following from the Outputs tab to be used during the deployment of Amplify:
userPoolIduserPoolClientIdinvokeUrl
Deploy the Amplify application
You have to manually deploy the Amplify application using the frontend code found on GitHub. Complete the following steps:
- Download the frontend code from the GitHub repo.
- Unzip the downloaded file and navigate to the folder.
- In the
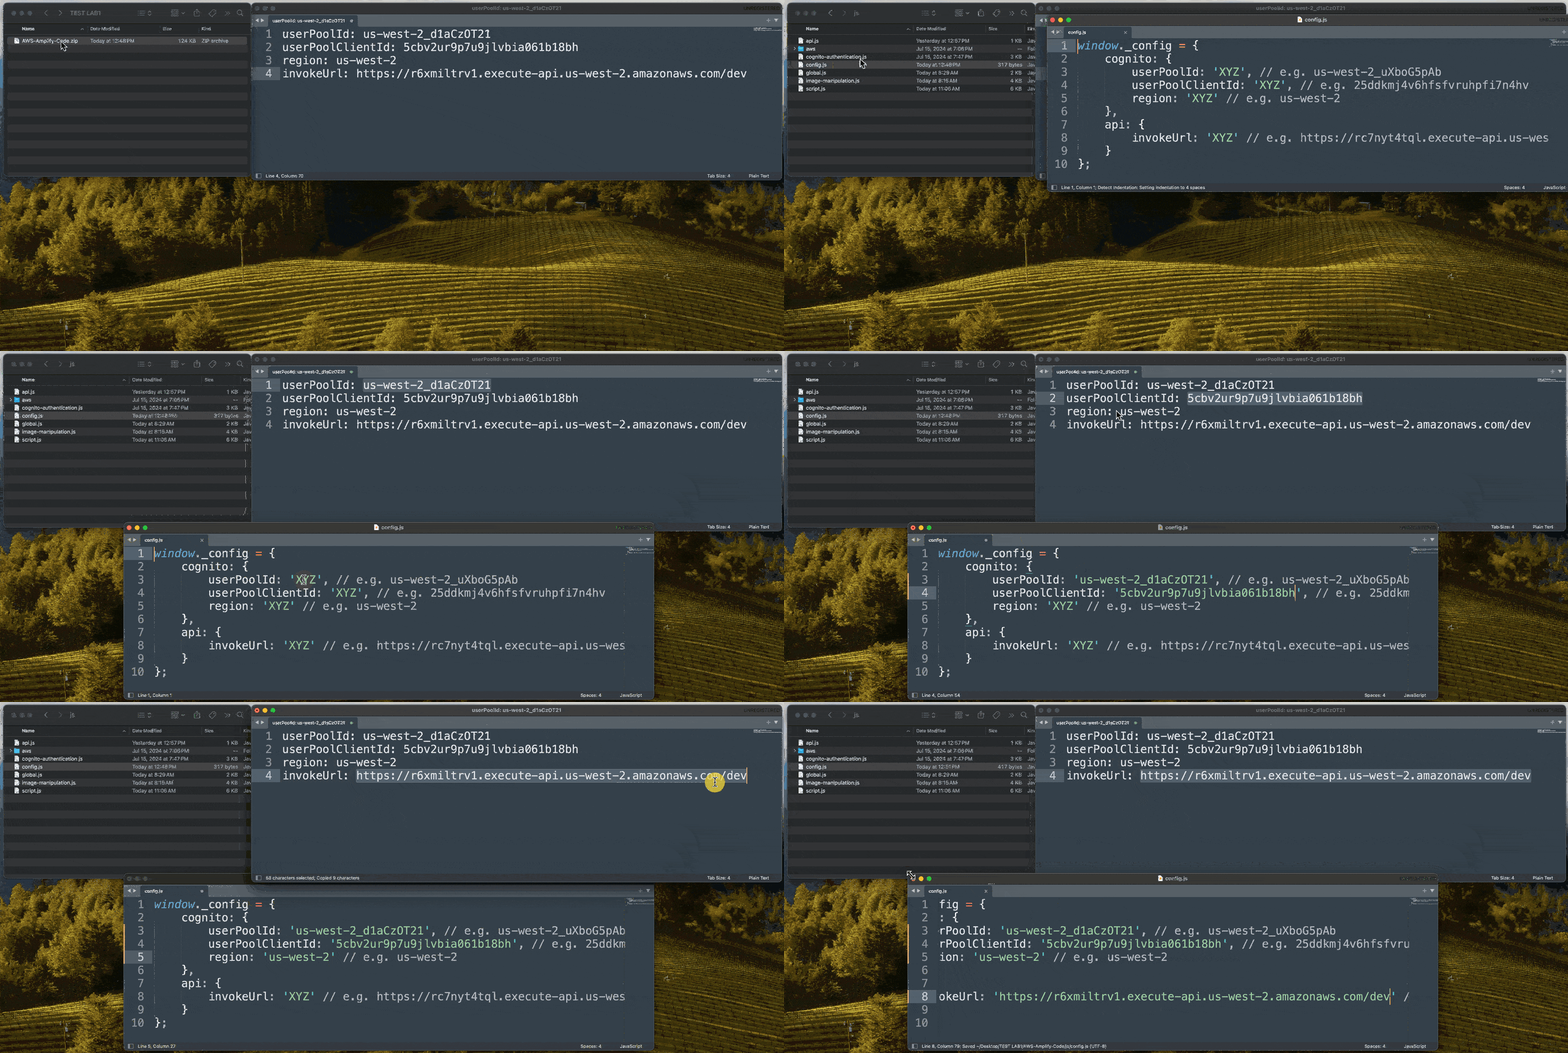
jsfolder, find theconfig.jsfile and replace the values ofXYZforuserPoolId,userPoolClientId, andinvokeUrlwith the values you collected from the CloudFormation stack outputs. Set theregionvalue based on the Region where you’re deploying the solution.
The following is an example config.js file:
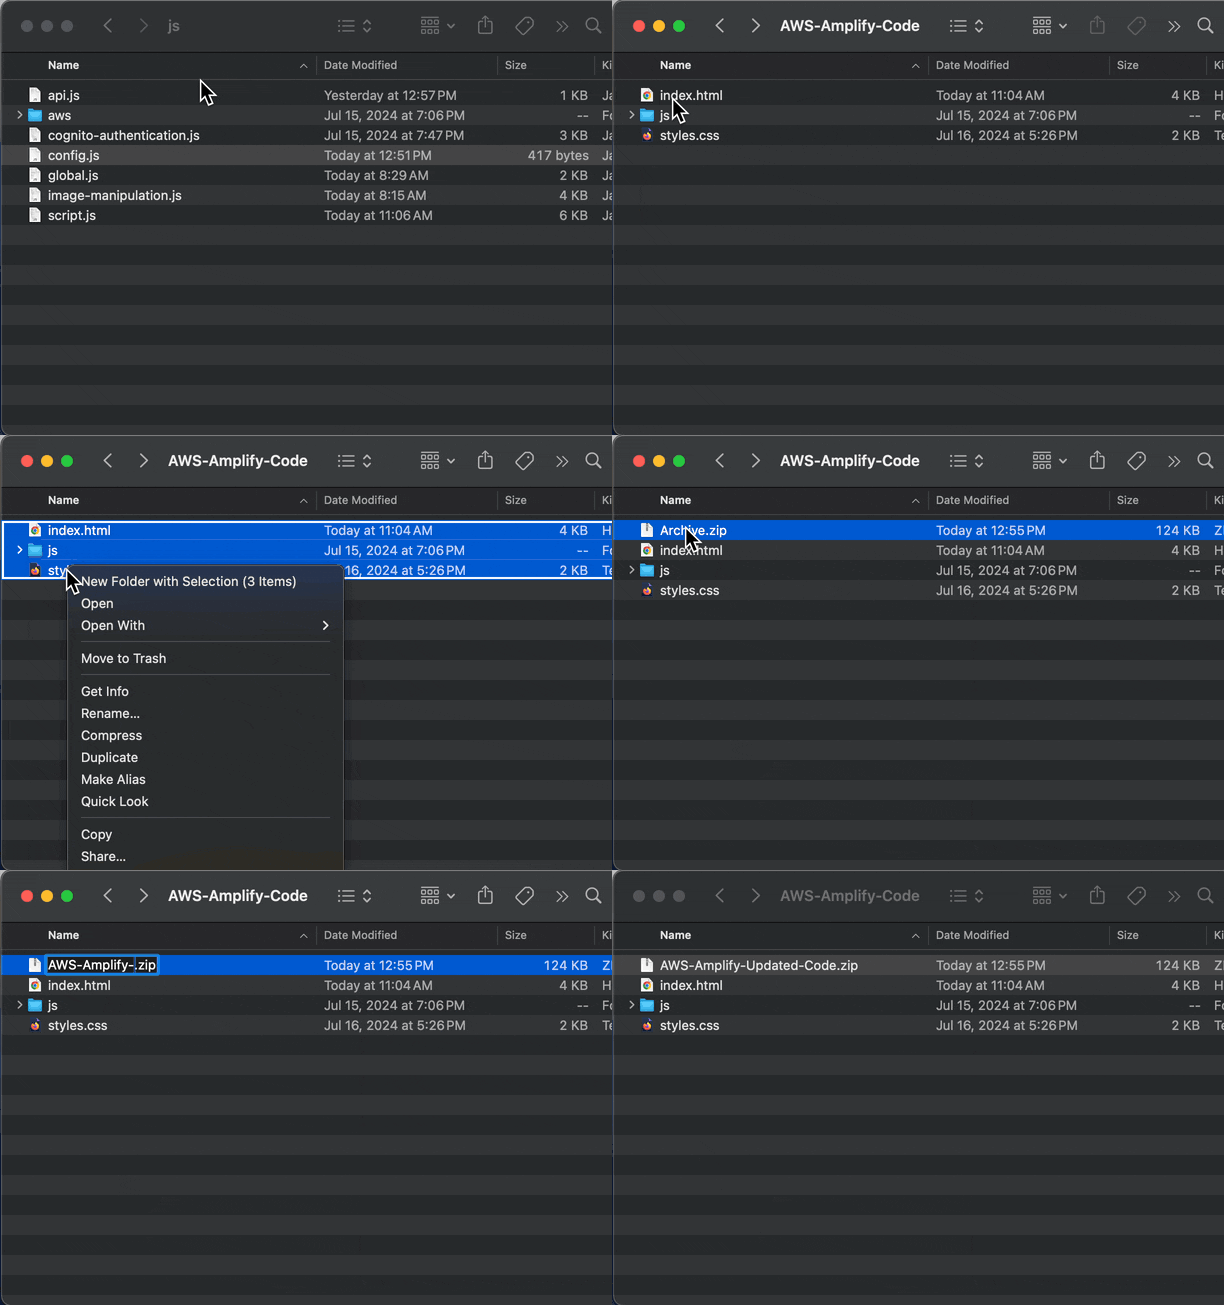
- Select all the files and compress them as shown in the following screenshot.
Make sure you zip the contents and not the top-level folder. For example, if your build output generates a folder named AWS-Amplify-Code, navigate into that folder and select all the contents, and then zip the contents.
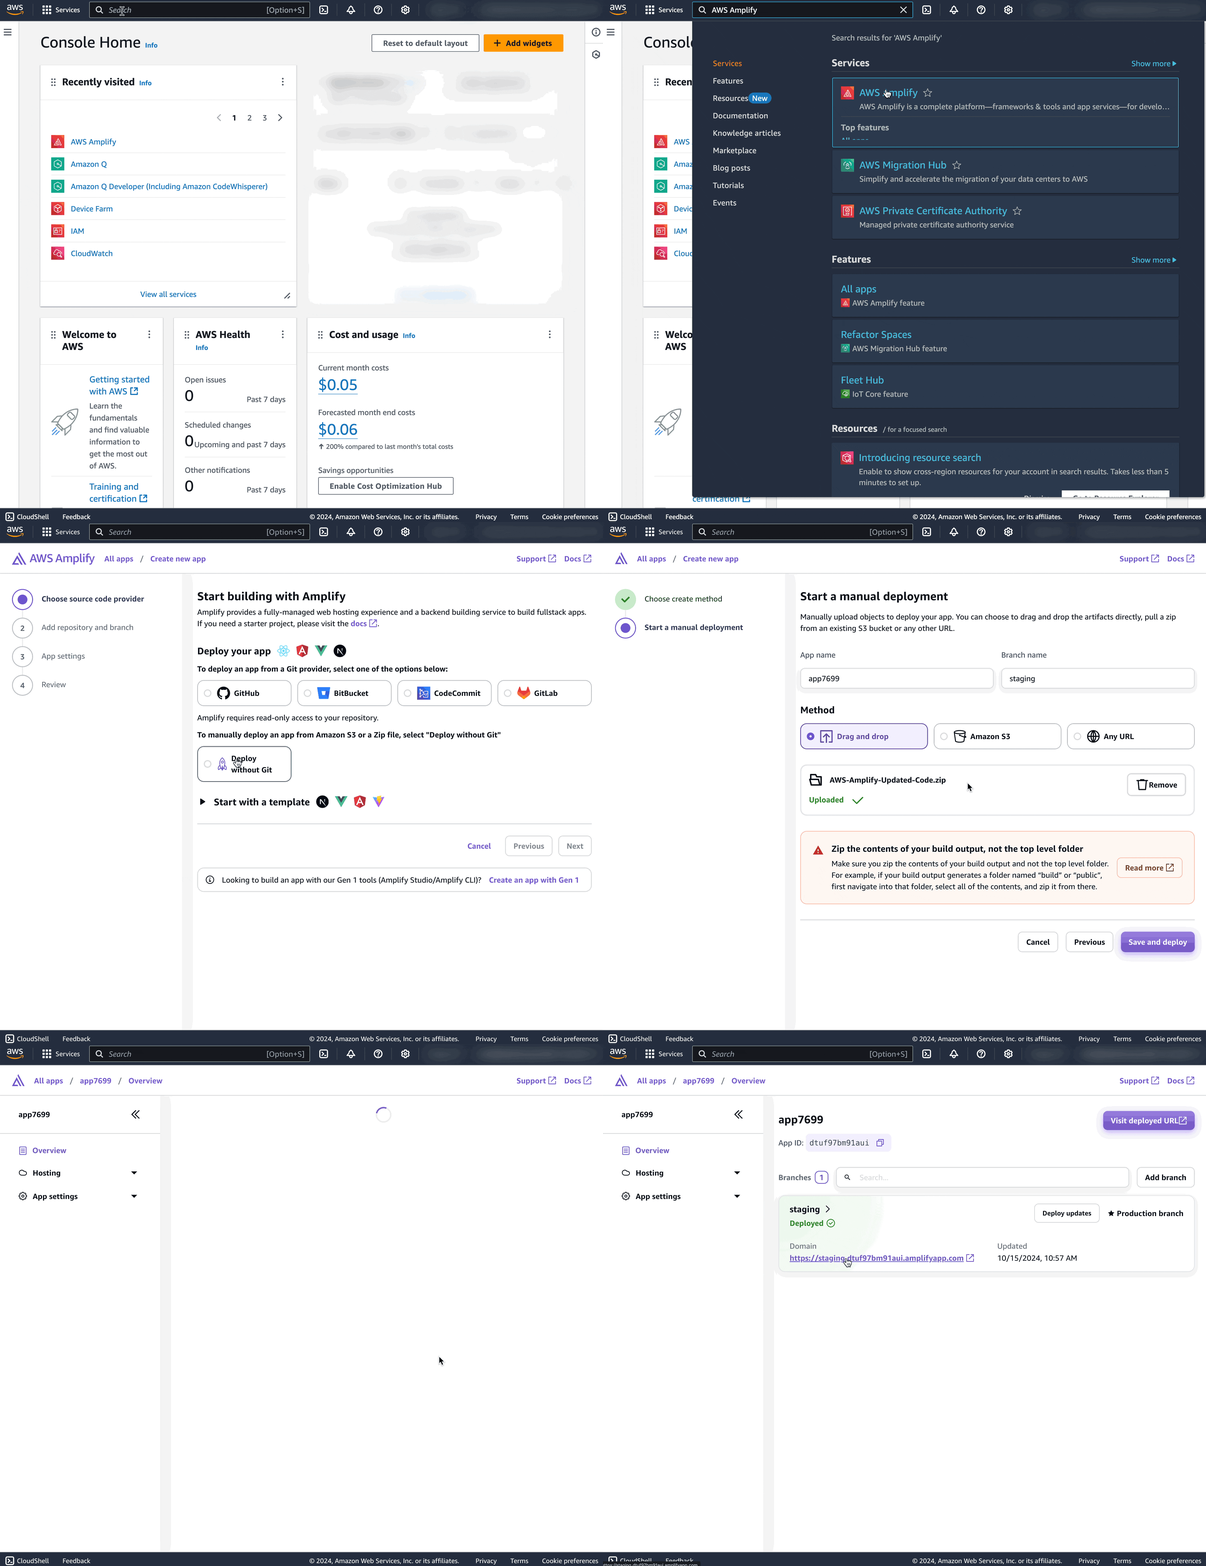
- Use the new .zip file to manually deploy the application in Amplify.
After it’s deployed, you will receive a domain that you can use in later steps to access the application.
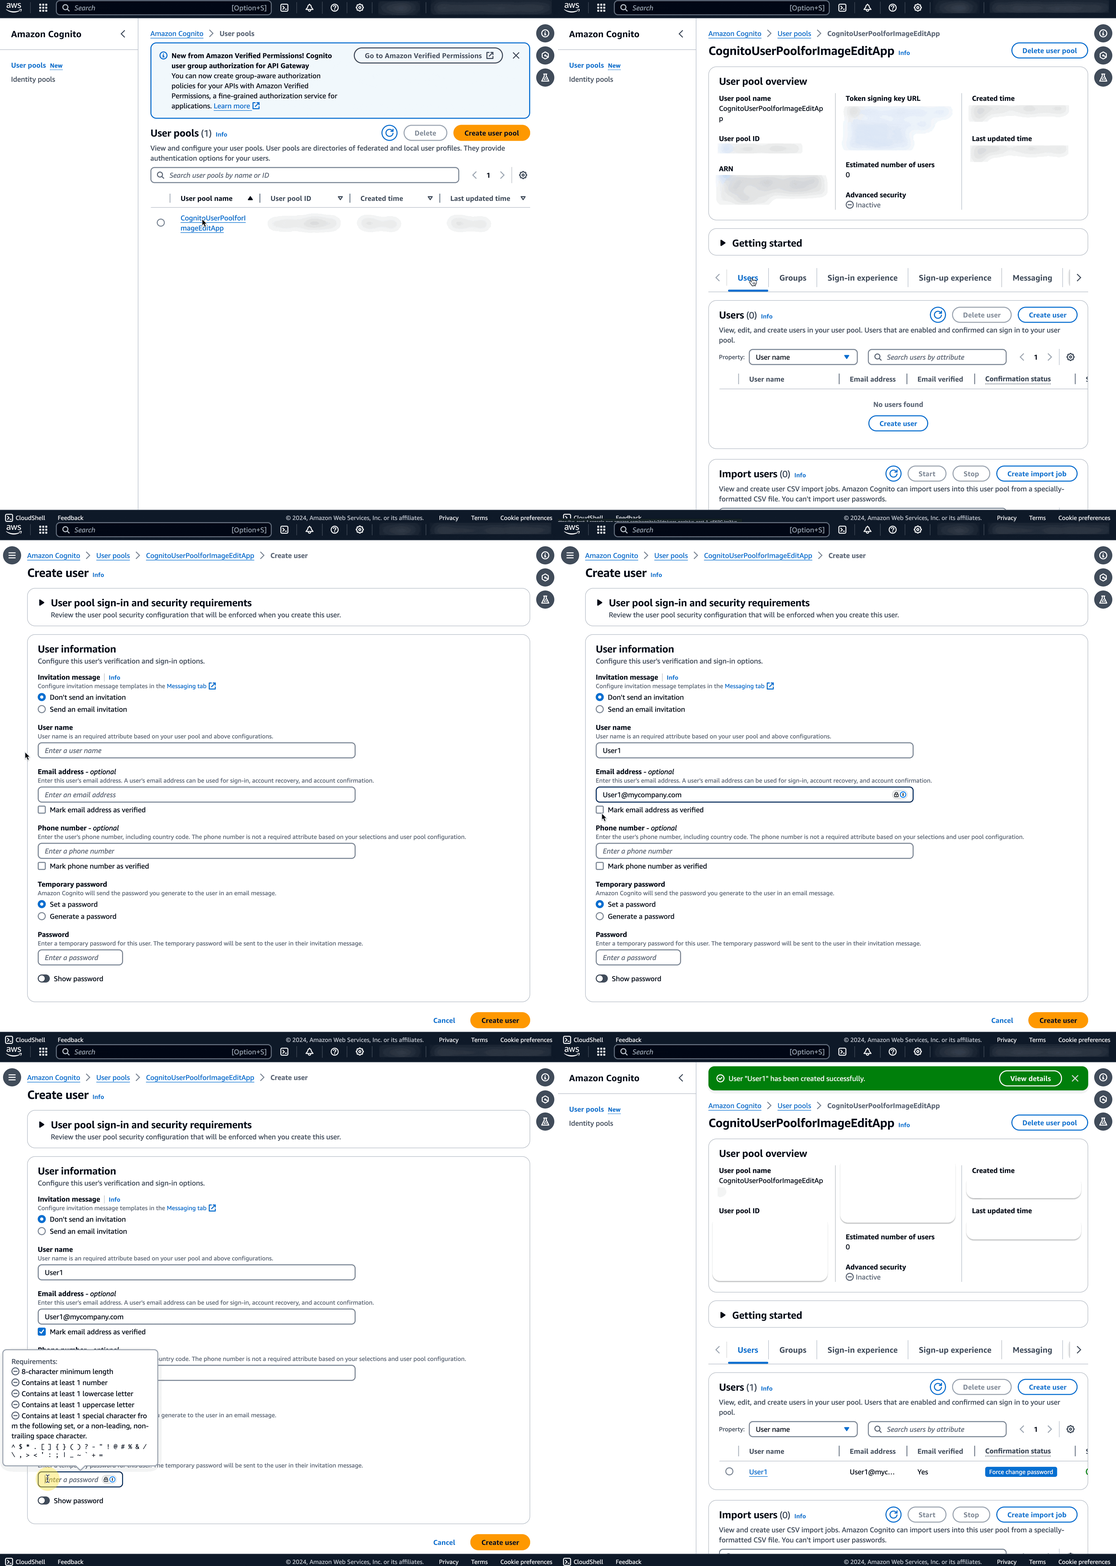
- Create a test user in the Amazon Cognito user pool.
An email address is required for this user because you will need to mark the email address as verified.
- Return to the Amplify page and use the domain it automatically generated to access the application.
Use Amazon Cognito for user authentication
Amazon Cognito is an identity platform that you can use to authenticate and authorize users. We use Amazon Cognito in our solution to verify the user before they can use the image editing application.
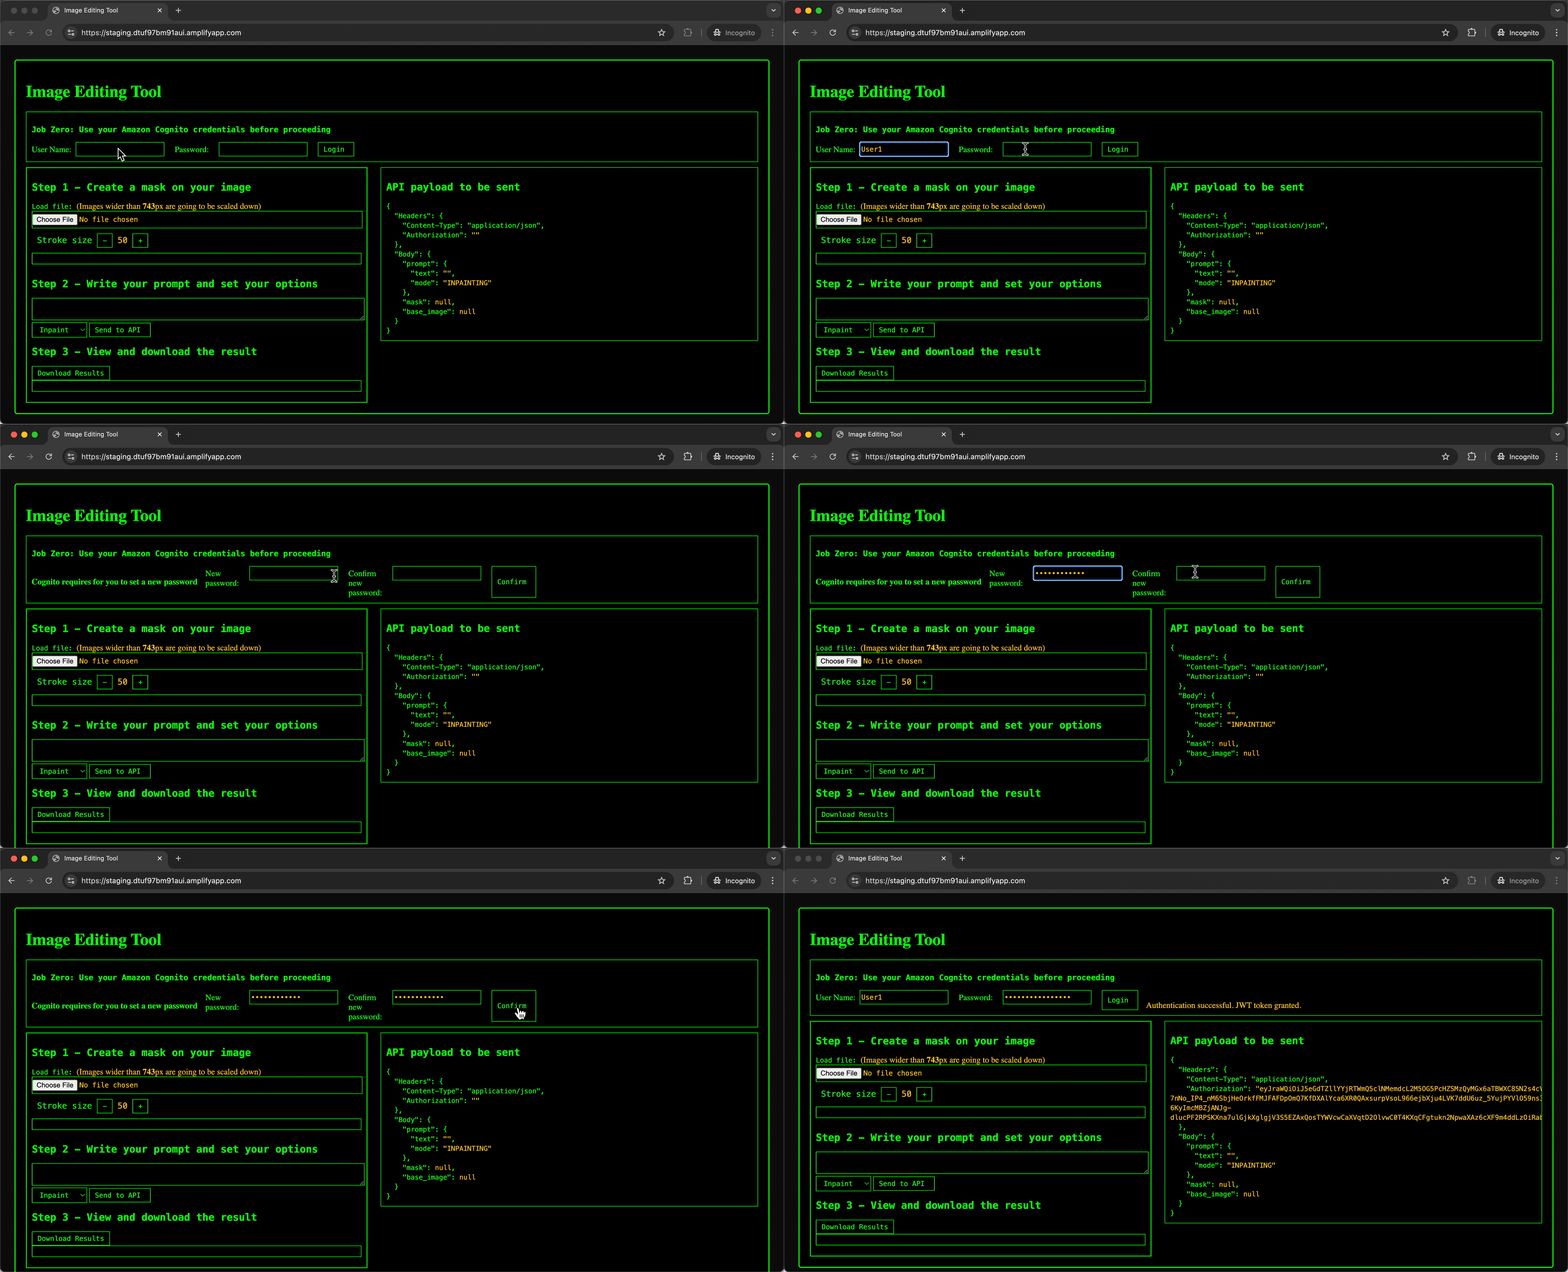
Upon accessing the Image Editing Tool URL, you will be prompted to sign in with a previously created test user. For first-time sign-ins, users will be asked to update their password. After this process, the user’s credentials are validated against the records stored in the user pool. If the credentials match, Amazon Cognito will issue a JSON Web Token (JWT). In the API payload to be sent section of the page, you will notice that the Authorization field has been updated with the newly issued JWT.
Use Lambda for backend code and Amazon Bedrock for generative AI function
The backend code is hosted on Lambda, and launched by user requests routed through API Gateway. The Lambda function process the request payload and forwards it to Amazon Bedrock. The reply from Amazon Bedrock follows the same route as the initial request.
Use API Gateway for API management
API Gateway streamlines API management, allowing developers to deploy, maintain, monitor, secure, and scale their APIs effortlessly. In our use case, API Gateway serves as the orchestrator for the application logic and provides throttling to manage the load to the backend. Without API Gateway, you would need to use the JavaScript SDK in the frontend to interact directly with the Amazon Bedrock API, bringing more work to the frontend.
Use Amplify for frontend code
Amplify offers a development environment for building secure, scalable mobile and web applications. It allows developers to focus on their code rather than worrying about the underlying infrastructure. Amplify also integrates with many Git providers. For this solution, we manually upload our frontend code using the method outlined earlier in this post.
Image editing tool walkthrough
Navigate to the URL provided after you created the application in Amplify and sign in. At first login attempt, you’ll be asked to reset your password.
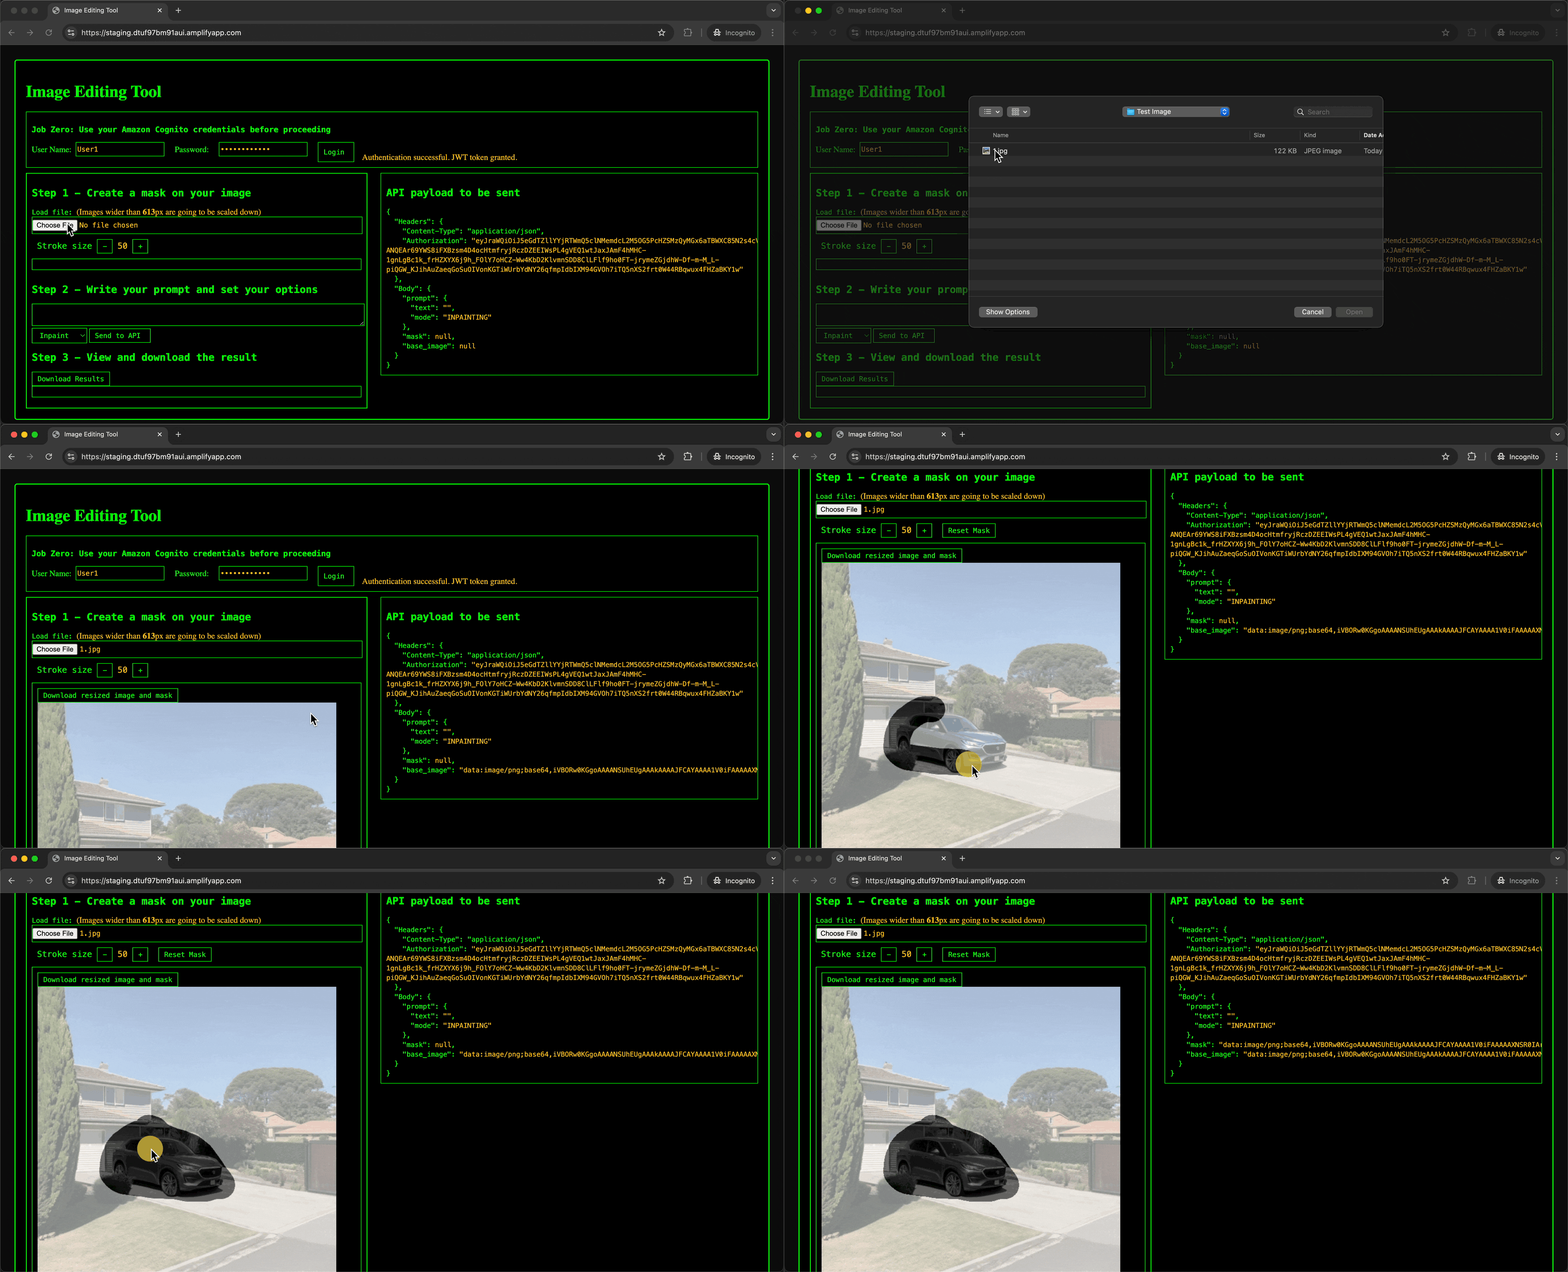
As you follow the steps for this tool, you will notice the API Payload to be Sent section on the right side updating dynamically, reflecting the details mentioned in the corresponding steps that follow.
Step 1: Create a mask on your image
To create a mask on your image, choose a file (JPEG, JPG, or PNG).
After the image is loaded, the frontend converts the file into base64 and base_image value is updated.
As you select a portion of the image you want to edit, a mask will be created, and mask value is updated with a new base64 value. You can also use the stroke size option to adjust the area you are selecting.
You now have the original image and the mask image encoded in base64. (The Amazon Titan Image Generator G1 model requires the inputs to be in base64 encoding.)
Step 2: Write a prompt and set your options
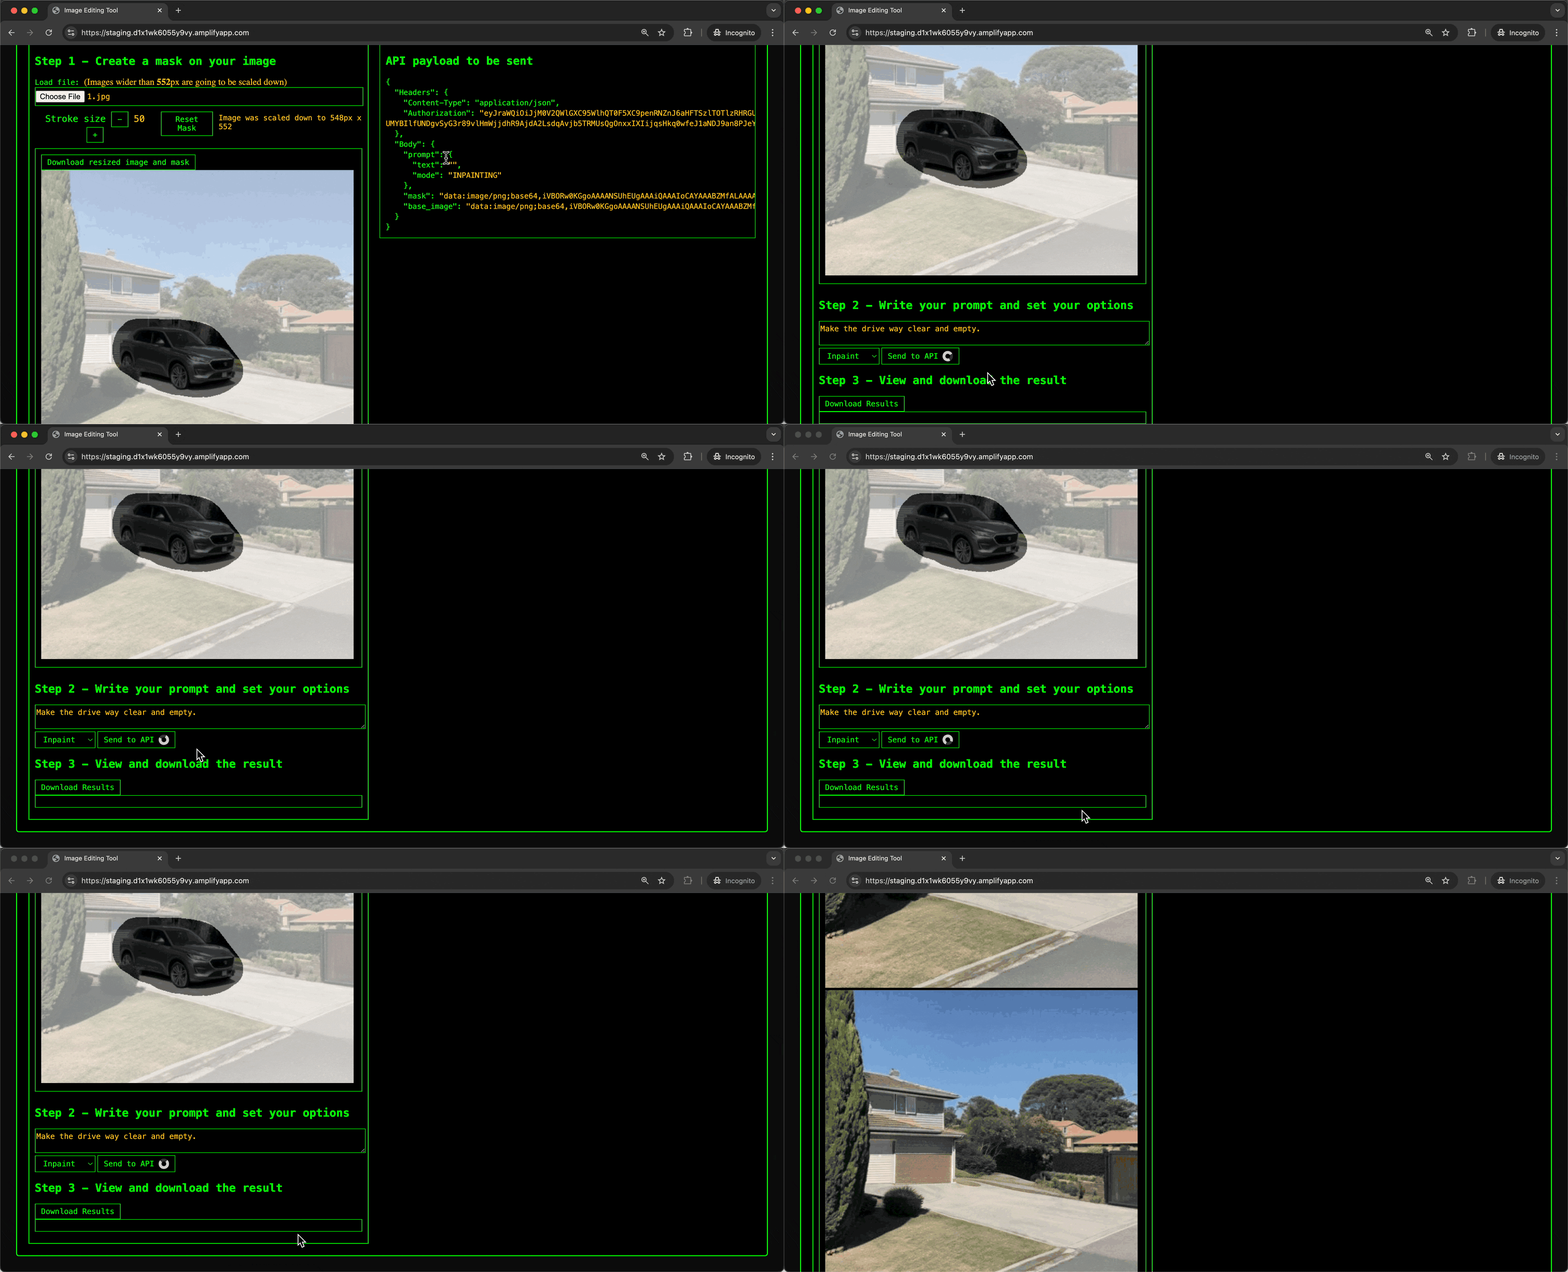
Write a prompt that describes what you want to do with the image. For this example, we enter Make the driveway clear and empty. This is reflected in the prompt on the right.
You can choose from the following image editing options: inpainting and outpainting. The value for mode is updated depending on your selection.
- Use inpainting to remove masked elements and replace them with background pixels
- Use outpainting to extend the pixels of the masked image to the image boundaries
Choose Send to API to send the payload to the API gateway. This action invokes the Lambda function, which validates the received payload. If the payload is validated successfully, the Lambda function proceeds to invoke the Amazon Bedrock API for further processing.
The Amazon Bedrock API generates two image outputs in base64 format, which are transmitted back to the frontend application and rendered as visual images.
Step 3: View and download the result
The following screenshot shows the results of our test. You can download the results or provide an updated prompt to get a new output.
Testing and troubleshooting
When you initiate the Send to API action, the system performs a validation check. If required information is missing or incorrect, it will display an error notification. For instance, if you attempt to send an image to the API without providing a prompt, an error message will appear on the right side of the interface, alerting you to the missing input, as shown in the following screenshot.
Clean up
If you decide to discontinue using the Image Editing Tool, you can follow these steps to remove the Image Editing Tool, its associated resources deployed using AWS CloudFormation, and the Amplify deployment:
- Delete the CloudFormation stack:
- On the AWS CloudFormation console, choose Stacks in the navigation pane.
- Locate the stack you created during the deployment process (you assigned a name to it).
- Select the stack and choose Delete.
- Delete the Amplify application and its resources. For instructions, refer to Clean Up Resources.
Conclusion
In this post, we explored a sample solution that you can use to deploy an image editing application by using AWS serverless services and generative AI services. We used Amazon Bedrock and an Amazon Titan FM that allows you to edit images by using prompts. By adopting this solution, you gain the advantage of using AWS managed services, so you don’t have to maintain the underlying infrastructure. Get started today by deploying this sample solution.
Additional resources
To learn more about Amazon Bedrock, see the following resources:
- GitHub repo: Amazon Bedrock Workshop
- Amazon Bedrock User Guide
- Amazon Bedrock InvokeModel API
- Workshop: Using generative AI on AWS for diverse content types
To learn more about the Amazon Titan Image Generator G1 model, see the following resources:
About the Authors
 Salman Ahmed is a Senior Technical Account Manager in AWS Enterprise Support. He enjoys helping customers in the travel and hospitality industry to design, implement, and support cloud infrastructure. With a passion for networking services and years of experience, he helps customers adopt various AWS networking services. Outside of work, Salman enjoys photography, traveling, and watching his favorite sports teams.
 Sergio Barraza is a Senior Enterprise Support Lead at AWS, helping energy customers design and optimize cloud solutions. With a passion for software development, he guides energy customers through AWS service adoption. Outside work, Sergio is a multi-instrument musician playing guitar, piano, and drums, and he also practices Wing Chun Kung Fu.
 Ravi Kumar is a Senior Technical Account Manager in AWS Enterprise Support who helps customers in the travel and hospitality industry to streamline their cloud operations on AWS. He is a results-driven IT professional with over 20 years of experience. In his free time, Ravi enjoys creative activities like painting. He also likes playing cricket and traveling to new places.
 Ankush Goyal is a Enterprise Support Lead in AWS Enterprise Support who helps customers streamline their cloud operations on AWS. He is a results-driven IT professional with over 20 years of experience.




Leave a Reply