Build a reverse image search engine with Amazon Titan Multimodal Embeddings in Amazon Bedrock and AWS managed services
In ecommerce, visual search technology revolutionizes how customers find products by enabling them to search for products using images instead of text. Shoppers often have a clear visual idea of what they want but struggle to describe it in words, leading to inefficient and broad text-based search results. For example, searching for a specific red leather handbag with a gold chain using text alone can be cumbersome and imprecise, often yielding results that don’t directly match the user’s intent. By using images, visual search can directly match physical attributes, providing better results quickly and enhancing the overall shopping experience.
A reverse image search engine enables users to upload an image to find related information instead of using text-based queries. It works by analyzing the visual content to find similar images in its database. Companies such as Amazon use this technology to allow users to use a photo or other image to search for similar products on their ecommerce websites. Other companies use it to identify objects, faces, and landmarks to discover the original source of an image. Beyond ecommerce, reverse image search engines are invaluable to law enforcement for identifying illegal items for sale and identifying suspects, to publishers for validating visual content authenticity, for healthcare professionals by assisting in medical image analysis, and tackling challenges such as misinformation, copyright infringement, and counterfeit products.
In the context of generative AI, significant progress has been made in developing multimodal embedding models that can embed various data modalities—such as text, image, video, and audio data—into a shared vector space. By mapping image pixels to vector embeddings, these models can analyze and compare visual attributes such as color, shape, and size, enabling users to find similar images with specific attributes, leading to more precise and relevant search results.
Amazon Bedrock is a fully managed service that offers a choice of high-performing foundation models (FMs) from leading AI companies like AI21 Labs, Anthropic, Cohere, Meta, Mistral AI, Stability AI, and Amazon through a single API, along with a broad set of capabilities you need to build generative AI applications with security, privacy, and responsible AI. The Amazon Bedrock single API access, regardless of the models you choose, gives you the flexibility to use different FMs and upgrade to the latest model versions with minimal code changes.
Exclusive to Amazon Bedrock, the Amazon Titan family of models incorporates 25 years of experience innovating with AI and machine learning at Amazon. Amazon Titan FMs provide customers with a breadth of high-performing image, multimodal, and text model choices, through a fully managed API. With Amazon Titan Multimodal Embeddings, you can power more accurate and contextually relevant multimodal search, recommendation, and personalization experiences for users.
In this post, you will learn how to extract key objects from image queries using Amazon Rekognition and build a reverse image search engine using Amazon Titan Multimodal Embeddings from Amazon Bedrock in combination with Amazon OpenSearch Serverless Service.
Solution overview
The solution outlines how to build a reverse image search engine to retrieve similar images based on input image queries. This post demonstrates a guide for using Amazon Titan Multimodal Embeddings to embed images, store these embeddings in an OpenSearch Serverless vector index, and use Amazon Rekognition to extract key objects from images for querying the index.
The following diagram illustrates the solution architecture:
 The steps of the solution include:
- Upload data to Amazon S3: Store the product images in Amazon Simple Storage Service (Amazon S3).
- Generate embeddings: Use Amazon Titan Multimodal Embeddings to generate embeddings for the stored images.
- Store embeddings: Ingest the generated embeddings into an OpenSearch Serverless vector index, which serves as the vector database for the solution.
- Image analysis: Use Amazon Rekognition to analyze the product images and extract labels and bounding boxes for these images. These extracted objects will then be saved as separate images, which can be used for the query.
- Convert search query to an embedding: Convert the user’s image search query into an embedding using Amazon Titan Multimodal Embeddings.
- Run similarity search: Perform a similarity search on the vector database to find product images that closely match the search query embedding.
- Display results: Display the top K similar results to the user.
Prerequisites
To implement the proposed solution, make sure that you have the following:
- An AWS account and a working knowledge of FMs, Amazon Bedrock, Amazon SageMaker, Amazon OpenSearch Service, Amazon S3, and AWS Identity and Access Management (IAM).
- The AWS Command Line Interface (AWS CLI) installed on your machine to upload the dataset to Amazon S3. Alternatively, you could directly upload the dataset to an S3 bucket by using the AWS Management Console.
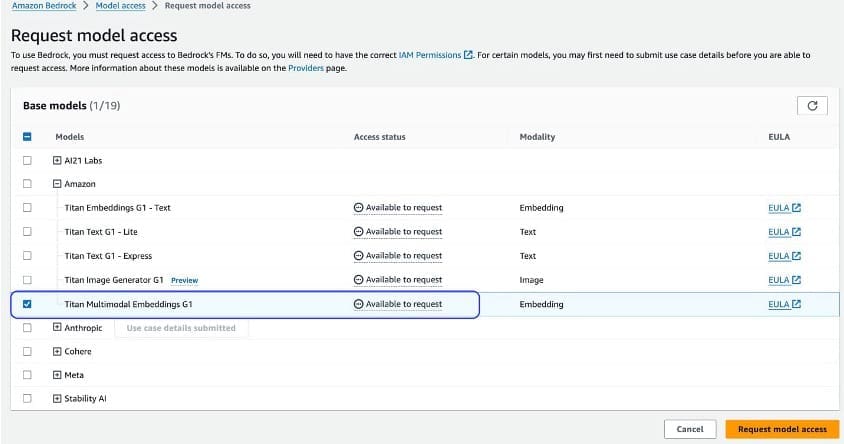
- Amazon Titan Multimodal Embeddings model access in Amazon Bedrock. Verify its status on the Model access page of the Amazon Bedrock console. If enabled, its status will display as Access granted. If the model isn’t enabled, you can gain model access by selecting choosing Manage model access, selecting Amazon Titan Multimodal Embeddings G1, and choosing Request model access. The model will then be available for use.

- An Amazon SageMaker Studio domain. If you haven’t set up a SageMaker Studio domain, see this Amazon SageMaker blog post for instructions on setting up SageMaker Studio for individual users.
- An Amazon OpenSearch Serverless collection. You can create a vector search collection by following the steps in Create a collection with public network access and data access granted to the Amazon SageMaker Notebook execution role principal.
- The GitHub repo cloned to the Amazon SageMaker Studio instance. To clone the repo onto your SageMaker Studio instance, choose the Git icon on the left sidebar and enter
https://github.com/aws-samples/reverse-image-search-engine.git - After it has cloned, you can navigate to the
reverse-image-search-engine.ipynbnotebook file to and run the cells. This post highlights the important code segments; however, the full code can be found in the notebook. - The necessary permissions attached to the Amazon SageMaker notebook execution role to grant read and write access to the Amazon OpenSearch Serverless collection. For more information on managing credentials securely, see the AWS Boto3 documentation. Make sure that full access is granted to the SageMaker execution role by applying the following IAM policy:
Upload the dataset to Amazon S3
In this solution, we will use the Shoe Dataset from Kaggle.com, which contains a collection of approximately 1,800 shoe images. The dataset is primarily used for image classification use cases and contains images of shoes from six main categories—boots, sneakers, flip flops, loafers, sandals, and soccer shoes—with 249 JPEG images for each shoe type. For this tutorial, you will concentrate on the loafers folder found in the training category folder.
To upload the dataset
- Download the dataset: Go to the Shoe Dataset page on Kaggle.com and download the dataset file (350.79MB) that contains the images.
- Extract the specific folder: Extract the downloaded file and navigate to the loafers category within the training
- Create an Amazon S3 bucket: Sign in to the Amazon S3 console, choose Create bucket, and follow the prompts to create a new S3 bucket.
- Upload images to the Amazon S3 bucket using the AWS CLI: Open your terminal or command prompt and run the following command to upload the images from the loafers folder to the S3 bucket:
aws s3 cp s3:/// --recursive
Replace with the path to the loafers category folder from the training folder on your local machine. Replace <your-bucket-name> with the name of your S3 bucket. For example:
aws s3 cp /Users/username/Documents/training/loafers s3://footwear-dataset/ --recursive
- Confirm the upload: Go back to the S3 console, open your bucket, and verify that the images have been successfully uploaded to the bucket.
Create image embeddings
Vector embeddings represent information—such as text or images—as a list of numbers, with each number capturing specific features. For example, in a sentence, some numbers might represent the presence of certain words or topics, while in an image or video, they might represent colors, shapes, or patterns. This numerical representation, or vector, is placed in a multidimensional space called the embedding space, where distances between vectors indicate similarities between the represented information. The closer vectors are to one another in this space, the more similar the information they represent is. The following figure is an example of an image and part of its associated vector.

To convert images to vectors, you can use Amazon Titan Multimodal Embeddings to generate image embeddings, which can be accessed through Amazon Bedrock. The model will generate vectors embeddings with 1,024 dimensions; however, you can choose a smaller dimension size to optimize for speed and performance.
To create image embeddings:
- The following code segment shows how to create a function that will be used to generate embeddings for the dataset of shoe images stored in the S3 bucket.
- Because you will be performing a search for similar images stored in the S3 bucket, you will also have to store the image file name as metadata for its embedding. Also, because the model expects a base64 encoded image as input, you will have to create an encoded version of the image for the embedding function. You can use the following code to fulfill both requirements.
- After generating embeddings for each image stored in the S3 bucket, the resulting embedding list can be obtained by running the following code
| image_key | image_embedding |
| image1.jpeg | [0.00961759, 0.0016261627, -0.0024508594, -0.0… |
| image10.jpeg | [0.008917685, -0.0013863152, -0.014576114, 0.0… |
| image100.jpeg | [0.006402869, 0.012893448, -0.0053941975, -0.0… |
| image101.jpg | [0.06542923, 0.021960363, -0.030726435, -0.000… |
| image102.jpeg | [0.0134112835, -0.010299515, -0.0044046864, -0… |
Upload embeddings to Amazon OpenSearch Serverless
Now that you have created embeddings for your images, you need to store these vectors so they can be searched and retrieved efficiently. To do so, you can use a vector database.
A vector database is a type of database designed to store and retrieve vector embeddings. Each data point in the database is associated with a vector that encapsulates its attributes or features. This makes it particularly useful for tasks such as similarity search, where the goal is to find objects that are the most similar to a given query object. To search against the database, you can use a vector search, which is performed using the k-nearest neighbors (k-NN) algorithm. When you perform a search, the algorithm computes a similarity score between the query vector and the vectors of stored objects using methods such as cosine similarity or Euclidean distance. This enables the database to retrieve the closest objects that are most similar to the query object in terms of their features or attributes. Vector databases often use specialized vector search engines, such as nmslib or faiss, which are optimized for efficient storage, retrieval, and similarity calculation of vectors.
In this post, you will use OpenSearch Serverless as the vector database for the image embeddings. OpenSearch Serverless is a serverless option for OpenSearch Service, a powerful storage option built for distributed search and analytics use cases. With Amazon OpenSearch Serverless, you don’t need to provision, configure, and tune the instance clusters that store and index your data.
To upload embeddings:
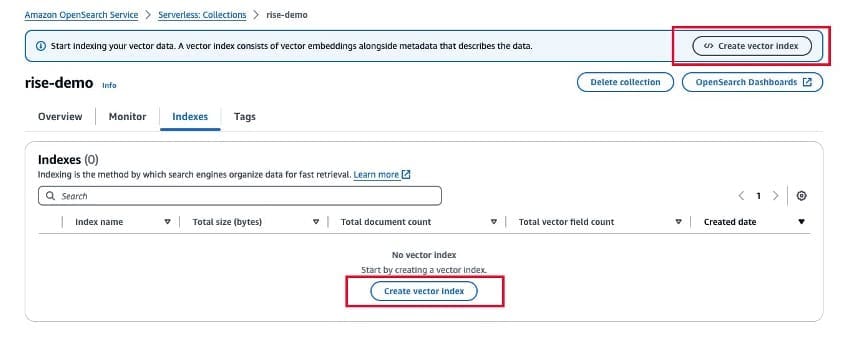
- If you have set up your Amazon OpenSearch Serverless collection, the next step is to create a vector index. In the Amazon OpenSearch Service console, choose Serverless Collections, then select your collection.
- Choose Create vector index.

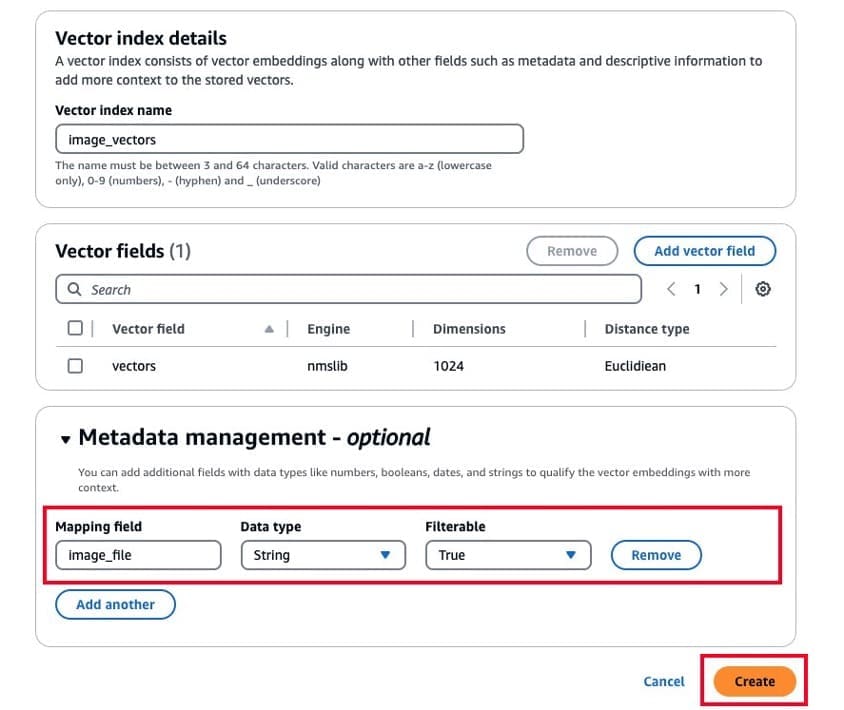
- Next, create a vector field by entering a name, defining an engine, and adding the dimensions, and search configurations.
- Vector field name: Enter a name, such as
vector. - Engine: Select nmslib.
- Dimensions: Enter 1024.
- Distance metric: Select Euclidean.
- Choose Confirm.
- Vector field name: Enter a name, such as

- To tag each embedding with the image file name, you must also add a mapping field under Metadata management.
- Mapping field: Enter
image_file. - Data type: Select String.
- Filterable: Select True.
- Choose Create to create the index.
- Mapping field: Enter

- Now that the vector index has been created, you can ingest the embeddings. To do so, run the following code segment to connect to your Amazon OpenSearch Serverless collection.
- After connecting, you can ingest your embeddings and the associated image key for each vector as shown in the following code.
Use Amazon Rekognition to extract key objects
Now that the embeddings have been created, use Amazon Rekognition to extract objects of interest from your search query. Amazon Rekognition analyzes images to identify objects, people, text, and scenes by detecting labels and generating bounding boxes. In this use case, Amazon Rekognition will be used to detect shoe labels in query images.
To view the bounding boxes around your respective images, run the following code. If you want to apply this to your own sample images, make sure to specify the labels you want to identify. Upon completion of the bounding box and label generation, the extracted objects will be saved in your local directory in the SageMaker Notebook environment.
The following image shows the outputted image with the respective labels within the bounding boxes:

Embed object image
Now that the object of interest within the image has been extracted, you need to generate an embedding for it so that it can be searched against the stored vectors in the Amazon OpenSearch Serverless index. To do so, find the best extracted image in the local directory created when the images were downloaded. Ensure the image is unobstructed, high-quality, and effectively encapsulates the features that you’re searching for. After you have identified the best image, paste its file name as shown in the following code.
Perform a reverse image search
With the embedding of the extracted object, you can now perform a search against the Amazon OpenSearch Serverless vector index to retrieve the closest matching images, which is performed using the k-NN algorithm. When you created your vector index earlier, you defined the similarity between vector distances to be calculated using the Euclidian metric with the nmslib engine. With this configuration, you can define the number of results to retrieve from the index and invoke the Amazon OpenSearch Service client with a search request as shown in the following code.
Because the preceding search retrieves the file names that are associated with the closest matching vectors, the next step is to fetch each specific image to display the results. This can be accomplished by downloading the specific image from the S3 bucket to a local directory in the notebook, then displaying each one sequentially. Note that if your images are stored within a subdirectory in the bucket, you might need to add the appropriate prefix to the bucket path as shown in the following code.
The following images show the results for the closest matching products in the S3 bucket related to the extracted object image query:
First match:
File Name: image17.jpeg
Score: 0.64478767

Second match:
File Name: image209.jpeg
Score: 0.64304984

Third match:
File Name: image175.jpeg
Score: 0.63810235

Clean up
To avoid incurring future charges, delete the resources used in this solution.
- Delete the Amazon OpenSearch Collection vector index.
- Delete the Amazon OpenSearch Serverless collection.
- Delete the Amazon SageMaker resources.
- Empty and delete the Amazon S3 bucket.
Conclusion
By combining the power of Amazon Rekognition for object detection and extraction, Amazon Titan Multimodal Embeddings for generating vector representations, and Amazon OpenSearch Serverless for efficient vector indexing and search capabilities, you successfully created a robust reverse image search engine. This solution enhances product recommendations by providing precise and relevant results based on visual queries, thereby significantly improving the user experience for ecommerce solutions.
For more information, see the following resources:
- Amazon Rekognition Developer Guide
- Amazon Titan Multimodal Embeddings
- Getting started with Amazon OpenSearch Service
About the Authors
 Nathan Pogue is a Solutions Architect on the Canadian Public Sector Healthcare and Life Sciences team at AWS. Based in Toronto, he focuses on empowering his customers to expand their understanding of AWS and utilize the cloud for innovative use cases. He is particularly passionate about AI/ML and enjoys building proof-of-concept solutions for his customers.
 Waleed Malik is a Solutions Architect with the Canadian Public Sector EdTech team at AWS. He holds six AWS certifications, including the Machine Learning Specialty Certification. Waleed is passionate about helping customers deepen their knowledge of AWS by translating their business challenges into technical solutions.

Leave a Reply