
Improve accuracy of Amazon Rekognition Face Search with user vectors

In various industries, such as financial services, telecommunications, and healthcare, customers use a digital identity process, which usually involves several steps to verify end-users during online onboarding or step-up authentication. An example of one step that can be used is face search, which can help determine whether a new end-user’s face matches those associated with an existing account.
Building an accurate face search system involves several steps. The system must be able to detect human faces in images, extract the faces into vector representations, store face vectors in a database, and compare new faces against existing entries. Amazon Rekognition makes this effortless by giving you pre-trained models that are invoked via simple API calls.
Amazon Rekognition enables you to achieve very high face search accuracy with a single face image. In some cases, you can use multiple images of the same person’s face to create user vectors and improve accuracy even further. This is especially helpful when images have variations in lighting, poses, and appearances.
In this post, we demonstrate how to use the Amazon Rekognition Face Search APIs with user vectors to increase the similarity score for true matches and decrease the similarity score for true non-matches.
We compare the results of performing face matching with and without user vectors.
Amazon Rekognition face matching
Amazon Rekognition face matching enables measuring the similarity of a face vector extracted from one image to a face vector extracted from another image. A pair of face images is said to be a true match if both images contain the face of the same person, and a true non-match otherwise. Amazon Rekognition returns a score for the similarity of the source and target faces. The minimum similarity score is 0, implying very little similarity, and the maximum is 100.
For comparing a source face with a collection of target faces (1:N matching), Amazon Rekognition allows you to create a Collection object and populate it with faces from images using API calls.
When adding a face to a collection, Amazon Rekognition doesn’t store the actual image of the face but rather the face vector, a mathematical representation of the face. With the SearchFaces API, you can compare a source face with one or several collections of target faces.
In June 2023, AWS launched user vectors, a new capability that significantly improves face search accuracy by using multiple face images of a user. Now, you can create user vectors, which aggregate multiple face vectors of the same user. User vectors offer higher face search accuracy with more robust depictions, because they contain varying degrees of lighting, sharpness, pose, appearance, and more. This improves the accuracy compared to searching against individual face vectors.
In the following sections, we outline the process of using Amazon Rekognition user vectors. We guide you through creating a collection, storing face vectors in that collection, aggregating those face vectors into user vectors, and then comparing the results of searching against those individual face vectors and user vectors.
Solution overview
For this solution, we use an Amazon Rekognition collection of users, each with its associated indexed face vectors from a number of different images of faces for each user.
Let’s look at the workflow to build a collection with users and faces:
- Create an Amazon Rekognition collection.
- For each user, create a user in the collection.
- For each image of the user, add the face to the collection (IndexFaces, which returns face ID corresponding to each face vector).
- Associate all indexed face IDs with the user (this is necessary for user vectors).
Then, we will compare the following workflows:
Searching with a new given input image against individual face vectors in our collection:
- Get all faces from an image (DetectFaces).
- For each face, compare against individual faces in our collection (SearchFacesByImage).
Searching with a new given input image against user vectors in our collection:
- Get all faces from an image (DetectFaces).
- For each face, compare to the user vector (SearchUsersByImage).
Now let’s describe the solution in details.
Prerequisites
Add the following policy to your AWS Identity and Access Management (IAM) user or role. The policy grants you permission to the relevant Amazon Rekognition APIs and allows access to an Amazon Simple Storage Service (Amazon S3) bucket to store the images:
Create an Amazon Rekognition collection and add users and faces
First, we create an S3 bucket to store users’ images. We organize the bucket by creating a folder for each user that contains their personal images. Our images folder looks like the following structure:
Our S3 bucket has a directory for each user that stores their images. There are currently two folders, and each contains several images. You can add more folders for your users, each containing one or more images to be indexed.
Next, we create our Amazon Rekognition collection. We have supplied helpers.py, which contains different methods that we use:
- create_collection – Create a new collection
- delete_collection – Delete a collection
- create_user – Create a new user in a collection
- add_faces_to_collection – Add faces to collection
- associate_faces – Associate face_ids to a user in a collection
- get_subdirs – Get all subdirectories under the S3 prefix
- get_files – Get all files under the S3 prefix
The following is an example method for creating an Amazon Rekognition collection:
Create the collection with the following code:
Next, let’s add the face vectors into our collection and aggregate them into user vectors.
For each user in the S3 directory, we create a user vector in the collection. Then we index the face images for each user into the collection as individual face vectors, which generates face IDs. Lastly, we associate the face IDs to the appropriate user vector.
This creates two types of vectors in our collection:
- Individual face vectors
- User vectors, which are built based on the face vector IDs supplied using the method
associate_faces
See the following code:
We use the following methods:
- get_subdirs – Returns a list of all the users’ directories. In our example, the value is [Swami,Werner].
- get_files – Returns all the images files under the S3 prefix for the user.
- face_ids – This is a list containing all the face IDs belonging to a user. We use this list when calling the AssociateFaces API.
As explained earlier, you can add more users by adding folders for them (the folder dictates the user ID) and add your images in that folder (no ordering is required for the files).
Now that our environment is set up and we have both individual face vectors and user vectors, let’s compare our search quality against each of them. To do that, we use a new photo with multiple people and attempt to match their faces against our collection, first against the individual face vectors and then against the user vectors.
Face search of image against a collection of individual face vectors
To search against our individual face vectors, we use the Amazon Rekognition SearchFacesByImage API. This function uses a source face image to search against individual face vectors in our collection and returns faces that match our defined similarity score threshold.
An important consideration is that the SearchFacesByImage API will only operate on the largest face detected in the image. If multiple faces are present, you need to crop each individual face and pass it separately to the method for identification.
For extracting faces details from an image (such as their location on the image), we use the Amazon Rekognition DetectFaces API.
The following detect_faces_in_image method detects faces in an image. For each face, it performs the following actions:
- Print its bounding box location
- Crop the face from the image and check if such face exists in the collection and print the user or ‘Unknown’
- Print the similarity score
The example Python code uses the Pillow library for doing the image manipulations (such as printing, drawing, and cropping).
We use a similarity score threshold of 99%, which is a common setting for identity verification use cases.
Run the following code:
file_key is the S3 object key we want to match against our collection. We have supplied an example image (photo.jpeg) under the images folder.
The following image shows our results.
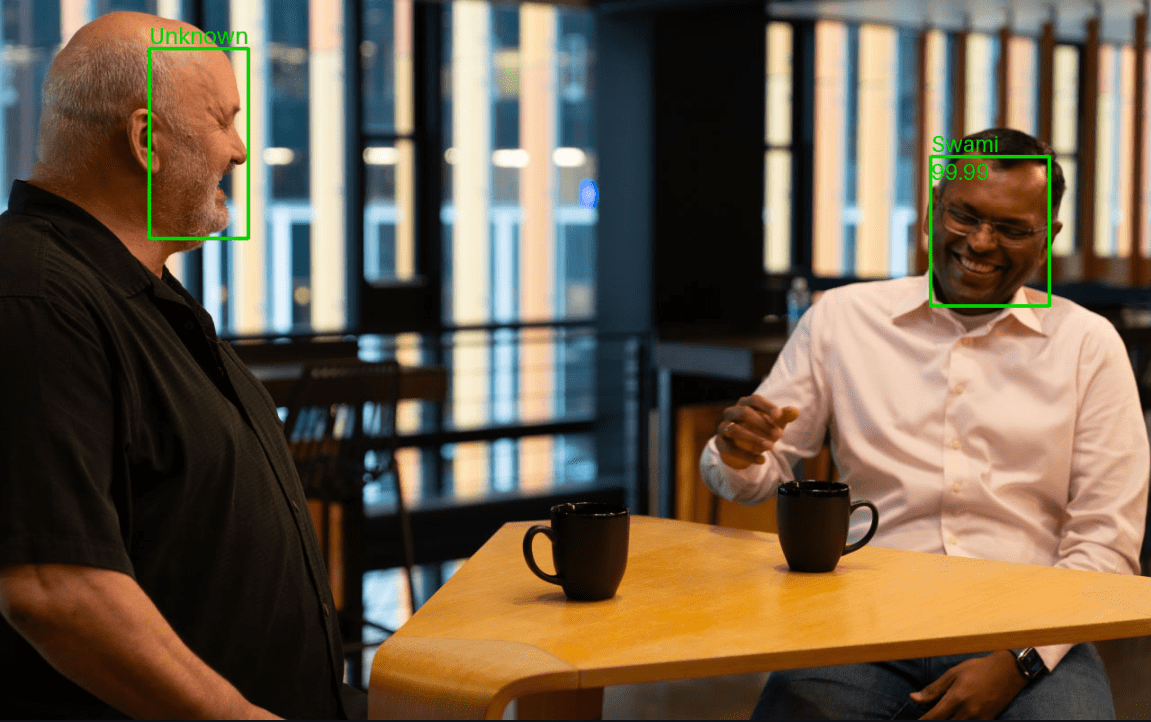
Using a threshold of 99%, only one person was identified. Dr. Werner Vogels was flagged as Unknown. If we run the same code using a lower threshold of 90 (set threshold=90), we get the following results.
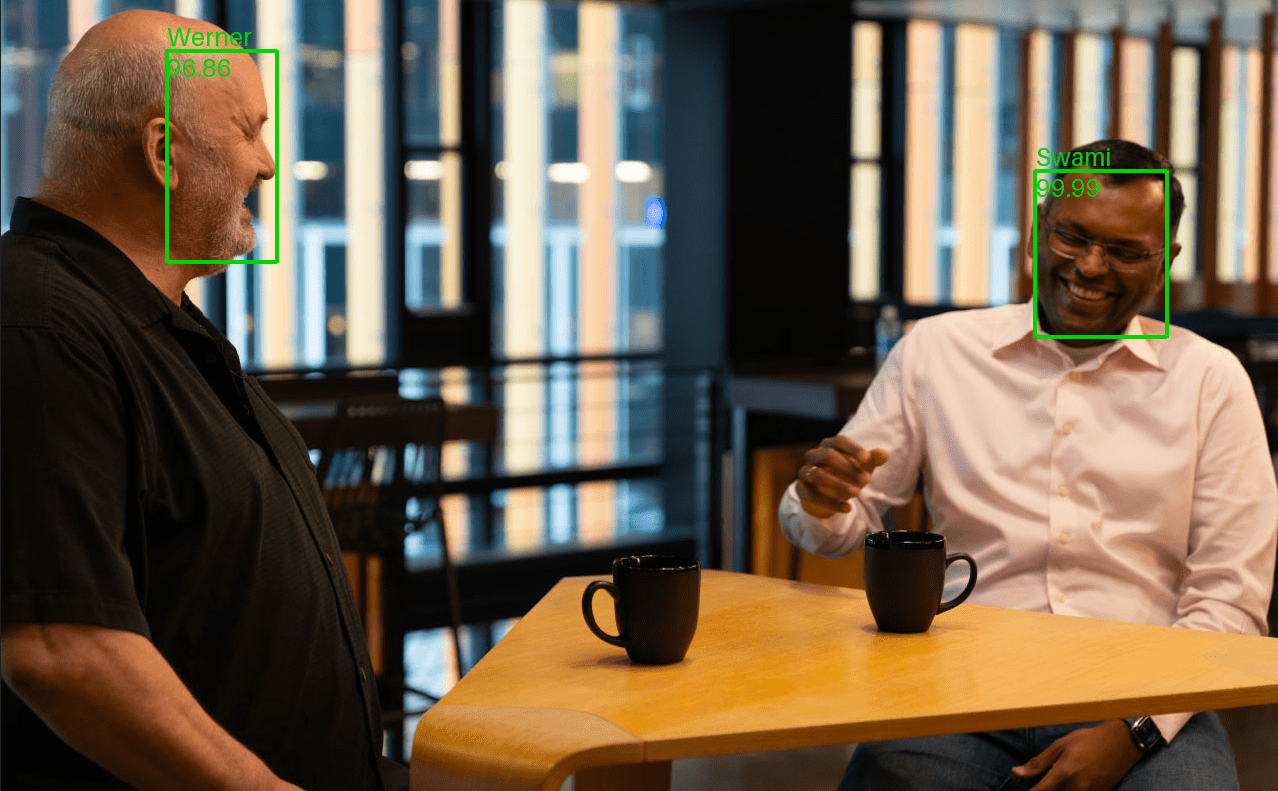
Now we see Dr. Werner Vogel’s face has a similarity score of 96.86%. Next, let’s check if we can get the similarity score above our defined threshold by using user vectors.
Face search of image against a collection of user vectors
To search against our user vectors, we use the Amazon Rekognition SearchUsersByImage API. This function uses a source face image to search against user vectors in our collection and returns users that match our defined similarity score threshold.
The same consideration is relevant here – the SearchUsersByImage API will only operate on the largest face detected in the image. If there are multiple faces present, you need to crop each individual face and pass it separately to the method for identification.
For extracting faces details from an image (such as their location on the image), we use the Amazon Rekognition DetectFaces API.
The following detect_users_in_image method detects faces in an image. For each face, it performs the following actions:
- Print its bounding box location
- Crop the face from the image and check if such user face exists in our collection and print the user or ‘Unknown’
- Print the similarity score
See the following code:
The function returns a modified image with the results that can be saved to Amazon S3 or printed. The function also outputs statistics about the estimated ages of the faces to the terminal.
Run the following code:
The following image shows our results.
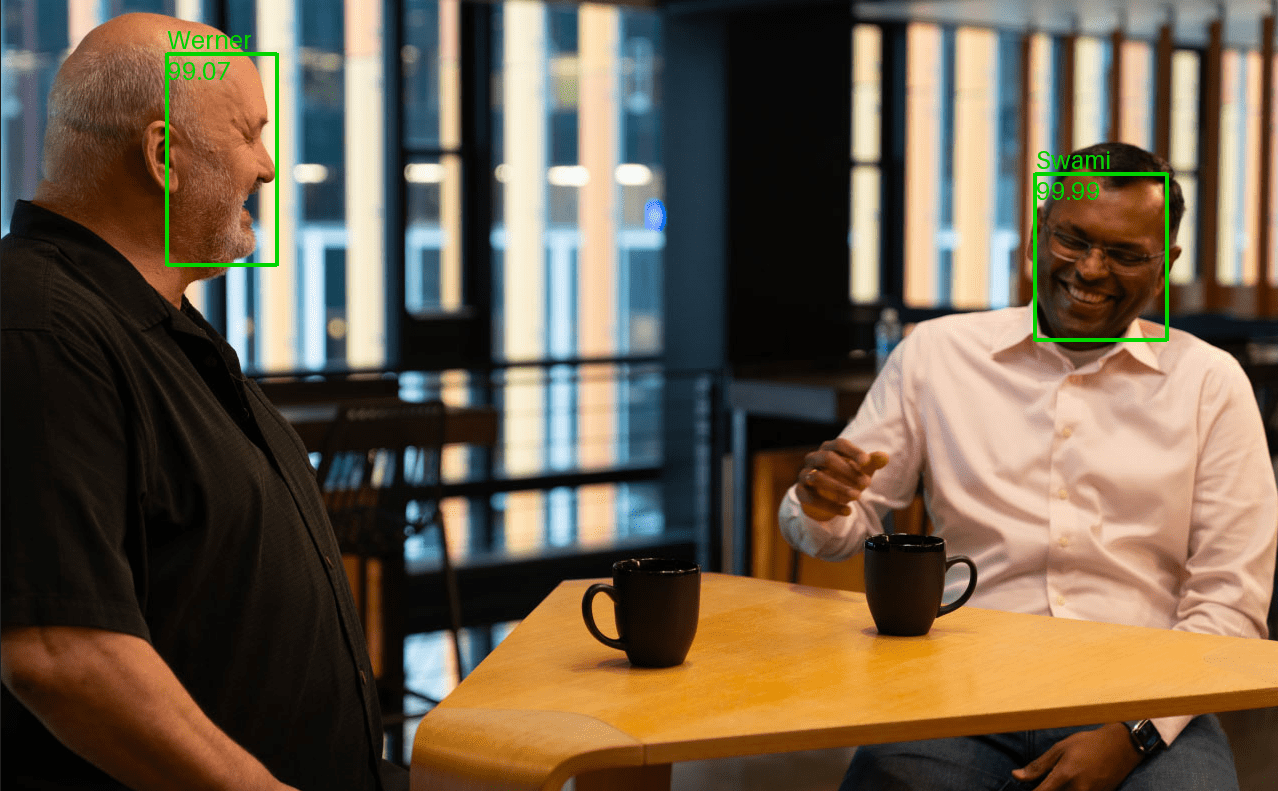
The users that exist in our collection were identified correctly with high similarity (over 99%).
We were able to increase the similarity score by using three face vectors per user vector. As we increase the number of face vectors used, we expect the similarity score for true matches to also increase. You can use up to 100 face vectors per user vector.
An end-to-end example code can be found in the GitHub repository. It includes a detailed Jupyter notebook that you can run on Amazon SageMaker Studio (or other alternatives).
Clean up
To delete the collection, use the following code:
Conclusion
In this post, we presented how to use Amazon Rekognition user vectors to implement face search against a collection of users’ faces. We demonstrated how to improve face search accuracy by using multiple face images per user and compared it against individual face vectors. Additionally, we described how you can use the different Amazon Rekognition APIs to detect faces. The provided example code serves as a solid foundation for constructing a functional face search system.
For more information about Amazon Rekognition user vectors, refer to Searching faces in a collection. If you’re new to Amazon Rekognition, you can use our Free Tier, which lasts 12 months and includes processing 5,000 images per month and storing 1,000 user vector objects per month.
About the Authors
 Arik Porat is a Senior Startups Solutions Architect at Amazon Web Services. He works with startups to help them build and design their solutions in the cloud, and is passionate about machine learning and container-based solutions. In his spare time, Arik likes to play chess and video games.
 Eliran Efron is a Startups Solutions Architect at Amazon Web Services. Eliran is a data and compute enthusiast, assisting startups designing their system architectures. In his spare time, Eliran likes to build and race cars in Touring races and build IoT devices.
Leave a Reply