Maximizing NLP model performance with automatic model tuning in Amazon SageMaker
The field of Natural Language Processing (NLP) has had many remarkable breakthroughs in the past two years. Advanced deep learning models are raising the state-of-the-art performance standards for NLP tasks. To benefit from newly published NLP models, the best approach is to apply a pre-trained language model to a new dataset and fine-tune it for a specific NLP task. This approach is known as transfer learning, which could significantly reduce model training resource requirements, compared to training a model from scratch, and could also produce decent results, even with small amounts of training data.
With the rapid growth of NLP techniques, many NLP frameworks with packaged pre-trained language models have been developed to provide users easy access to transfer learning. For example, ULMFiT by fast.ai and PyTorch-Transformers by Hugging Face are two popular NLP frameworks with pre-trained language models.
This post shows how to fine-tune NLP models using PyTorch-Transformers in Amazon SageMaker and apply the built-in automatic model-tuning capability for two NLP datasets: the Microsoft Research Paraphrase Corpus (MRPC) [1] and the Stanford Question Answering Dataset (SQuAD) 1.1 [2]. PyTorch-Transformers is a library with a collection of state-of-the-art pre-trained language models, including BERT, XLNET, and GPT-2. This post uses its pre-trained BERT (Bidirectional Encoder Representations from Transformers) uncased base model, which Google developed [3].
| About this blog post | |
| Time to read | 10 minutes |
| Time to complete | ~ 20 hours |
| Cost to complete | ~ $160 (at publication time) |
| Learning level | Advanced (300) |
| AWS services | Amazon SageMaker Amazon S3 |
The detailed step-by-step code walkthrough can be found in the example notebook.
This post demonstrates how to do the following:
- Run PyTorch-Transformers Git code in Amazon SageMaker that can run on your local machine, using the SageMaker PyTorch framework.
- Optimize hyperparameters using automatic model tuning in Amazon SageMaker.
- View the sensitivity of NLP models to hyperparameter values.
Setting up PyTorch-Transformers
This post uses a ml.t2.medium notebook instance. For a general introduction to Amazon SageMaker, see Get Started with Amazon SageMaker.
This post uses a General Language Understanding Evaluation (GLUE) dataset MRPC as an example to walk through the key steps required for onboarding the PyTorch-Transformer into Amazon SageMaker, and for fine-tuning the model using the SageMaker PyTorch container. To set up PyTorch-Transformer, complete the following steps:
- Download the GLUE data by running the download_glue_data.py script on the GitHub repo and unpacking it to the directory
$GLUE_DIR. The following example code in the Jupyter notebook downloads the data and saves it to a folder namedglue_data: - Copy the PyTorch-Transformer GitHub code to a local directory in the Amazon SageMaker notebook instance. See the following code:
After these two steps, you should have a data folder named
glue_dataand a script folder namedpytorch-transformersin the directory of your Jupyter notebook. - Fine tune the BERT model for the MRPC dataset. Use the script
run_glue.py, provided in/pytorch-transformers/example/, as a training script for the PyTorch estimator in Amazon SageMaker.
Before you create the estimator, make the following changes:
- Check and modify the argparse code in
run_glue.pyto allow the SageMaker estimator to read the input arguments as hyperparameters. For example, you may want to treatdo_trainanddo_evalas hyperparameters and pass a boolean value to them when the PyTorch estimator is called in Amazon SageMaker. - Create a
requirements.txtfile in the same directory as the training scriptrun_glue.py. Therequirements.txtfile should include packages required by the training script that are not already installed by default in the Amazon SageMaker PyTorch container. For example,pytorch_transformersis one of the packages you need to install.
A requirements.txt file is a text file that contains a list of required packages that are installed using a python package installer, in this case pip. When you launch training jobs, the Amazon SageMaker container automatically looks for a requirements.txt file in the script source folder, and uses pip install to install the packages listed in that file.
Fine-tuning the NLP model in Amazon SageMaker
After downloading the data and preparing the training script, you are ready to fine-tune the NLP model in Amazon SageMaker. To launch a training job, complete the following steps:
- Upload the data to Amazon S3. See the following code:
- Configure the training script environment variables and hyperparameter initial settings. See the following code:
In the preceding code, you pass the container directories for input data (
/opt/ml/input/data/training) and model artifacts (/opt/ml/model) to the training script. You provide directories relative to the container, instead of local directories, because Amazon SageMaker runs a training job in a Docker container. To launch a training job, you need to pass the training data’s S3 path to theestimator.fit()function. During the container creation process, Amazon SageMaker automatically downloads the S3 data and saves it to the directories defined by the container’s environment variables.It is important to know the correct model input and output locations in an Amazon SageMaker Docker container. For model input, use
/opt/ml/input/data/channel_name/, where the user provides thechannel_name(for exampletrainingortesting). For model artifacts, use/opt/ml/model/. For more information, see Amazon SageMaker Containers: a Library to Create Docker Containers and Building your own algorithm container in the GitHub repo.The training script
run_glue.pyloads both training and validation data from the same directory, so you only need to define one data directory and label the channel name astraining. The model logging file and trained model artifacts are saved to the directory/opt/ml/model/in the Docker container, and upload to S3 when the training job is complete. - Create a PyTorch estimator and launch a training job. See the following code:
The training job for the preceding example takes approximately five minutes to complete. You should see a training job launched in the Training jobs session tab in the Amazon SageMaker console. By choosing the training job, you can see detailed information about the training run, including Amazon CloudWatch logs and the S3 location link for model output and artifacts.
Launching automatic model tuning
Test the training setup by completing one full training job without errors. Then you can launch an automatic model tuning using Bayesian optimization with the following steps:
- Define an optimization metric. Amazon SageMaker supports predefined metrics that it can read automatically from the training CloudWatch log, which exist for built-in algorithms (such as XGBoost) and frameworks (such as TensorFlow or MXNet). When you use your own training script, you need to tell Amazon SageMaker how to extract your metric from the log with a simple regular expression. See the following code:
Modify
run_glue.pyto make sure the model evaluation results print out into the CloudWatch log. For this post, use the F1 score as the optimization metric for automatic model tuning. - Define the hyperparameter range. See the following code:
For large NLP models, it is better to limit the tuning job to one or two hyperparameters at a time, so the Bayesian optimization is stable and can converge faster. Also keep in mind that different hyperparameter values could require different computing resources. For example, the batch size for deep learning models directly impacts the amount of CPU/GPU memory you need during model training. Setting a hyperparameter range that is compatible with the EC2 training instance capacity is good practice, and helps provide a smooth model tuning experience.
- Launch the hyperparameter tuning job. See the following code:
You can monitor the tuning job’s progress in the Amazon SageMaker console. For more information, see Monitor the Progress of a Hyperparameter Tuning Job.
Automatic model tuning results for GLUE dataset MRPC
You can easily extract the hyperparameter tuning results into a dataframe for further analysis. See the following code:
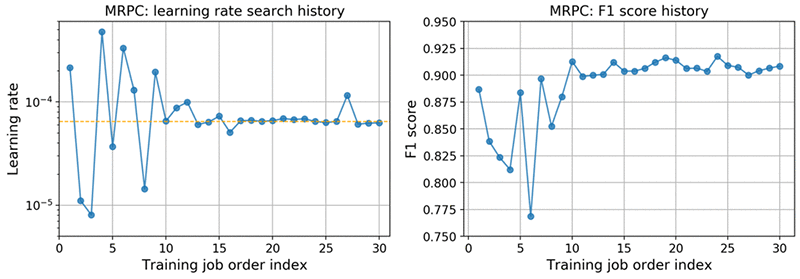
The following graphs show the progression of the learning rate and the model F1 score over training jobs, ordered by the training job start time. The Bayesian optimization process is set using three parallel jobs for 10 iterations (a total of 30 training jobs). The automatic model tuning took 15 training jobs (five iterations) to find an optimal learning rate and then finely adjust the learning rate around a value of 6.5e-5 to maximize the F1 score.

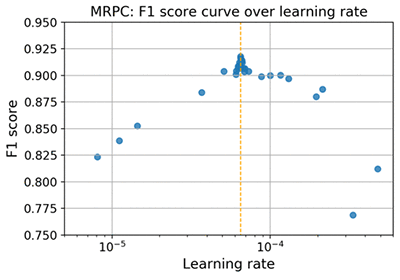
The following graph plots the F1 score vs. learning rate and illustrates the model’s sensitivity to hyperparameters. The results are from the MRPC dev dataset using the pre-trained BERT uncase base model.

The F1 score can vary widely between 0.75 and 0.92 for a learning rate between 1e-5 and 5e-4. The graph also shows there is an optimal learning rate at 6.47e-5, with the F1 score peaked at 0.918 for the validation dataset. Most of the training jobs (22 of 30 jobs) were conducted near the optimal value of the learning rate, indicating good efficiency of the Bayesian optimization algorithm.
Automatic model tuning results for SQuAD dataset
You can conduct a similar automatic model tuning for the SQuAD 1.1 dataset, a collection of 100K crowd-sourced question and answer pairs. Fine-tuning the SQuAD dataset demonstrates the hyperparameter tuning for another NLP task and also for a dataset larger than MRPC data, which is a collection of approximately 5,000 sentence pairs. The code details can be found in the notebook.
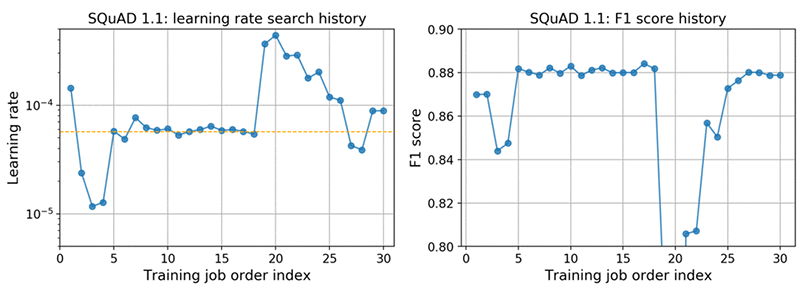
The following graphs show the hyperparameter tuning progression in the same way as the MRPC results. The training has slightly different settings and used two parallel jobs for 15 iterations (30 jobs in total). Again, the Bayesian optimization can quickly find an optimal learning rate (around 5.7e-5) after eight jobs (four iterations). There is also a spike at job 20, but then the tuning jobs quickly converge toward the optimal learning rate. The spike at job 20 may be due to randomization in the Bayesian optimization algorithm, which tends to prevent local minimum/maximum fitting.

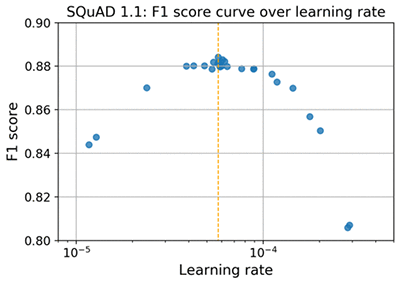
Similar to the MRPC case, the SQuAD model also has a strong sensitivity to hyperparameter values. The following graph of F1 vs. learning rate shows a nice parabolic shape, with the optimal learning rate at 5.73e-5. The corresponding F1 score is 0.884 and the exact match (EM) is 0.812, which are similar to the original BERT paper reporting of F1 at 0.885 and EM at 0.808 for the SQuAD 1.1 dev dataset.

We used a smaller batch size (16) and one epoch in model tuning, compared to a batch size of 32 and three epochs as used in the BERT paper [3].
Cleaning up
To prevent any additional charges, stop the notebook instance and delete the model artifacts saved in S3.
Conclusion
This post showed you how to fine-tune NLP models using Hugging Face’s PyTorch-Transformers library in Amazon SageMaker, and demonstrated the effectiveness of using the built-in automatic model tuning in Amazon SageMaker to maximize model performance through hyperparameter optimization. This approach makes it easy to adopt state-of-the-art language models for NLP problems, and to achieve new accuracy records in NLP by using Amazon SageMaker’s automatic model tuning capability.
References:
[1] Alex Wang, Amanpreet Singh, Julian Michael, Fe-lix Hill, Omer Levy, and Samuel Bowman. “GLUE: A Multi-Task Benchmark and Analysis Platform for Natural Language Understanding.” arXiv preprint arXiv:1804.07461 (2018)
[2] Pranav Rajpurkar, Jian Zhang, Konstantin Lopyrev, and Percy Liang. “SQuAD: 100,000+ questions for machine comprehension of text.” arXiv preprint arXiv:1606.05250 (2016)
[3] Jacob Devlin, Ming-Wei Chang, Kenton Lee, Kristina Toutanova. “BERT: Pre-training of Deep Bidirectional Transformers for Language Understanding.” arXiv preprint arXiv: 1810.04805 (2018)
About the authors
 Jason Zhu is a Data Scientist with AWS Professional Services focusing on helping customers using machine learning. In his spare time, he enjoys being outdoors and growing his capabilities as a cook.
 Xiaofei Ma is an Applied Scientist with AWS AI Labs focusing on developing machine learning-based services for AWS customers. In his spare time, he enjoys reading and traveling.
 Kyle Brubaker is a Data Scientist with AWS Professional Services, where he works with customers to develop and implement machine learning solutions on AWS. He enjoys playing soccer, surfing, and finding new shows to watch.
Tags: Archive

Leave a Reply