Building a scalable outbound call engine using Amazon Connect and Amazon Lex
This is a guest post by AWS Machine Learning Hero Cyrus Wong.
Staying connected with family, friends, and colleagues is easy for most people who live with or close to others. For educators who need to communicate lessons and schedules with their students, or businesses who communicate with new and existing customers, staying connected can be hard, especially in times of crisis and isolation.
Specifically, I wanted to make remote communication between educators and students easier. Communicating time-sensitive information and confirming that students received messages can be hard; scaling communication from tens to thousands of students can make the problem more complex, impacting educator and student productivity, time, and overall experience.
To meet this challenge, I developed Callouts, a simple, consistent, and scalable solution for educators to communicate with students a using Amazon Connect and Amazon Lex. In crisis times, such as a quarantine, this solution helps educators use an automated bot that calls students to communicate important messages, such as schedule changes, general announcements, and attendance confirmation.
Even if the resulting calls are similar, building scalable contact flows and chatbots can take time. By generalizing a survey-like call job to contact multiple recipients in parallel, Callouts makes it easy for developers to create sophisticated conversational experiences. Non-technical users who may find this intimidating can simply upload an Excel file into an Amazon Simple Storage Service (Amazon S3) bucket to trigger an automatic process that ultimately results in the AI agent calling multiple recipients at the same time.
Architecture and design
Callouts uses AWS Serverless Application Model (AWS SAM), an open-source framework for building serverless applications. It offers a syntax designed specifically for expressing serverless resources.
The following diagram illustrates the architecture.
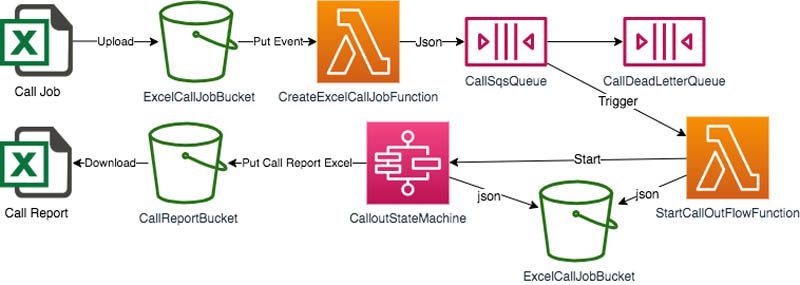
The goal of the architecture is to allow non-technical users to define a “call job” and request execution without having to write code. The user creates an Excel file that contains their call tasks (for example, “You now have until Friday to submit your homework.”) and uploads it to Amazon S3. This triggers CreateExcelCallJobFunction, which converts the Excel file into a JSON message and sends it to an Amazon Simple Queue Service (Amazon SQS) FIFO queue (CallSqsQueue). An AWS Lambda function connected to the SQS queue processes the incoming messages, creates individual call task data, uploads the data to an S3 bucket, and starts the CalloutStateMachine AWS Step Functions task. The individual job data is saved and loaded from Amazon S3 to prevent sending an oversized payload to the start execution API. The ReservedConcurrentExecutions value of StartCallOutFlowFunction is set to 1 to make sure only one job goes to the state machine at a time.
This design allows other systems to create a call job by sending the defined data message to the SQS queue directly.
CalloutStateMachine
The following diagram shows the CalloutStateMachine workflow.
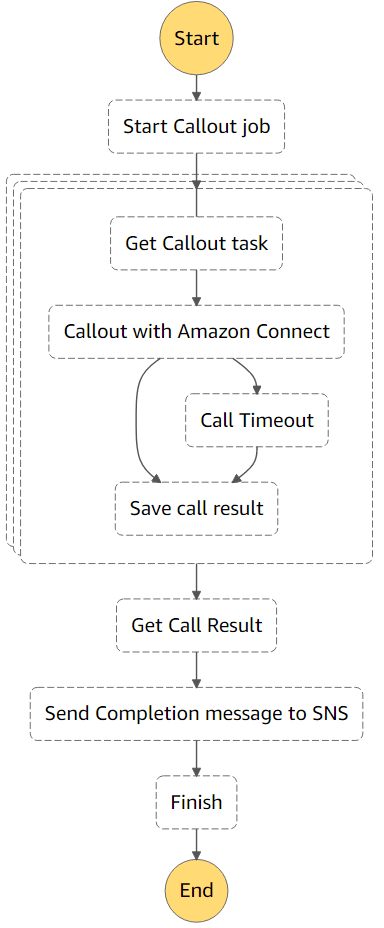
- One callout job includes a set of callout tasks, which calls one receiver.
- The callout task proceeds with dynamic parallelism. For more information, see New – Step Functions Support for Dynamic Parallelism.
- The step “Get Callout task” is a Lambda function to get the call task JSON from
ExcelCallTaskBucket. - The step “Callout with Amazon Connect” sends the message to
AsynCalloutQueue. - This step waits for the callback with task token or “Call Timeout.” For more information, see Call Amazon SQS with Step Functions.
- “Get Call Result” combines call results and generates an Excel call report.
- A completion message goes to the SNS topic.
This pattern lets the Amazon Connect contact flow use the SendTaskSuccess API to provide a call result for each outbound call with the task token. If “Callout with AWS Connect” can’t call back within 5 minutes by default, then the job goes through the “Call Timeout” state. For longer communications that may need more time to complete, you can change the AWS CloudFormation TimeoutSeconds parameter.
“Save call result” saves the call result to CallResultDynamoDBTable. “Get Call Result” retrieves all call results from CallResultDynamoDBTable, generates the call report, and uploads the report to the CallReportBucket.
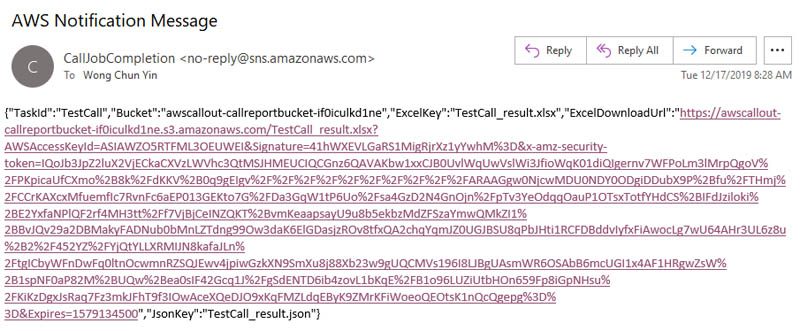
Finally, the job publishes a message to the CallJobCompletion SNS topic. The message contains the task ID, bucket name, Excel report key, JSON report key, and a pre-assigned URL of the Excel report.
You can create an email subscription to the SNS topic to get a notification message upon completion of the call job. See the following screenshot for an example.
Callouts with Amazon Connect
The following diagram shows the architecture of Callouts with Amazon Connect.

- The “Callout with Amazon Connect” step of the
CalloutStateMachineworkflow sends an individual call task JSON to the SQS FIFO queue AsynCalloutQueue. - A SQS new message event triggers
CalloutFunction. CalloutFunctionsends the call task to a “Calling out” contact flow.- If a phone number isn’t accessible, the function calls back to
CalloutStateMachinethrough theSendTaskSuccessAPI with the statusNotCallable. (If one of the phone calls fails and the function calls theSendTaskFailureAPI, the whole workflow fails. The workflow has to continue even if some calls fail.) - The “Calling out” contact flow interacts with three Lambda functions.
SendTaskSuccessFunctioncalls toCalloutStateMachinewith the statusCallCompletedwhen the “Calling out” contact flow is successfully complete.
“Calling out” contact flow
The following diagram illustrates the “Calling out” contact flow.
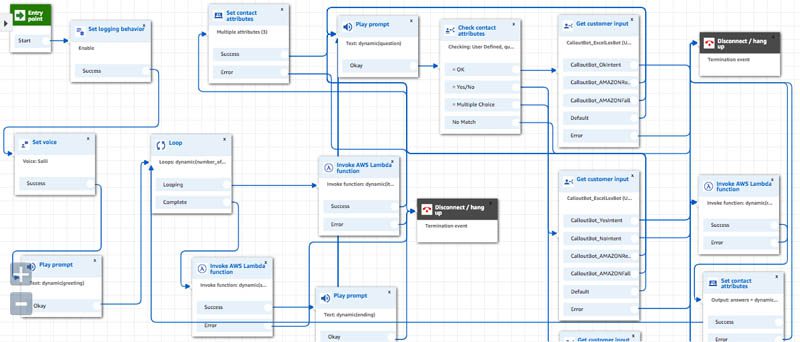
Although the contact flow may seem complicated, the logic is straightforward.
“Calling out” architecture
The following diagram illustrates the “Calling out” architecture.
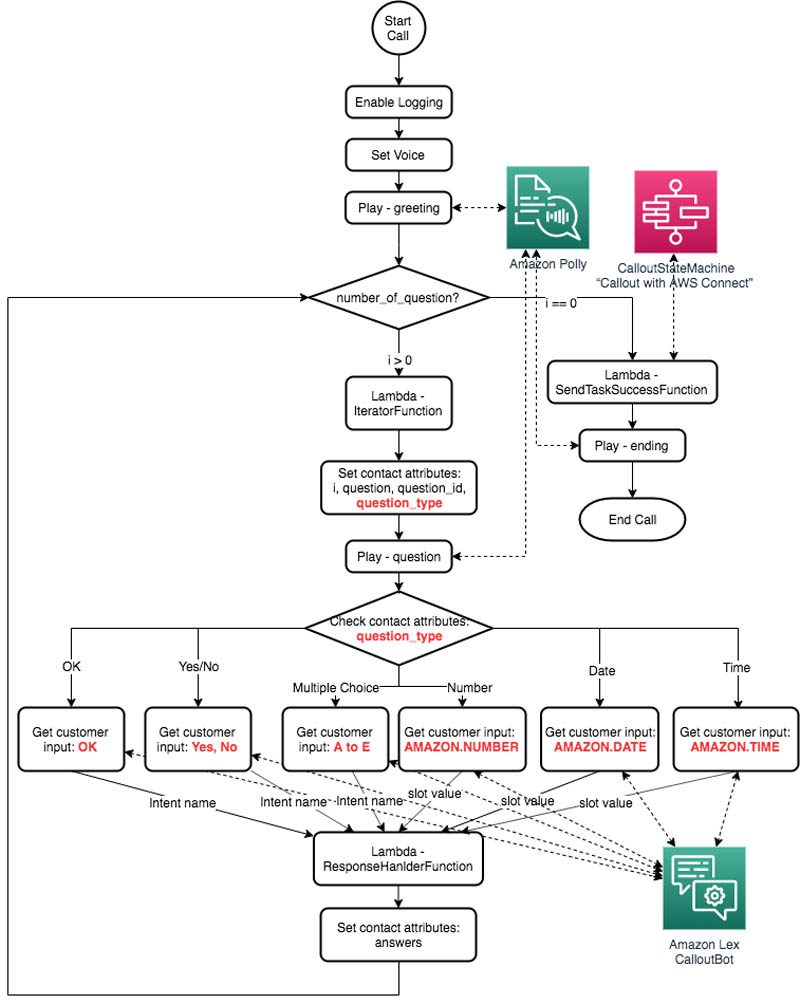
The following are a few highlights:
- Enabling logging is very useful for call debugging, and you can use CloudWatch Logs Insights to trace a call from the log stream. For more information, see Analyzing Log Data with CloudWatch Logs Insights. For example, see the following code:
- You can invoke Lambda functions to do anything, such as saving data into Amazon DynamoDB and checking information from databases. For more information, see Invoke AWS Lambda Functions.
- The “Get Customer Input” block redirects the call to Amazon Lex and returns the intent name and intent slot value for number, date, and time question types. For more information, see Create a Contact Flow and Add Your Amazon Lex Bot.
- The chat flow omits the possibility of error, and all errors in Lambda or Amazon Lex end the call. Additionally, all error handlers of contact flow blocks connect to the Disconnect/Hang Up block.
SendTaskSuccessFunctioncalls theSendTaskSuccessAPI with statusCallCompletedto finish the “Callout with AWS Connect” step.
Amazon Lex CalloutBot
This chatbot contains a set of intents that captures simple answers such as yes or no, letters, numbers, dates, and times; they don’t need a slot. The ExcelLexBot engine creates slots for each answer. For more sample flows and sample utterances, see Build an Amazon Lex Chatbot with Microsoft Excel and Building Better Bots Using Amazon Lex (Part 1).
This project contains four chatbots built on Amazon Lex to handle different scenarios: CalloutBot, CalloutBotDate, CalloutBotNumber, and CalloutBotTime.
The following conversation shows the question model:
Contact Flow: Play a question based on question_template and receiver data.
Chatbot Agent: Wait for answer in question_type.
User: Answer in question_type.
CalloutBot contains OkIntent, YesIntent, NoIntent, AIntent, BIntent, CIntent, DIntent, and EIntent. All the intents have a set of sample utterances, and Amazon Connect uses the intent name to capture the user’s answer. The following screenshots show the details in Excel for OkIntent and AIntent.
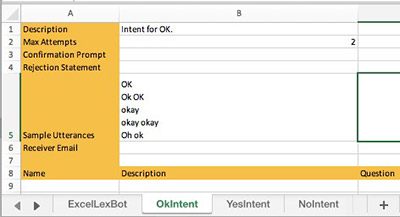
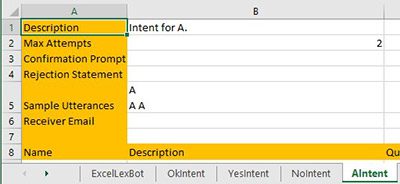
BIntent, CIntent, DIntent, and EIntent are all similar to AIntent. The bot uses those eight intents to handle OK, Yes/No, and multiple choice question types.
CalloutBotDate contains a DateIntent to solicit date information from the caller, receiver, or user; for example, for an appointment. See the following screenshot.

CalloutBotNumber contains a NumberIntent to solicit number information from the caller, receiver, or user; for example, for the number of attempts. See the following screenshot.

CalloutBotTime contains a TimeIntent to solicit time information from the caller, receiver, or user; for example, appointment information. See the following screenshot.

All chatbots contain AMAZONFallbackIntent and AMAZONRepeatIntent for the built-in intents FallbackIntent and RepeatIntent. The system uses built-in intents to capture the repeat and the message the chatbot can’t understand with a fallback intent. The contact flow repeats the question for the repeat or fallback intent captured. For more information, see Managing conversation flow with a fallback intent on Amazon Lex.
ExcelLexBot creates a DynamoDB table per intent to save each user answer and all intent history. For example, the following screenshot shows that after the receiver answered OK, you can find the record in the CalloutBotOkIntent table.
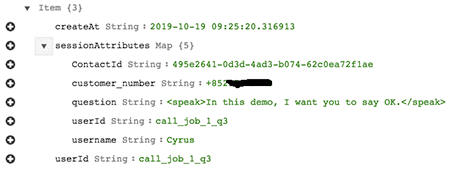
ContactId can help you to trace each call.
Call job Excel format
Non-technical users can also use Excel to create a call job. There are three Excel sheets: Configures, Questions, and Receivers. They are straightforward and don’t require any programming knowledge, and users need to fill in all three sheets for a call job. Developers can integrate Callouts into other systems by sending a JSON object into CallSqsQueue programmatically.
Receivers sheet
The list of receivers contains the following information:
- id – A unique identifier for each user.
- phone_number – The user’s phone number. If you specify the
phone_prefixin the Configures sheet, you don’t need to add the country code here. - Additional columns – Optional columns for your message. For example, the following table includes the additional column username.
| id | phone_number | username |
| 1 | 12345678 | Cyrus |
| 2 | 89654201 | Cyrus Wong |
Configures sheet
The Configures sheet contains the following information for the common settings of this call job:
- greeting – Greeting message for the call
- ending – Closing message for the call
- phone_prefix – International subscriber dialing (ISD) code for each phone call (the + is optional)
The following table shows example values in a Configures sheet.
| Key | Value |
| greeting | Hi {{ username }}, This is a simple survey. |
| ending | Good Bye {{ username }} and have a nice day! |
| phone_prefix | +852 |
Questions sheet
Each row in the Questions sheet represents one question. There are two columns:
- question_template – A Jinja 2 template generates output for each row receiver
- question_type – This contains the following question types:
The following table shows example values of question_template and question_type.
| question_template | question_type |
| Are you using Amazon Connect? | Yes/No |
| How do you first hear about Amazon Connect? A. Newsletter, B. Social Media, C. AWS Event, D. AWS Website, or E. From Friend. | Multiple Choice |
| How many applications do you use with Amazon Connect? | Number |
| When should we call you back? | Date |
| Preferred call back time? | Time |
| In this demo, I want you to say OK. | OK |
If you just want to make a call, remove all rows and keep the header.
The question_template, greeting, and ending columns are in the Jinja template and generate an output with each receiver row. All messages use Amazon Connect SSML and are embedded with
Call report in Excel
The following screenshot is an example of an Excel call report.
![]()
The report contains the following columns:
- task_id – The Excel file name. If you upload the same file again, you overwrite the result.
- receiver_id – The receiver ID from the Receivers sheet.
- call_at – The call start time.
- status – The status of the call. There are two values:
- CallCompleted – The receiver picked up the call and answered all the questions.
- DropCall – The receiver either didn’t pick up the call or didn’t complete all the questions.
- error – The entry
nullmeans no error or exception message. - phone_number – The receiver’s phone number.
- username – The additional field from the call job from the Receivers sheet. All additional columns are copied to the result report.
- Question_x – The number in the column name changes with the number of the question and shows the receiver’s answer.
Deploying Callouts
This section provides a walkthrough of deploying Callouts.
Creating an Amazon Connect instance and setting up contact flow
To create an Amazon Connect instance and set up the contact flow, complete the following steps:
- Create a virtual contact center instance in
us-east-1. For instructions, see Create an Amazon Connect Instance.- In Step 3, select I want to make outbound calls with Amazon Connect.
- Download the following contact flow from the GitHub repo.
- Import the “Calling out” contact flow. For instructions, see Export and Import a Contact Flow.
- Choose Show additional flow information.
- Locate the contact flow ARN (see the following screenshot).

- Record the
InstanceIdandContactFlowId.
The Amazon Connect ARN format is arn:${Partition}:connect::${Account}:instance/${InstanceId}/contact-flow/${ContactFlowId}. For more information, see Resource Types Defined by Amazon Connect.
- Set a phone number for the “Calling out” contact flow. For instructions, see Claim a Phone Number and Associate a Phone Number with a Contact Flow.
- Record the phone number.
Deploying the Amazon Lex Chatbot and Callouts serverless application
To deploy the chatbot, complete the following steps:
- Sign in to your AWS account.
- Choose the US East (N. Virginia) Region.
- Open AWS Serverless Application Repository for ExcelLexBot.
- Select I acknowledge that this app creates custom IAM roles and resource policies.
- Choose Deploy.
- Wait for the completion message.

- Choose View CloudFormation Stack.
- Choose Outputs.
- Download the zipped chatbot Excel files from the GitHub repo and unzip them.
- Upload the four Excel files into the S3 bucket
LexExcelBucket; for example,serverlessrepo-excellexbot-bucket-1bxqjwlbfqjy9. - On the AWS CloudFormation console, wait for the status of all four stacks to show as
CREATE_COMPLETE.

- Open the AWS Serverless Application Repository for Callouts.
- Select I acknowledge that this app creates custom IAM roles and resource policies.
- Choose Deploy with the parameters Create Connect Instance and set up contract flow (the application name is S3 bucket name prefix, and I suggest you use the default value).
- Wait for the completion message.
Giving permission to the Amazon Connect instance
To give permission to your Amazon Connect instance, add the Amazon Lex bot to the Amazon Connect instance and add CalloutBot_ExcelLexBot, CalloutBotDate_ExcelLexBot, CalloutBotNumber_ExcelLexBot, and CalloutBotTime_ExcelLexBot.
You don’t need to set up permission for the Lambda functions IteratorFunction, ResponseHanlderFunction, and SendTaskSuccessFunction for the Amazon Connect instance because AWS CloudFormation granted the invoke function permission.
When the deployment is complete, you can upload your call job to the S3 bucket.
Un-deploying Callouts
To un-deploy Callouts, complete the following steps:
- Go to
LexExcelBucketand delete the four chatbot Excel files.
This action triggers the deletion of the four chatbot stacks, which takes a few minutes.
- Delete all files in
excelcalljobbucketandcallreportbucket. - After the chatbot stacks are deleted, delete
serverlessrepo-ExcelLexBotandserverlessrepo-awscallouts.
Creating the outbound call job
To create the outbound call job, complete the following steps:
- Download the Excel example from the GitHub repo.
- Change the content in the file—at least the phone number and
phone_prefix. - Upload the file to the S3 bucket that contains
excelcalljobbucketin the name. - Wait for up to 5 minutes and download the call report from the S3 bucket that contains
callreportbucketin the name.
Demos
For examples of using Callouts, see the following videos on YouTube:
- “Callouts” Phone call demo – A demo of a conversation in which the receiver picks up a call and answer a simple survey
- ”Callouts” Demo 5 phones – A demo of phoning together
- “Callouts” Massive call demo – A demo of uploading an Excel file to Amazon S3 and receivers getting a call immediately
- “Callouts” Deployment demo – A step-by-step demo of how to deploy Callouts
Conclusion
This post demonstrates how to build Callouts, a solution for educators to contact students in a simple, consistent, and scalable way using Amazon Connect and Amazon Lex. Based on the user experience at the Hong Kong Institute of Vocational Education, we believe that this solution not only benefits educators and students, but can also aid caregivers, businesses, and individuals.
Project collaborators include Mike Ng, Technical Program Intern at AWS, Brian Cheung, Sam Lam, and Pearly Law from the IT114115 Higher Diploma in Cloud and Data Centre Administration. Special thanks to the AWS team, including Dickson Yue, Jerry Yuen, Niranjan Hira, Randall Hunt, and Cameron Peron, for educating and supporting our team.
About the Author
 Cyrus Wong is a Data Scientist at the Hong Kong Institute of Vocational Education (Lee Wai Lee) Cloud Innovation Centre, has achieved all 13 AWS Certifications, and enjoys sharing his AWS knowledge with others through open-source projects, blog posts, and events.
Tags: Archive


Leave a Reply