Perform interactive data processing using Spark in Amazon SageMaker Studio Notebooks
Amazon SageMaker Studio is the first fully integrated development environment (IDE) for machine learning (ML). With a single click, data scientists and developers can quickly spin up Studio notebooks to explore datasets and build models. You can now use Studio notebooks to securely connect to Amazon EMR clusters and prepare vast amounts of data for analysis and reporting, model training, or inference.
You can apply this new capability in several ways. For example, data analysts may want to answer a business question by exploring and querying their data in Amazon EMR, viewing the results, and then either alter the initial query or drill deeper into the results. You can complete this interactive query process directly in a Studio notebook and run the Spark code remotely. The results are then presented in the notebook interface.
Data engineers and data scientists can also use Apache Spark for preprocessing data and use Amazon SageMaker for model training and hosting. SageMaker provides an Apache Spark library that you can use to easily train models in SageMaker using org.apache.spark.sql.DataFrame DataFrames in your EMR Spark clusters. After model training, you can also host the model using SageMaker hosting services.
This post walks you through securely connecting Studio to an EMR cluster configured with Kerberos authentication. After we authenticate and connect to the EMR cluster, we query a Hive table and use the data to train and build an ML model.
Solution walkthrough
We use an AWS CloudFormation template to set up a VPC with a private subnet to securely host the EMR cluster. Then we create a Kerberized EMR cluster and configure it to allow secure connectivity from Studio. We then create a Studio domain and a new Studio user. Finally, we use the new PySpark (SparkMagic) kernel to authenticate and connect a Studio notebook to the EMR cluster.
The PySpark (SparkMagic) kernel allows you to define specific Spark configurations and environment variables, and connect to an EMR cluster to query, analyze, and process large amounts of data. Studio comes with a SageMaker SparkMagic image that contains a PySpark kernel. The SparkMagic image also contains an AWS Command Line Interface (AWS CLI) utility, sm-sparkmagic, that you can use to create the configuration files required for the PySpark kernel to connect to the EMR cluster. For added security, you can specify that the connection to the EMR cluster uses Kerberos authentication.
Studio runs on an environment managed by AWS. In this solution, the network access for the new Studio domain is configured as VPC Only. For more details on different connectivity methods, see Securing Amazon SageMaker Studio connectivity using a private VPC. The Elastic Network Interface (ENI) created in the private subnet connects to required AWS services through VPC endpoints.
The following diagram represents the different components used in this solution.
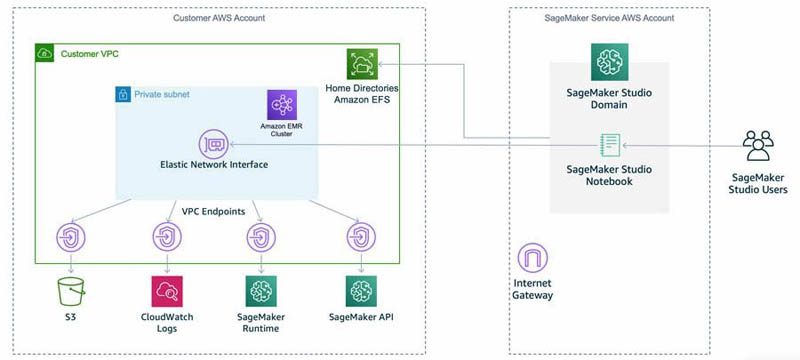
The CloudFormation template creates a Kerberized EMR cluster and configures it with a bootstrap action to create a Linux user and install Python libraries (Pandas, requests, and Matplotlib).
You can set up Kerberos authentication in a few different ways (for more information, see Kerberos Architecture Options):
- Cluster-dedicated Key Distribution Center (KDC)
- Cluster-dedicated KDC with Active Directory cross-realm trust
- External KDC
- External KDC integrated with Active Directory
The KDC can have its own user database or it can use cross-realm trust with an Active Directory that holds the identity store. For this post, we use a cluster-dedicated KDC that holds its own user database.
First, the EMR cluster has security configuration enabled to support Kerberos and is launched with a bootstrap action to create Linux users on all nodes and install the necessary libraries. The CloudFormation template launches the bash step after the cluster is ready. This step creates HDFS directories for the Linux users with default credentials. The user must change the password the first time they log in to the EMR cluster. The template also creates and populates a Hive table with a movie reviews dataset. We use this dataset in the Explore and query data section of this post.
The CloudFormation template also creates a Studio domain and a user named defaultuser. You can access the SparkMagic image from the Studio environment.
Deploy the resources with CloudFormation
You can use the provided CloudFormation template to set up the solution’s building blocks, including the VPC, subnet, EMR cluster, Studio domain, and other required resources.
This template deploys a new Studio domain. Ensure the Region used to deploy the CloudFormation stack has no existing Studio domain.
Complete the following steps to deploy the environment:
- Sign in to the AWS Management Console as an AWS Identity and Access Management (IAM) user, preferably an admin user.
- Choose Launch Stack to launch the CloudFormation template:
- Choose Next.
- For Stack name, enter a name for the stack (for example,
blog). - Leave the other values as default.
- Continue to choose Next and leave other parameters at their default.
- On the review page, select the check box to confirm that AWS CloudFormation might create resources.
- Choose Create stack.
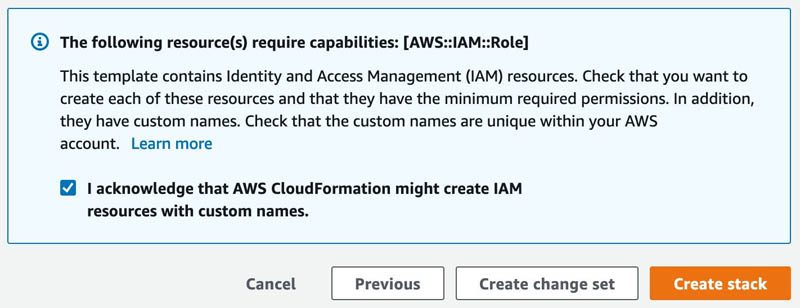
Wait until the status of the stack changes from CREATE_IN_PROGRESS to CREATE_COMPLETE. The process usually takes 10–15 minutes.
Connect a Studio Notebook to an EMR cluster
After we deploy our stack, we create a connection between our Studio notebook and the EMR cluster. Establishing this connection allows us to connect code to our data hosted on Amazon EMR.

Complete the following steps to set up and connect your notebook to the EMR cluster:
- On the SageMaker console, choose Amazon SageMaker Studio.
The first time launching a Studio session may take a few minutes to start.
- Choose the Open Studio link for
defaultuser.
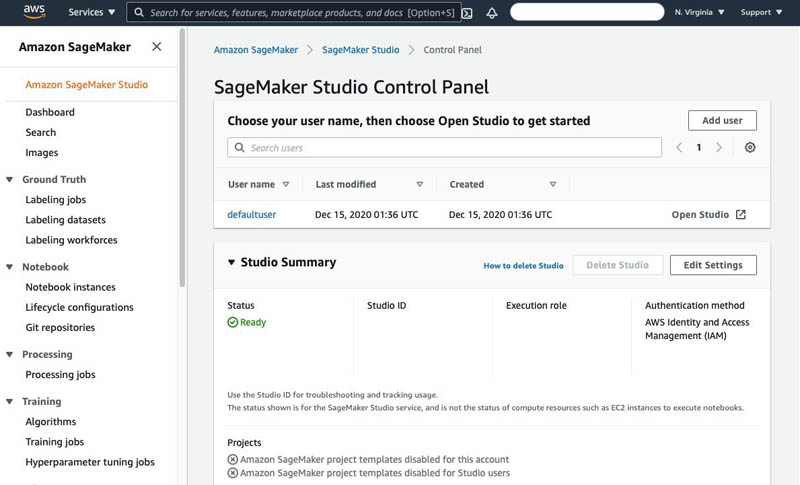
The Studio IDE opens. Next, we download the code for this walkthrough from Amazon Simple Storage Service (Amazon S3).
- Choose File, then choose New and Terminal.
- In the terminal, run the following commands:
- Open the
smstudio-pyspark-hive-sentiment-analysis.ipynb - For Select Kernel, choose PySpark (SparkMagic).
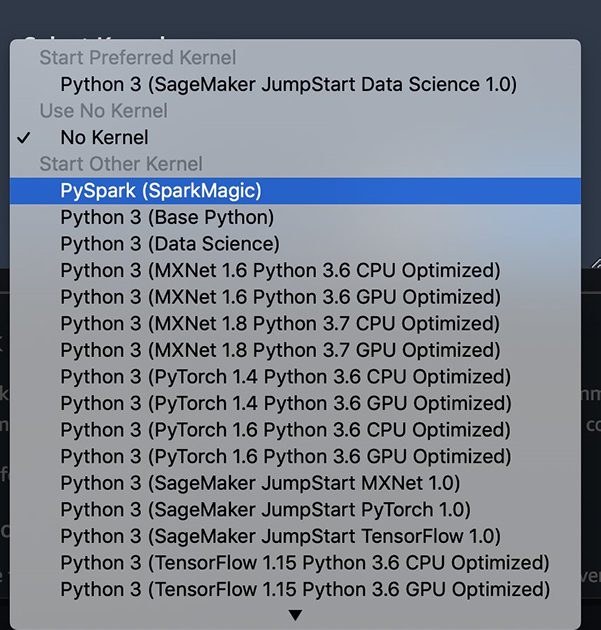
- Run each cell in the notebook and explore the capabilities of Sparkmagic using the PySpark kernel.
Before you can run the code in the notebook, you need to provide the cluster ID of the EMR cluster that was created as part of the solution deployment. You can find this information on the EMR console, on the Clusters page.

- Substitute the placeholder value with the ID of the EMR cluster.

- Connect to the EMR cluster from the notebook using the open-source Studio Sparkmagic library.
The SparkMagic library is available as open source on GitHub.

- In the notebook toolbar, choose the Launch terminal icon (
 ) to open a terminal in the same SparkMagic image as the notebook.
 - Run
kinit user1to get the Kerberos ticket. - Enter your password when prompted.
This ticket is valid for 24 hours by default. If you’re connecting to the EMR cluster for the first time, you must change the password.
- Choose the notebook tab and restart the Kernel using the Restart kernel icon (
 ) from the toolbar.
This is required so that SparkMagic can pick up the generated configuration.

- To verify that the connection was set up correctly, run the
%%infocommand.
This command displays the current session information.

Now that we have set up the connectivity, let’s explore and query the data.
Explore and query data
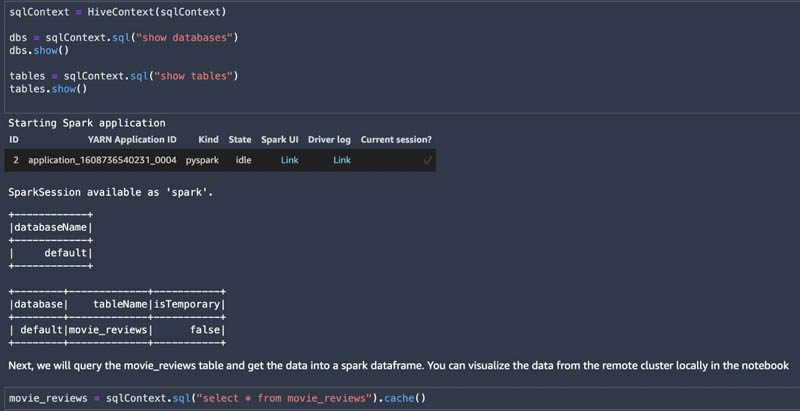
After you configure the notebook, run the code of the cells shown in the following screenshots. This connects to the EMR cluster in order to query data.
Sparkmagic allows you to run Spark code against the remote EMR cluster through Livy. Livy is an open-source REST server for Spark. For more information, see EMR Livy documentation.
Sparkmagic also creates an automatic SparkContext and HiveContext. You can use the HiveContext to query data in the Hive table and make it available in a spark DataFrame.
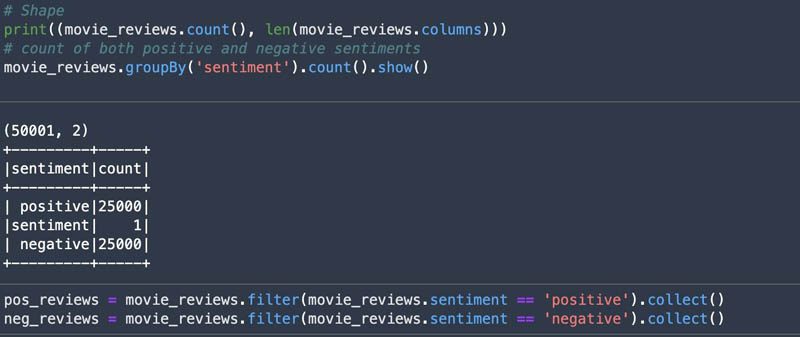
You can use the DataFrame to look at the shape of the dataset and size of each class (positive and negative) and visualize it using Matplotlib. The following screenshots show that we have a balanced dataset.
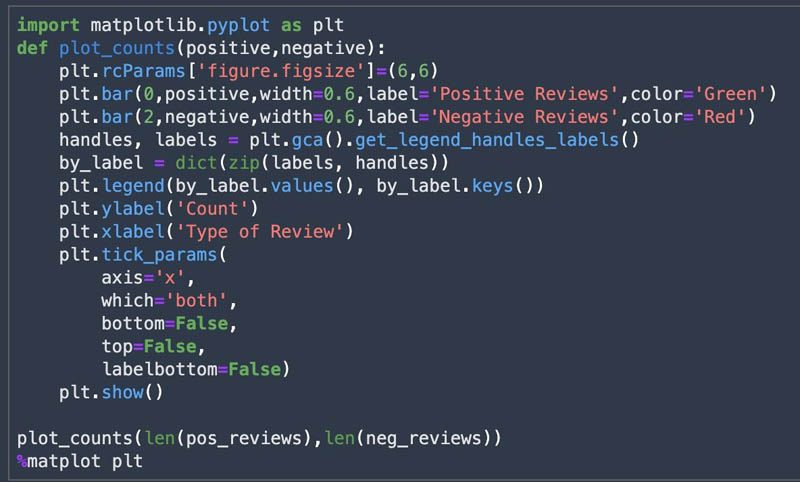
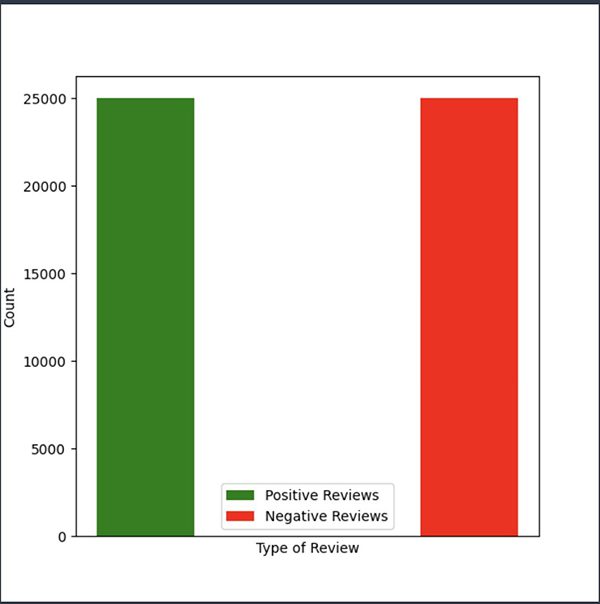
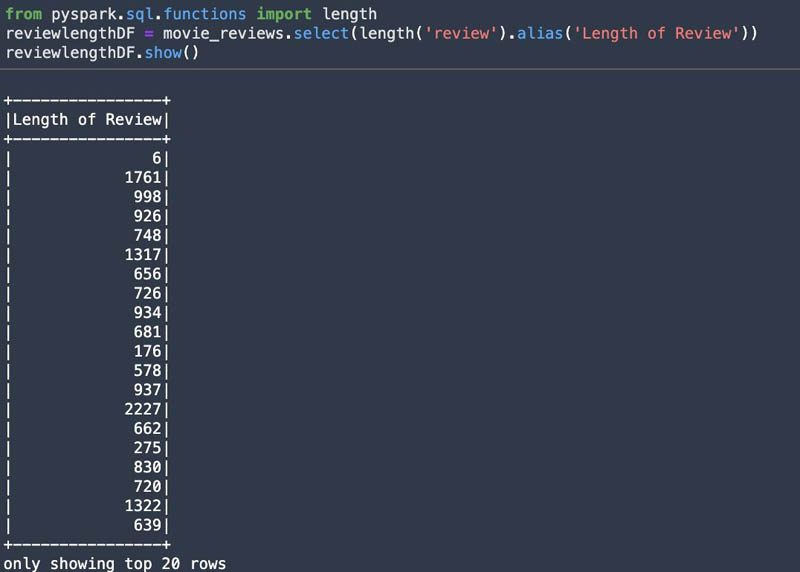
You can use the pyspark.sql.functions module as shown in the following screenshot to inspect the length of the reviews.
You can use SparkSQL queries using %%sql from the notebook and save results to a local DataFrame. This allows for a quick data exploration. The maximum rows returned by default is 2,500. You can set the maximum rows by using the -n argument.
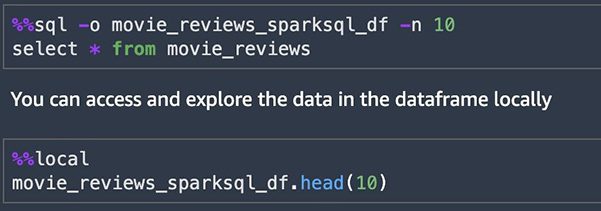
As we continue through the notebook, query the movie reviews table in Hive, storing the results into a DataFrame. The Sparkmagic environment allows you to send local data to the remote cluster using %%send_to_spark. We send the S3 location (bucket and key) variables to the remote cluster, then convert the Spark DataFrame to a Pandas DataFrame. Then we upload it to Amazon S3 and use this data as an input to the preprocessing step that creates training and validation data. This data trains a sentiment analysis model using the SageMaker BlazingText algorithm.

Preprocess data and feature engineering
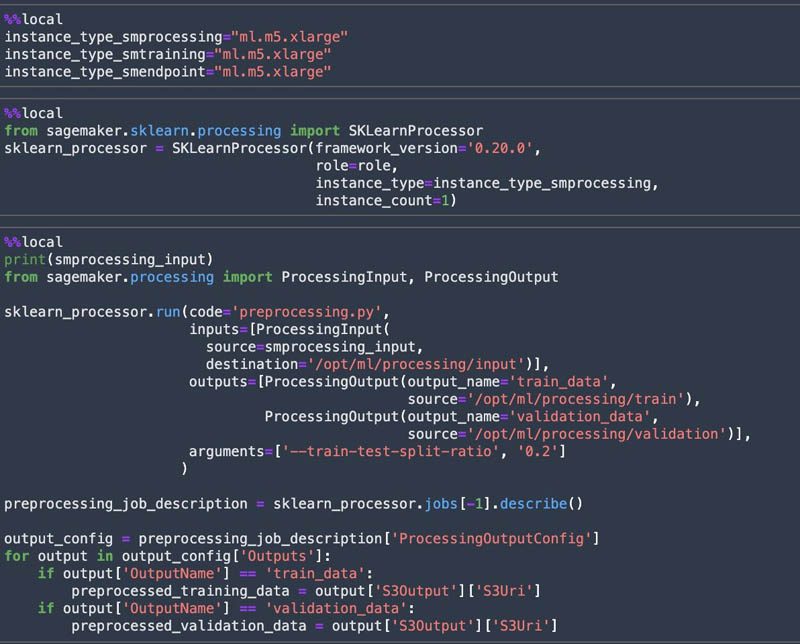
We perform data preprocessing and feature engineering on the data using SageMaker Processing. With SageMaker Processing, you can leverage a simplified, managed experience to run data preprocessing, data postprocessing, and model evaluation workloads on the SageMaker platform. A processing job downloads input from Amazon S3, then uploads output to Amazon S3 during or after the processing job. The preprocessing.py script does the required text preprocessing with the movie reviews dataset and splits the dataset into train data and validation data for the model training.
The notebook uses the Scikit-learn processor within a Docker image to perform the processing job.
For this post, we use the SageMaker instance type ml.m5.xlarge for processing, training, and model hosting. If you don’t have access to this instance type and get a ResourceLimitExceeded error, use another instance type that you have access to. You can also request a service limit increase using AWS Support Center.
Train a SageMaker model
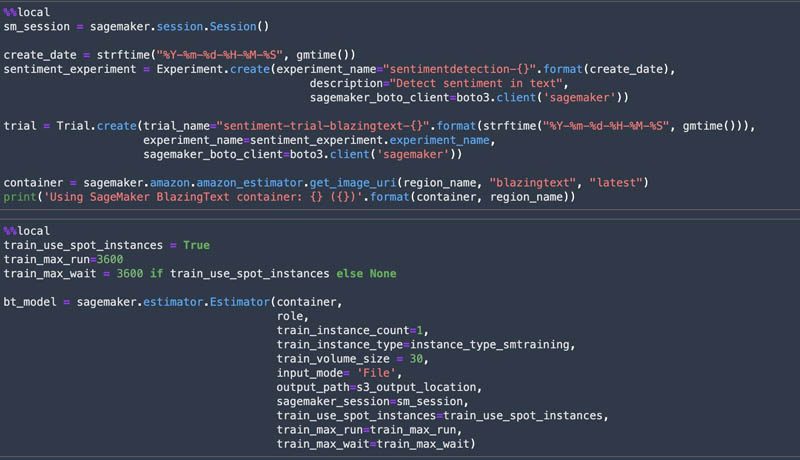
Amazon SageMaker Experiments allows us to organize, track, and review ML experiments with Studio notebooks. We can log metrics and information as we progress through the training process and evaluate results as we run the models.
We create a SageMaker experiment and trial, a SageMaker estimator, and set the hyperparameters. We then start a training job by calling the fit method on the estimator. We use Spot Instances to reduce the training cost.


Deploy the model and get predictions
When the training is complete, we host the model for real-time inference. The deploy method of the SageMaker estimator allows you to easily deploy the model and create an endpoint.
![]()
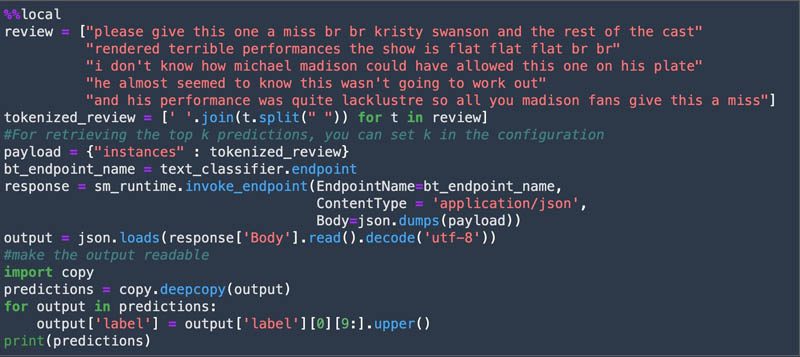
After the model is deployed, we test the deployed endpoint with test data and get predictions.
Clean up resources
Clean up the resources when you’re done, such as the SageMaker endpoint and the S3 bucket created in the notebook.

The %%cleanup -f command deletes all Livy sessions created by the notebook.

Conclusion
We have walked you through connecting a notebook backed by the Sparkmagic image to a kerberized EMR cluster. We then explored and queried the sample dataset from a Hive table. We used that dataset to train a sentiment analysis model with SageMaker. Finally, we deployed the model for inference.
For more information and other SageMaker resources, see the SageMaker Spark GitHub repo and Securing data analytics with an Amazon SageMaker notebook instance and Kerberized Amazon EMR cluster.
About the Authors
 Graham Zulauf is a Senior Solutions Architect. Graham is focused on helping AWS’ strategic customers solve important problems at scale.
 Huong Nguyen is a Sr. Product Manager at AWS. She is leading the user experience for SageMaker Studio. She has 13 years’ experience creating customer-obsessed and data-driven products for both enterprise and consumer spaces. In her spare time, she enjoys reading, being in nature, and spending time with her family.
 James Sun is a Senior Solutions Architect with Amazon Web Services. James has over 15 years of experience in information technology. Prior to AWS, he held several senior technical positions at MapR, HP, NetApp, Yahoo, and EMC. He holds a PhD from Stanford University.
 Naresh Kumar Kolloju is part of the Amazon SageMaker launch team. He is focused on building secure machine learning platforms for customers. In his spare time, he enjoys hiking and spending time with family.
 Timothy Kwong is a Solutions Architect based out of California. During his free time, he enjoys playing music and doing digital art.
 Praveen Veerath is a Senior AI Solutions Architect for AWS.
Tags: Archive

Leave a Reply