Perform interactive data engineering and data science workflows from Amazon SageMaker Studio notebooks
Amazon SageMaker Studio is the first fully integrated development environment (IDE) for machine learning (ML). With a single click, data scientists and developers can quickly spin up Studio notebooks to explore and prepare datasets to build, train, and deploy ML models in a single pane of glass.
We’re excited to announce a new set of capabilities that enable interactive Spark-based data processing from Studio notebooks. Data scientists and data engineers can now visually browse, discover, and connect to Spark data processing environments running on Amazon EMR, right from your Studio notebooks in a few simple clicks. After you’re connected, you can interactively query, explore and visualize data, and run Spark jobs to prepare data using the built-in SparkMagic notebook environments for Python and Scala.
Analyzing, transforming, and preparing large amounts of data is a foundational step of any data science and ML workflow, and businesses are increasingly using Apache Spark for fast data preparation. Studio already offers purpose-built and best-in-class tooling such as Experiments, Clarify, and Model Monitor for ML. The newly launched capability of easily accessing purpose-built Spark environments from Studio notebooks enables Studio to serve as a unified environment for data science and data engineering workflows. In this post, we present an example of predicting the sentiment of a movie review.
We start with explaining how you can set up connecting Studio securely to an EMR cluster configured with various authentication methods. We provide CloudFormation templates to make it easy for you to deploy resources such as networking, EMR clusters, and Studio with a few simple clicks so that you can follow along with the examples in your own AWS account. We then demonstrate how you can use a Studio notebook to visually discover, authenticate with, and connect to an EMR cluster. After we’re connected, we query a Hive table on Amazon EMR using SparkSQL and PyHive. We then locally preprocess and feature engineer the retrieved data, train an ML model, deploy it, and get predictions—all from the Studio notebook.
Solution overview
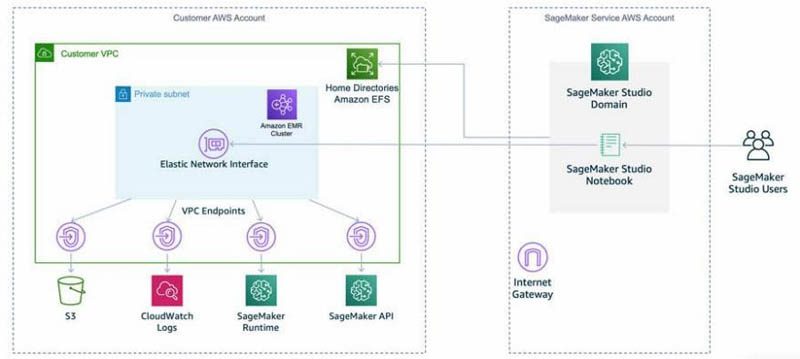
Studio runs on an environment managed by AWS. In this solution, the network access for the new Studio domain is configured as VPC Only. For more details on different connectivity methods, see Securing Amazon SageMaker Studio connectivity using a private VPC. The elastic network interface created in the private subnet connects to required AWS services through VPC endpoints.
The following diagram represents the different components used in this solution.
For connecting to the EMR cluster, we walk through three authentication options. We use a separate AWS CloudFormation template stack for each of these authentication scenarios.
In each of the options, the CloudFormation template also does the following:
- Creates and populates a Hive table with a movie reviews dataset. We use this dataset to explore and query the data.
- Creates a Studio domain, along with a user named
studio-user. - Creates building blocks, including the VPC, subnet, EMR cluster, and other required resources to successfully run the examples.
Kerberos
In the Kerberos authentication mode CloudFormation template, we create a Kerberized EMR cluster and configure it with a bootstrap action to create a Linux user and install Python libraries (Pandas, requests, and Matplotlib).
You can set up Kerberos authentication in a few different ways (for more information, see Kerberos Architecture Options):
- Cluster-dedicated key distribution center (KDC)
- Cluster-dedicated KDC with Active Directory cross-realm trust
- External KDC
- External KDC integrated with Active Directory
The KDC can have its own user database or it can use cross-realm trust with an Active Directory that holds the identity store. For this post, we use a cluster-dedicated KDC that holds its own user database. First, the EMR cluster has security configuration enabled to support Kerberos and is launched with a bootstrap action to create Linux users on all nodes and install the necessary libraries. The CloudFormation template launches the bash step after the cluster is ready. This step creates HDFS directories for the Linux users with default credentials.
LDAP
In the LDAP authentication mode CloudFormation template, we provision an Amazon Elastic Compute Cloud (Amazon EC2) instance with an LDAP server and configure the EMR cluster to use this server for authentication.
No-Auth
In the No-Auth authentication mode CloudFormation template, we use a standard EMR cluster with no authentication enabled.
Deploy the resources with AWS CloudFormation
Complete the following steps to deploy the environment:
- Sign in to the AWS Management Console as an AWS Identity and Access Management (IAM) user, preferably an admin user.
- Choose Launch Stack to launch the CloudFormation template for the appropriate authentication scenario. Make sure the Region used to deploy the CloudFormation stack has no existing Studio domain. If you already have a Studio domain in a Region, you may choose a different Region.
| Kerberos | |
| LDAP | |
| No Auth |
- Choose Next.
- For Stack name, enter a name for the stack (for example,
blog). - Leave the other values as default.
- Continue to choose Next. If you are using the Kerberos stack, in the “Parameters” section, enter the
CrossRealmTrustPrincipalPasswordandKdcAdminPassword. You can enter the example password provided in both the fields:CfnIntegrationTest-1. - On the review page, select the check box to confirm that AWS CloudFormation might create resources.
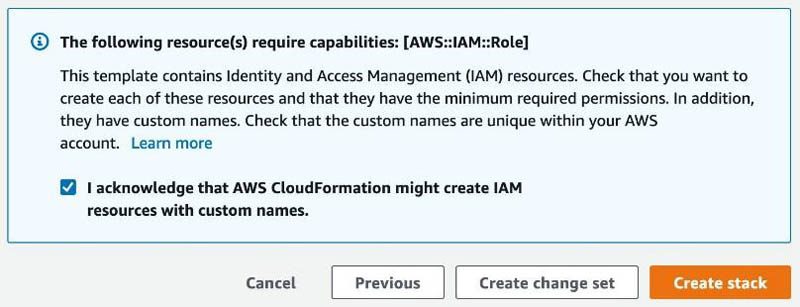

- Choose Create stack.
Wait until the status of the stack changes from CREATE_IN_PROGRESS to CREATE_COMPLETE. The process usually takes 10–15 minutes.
Note: If you would like to try multiple stacks, please follow the steps in the “Clean up” section. Remember that you must delete the SageMaker Studio Domain before the next stack can be successfully launched.
Connect a Studio notebook to an EMR cluster
After we deploy the stack, we can create a connection between our Studio notebook and the EMR cluster. Establishing this connection allows us to connect code to our data hosted on Amazon EMR.
Complete the following steps to set up and connect your notebook to the EMR cluster:
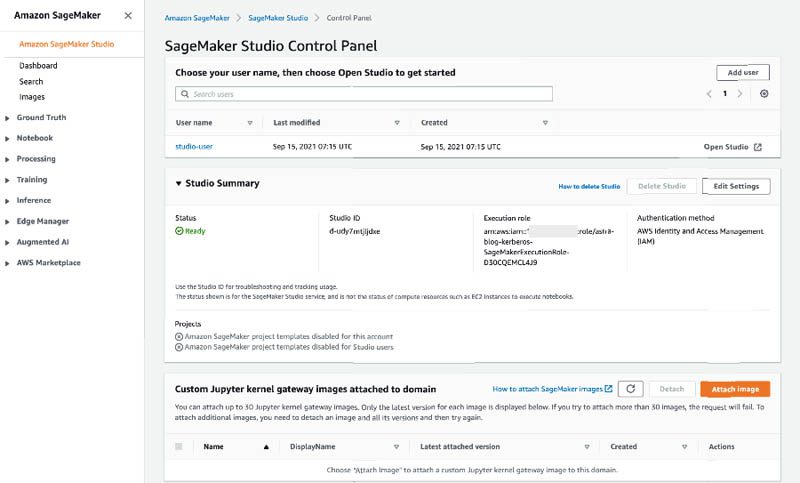
- On the SageMaker console, choose Amazon SageMaker Studio.
- Choose Open Studio for
studio-userto open the Studio IDE.

Next, we download the code for this walkthrough from Amazon Simple Storage Service (Amazon S3).
- Choose File in the Studio IDE, then choose New and Terminal.
- Run the following commands in the terminal:
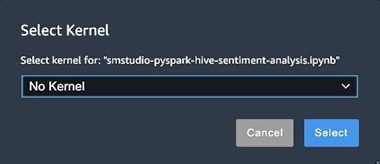
- For Select Kernel, choose either the PySpark (SparkMagic) or Python 3 (Data Science) kernels depending upon the examples you want to run.
The smstudio-pyspark-hive-sentiment-analysis.ipynb notebook demonstrates examples that you can run using the PySpark (SparkMagic) kernel. The smstudio-ds-pyhive-sentiment-analysis.ipynb notebook demonstrates examples that you can run using the IPython-based kernel.

- Choose the Cluster menu on the top of the notebook.
- For Connect to cluster, choose a cluster to connect to and choose Connect.
This adds a code block to the active cell and runs automatically to establish connection.
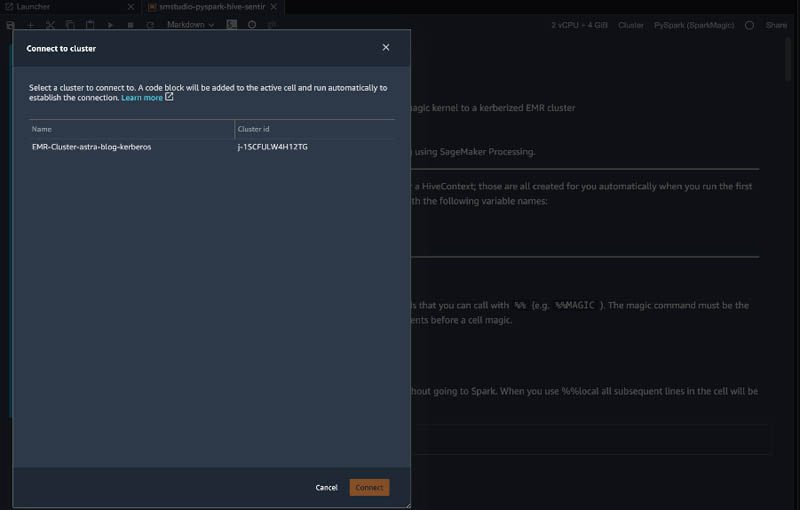

We connect to and run Spark code on a remote EMR cluster through Livy, an open-source REST server for Spark. Depending on the authentication method required by Livy on the chosen EMR cluster, appropriate code is injected into a new cell and is run to connect to the cluster. You can use this code to establish a connection to the EMR cluster if you’re using this notebook at a later time. Examples of the types of commands injected include the following:
- Kerberos-based authentication to Livy.
![]()
![]()
- LDAP-based authentication to Livy.


- No-Auth authentication to Livy. For No-Auth authentication, the following dialog asks you to select the credential type.
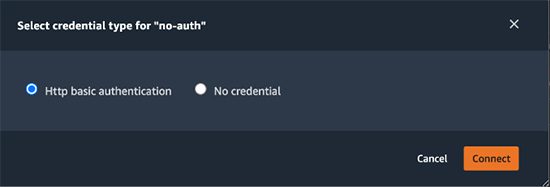

Selecting HTTP basic authentication injects the following code into a new cell on the Studio notebook:
![]()
![]()
Selecting No credential injects the following code into a new cell on the Studio notebook:
![]()
![]()
This code runs automatically. You’re prompted to enter a user name and password for the EMR cluster authentication if authentication is required. After you’re authenticated, a Spark application is started.


You can also change the EMR cluster that the Studio notebook is connected to by using the method described. Simply browse to find the cluster you want to switch to and connect to it. The Studio notebook can only be connected to one EMR cluster at a time.
If you’re using the PySpark kernel, you can use the PySpark magic %%info to display the current session information.


Monitoring and debugging
If you want to set up SSH tunneling to access the Spark UI, complete the following steps. The link under Spark UI and Driver log isn’t enabled unless the steps for SSH tunneling for Spark UI is followed.
- Option 1 – Set up an SSH tunnel to the primary node using local port forwarding
- Option 2, part 1 – Set up an SSH tunnel to the primary node using dynamic port forwarding
- Option 2, part 2 – Configure proxy settings to view websites hosted on the primary node
For information on how to view web interfaces on EMR clusters, see View web interfaces hosted on Amazon EMR clusters.
Explore and query the data
In this section, we present examples of how to explore and query the data using either the PySpark (SparkMagic) kernel or Python3 (Data Science) kernel.
Query data from the PySpark (SparkMagic) kernel
In this example, we use the PySpark kernel to connect to a Kerberos-protected EMR cluster and query data from a Hive table and use that for ML training.
- Open the
smstudio-pyspark-hive-sentiment-analysis.ipynbnotebook and choose the PySpark (SparkMagic) kernel. - Choose the Cluster menu on the top of the notebook.
- For Connect to cluster, choose Connect.
This adds a code block to the active cell and runs automatically to establish connection.
When using the PySpark kernel, an automatic SparkContext and HiveContext are created automatically after connecting to an EMR cluster. You can use HiveContext to query data in the Hive table and make it available in a Spark DataFrame.
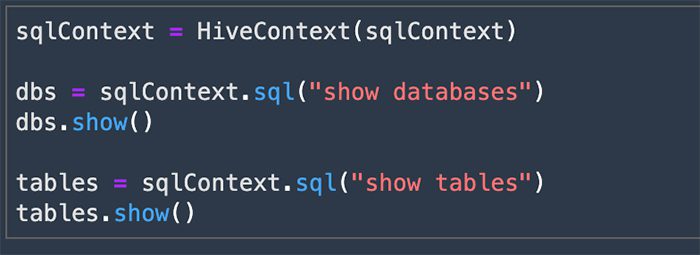

- Next, we query the
movie_reviewstable and get the data in a Spark DataFrame.
![]()
![]()
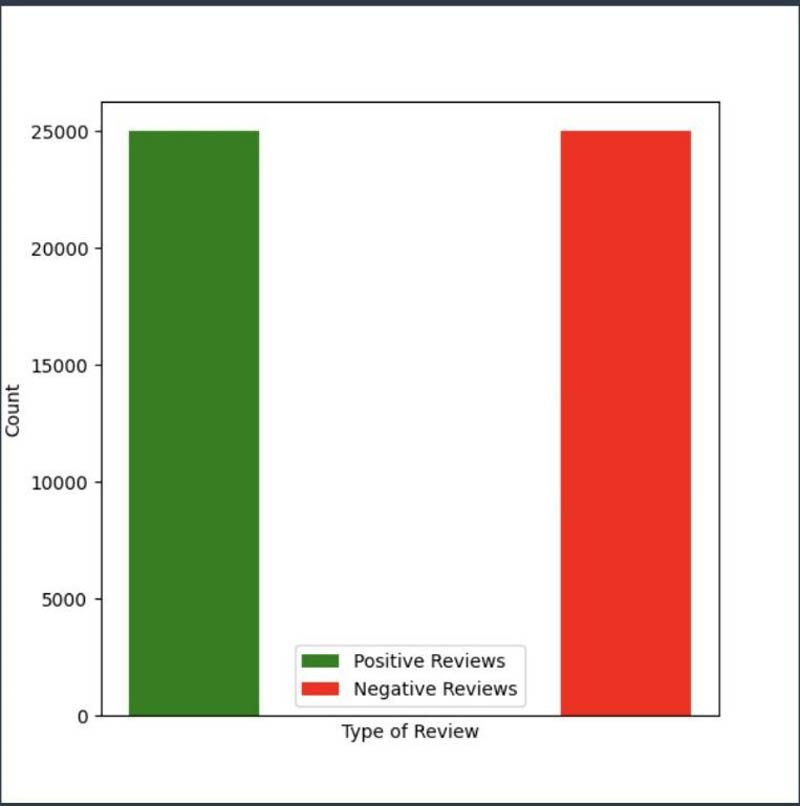
We can use the DataFrame to look at the shape of the dataset and size of each class (positive and negative). The following screenshots show that we have a balanced dataset.
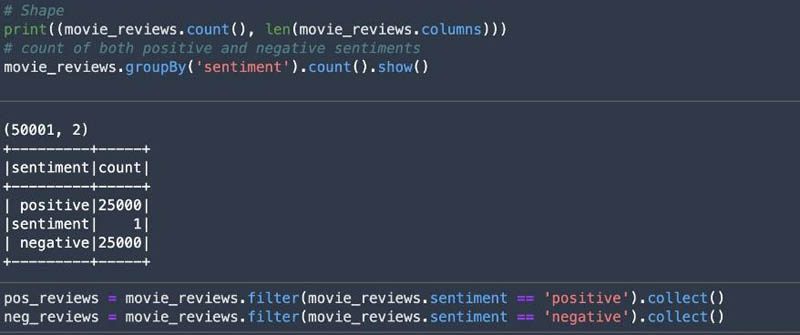

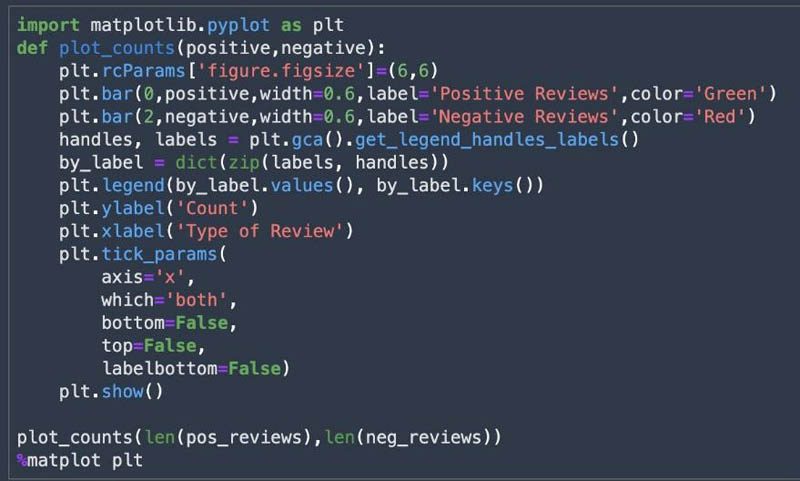

You can visualize the shape and size of the dataset using Matplotlib.

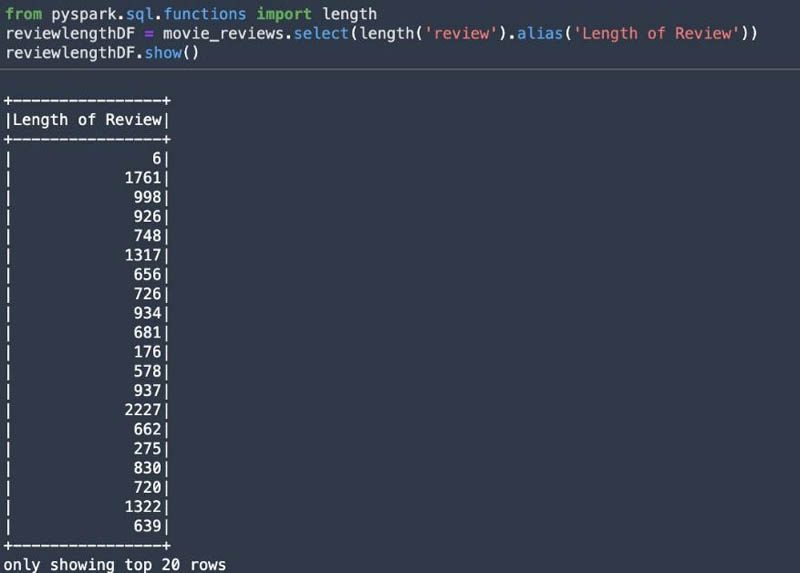
You can use the pyspark.sql.functions module as shown in the following screenshot to inspect the length of the reviews.

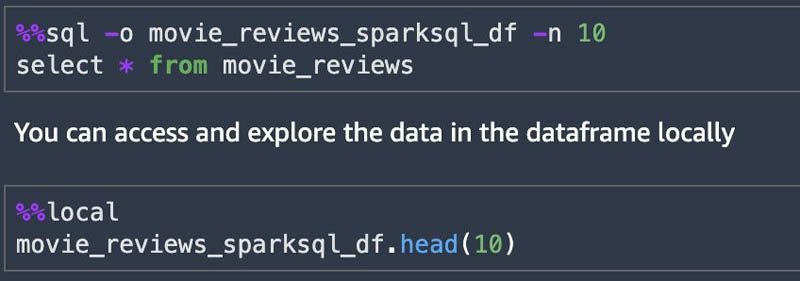
You can use SparkSQL queries using %%sql from the notebook and save results to a local DataFrame. This allows for a quick data exploration. The maximum rows returned by default is 2,500. You can set the max rows by using the -n argument.

As we continue through the notebook, we query the movie reviews table in Hive, storing the results into a DataFrame. The SparkMagic environment allows you to send local data to the remote cluster using %%send_to_spark. We send the Amazon S3 location (bucket and key) variables to the remote cluster, then convert the Spark DataFrame to a Pandas DataFrame. Next, we upload it to Amazon S3 and use this data as input to the preprocessing step that creates training and validation data. This data trains a sentiment analysis model using the SageMaker BlazingText algorithm.


Query data using the PyHive library from the Python3 (Data Science) kernel
In this example, we use the Python 3 (Data Science) kernel. We use the PyHive library to connect to the Hive table. We then query data from a Hive table and use that for ML training.
Note: Please use LDAP or No Auth authentication mechanisms to connect to EMR before running the following sample code.
- Open the
smstudio-ds-pyhive-sentiment-analysis.ipynbnotebook and choose the Python 3 (Data Science) kernel. - Choose the Cluster menu on the top of the notebook.
- For Connect to cluster, choose a cluster to connect to and choose Connect.
This adds a code block to the active cell and runs automatically to establish connection.
We run each cell in the notebook to walkthrough the PyHive example.
- First, we import the
hivemodule from the PyHive library.
![]()
![]()
- You can connect to the Hive table using the following code.
We use the private DNS name of the EMR primary in the following code. Replace the host with the correct DNS name. You can find this in the output of the CloudFormation stack under the key EMRMasterDNSName. You can also find this information on the Amazon EMR console (expand the cluster name and locate Master public DNS under in summary section).
![]()
![]()
- You can retrieve the data from the Hive table using the following code.
![]()
![]()
- Continue running the cells in the notebook to upload the data to Amazon S3, preprocess the data for ML, train a SageMaker model, and deploy the model for prediction, as described later in this post.
Preprocess data and feature engineering
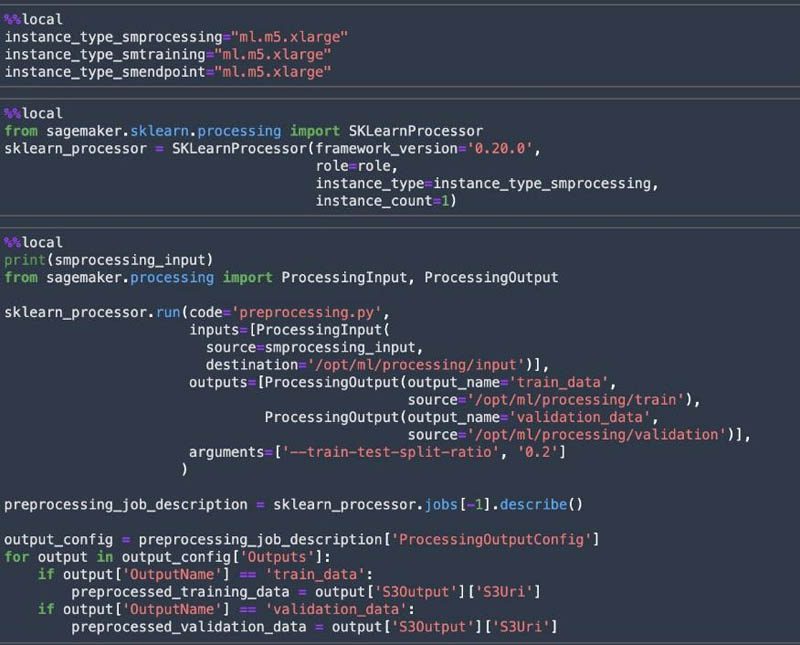
We perform data preprocessing and feature engineering on the data using SageMaker Processing. With Processing, you can use a simplified, managed experience to run data preprocessing or postprocessing and model evaluation workloads on the SageMaker platform. A processing job downloads input from Amazon S3, then uploads output to Amazon S3 during or after the processing job. The preprocessing.py script does the required text preprocessing with the movie reviews dataset and splits the dataset into training data and validation data for the model training.
The notebook utilizes the scikit-learn processor within a Docker image to perform the processing job.
We use the SageMaker instance type ml.m5.xlarge for processing, training, and model hosting. If you don’t have access to this instance type and see a ResourceLimitExceeded error, use another instance type that you have access to. You can also request a service limit increase via the AWS Support Center.

Train a SageMaker model
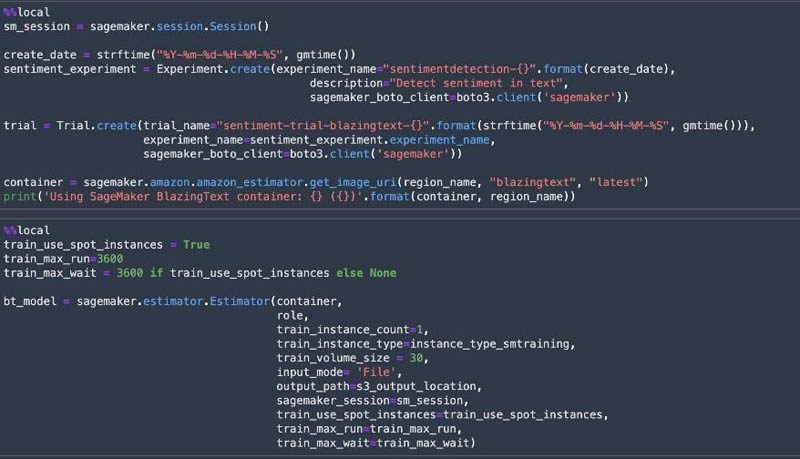
SageMaker Experiments allows us to organize, track, and review ML experiments with Studio notebooks. We can log metrics and information as we progress through the training process and evaluate results as we run the models. We create a SageMaker experiment and trial, a SageMaker estimator, and set the hyperparameters. We then kick off a training job by calling the fit method on the estimator. We use Spot Instances to reduce the training cost.


Deploy the model and get predictions
When the training is complete, we host the model for real-time inference. We use the deploy method of the SageMaker estimator to easily deploy the model and create an endpoint.
![]()
![]()
After the model is deployed, we test the deployed endpoint with test data and get predictions.
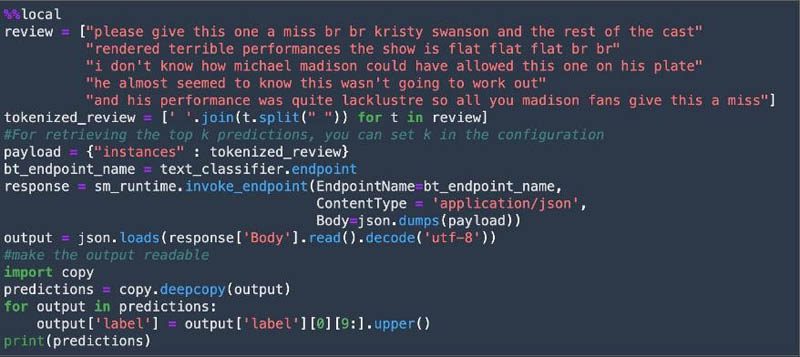

Finally, we clean up the resources such as the SageMaker endpoint and the S3 bucket created in the notebook.


Bring your own image
If you want to bring your own image for the Studio kernels to perform the tasks we described, you need to install the following dependencies to your kernel. The following code lists the pip command along with the library name:
If you want to connect to a Kerberos-protected EMR cluster, you also need to install the kinit client. Depending on your OS, the command to install the kinit client varies. The following is the command for an Ubuntu or Debian based image:
Clean up
You can complete the following steps to clean up resources deployed for this solution. This also deletes the S3 bucket, so you should copy the contents in the bucket to a backup location if you want to retain the data for later use.
- Delete Amazon SageMaker Studio Apps
Navigate to Amazon SageMaker Studio Console. Click on your username (studio-user) then delete all the apps listed under “Apps” by clicking the “Delete app” button. Wait until the Status shows as “completed.
- Delete EFS volume
Navigate to Amazon EFS. Locate the filesystem that was created by SageMaker (you can confirm this by clicking on the File System Id and confirming the tag “ManagedByAmazonSageMakerResource” on the Tags tab)
- Finally, delete the CloudFormation Template by navigating to the CloudFormation console
- On the CloudFormation console, choose Stacks.
- Select the stack deployed for this solution.
- Choose Delete.
Conclusion
In conclusion, we walked through how you can visually browse, discover, and connect to Spark data processing environments running on Amazon EMR, right from Studio notebooks in a few simple clicks. We demonstrated connecting to EMR clusters using various authentication mechanisms—Kerberos, LDAP, and No-Auth. We then explored and queried a sample dataset from a Hive table on Amazon EMR using SparkSQL and PyHive. We locally preprocessed and feature engineered the retrieved data, trained an ML model to predict the sentiment of a movie review, and deployed it and to get predictions—all from the Studio notebook. Through this example, we demonstrated how to unify data preparation and ML workflows on Studio notebooks.
For more information, see the SageMaker Developer Guide.
About the Authors


Tags: Archive

Leave a Reply