Detect online transaction fraud with new Amazon Fraud Detector features
Fraud teams need a secure, fast, and flexible transaction fraud detection solution to combat global fraudsters. Unlike many solutions on the market, Amazon Fraud Detector allows you to tailor your fraud detection efforts specifically to your data and business challenge while also bringing the latest in fraud detection machine learning (ML) technology to bear on the cloud.
To help you catch fraud faster across multiple use cases, Amazon Fraud Detector offers specific models with tailored algorithms, enrichments, and feature transformations. The new Transaction Fraud Insights model has been developed to detect card-not-present and other transaction frauds in real time. In addition to the latest ML techniques used in the existing Online Fraud Insights model, the Transaction Fraud Insights model dynamically calculates information about your customers, such as their frequency of purchases and how long their account has been active. These calculations, often called aggregates or velocity measures, improve model performance and stability over time. This improvement in model performance directly benefits your business as you capture more fraud and turn away fewer legitimate customers.
In addition to discussing the Transaction Fraud Insights model, this post guides you through several other new features:
- Stored events – Allows you to easily store production fraud data directly within Amazon Fraud Detector, enabling the service to continuously calculate aggregates and simplifying the model retraining process
- Batch import – Allows you to upload a CSV file of event data to be automatically stored
- Events data metrics – Displays information about your stored events, such as the total number of events and the earliest event timestamp
- Model variable importance – Provides a ranked list of model inputs based on their relative importance so you have better insight into how to improve your model’s performance
Solution overview
This post helps you test the Transaction Fraud Insights model using the Amazon Fraud Detector console so you can demonstrate the value of Amazon Fraud Detector to your business. The following steps outline the process of training a Transaction Fraud Insights model and using the model to generate fraud predictions. If you’re already familiar with training the Online Fraud Insights models, you’ll notice that only Step 4 is significantly different than the existing model training process.
- Gather data
- Define the entity
- Define the event, event variables, and event labels
- Upload event data
- Initiate model training
- Evaluate the model
- Create a detector and define business rules
- Integrating your detector to payment systems
Gather data
To train a model, the Transaction Fraud Insights model requires at least 10,000 records, with at least 400 of those records identified as fraudulent. The model also requires that both fraudulent records and legitimate records come from at least 100 different entities each to ensure the diversity of the dataset. Entities represent what or who is performing the transaction, such as a customer. There is no upper limit on the number of records you can provide; the more records and variety of fraudulent examples, the better. We have provided a sample dataset that you can use to get started.
The Transaction Fraud Insights model is trained on stored event data and applies historic context to predictions by calculating aggregates on each entity within the stored dataset. Therefore, in addition to the mandatory EVENT_TIMESTAMP and EVENT_LABEL fields you needed to provide for Online Fraud Insights models, Transaction Fraud Insights requires four additional fields: EVENT_ID, ENTITY_ID, ENTITY_TYPE, and LABEL_TIMESTAMP. The field details are as follows:
- EVENT_TIMESTAMP – Identifies when the event took place and should follow timestamp formats.
- EVENT_LABEL – Classifies the event as fraudulent or legitimate.
- LABEL_TIMESTAMP – Identifies when the event label was last updated and should follow timestamp formats. If you don’t have this information available, you can set the value to be equal to EVENT_TIMESTAMP.
- EVENT_ID – Is used to retrieve, modify, and delete records stored in Amazon Fraud Detector, and should be unique for each transaction record.
- ENTITY_TYPE – Describes the type of actor performing the transaction. For example, your ENTITY_TYPE may be
customerorapplicant. - ENTITY_ID – Is used to identify the specific actor performing the transaction and is crucial for Transaction Fraud Insights to calculate aggregates. This should be the same for all transactions from the same entity. Typical choices for ENTITY_ID are account numbers, customer emails, or phone numbers.
Define the entity
The Transaction Fraud Insights model builds a dynamic profile for each entity within your dataset so that it can calculate important data inputs like the first and last time the entity made a transaction, the number of transactions the entity has made, and more.
To create an entity, complete the following steps:
- On the Amazon Fraud Detector console, in the navigation pane, choose Entities.
- Choose Create.
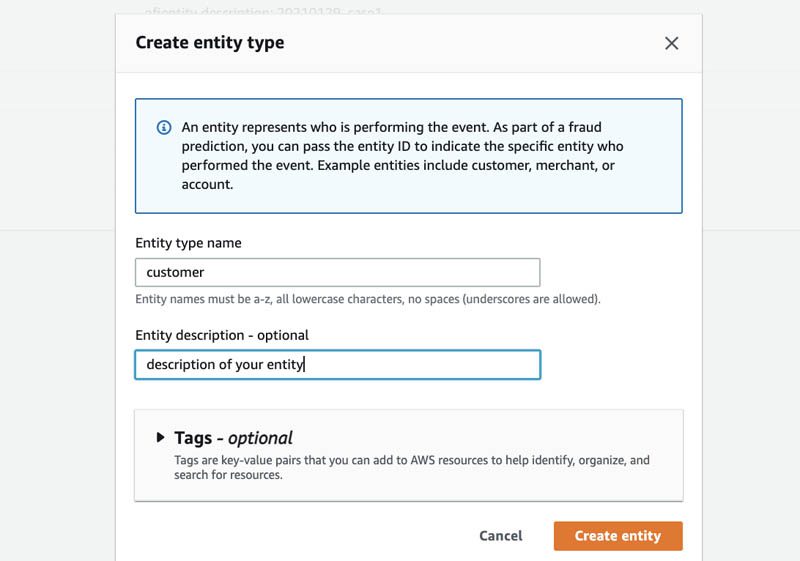
- On the Create entity type page, enter an entity name and optionally an entity description.
If you’re using the sample dataset, we suggest creating an entity called customer.
- Choose Create entity.
Define the event, event variables, and event labels
Events are the activities that an entity performs. For example, an online retail order is an event. An event contains variables like IP address, user agent, and billing information. Events are required to have metadata describing the event (like EVENT_TIMESTAMP and EVENT_ID) and at least two event variables. To save time, you can import your variable names from a CSV file. To do so, store the training data for your events in Amazon Simple Storage Service (Amazon S3). You also need an AWS Identity and Access Management (IAM) role with permissions to access Amazon S3. Complete the following steps to create an event:
- On the Amazon S3 console, create an S3 bucket.
- Upload your training data file to that bucket. Note the Amazon S3 location of your training file (for example,
s3://bucketname/path/to/some/object.csv) and your role name. - On the Amazon Fraud Detector console, in the navigation pane, choose Events.
- Choose Create.
- For Name, enter
transaction_eventas the event name. - For Entity, choose customer.
- Under Event variables, choose Select variables from a training dataset.
- For IAM role, choose an existing IAM role or create a new role to access data in Amazon S3.
- For Data location, enter the S3 location of your training file and choose Upload.
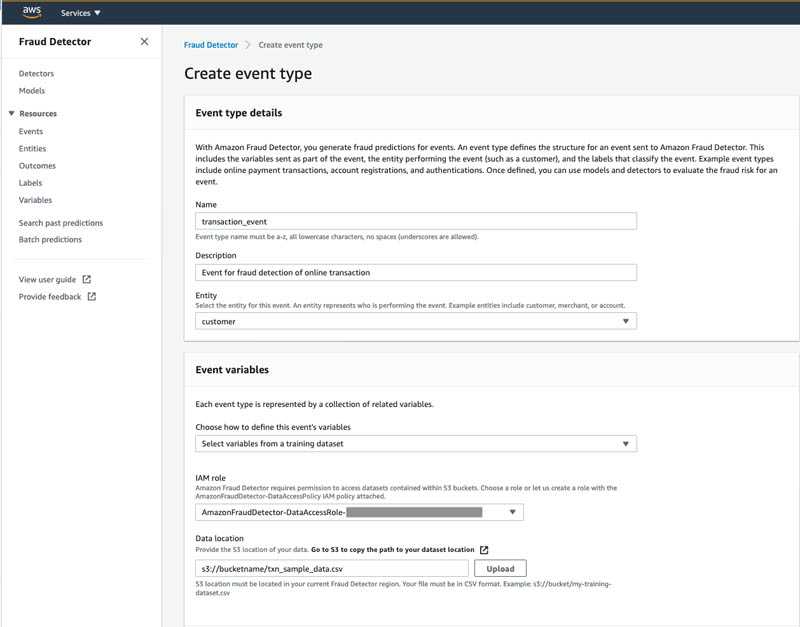
Amazon Fraud Detector extracts the headers from your training dataset and creates a variable for each header.
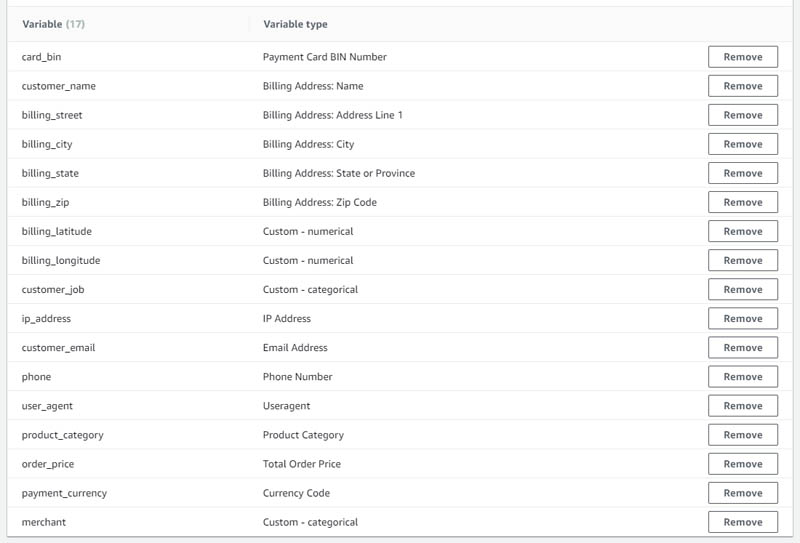
- Next, map the variables to variable types.
Mapping variables to their correct type ensures maximum model performance, because Amazon Fraud Detector has specific enrichment and transformation techniques for each variable type.
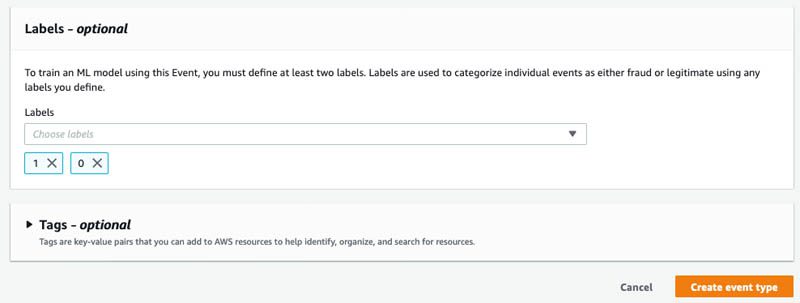
- Finally, define the labels.
Those should include all the values under the EVENT_LABEL column in your dataset. In the sample dataset, 1 denotes fraud and 0 denotes a legitimate event.
- Choose Create event type.
Upload event data
After you define your event, navigate to the Stored events tab. On this page, you can turn event ingestion on or off. When event ingestion is on, you can upload historic event data to Amazon Fraud Detector and automatically store event data from predictions in real time.
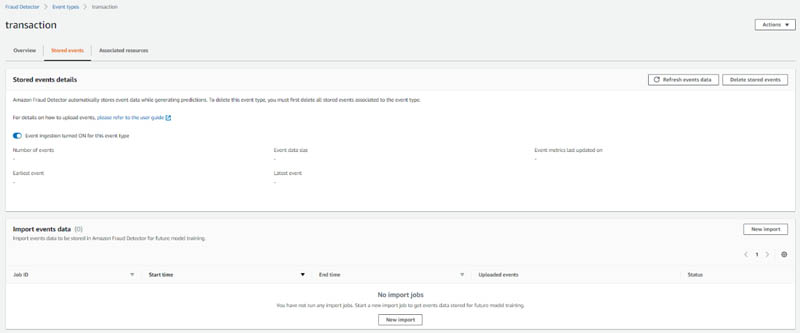
On the Stored events tab, you can see information about your dataset, such as the number of events stored and the total size of the dataset in MB. Because you just created this event type, there are no stored events yet. Before you start generating predictions, you should upload a large amount of historic data to train your first Transaction Fraud Insights model. You only need to do this one time—after you train your first model, Amazon Fraud Detector automatically stores event data whenever you generate predictions.
The easiest way to store historic data is by uploading a CSV file and importing the events. Alternatively, you can stream the data into Amazon Fraud Detector using the SendEvent API (see our GitHub repository for sample notebooks). To upload a CSV file, complete the following steps:
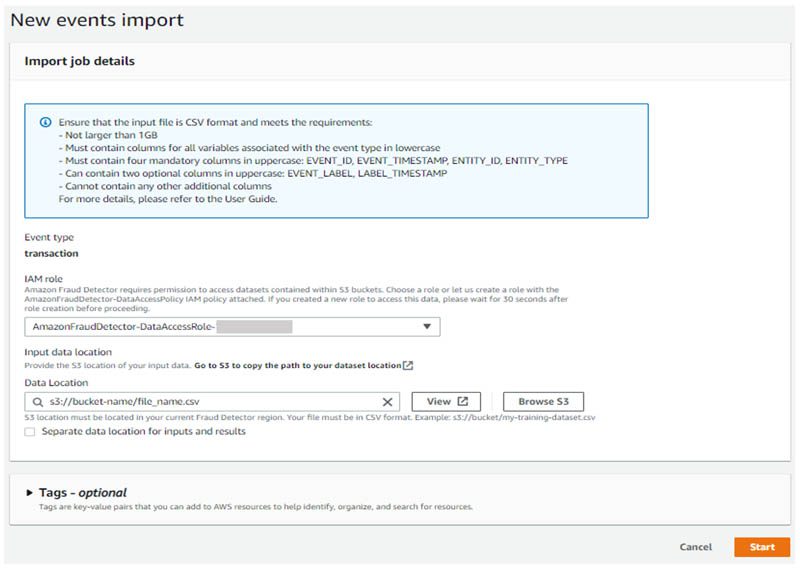
- Under Import events data, choose New import.
You likely need to create a new IAM role, because the import feature requires both read and write access to Amazon S3.
- When creating a new IAM role, specify the bucket that stores your event data and, optionally, a separate bucket to write output files. If you prefer to keep all files within the same bucket, enter the same bucket name into both fields.
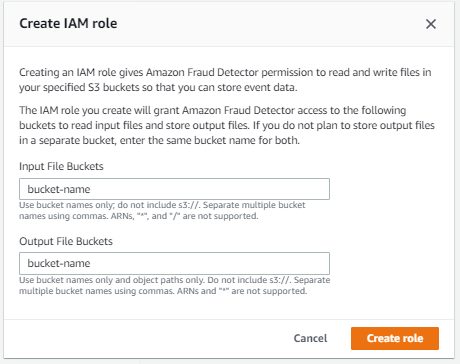
- After you create your IAM role, enter the location of the CSV file that contains your event data. You can use the same file that you used to import a list of variables earlier.
- Choose Start to begin importing events to Amazon Fraud Detector.
The import time varies based on the number of events you’re importing. For the sample dataset, the process takes around 12 minutes. After you refresh the page, the status changes to Completed and all the events in the file have successfully been uploaded.
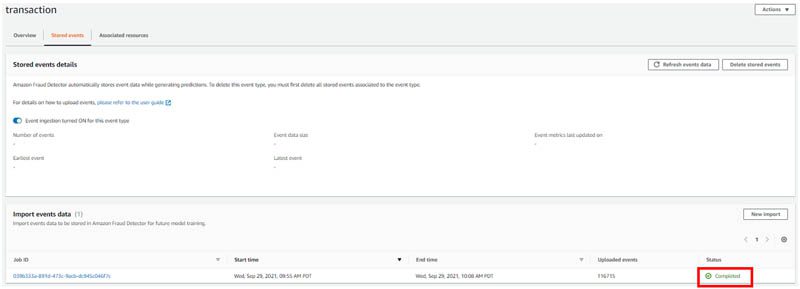
The data on your stored events, like the total number of events, has not been updated. This data is refreshed automatically one time per day. You can optionally refresh it on demand by choosing Refresh events data.
Initiate model training
Now that you have uploaded events to Amazon Fraud Detector, your next step is to train a model. We recommend waiting 10 minutes after the import completes to ensure that they are fully processed by the system.
To train a model, complete the following steps:
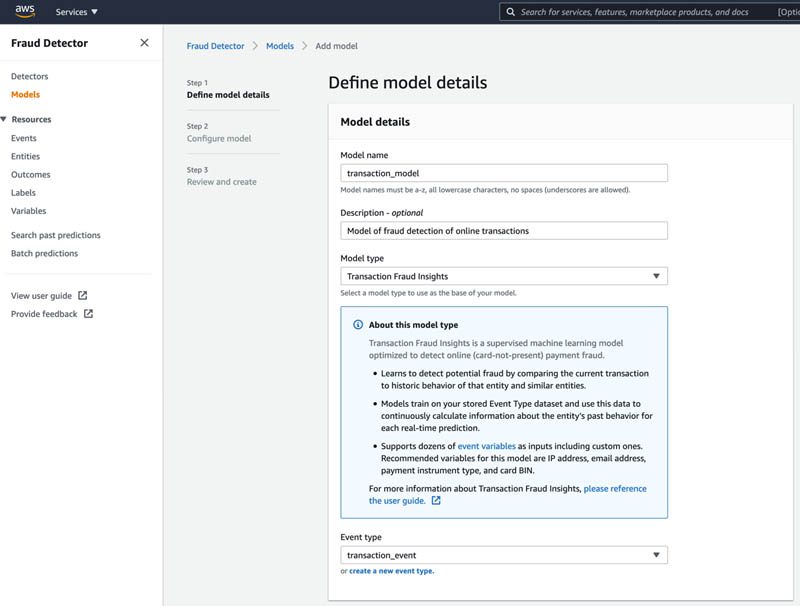
- On the Amazon Fraud Detector console, in the navigation pane, choose Models.
- Choose Add model and select Create model.
- For Model name, enter transaction_model.
- For Model type, choose Transaction Fraud Insights.
- For Event type, choose the event type you created (transaction_event).
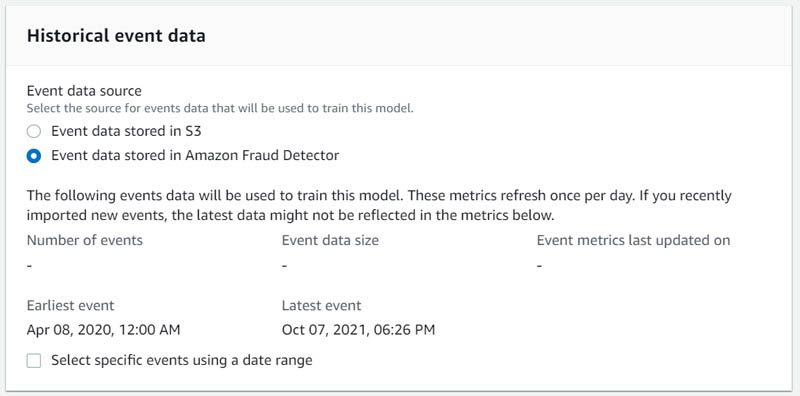
- Under Historical event data, you can specify the date range of events to train the model.
For example, you can exclude events that are still within a credit card chargeback window because the outcome of those events is still uncertain. For this example, you can deselect Select specific events using a date range.
- Choose Next.
- Configure your training by identifying the variables used as inputs to the model. For this example, include all the variables associated to your event type.
It’s a best practice to include all the available variables, even if you’re not sure about their value to the model. After the model is trained, Amazon Fraud Detector provides a ranked list of each variable’s impact on the model performance, so you can know whether to include that variable in future model trainings.
- Choose Next.
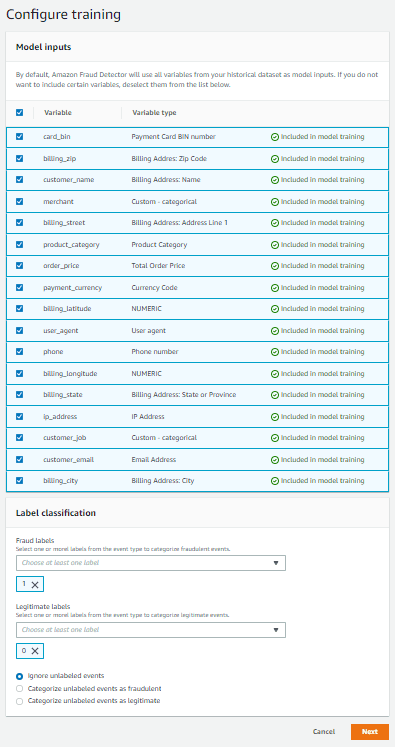
- Specify your fraud labels and legitimate labels. In the sample dataset, the fraud label is 1 and the legitimate label is 0.
- Specify how Amazon Fraud Detector should handle unlabeled events during model training. In this example, the dataset you uploaded didn’t have any unlabeled events, so you can select any option.
In general, you should select Ignore unlabeled events unless you’re certain your unlabeled events should be categorized as legitimate or fraud.
- After reviewing the model configured in the first two steps, choose Create and train model.
You can see the model in training.

Model training takes about an hour. This is because Amazon Fraud Detector trains, evaluates, and optimizes several models on your behalf on the backend. The parameters of the model with the best performance are used to generate your final model that you use to generate predictions.
Evaluate the model
After your model has finished training, you can review various metrics to understand its performance.
- On the Amazon Fraud Detector console, in the navigation pane, choose Models.
In the Model versions section, you can see that you have a model with model version 1.0 and the status Ready to deploy. Before we get to that, let’s dig into the model performance.
- Choose the model version.

- On your model page, review the Model performance
The number next to AUC (Area Under the Curve) summarizes the general performance of a model. A model with no predictive power has an AUC of 0.5, whereas a perfect model has an AUC of 1.0. In general, a model with AUC greater than 0.9 is considered a great model.
- You can choose different model scores in the Score distribution chart to see the corresponding true positive rate (TPR), false positive rate (FPR), and confusion matrix.
To learn more about model scores and model performance metrics, see Model scores and Training performance metrics.
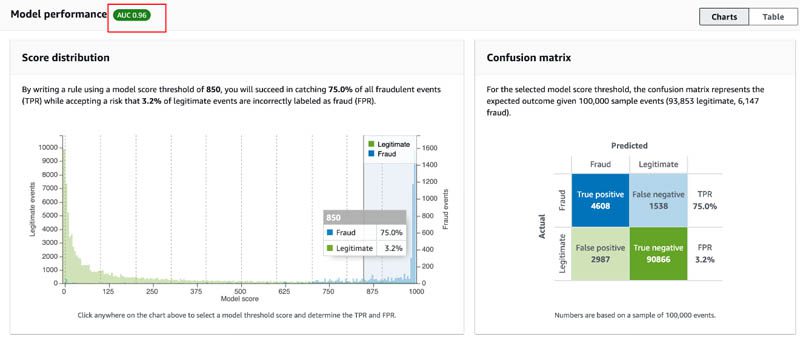
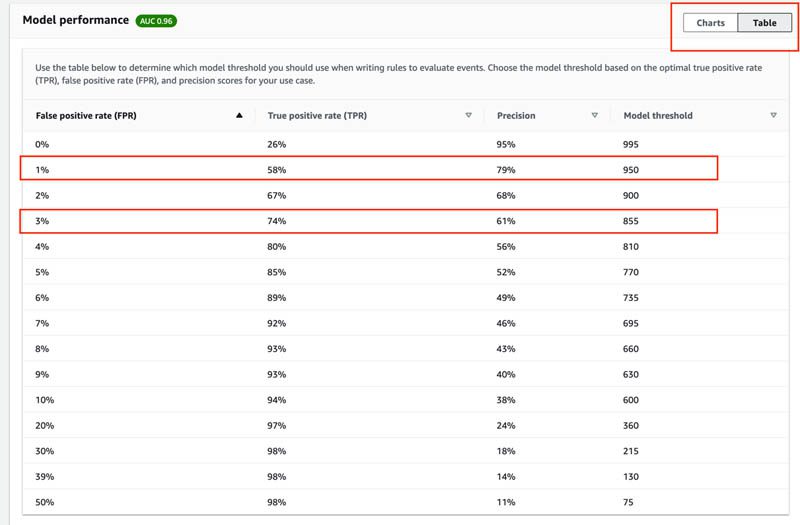
- On the Table tab, you can use the table to determine model thresholds for writing rules for your detector.
For example, make note of the score threshold and true positive rates at a 1% and 3% false positive rate. We use these to define business rules in later steps.
- Scroll down to the Model variable importance
This ranked list provides the relative importance of each variable that your model was trained on. In this example, product_category had a lot of value, so you may want to include related variables in your next model training. Similarly, billing_city had very little impact to model performance, so you may want to save time in the future by not collecting that data.

- On the Actions menu, choose Deploy model version.
This creates a model endpoint and makes the model available to detectors. Models take 5–10 minutes to deploy.

Create a detector and define business rules
Next, you add your model to a detector. A detector is the container for all your fraud detection logic. Here you can combine zero, one, or many ML models with business rules to detect fraud in real time.
To create a detector, complete the following steps:
- On the Amazon Fraud Detector console, in the navigation pane, choose Detectors.
- Choose Create detector.
- For Detector name, enter transaction_fraud_detector.
- Optionally, provide a description for your detector
- For Event type, choose the same event type as the model (transaction_event).
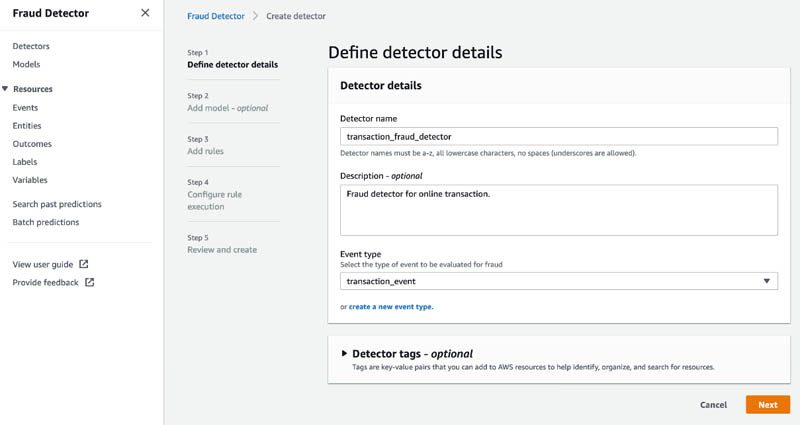
- On the Add model (optional) page, choose Add model.
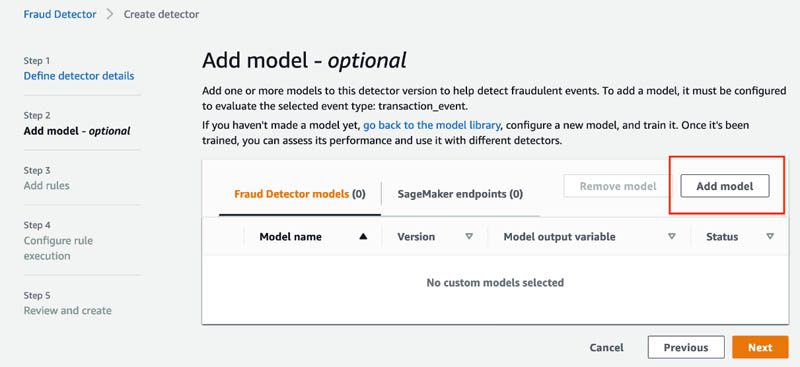
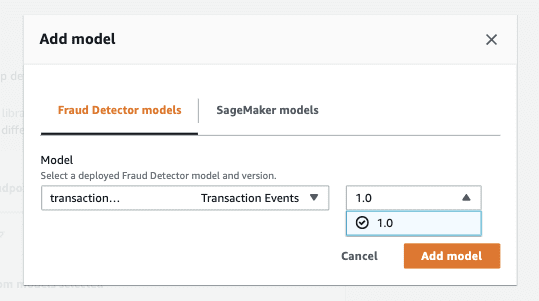
- For Model, choose transaction_model and then choose the model version.
You can choose to add multiple models to the detector.
- Choose Add model.
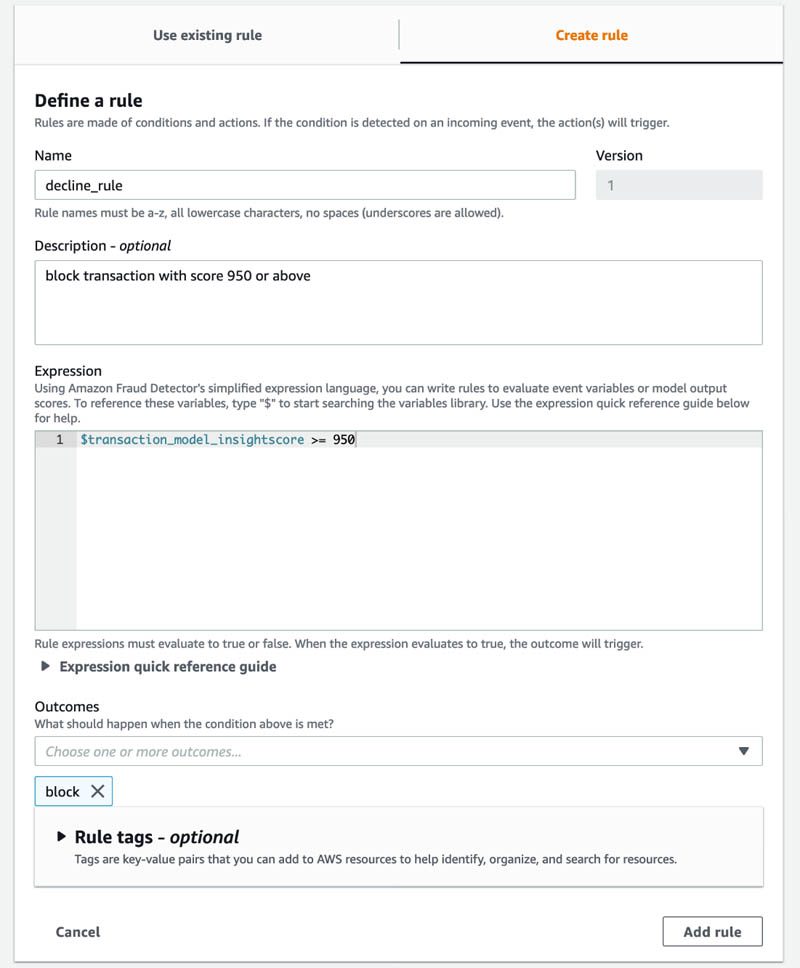
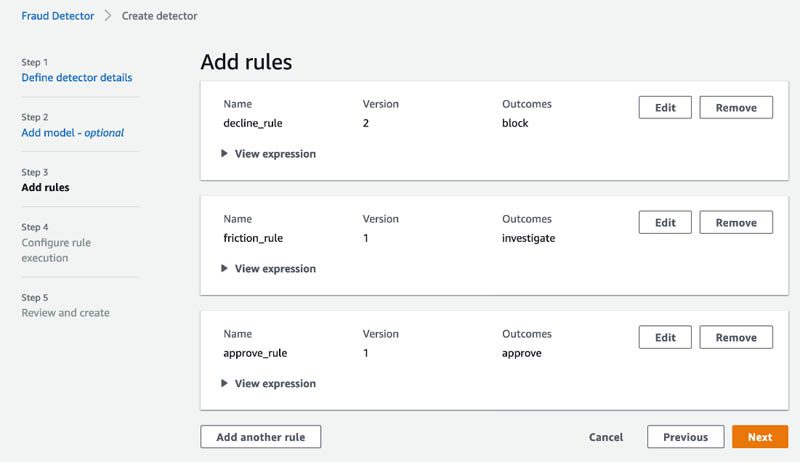
On the Add rules page, you add your business rules. Models produce an insightscore field that quantifies the risk of the event being fraud. In this case, your model creates a field called transaction_model_insightscore that you can reference when you author rules. Scores range between 0 (least risky) and 1000 (most risky).
- Specify
decline_ruleas$transaction_model_insightscore >= 950. - Specify
friction_ruleas –$transaction_model_insightscore >= 855and$transaction_model_insightscore < 950. - Specify
approve_ruleas –$transaction_model_insightscore < 855.
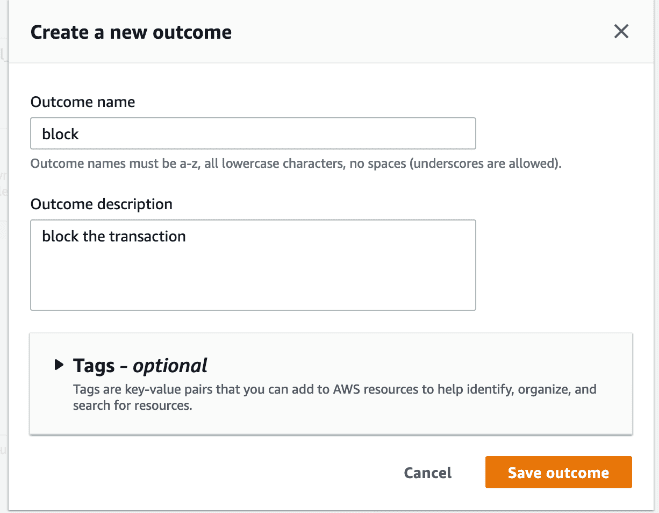
Outcomes are strings returned in the GetEventPrediction API response. You can use outcomes to trigger events by calling applications and downstream systems, or to simply identify who is likely to be fraud or legitimate.
- Choose Outcomes, and choose Create a new outcome.
- Enter a name and description for your outcome.
- Choose Save outcome.
- On the Add rules page, choose Next after you finish adding all your rules.
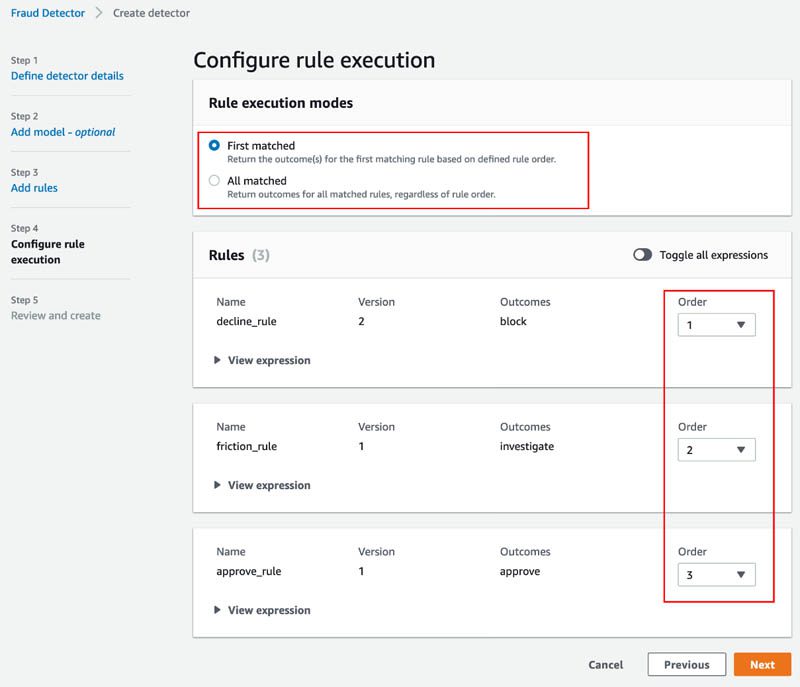
- On the Configure rule execution page, select the rule execution mode.
The Amazon Fraud Detector rules engine has two modes: first matched or all matched. First matched mode is for sequential rule runs, meaning rules have an order and the detector returns the outcome for the first condition met. The other mode is all matched, which evaluates all rules and returns outcomes from all the matching rules. In this example, we use the first matched mode for our detector.
- If using first matched mode, you can reorder your rules as needed.
- Choose Next.
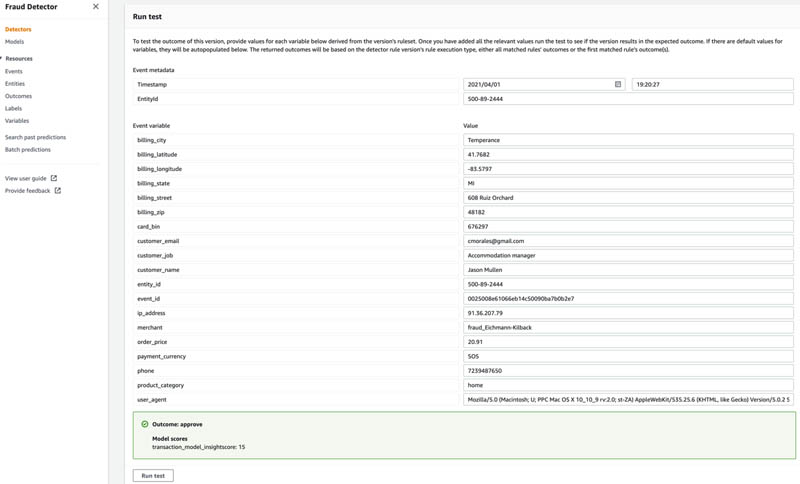
- Finally, test your detector by choosing Run test.
Test the detector with the following two example records:
| Example 1 | Example 2 | |
| EVENT_LABEL | 0 | 1 |
| EVENT_TIMESTAMP | 2021-04-01T19:20:27Z | 2021-04-01T22:08:32Z |
| entity_id | 500-89-2444 | 217-78-6732 |
| event_id | 0025008e61066eb14c50090ba7b0b2e7 | 00dfe7d7fc455c8f676ff684e2b9f61b |
| billing_street | 608 Ruiz Orchard | 858 Douglas Ways |
| billing_city | Temperance | Hayti |
| billing_state | MI | SD |
| billing_zip | 48182 | 57241 |
| billing_latitude | 41.7682 | 44.6647 |
| billing_longitude | -83.5797 | -97.2305 |
| customer_job | Accommodation manager | Building surveyor |
| ip_address | 91.36.207.79 | 200.236.210.122 |
| customer_email | cmorales@gmail.com | espinozadiana@miller-jones.com |
| phone | 7239487650 | 397-444-9902-233 |
| product_category | home | grocery_pos |
| order_price | 20.91 | 314.83 |
| payment_currency | SOS | ZAR |
| merchant | fraud_Eichmann-Kilback | fraud_Rau and Sons |
| customer_name | Jason Mullen | Alan Hill |
| card_bin | 676297 | 443718 |
| user_agent | Mozilla/5.0 (Macintosh; U; PPC Mac OS X 10_10_9 rv:2.0; st-ZA) AppleWebKit/535.25.6 (KHTML, like Gecko) Version/5.0.2 Safari/535.25.6 | Mozilla/5.0 (iPod; U; CPU iPhone OS 3_1 like Mac OS X; bho-IN) AppleWebKit/533.49.3 (KHTML, like Gecko) Version/3.0.5 Mobile/8B114 Safari/6533.49.3 |
The following screenshot shows the outcome and model score.
Integrate your detector with payment systems
You can integrate your detector with your payment system with the GetEventPrediction API. When event ingestion is enabled for your event type, Amazon Fraud Detector automatically stores events evaluated through the GetEventPrediction API so they’re available for future model trainings. These events are unlabeled by default, but you can later assign labels with the UpdateEventLabel API. In a production environment, we recommend enabling event ingestion so each event benefits from the information gathered in preceding events to accurately quantify risk in real time.

The GetEventPrediction API allows you to simply supply information about the event you want to evaluate, and you synchronously receive a model score and outcome based on the designated detector.
As part of the request, you must specify the detectorId that Amazon Fraud Detector uses to evaluate the event. You can optionally specify a detectorVersionId. If you don’t specify a detectorVersionId, Amazon Fraud Detector uses whichever detector version is in Active status.
You have to provide the following metadata for each evaluated event:
- EventId – A unique identifier for the event.
- Entities – The
entityTypeandentityIdto specify who is performing the event. Use the entity you created earlier (for example,customer) as theentityType. UseentityIdto distinguish between different transaction entities; it should follow the same format as the entity_id in your training data. - EventTimestamp – The timestamp when the event occurred. The timestamp must be in ISO 8601 standard in UTC.
- Event variables – Names of the event type’s variables and their corresponding values for the evaluated event. If you don’t send a value for a variable, Amazon Fraud Detector uses a default value.
The following is a sample Python code for calling the GetEventPrediction API:
Conclusion
You have now followed the end-to-end process of deploying a sample detector, including uploading data, training a model, deploying a model, writing business rules, and generating real-time fraud predictions. We hope this post inspires you to train a model using data from your own business! Visit our webpage to learn more about Amazon Fraud Detector!
About the Author
 Bilal Ali is a Sr. Product Manager working on Amazon Fraud Detector. He listens to customers’ problems and finds ways to help them better fight fraud and abuse. He spends his free time watching old Jeopardy episodes and searching for the best tacos in Austin, TX.
 Hao Zhou is a Research Scientist with Amazon Fraud Detector. He holds a PhD in electrical engineering from Northwestern University, USA. He is passionate about applying machine learning techniques to combat fraud and abuse.
Tags: Archive

Leave a Reply