Take advantage of advanced deployment strategies using Amazon SageMaker deployment guardrails
Deployment guardrails in Amazon SageMaker provide a new set of deployment capabilities allowing you to implement advanced deployment strategies that minimize risk when deploying new model versions on SageMaker hosting. Depending on your use case, you can use a variety of deployment strategies to release new model versions. Each of these strategies relies on a mechanism to shift inference traffic to one or more versions of a deployed model. The chosen strategy depends on your business requirements for your machine learning (ML) use case. However, any strategy should include the ability to monitor the performance of new model versions and automatically roll back to a previous version as needed to minimize potential risk of introducing a new model version with errors. Deployment guardrails offer new advanced deployment capabilities and as of this writing supports two new traffic shifting policies, canary and linear, as well as the ability to automatically roll back when issues are detected.
As part of your MLOps strategy to create repeatable and reliable mechanisms to deploy your models, you should also ensure that the chosen deployment strategy is implemented as part of your automated deployment pipeline. Deployment guardrails use the existing SageMaker CreateEndpoint and UpdateEndpoint APIs, so you can modify your existing deployment pipeline configurations to take advantage of the new deployment capabilities.
In this post, we show you how to use the new deployment guardrail capabilities to deploy your model versions using both a canary and linear deployment strategy.
Solution overview
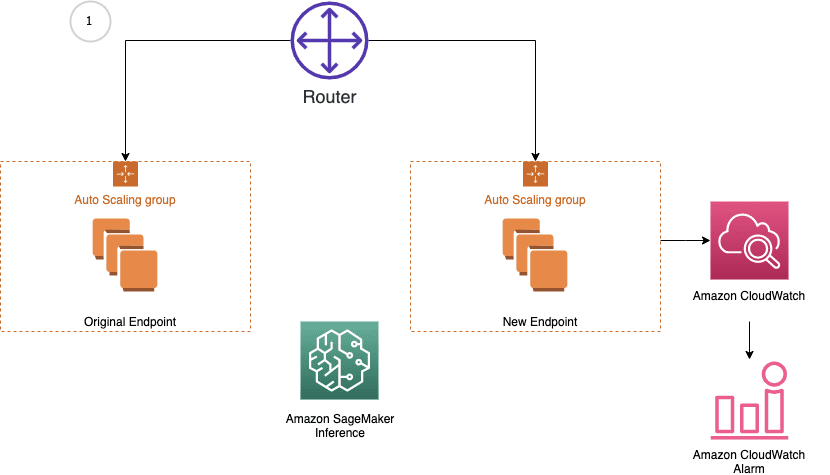
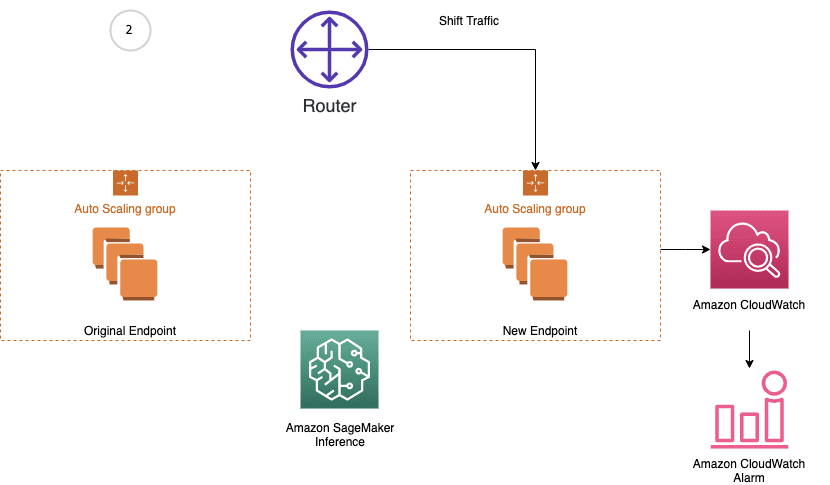
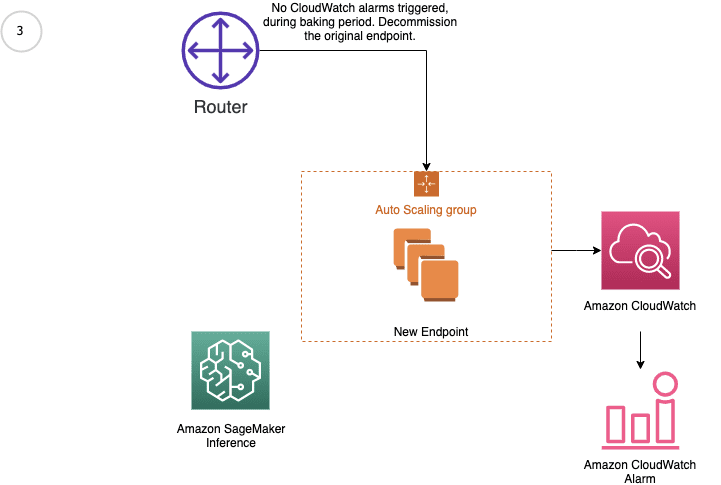
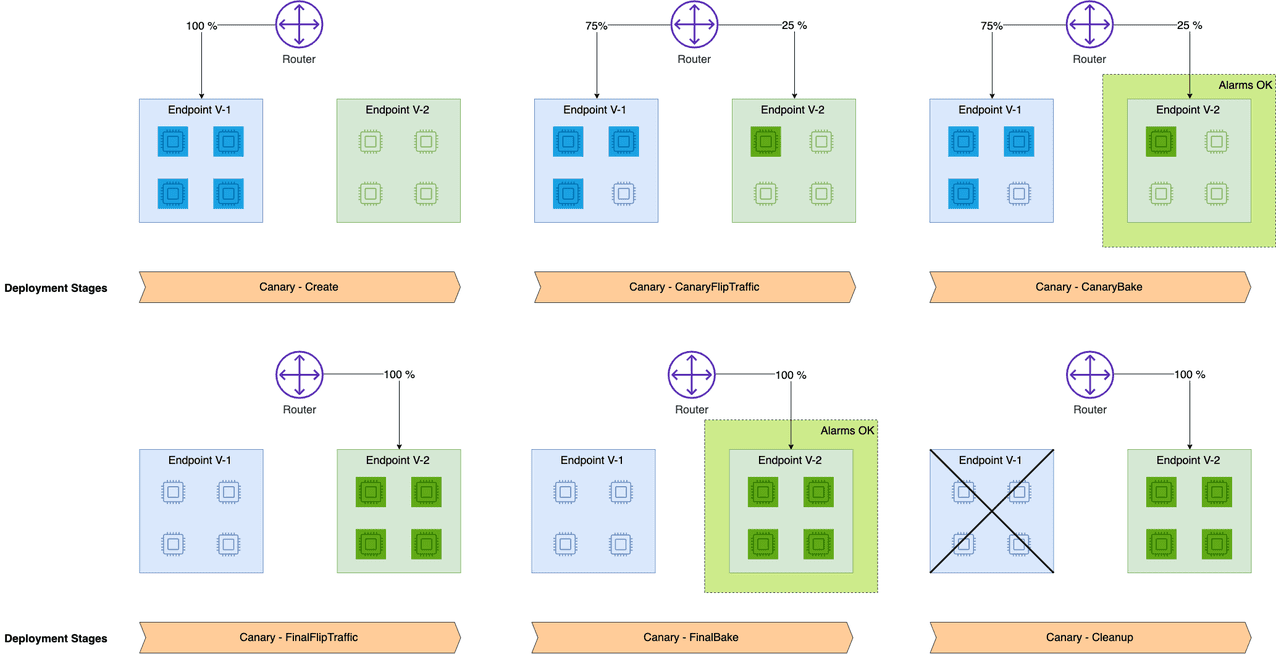
Amazon SageMaker inference provides managed deployment strategies for testing new versions of your models in production. We cover two new traffic shifting policies in this post: canary and linear. For each of these traffic shifting modes, two HTTPS endpoints are provisioned. Two endpoints are provisioned to reduce deployment risk as traffic is shifted from the original endpoint variant to the new endpoint variant. You configure the endpoints to contain one or more compute instances to deploy your trained model and perform inference requests. SageMaker manages the routing of traffic between the two endpoints. You define Amazon CloudWatch metrics and alarms to monitor metrics on the new endpoint, when traffic is shifted, for a set baking period. If a CloudWatch alarm is triggered, SageMaker performs an auto-rollback to route all traffic to the original endpoint variant. If no CloudWatch alarms are triggered, the original endpoint variant is stopped and the new endpoint variant continues to receive all traffic. The following diagrams illustrate shifting traffic to the new endpoint.
Let’s dive deeper into examples of the canary and linear traffic shifting policies.
We go over the following high-level steps as part of the deployment procedure:
- Create the model and endpoint configurations required for the three scenarios: the baseline, the update containing the incompatible model version, and the update with the correct model version.
- Invoke the baseline endpoint prior to the update.
- Specify the CloudWatch alarms used to trigger the rollbacks.
- Update the endpoint to trigger a rollback using either the canary or linear strategy.
First, let’s start with canary deployment.
Canary deployment
The canary deployment option lets you shift one small portion of your traffic (a canary) to the green fleet and monitor it for a baking period. If the canary succeeds on the green fleet, the rest of the traffic is shifted from the blue fleet to the green fleet before stopping the blue fleet.
To demonstrate canary deployments and the auto-rollback feature, we update an endpoint with an incompatible model version and deploy it as a canary fleet, taking a small percentage of the traffic. Requests sent to this canary fleet result in errors, which trigger a rollback using preconfigured CloudWatch alarms. We also demonstrate a success scenario where no alarms are tripped and the update succeeds.
Create and deploy the models
First, we upload our pre-trained models to Amazon Simple Storage Service (Amazon S3). These models were trained using the XGBoost churn prediction notebook in SageMaker. You can also use your own pre-trained models in this step. If you already have a pre-trained model in Amazon S3, you can add it by specifying the s3_key.
The models in this example are used to predict the probability of a mobile customer leaving their current mobile operator. The dataset we use is publicly available and was mentioned in the book Discovering Knowledge in Data by Daniel T. Larose.
Upload the models with the following code:
Next, we create our model definitions. We start with deploying the pre-trained churn prediction models. Here, we create the model objects with the image and model data. The three URIs correspond to the baseline version, the update containing the incompatible version, and the update containing the correct model version:
Now that the three models are created, we create the three endpoint configs:
We then deploy the baseline model to a SageMaker endpoint:
Invoke the endpoint
This step invokes the endpoint with sample data with a maximum invocations count and waiting intervals. See the following code:
For a full list of metrics, see Monitor Amazon SageMaker with Amazon CloudWatch.
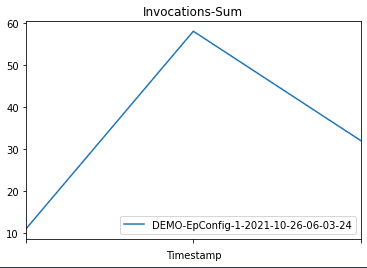
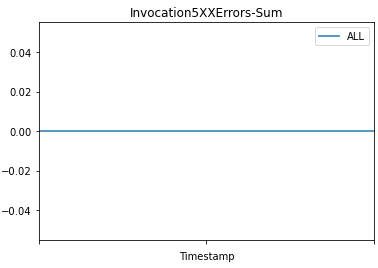
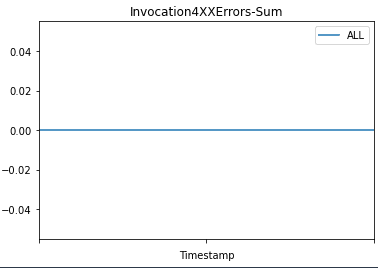
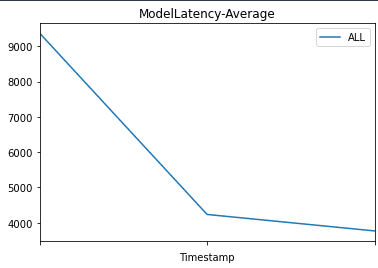
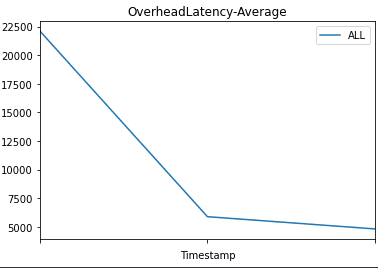
Then we plot graphs to show the metrics Invocations, Invocation4XXErrors, Invocation5XXErrors, ModelLatency, and OverheadLatency against the endpoint over time.
You can observe a flat line for Invocation4XXErrors and Invocation5XXErrors because we’re using the correct version model version and configs. Additionally, ModelLatency and OverheadLatency start decreasing over time.
 |
 |
 |
 |
 |
Create CloudWatch alarms to monitor endpoint performance
We create CloudWatch alarms to monitor endpoint performance with the metrics Invocation5XXErrors and ModelLatency.
We use metric dimensions EndpointName and VariantName to select the metric for each endpoint config and variant. See the following code:
Update the endpoint with deployment configurations
We define the following deployment configuration to perform a blue/green update strategy with canary traffic shifting from the old to the new stack. The canary traffic shifting option can reduce the blast ratio of a regressive update to the endpoint. In contrast, for the all-at-once traffic shifting option, the invocation requests start faulting at 100% after flipping the traffic. In canary mode, invocation requests are shifted to the new version of model gradually, preventing errors from impacting 100% of the traffic. Additionally, the auto-rollback alarms monitor the metrics during the canary stage.
The following diagram illustrates the workflow of our rollback use case.
We update the endpoint with an incompatible model version to simulate errors and trigger a rollback:
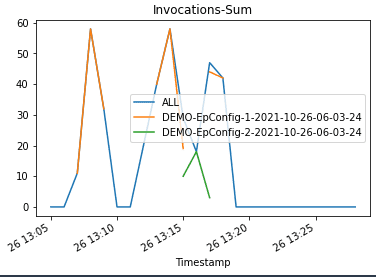
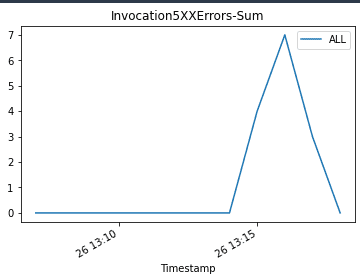
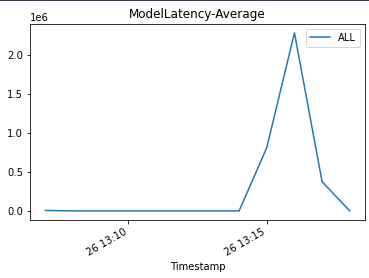
When we invoke the endpoint, we encounter errors because of the incompatible version of the model (ep_config_name2), and this leads to the rollback to a stable version of the model (ep_config_name1). This is reflected in the following graphs as Invocation5XXErrors and ModelLatency increase during this rollback phase.
 |
 |
 |
The following diagram shows a success case where we use the same canary deployment configuration but a valid endpoint configuration.
We update the endpoint configuration to a valid version (using the same canary deployment config as the rollback case):
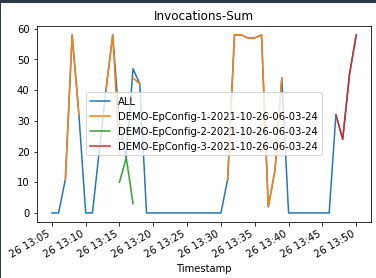
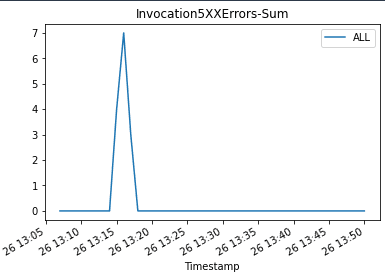
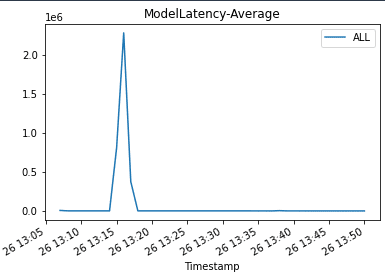
We plot graphs to show the Invocations, Invocation5XXErrors, and ModelLatency metrics against the endpoint. When the new endpoint config-3 (correct model version) starts getting deployed, it takes over endpoint config-2 (incompatible due to model version) without any errors. We can see this in the graphs as Invocation5XXErrors and ModelLatency decrease during this transition phase.
 |
 |
 |
Next, let’s see how linear deployments are configured and how it works.
Linear deployment
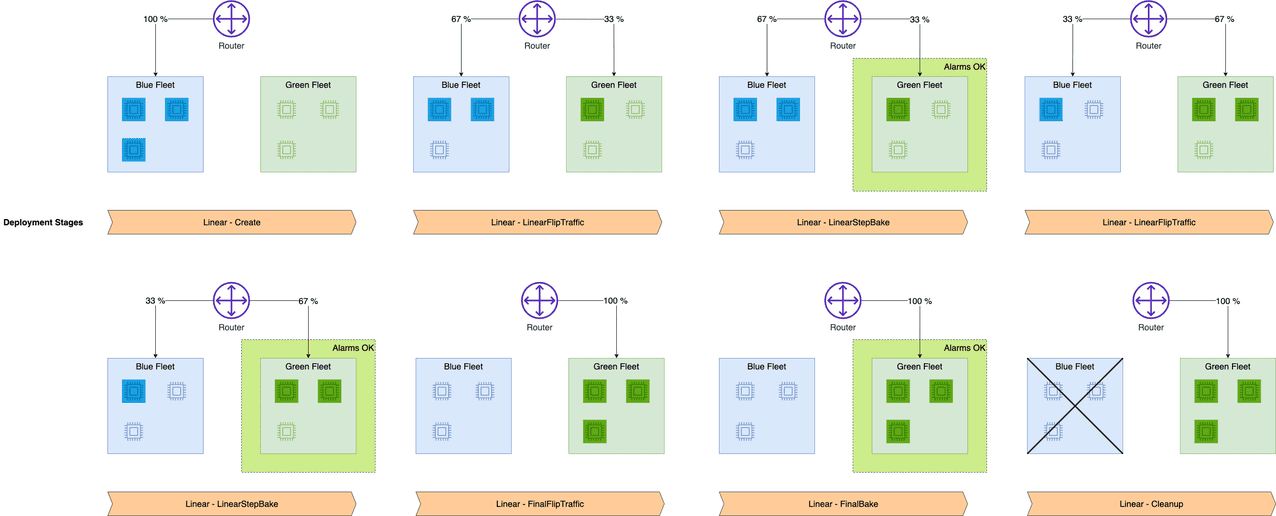
The linear deployment option provides even more customization over how many traffic-shifting steps to make and what percentage of traffic to shift for each step. Whereas canary shifting lets you shift traffic in two steps, linear shifting extends this to n linearly spaced steps.
To demonstrate linear deployments and the auto-rollback feature, we update an endpoint with an incompatible model version and deploy it as a linear fleet, taking a small percentage of the traffic. Requests sent to this linear fleet result in errors, which triggers a rollback using preconfigured CloudWatch alarms. We also demonstrate a success scenario where no alarms are tripped and the update succeeds.
The steps to create the models, invoke the endpoint, and create the CloudWatch alarms are the same as with the canary method.
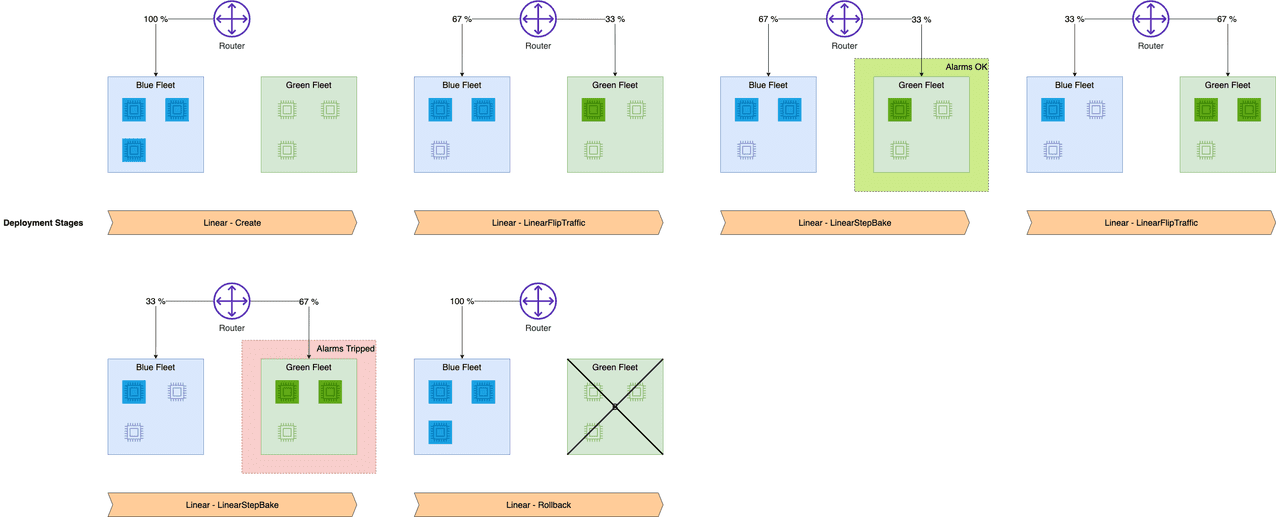
We define the following deployment configuration to perform a blue/green update strategy with linear traffic shifting from old to new stack. The linear traffic shifting option can reduce the blast ratio of a regressive update to the endpoint. In contrast, for the all-at-once traffic shifting option, the invocation requests start faulting at 100% after flipping the traffic. In linear mode, invocation requests are shifted to the new version of the model gradually, with a controlled percentage of traffic shifting for each step. You can use the auto-rollback alarms to monitor the metrics during the linear traffic shifting stage.
The following diagram shows the workflow for our linear rollback case.
We update the endpoint with an incompatible model version to simulate errors and trigger a rollback:
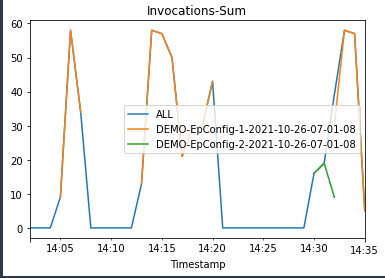
When we invoke the endpoint, we encounter errors because of the incompatible version of the model (ep_config_name2), which leads to the rollback to a stable version of the model (ep_config_name1). We can see this in the following graphs as the Invocation5XXErrors and ModelLatency metrics increase during this rollback phase.
 |
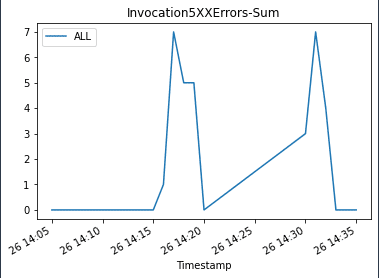 |
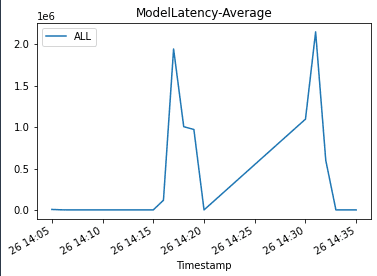 |
Let’s look at a success case where we use the same linear deployment configuration but a valid endpoint configuration. The following diagram illustrates our workflow.
We update the endpoint to a valid endpoint configuration version with the same linear deployment configuration:
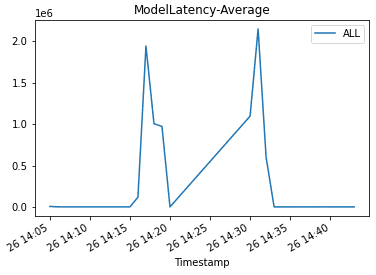
Then we plot graphs to show the Invocations, Invocation5XXErrors, and ModelLatency metrics against the endpoint.
As the new endpoint config-3 (correct model version) starts getting deployed, it takes over endpoint config-2 (incompatible due to model version) without any errors. We can see this in the following graphs as Invocation5XXErrors and ModelLatency decrease during this transition phase.
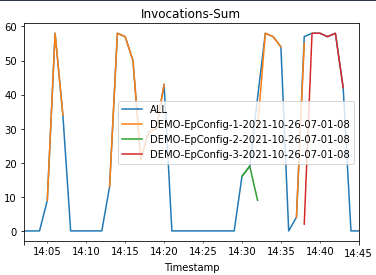 |
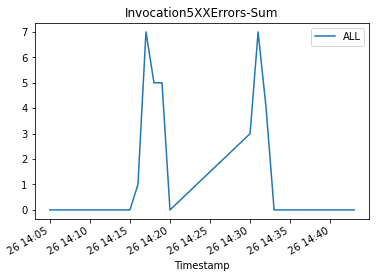 |
 |
Considerations and best practices
Now that we’ve walked through a comprehensive example, let’s recap some best practices and considerations:
- Pick the right health check – The CloudWatch alarms determine whether the traffic shift to the new endpoint variant succeeds. In our example, we used
Invocation5XXErrors(caused by the endpoint failing to return a valid result) andModelLatency, which measure how long the model takes to return a response. You can consider other built-in metrics in some cases, likeOverheadLatency, which accounts for other causes of latency, such as unusually large response payloads. You can also have your inference code record custom metrics, and you can configure the alarm measurement evaluation interval. For more information about available metrics, see SageMaker Endpoint Invocation Metrics. - Pick the most suitable traffic shifting policy – The all-at-once policy is a good choice if you just want to make sure that the new endpoint variant is healthy and able to serve traffic. The canary policy is useful if you want to avoid affecting too much traffic if the new endpoint variant has a problem, or if you want to evaluate a custom metric on a small percentage of traffic before shifting over. For example, perhaps you want to emit a custom metric that checks for inference response distribution, and make sure it falls within expected ranges. The linear policy is a more conservative and more complex take on the canary pattern.
- Monitor the alarms – The alarms you use to trigger rollback should also cause other actions, like notifying an operations team.
- Use the same deployment strategy in multiple environments – As part of an overall MLOps pipeline, use the same deployment strategy in test as well as production environments, so that you become comfortable with the behavior. This consideration implies that you can inject realistic load onto your test endpoints.
Conclusion
In this post, we introduced SageMaker inference’s new deployment guardrail options, which let you manage deployment of a new model version in a safe and controlled way. We reviewed the new traffic shifting policies, canary and linear, and showed how to use them in a realistic example. Finally, we discussed some best practices and considerations. Get started today with deployment guardrails on the SageMaker console or, for more information, review Deployment Guardrails.
About the Authors
 Raghu Ramesha is an ML Solutions Architect with the Amazon SageMaker Services SA team. He focuses on helping customers migrate ML production workloads to SageMaker at scale. He specializes in machine learning, AI, and computer vision domains, and holds a master’s degree in Computer Science from UT Dallas. In his free time, he enjoys traveling and photography.
 Shelbee Eigenbrode is a Principal AI and Machine Learning Specialist Solutions Architect at Amazon Web Services (AWS). She has been in technology for 24 years spanning multiple industries, technologies, and roles. She is currently focusing on combining her DevOps and ML background into the domain of MLOps to help customers deliver and manage ML workloads at scale. With over 35 patents granted across various technology domains, she has a passion for continuous innovation and using data to drive business outcomes. Shelbee is a co-creator and instructor of the Practical Data Science specialization on Coursera. She is also the Co-Director of Women In Big Data (WiBD), Denver chapter. In her spare time, she likes to spend time with her family, friends, and overactive dogs.
 Randy DeFauw is a Principal Solutions Architect. He’s an electrical engineer by training who’s been working in technology for 23 years at companies ranging from startups to large defense firms. A fascination with distributed consensus systems led him into the big data space, where he discovered a passion for analytics and machine learning. He started using AWS in his Hadoop days, where he saw how easy it was to set up large complex infrastructure, and then realized that the cloud solved some of the challenges he saw with Hadoop. Randy picked up an MBA so he could learn how business leaders think and talk, and found that the soft skill classes were some of the most interesting ones he took. Lately, he’s been dabbling with reinforcement learning as a way to tackle optimization problems, and re-reading Martin Kleppmann’s book on data intensive design.
 Lauren Mullennex is a Solutions Architect based in Denver, CO. She works with customers to help them architect solutions on AWS. In her spare time, she enjoys hiking and cooking Hawaiian cuisine.
Tags: Archive


Leave a Reply