Easily create and store features in Amazon SageMaker without code
Data scientists and machine learning (ML) engineers often prepare their data before building ML models. Data preparation typically includes data preprocessing and feature engineering. You preprocess data by transforming data into the right shape and quality for training, and you engineer features by selecting, transforming, and creating variables when building a predictive model.
Amazon SageMaker helps you perform these tasks by simplifying feature preparation with Amazon SageMaker Data Wrangler and storage and feature serving with Amazon SageMaker Feature Store. You can prepare your data and engineer features using over 300 built-in transformations with Data Wrangler. Then you can persist those features to a purpose-built feature store for ML with Feature Store. These services help you build automatic and repeatable processes to streamline your data preparation tasks, all without writing code.
We’re excited to announce a new capability that seamlessly integrates Data Wrangler with Feature Store. You can now easily create features with Data Wrangler and store those features in Feature Store with just a few clicks in Amazon SageMaker Studio.
In this post, we demonstrate creating features with Data Wrangler and persisting them in Feature Store using the hotel booking demand dataset. We focus on the data preparation and feature engineering tasks to show how easily you can create and stores features in SageMaker without code using Data Wrangler. After the features are stored, they can be used for training and inference by multiple models and teams.
Solution overview
To demonstrate feature engineering and feature storage, we use a hotel booking demand dataset. You can download the dataset and view the full description of each variable. The dataset contains information such as when a hotel booking was made, the booking location, the length of stay, the number of parking spaces, and other features.
Our goal is to engineer features to predict if a user will cancel a booking.
We host the dataset in an Amazon Simple Storage Service (Amazon S3) bucket. We also open a Studio domain to utilize the native Data Wrangler and Feature Store capabilities. We import the dataset into a Data Wrangler flow and define the data transformation steps we want to apply using the Data Wrangler user interface (UI). We then have SageMaker run our feature engineering steps and store the features in Feature Store.
The following diagram illustrates the solution workflow.

To demonstrate Data Wrangler’s feature engineering steps, we assume we’ve already conducted exploratory data analysis (EDA). EDA helps you understand your data by identifying patterns in your data. For example, we might find that customers who book resort hotels tend to stay longer than city hotels. Or customers that stay over the weekend purchase more meals. Because these patterns aren’t evident with data in tables, data scientists use visualization tools to help identify patterns. EDA is often a necessary step to determine which features to create, delete, and transform.
If you already have features ready to export to Feature Store, you can navigate to the Save features to Feature Store section to learn how you can easily save your prepared features to Feature Store.
Prerequisites
If you want to follow along with this post, you should have the following prerequisites:
- An AWS account
- A Studio domain with the
AmazonSageMakerFeatureStoreAccessmanaged policy attached to the AWS Identity and Access Management (IAM) execution role - An S3 bucket
- The dataset uploaded to the S3 bucket
Create features with Data Wrangler
To create features with Data Wrangler, complete the following steps:
- Enter your Studio domain.
- Choose Data Wrangler as your resource to view.
- Choose New flow.
- Choose Import and import your data.

You can see a preview of the data in the Data Wrangler UI when selecting your dataset. You can also choose a sampling method. Because our dataset is relatively small, we choose not to sample our data. The flow editor now shows two steps in the UI, representing the step you took to import the data and a data validation step Data Wrangler automatically completes for you.
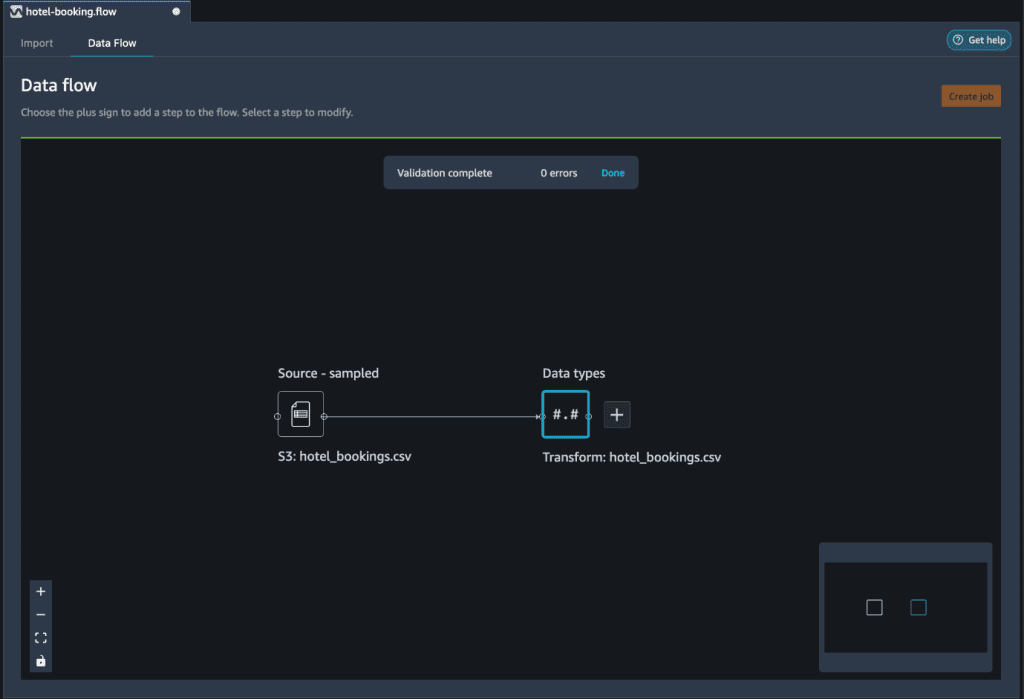
- Choose the plus sign next to Data types and choose Add transform.
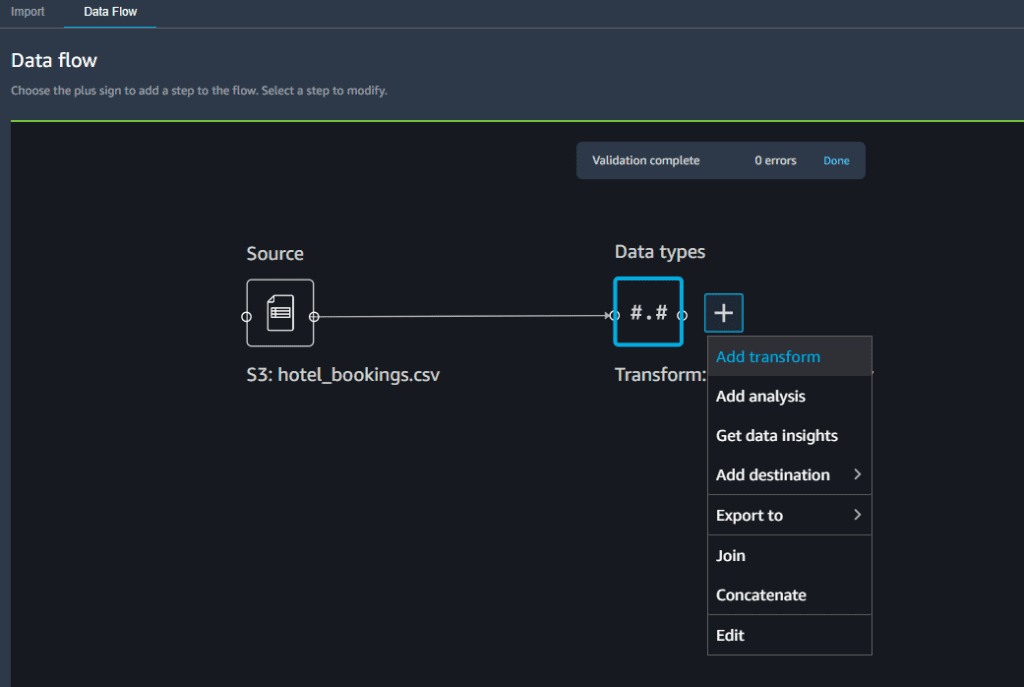
Assuming we’ve spent time in EDA, we can remove redundant columns that contribute to target leakage. Target leakage occurs when some data in a training dataset is strongly correlated with the target label, but isn’t available in real-world data. After we conduct a target leakage analysis, we determine we should drop redundant columns. Data Wrangler helped identify 10 columns to drop.
- Add a step and choose the Drop column transform step.
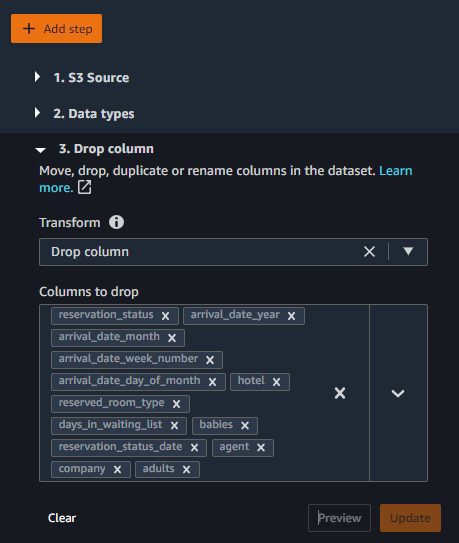
Additionally, we determine we can remove columns like agent and adults after a multicollinearity analysis. Multicollinearity is the presence of high correlations between two or more independent variables. We usually want to avoid variables to be correlated to each other because they can lead to misleading and inaccurate models.
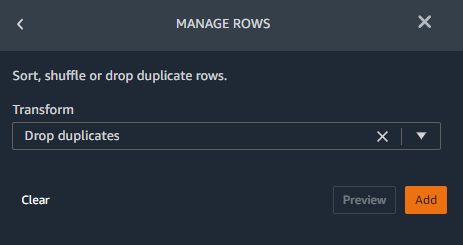
We also want to drop duplicate rows. In our case, nearly 28% of all rows in our dataset are duplicates. Because duplicates may have undesirable effects on our model, we use the transform set to remove them.
- Add a new transform and choose Manage rows from the list of available transforms.
- Choose Drop duplicates on the Transform drop-down menu.
Next, we want to handle missing values. We find that many hotel guests didn’t travel with children, and have a blank value for the children column. We can replace this blank value with 0.
- Choose Handle missing as the transform step and Fill missing as the transform type.
- Add a transform to fill blank values with the 0 value by choosing
childrenas the input column.
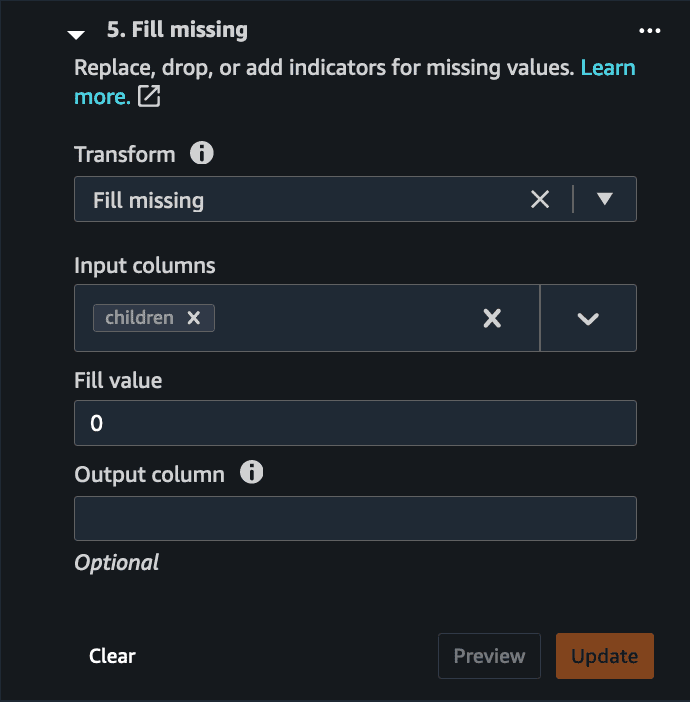
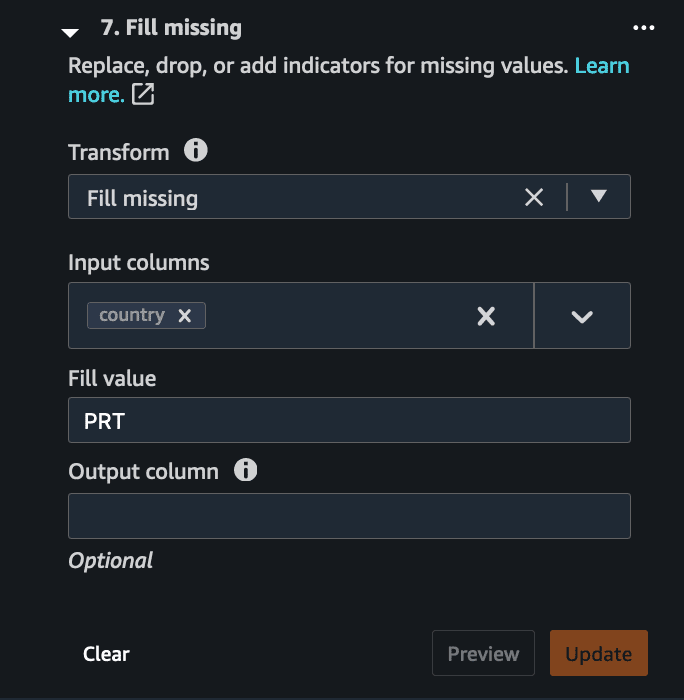
From our EDA, we see that there are many missing values for the country column. However, the data reveals most of the hotel guests are from Europe. We determine that missing country column values can be replaced with the most commonly occurring country—Portugal (PRT).
- Choose the Handle missing transform step and choose Fill missing as the transform type.
- Choose
countryas the input column, and enterPRTas the Fill value.
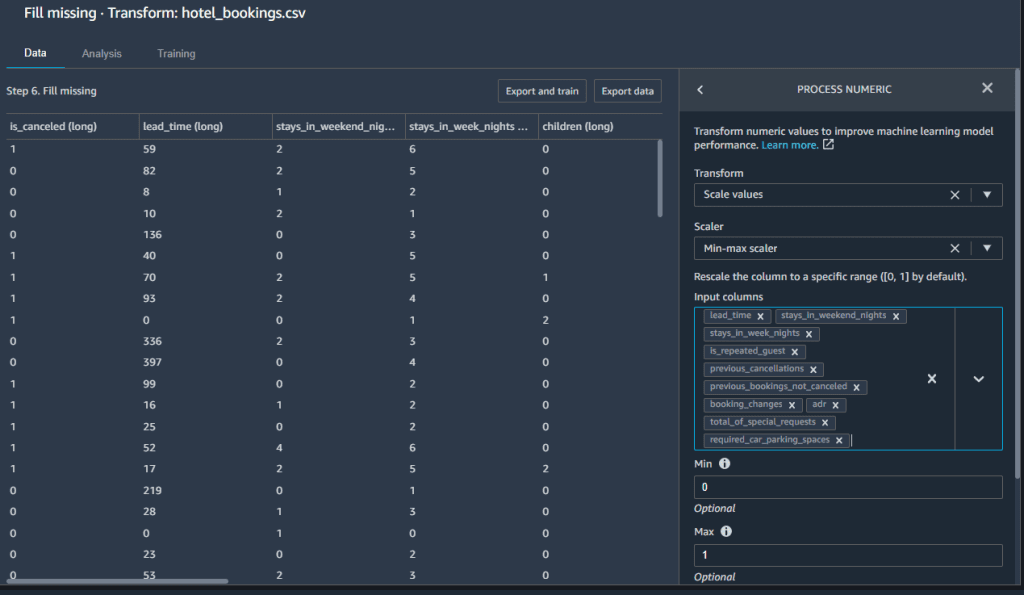
ML algorithms like linear regression, logistic regression, neural networks, and others that use gradient descent as an optimization technique require data to be scaled. Normalization (also known as min-max scaling) is a scaling technique that transforms values to be in the range of 0–1. Standardization is another scaling technique where the values are centered around the mean with a standard deviation unit. In our case, we normalize the numeric feature columns to a standard scale between [0, 1].
- Choose the Process numeric transform step and Scale values as the transform type.
- Choose Min-max scaler as the scaler and
lead_time,booking_changes,adr, and others as the input columns. - Leave 0 as Min and 1 as Max default values.
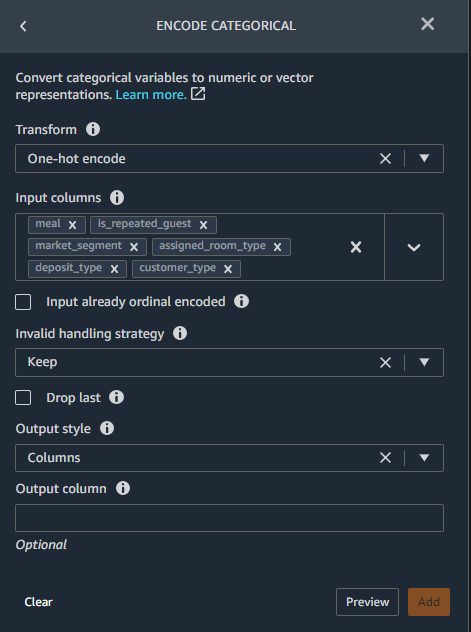
We also want to handle categorical data by representing them as numeric values. For example, if your categories are Dog and Cat, you may encode this information into two vectors, [1,0] to represent Dog, and [0,1] to represent Cat. For our dataset, we use one-hot encoding to encode categories into an integer between 0 and the total number of categories within the column.
- Choose the One-hot encode transform type from the Encode categorical transform.
ML models are sensitive to the distribution and range of your feature values. Outliers can negatively impact model accuracy and lead to longer training times. For our dataset, we apply the standard deviation numeric outliers transform with a set of configuration values as shown in the following screenshot. We apply this transform on the numeric columns.
- Choose the Standard Deviation Numeric Outliers transform type from the Handle outliers transform.
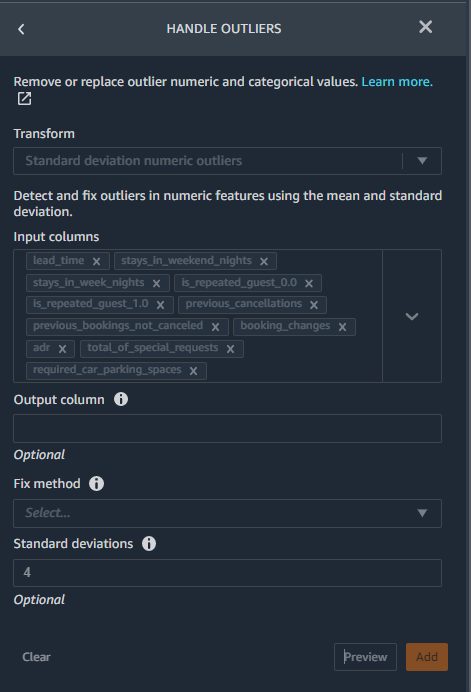
Lastly, we want to balance the target variable for class imbalance. In Data Wrangler, we can handle class imbalance using three different techniques:
- Random undersample
- Random oversample
- SMOTE
- In the Data Wrangler transform pane, choose Balance data as the group and choose Random oversample for the Transform field.
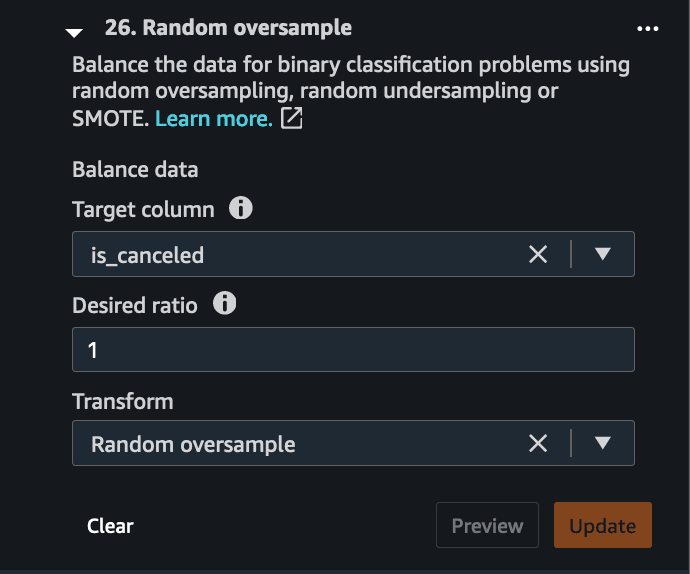
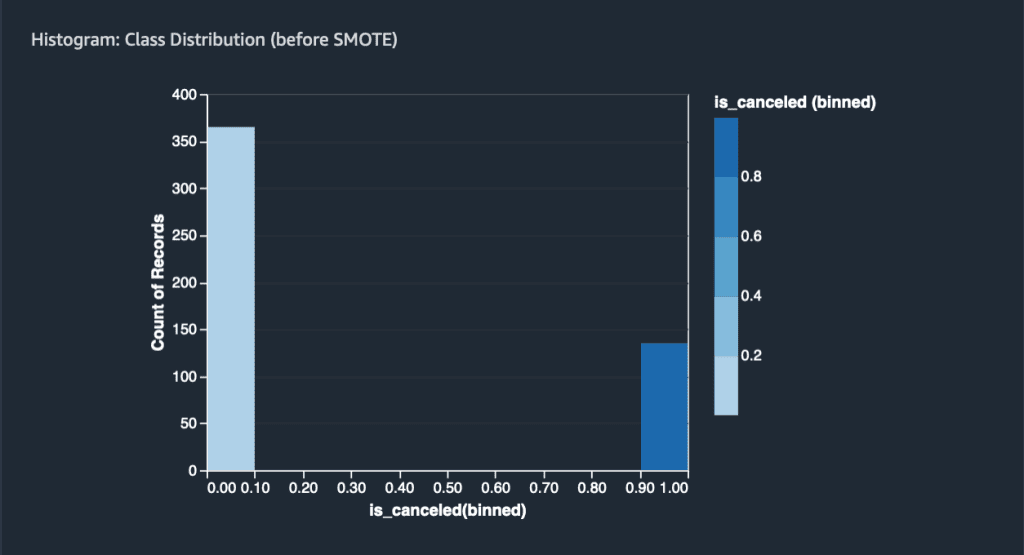
The ratio of positive to negative cases is around 0.38 before balancing.
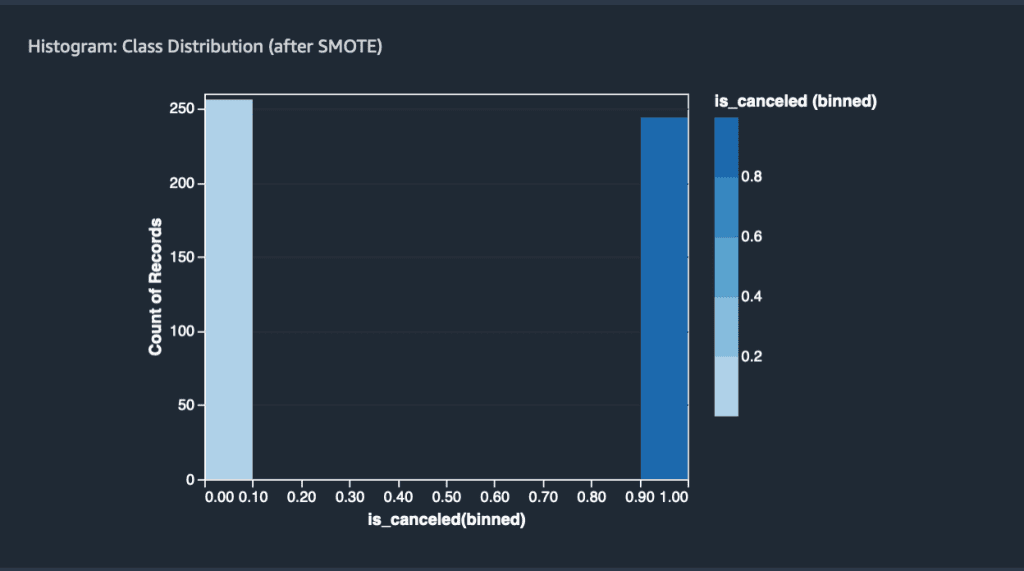
After oversampling and balancing the dataset, the ratio equates to 1.
Now that we’ve completed our feature engineering tasks, we’re ready to export our features to Feature Store with one click.
Save features to Feature Store
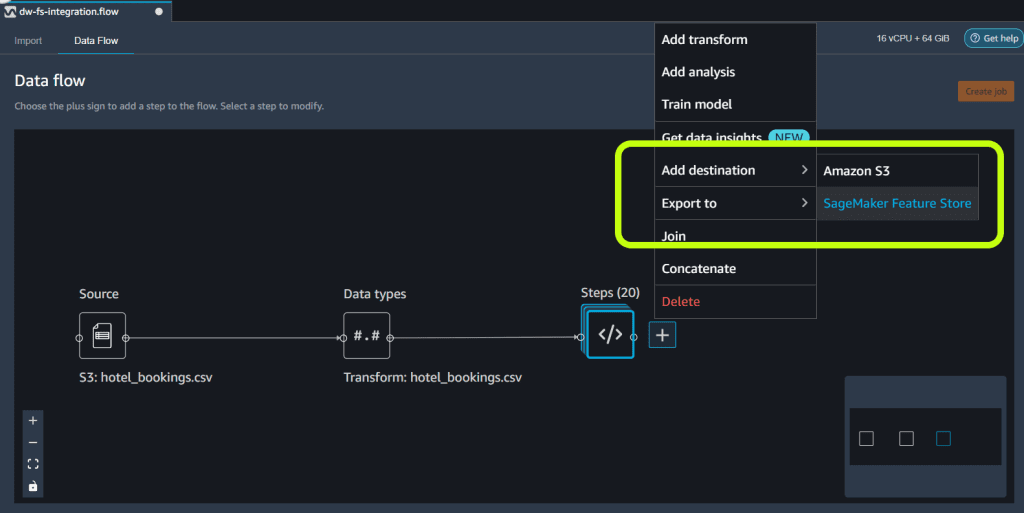
You can easily export your generated features to SageMaker Feature Store by selecting it as the destination.
You can save the features into an existing feature group or create new one. For this post, we create a new feature group. Studio directs you to a new tab where you can create a new feature group.
- Choose the plus sign, choose Export to, and choose SageMaker Feature Store.
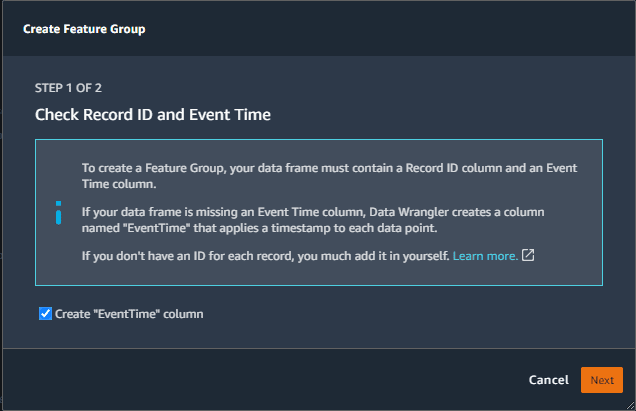
- Choose Create Feature Group.

- Optionally, select Create “EventTime” column.
- Choose Next.
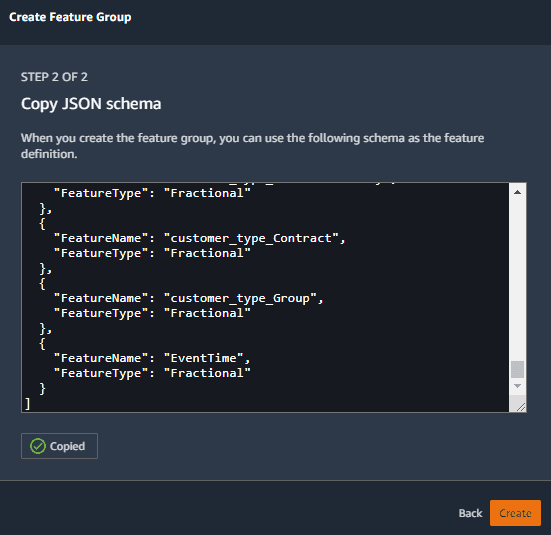
- Copy the JSON schema, then choose Create.
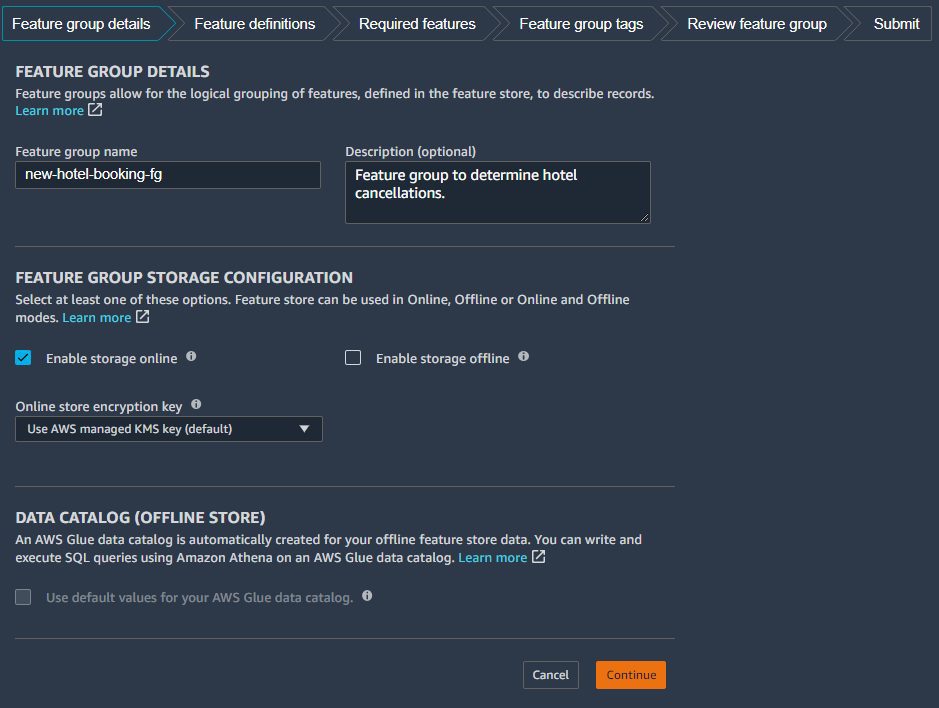
- Provide a feature group name and an optional description for your feature group.
- Select a feature group storage configuration that is either online or offline, or both.
Online stores serve features with low millisecond latency for real-time inference, whereas offline stores are ideal for retrieving your features for training models or for batch scoring. Additionally, you can run queries on your offline feature stores by registering your features in an AWS Glue Data Catalog. For more information, see Query Feature Store with Athena and AWS Glue.
- Choose Continue.
Next, you specify the feature definitions. You specify the data type (string, integral, fractional) for each feature definition.
- Enter the JSON schema from the previous step to define your feature definitions.
- Choose Continue.
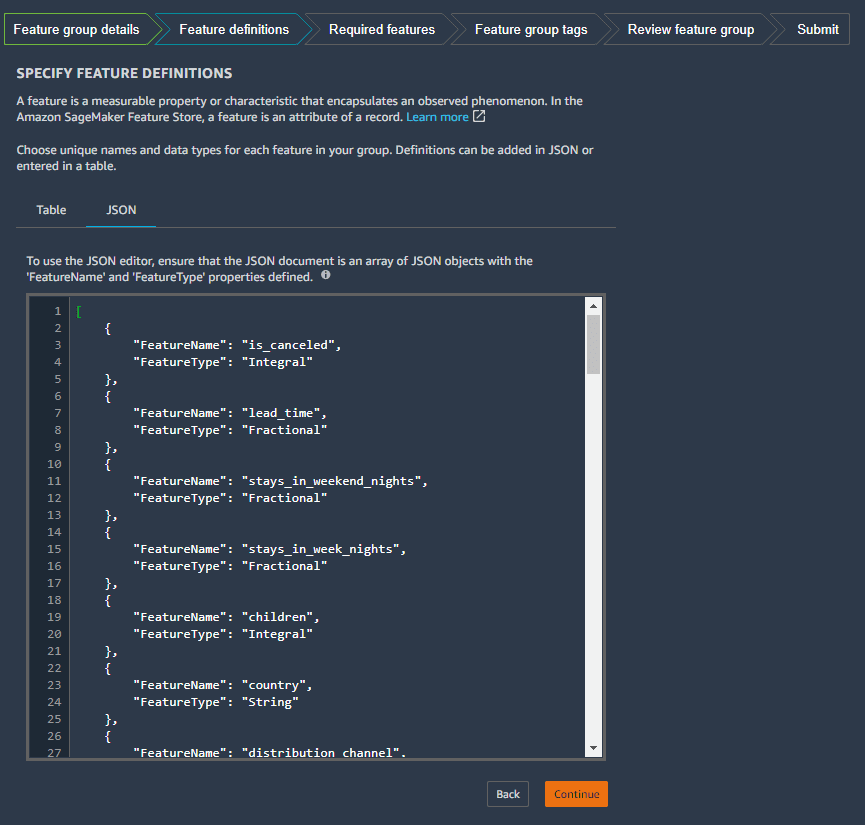
- Next, you specify a record identifier name and a timestamp to uniquely identify a record within a feature group.
The record identifier name must refer to one of the names of a feature defined in the feature group’s feature definition. In our case, we use the existing identifier, distribution-channel, which was in our source dataset, and EventTime.
- Choose Continue.
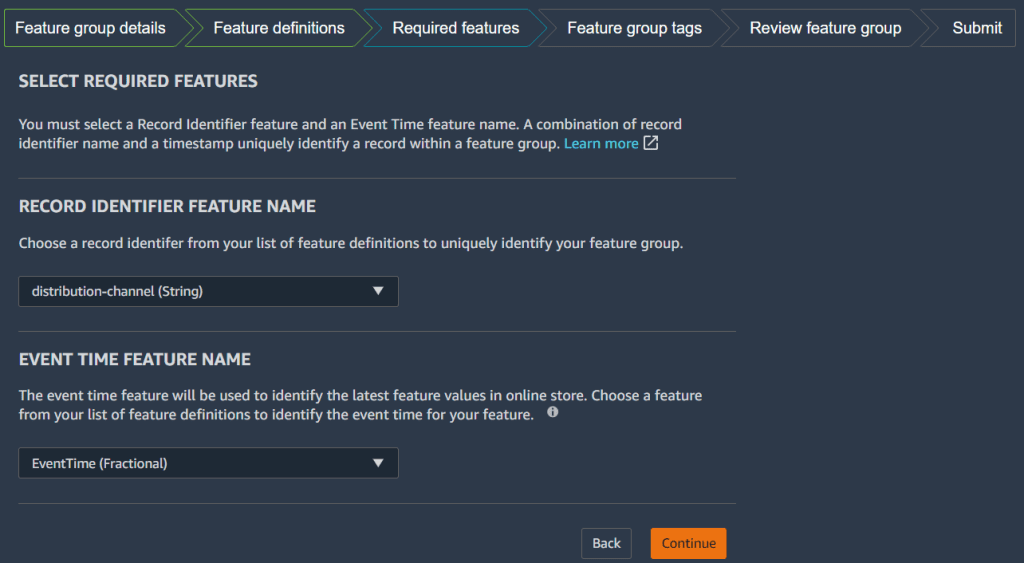
- Lastly, apply any relevant tags and review your feature group details.
- Choose Create feature group to finalize the process.
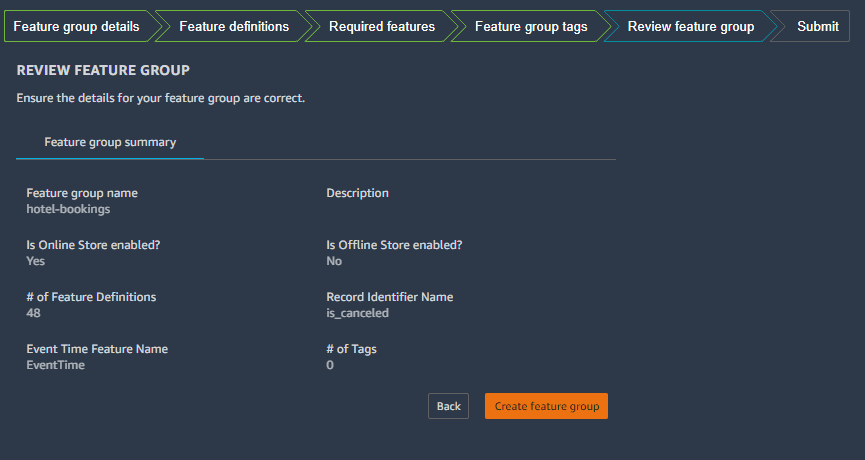
- After we create our feature group, we can return to the Data Wrangler flow UI.
- Choose the plus sign, choose Add destination, and choose SageMaker Feature Store.
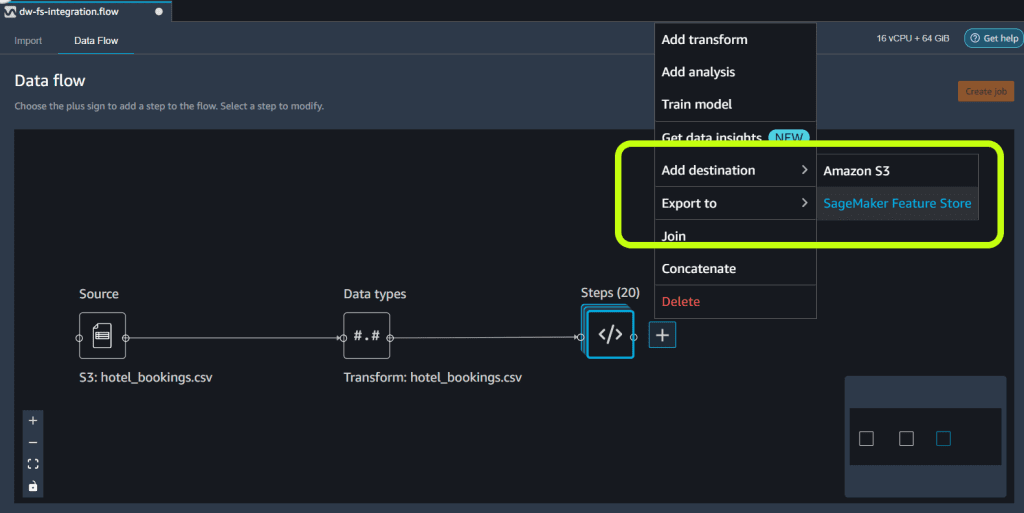
- We choose the desired destination feature group to ensure that the features we’re storing match the feature group schema.
If the newly created feature group doesn’t show up in the UI, refresh the list to reload the groups.
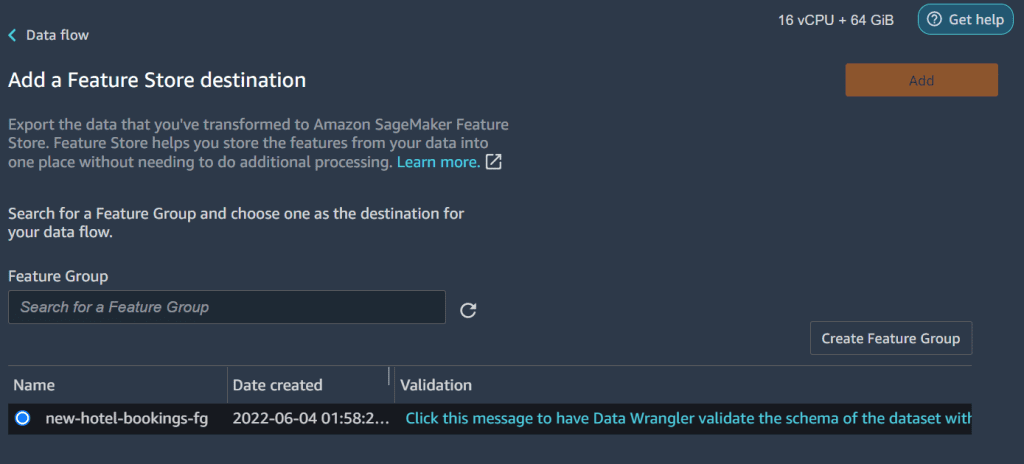
- Chose the message under the Validation column to have Data Wrangler validate the schema of the dataset with the schema of the feature group.
If you missed specifying the event time column, Data Wrangler will notify you of an error and request that you add one to your dataset.
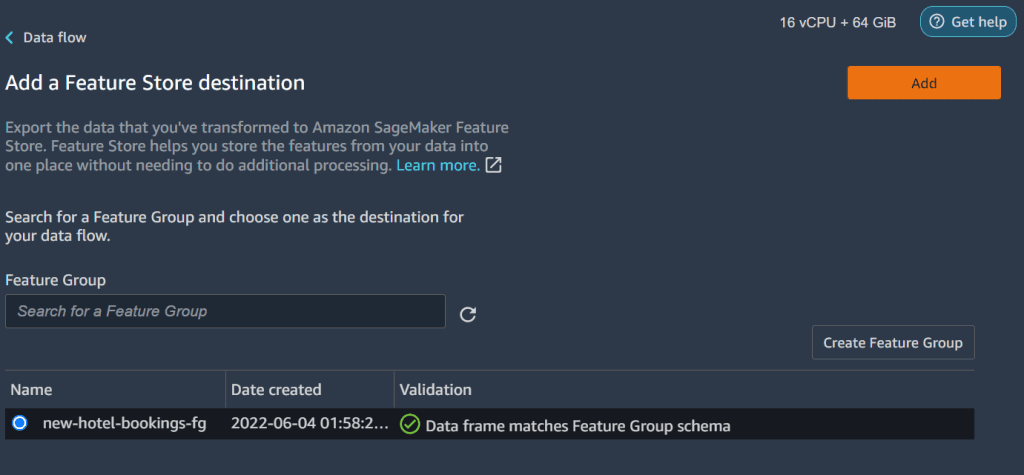
Once validated, Data Wrangler informs you that the data frame matches the feature group schema.
- If you enabled both the online and offline stores for the feature group, you can optionally select Write to offline store only to only ingest data to the offline store.
This is helpful for historical data backfilling scenarios.
- Choose Add to add another step to our Data Wrangler flow.
- With all our steps defined, choose Create job to run our ML workflow from feature engineering to ingesting features into our feature group.
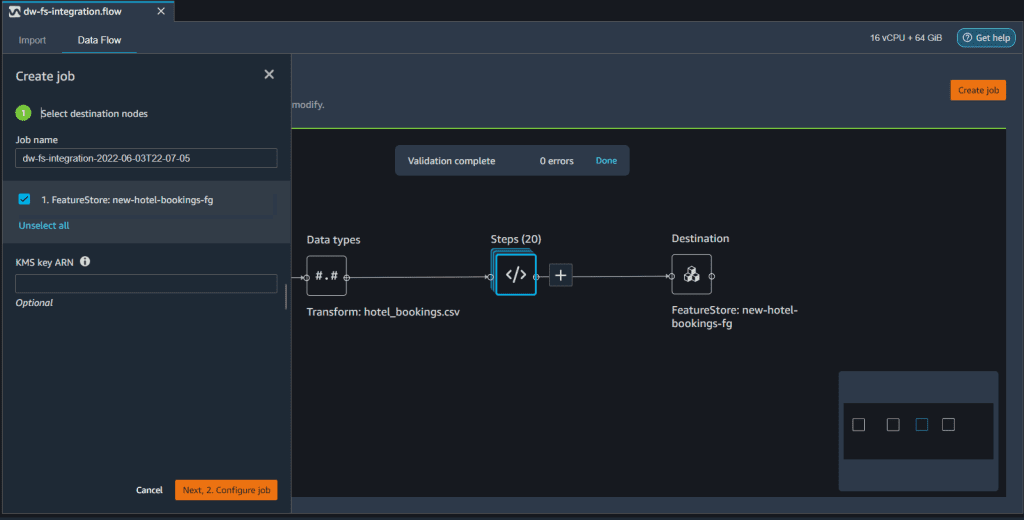
- Give the job a name, then provide the job specifications like the type and number of instances.
- Choose Run.
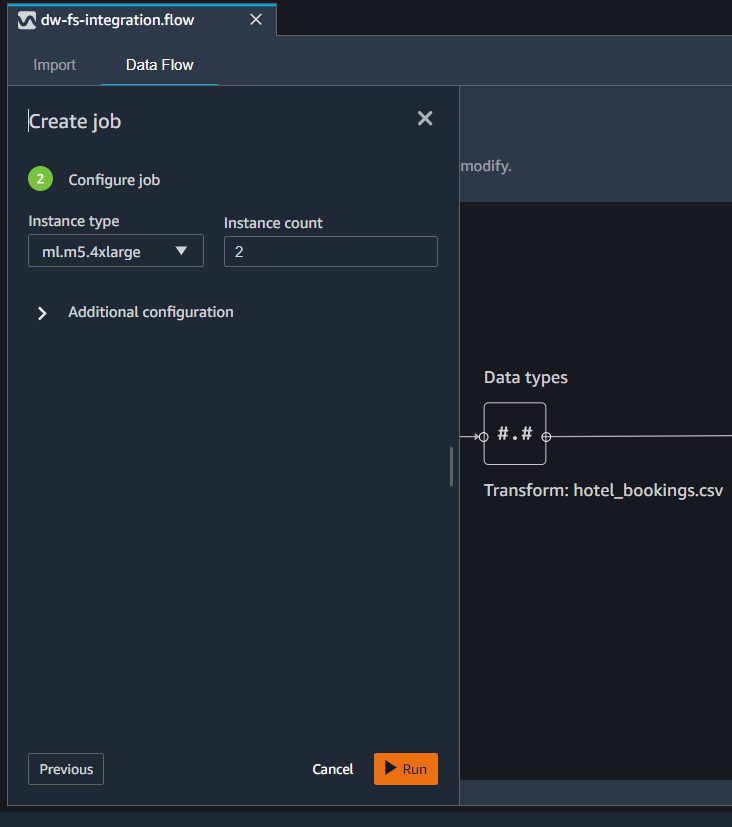
Congratulations! You’ve successfully engineered features using Data Wrangler and stored them in a persistent feature store without writing any code. You can easily explore features, see details of your feature group, and update the feature group schema when necessary.
Conclusion
In this post, we created features with Data Wrangler, and easily stored those features in Feature Store. We showed an example workflow for feature engineering in the Data Wrangler UI. Then we saved those features into Feature Store directly from Data Wrangler by creating a new feature group. Finally, we ran a processing job to ingest those features into Feature Store. These services helped us build automatic and repeatable processes to streamline our data preparation tasks, all without writing code.
With this new integration, you can accelerate your ML tasks with a more streamlined experience between feature engineering and feature ingestion. For more information, refer to Get Started with Data Wrangler and Get started with Amazon SageMaker Feature Store.
About the Authors
 Peter Chung is a Solutions Architect for AWS, and is passionate about helping customers uncover insights from their data. He has been building solutions to help organizations make data-driven decisions in both the public and private sectors. He holds all AWS certifications as well as two GCP certifications. He enjoys coffee, cooking, staying active, and spending time with his family.
 Patrick Lin is a Software Development Engineer with Amazon SageMaker Data Wrangler. He is committed to making Amazon SageMaker Data Wrangler the number one data preparation tool for productionized ML workflows. Outside of work, you can find him reading, listening to music, having conversations with friends, and serving at his church.
 Ziyao Huang is a Software Development Engineer with Amazon SageMaker Data Wrangler. He is passionate about building great product that makes ML easy for the customers. Outside of work, Ziyao likes to read, and hang out with his friends
Tags: Archive

Leave a Reply