Inspect your data labels with a visual, no code tool to create high-quality training datasets with Amazon SageMaker Ground Truth Plus
Launched at AWS re:Invent 2021, Amazon SageMaker Ground Truth Plus helps you create high-quality training datasets by removing the undifferentiated heavy lifting associated with building data labeling applications and managing the labeling workforce. All you do is share data along with labeling requirements, and Ground Truth Plus sets up and manages your data labeling workflow based on these requirements. From there, an expert workforce that is trained on a variety of machine learning (ML) tasks performs data labeling. You don’t even need deep ML expertise or knowledge of workflow design and quality management to use Ground Truth Plus.
Building a high-quality training dataset for your ML algorithm is an iterative process. ML practitioners often build custom systems to inspect data labels because accurately labeled data is critical to ML model quality. To ensure you get high-quality training data, Ground Truth Plus provides you with a built-in user interface (Review UI) to inspect the quality of data labels and provide feedback on data labels until you’re satisfied that the labels accurately represent the ground truth, or what is directly observable in the real world.
This post walks you through steps to create a project team and use several new built-in features of the Review UI tool to efficiently complete your inspection of a labeled dataset. The walkthrough assumes that you have an active Ground Truth Plus labeling project. For more information, see Amazon SageMaker Ground Truth Plus – Create Training Datasets Without Code or In-house Resources.
Set up a project team
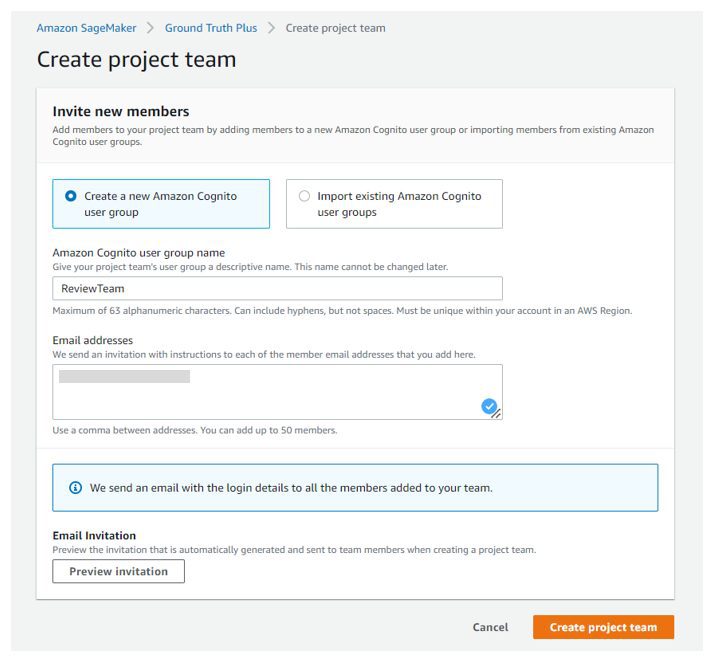
A project team provides access to the members from your organization to inspect data labels using the Review UI tool. To set up a project team, complete the following steps:
- On the Ground Truth Plus console, choose Create project team.
- Select Create a new Amazon Cognito user group . If you already have an existing Amazon Cognito user group, select the Import members option.
- For Amazon Cognito user group name, enter a name. This name can’t be changed.
- For Email addresses, enter the email addresses of up to 50 team members, separated by commas.
- Choose Create project team.
Your team members will receive an email inviting them to join the Ground Truth Plus project team. From there, they can log in to the Ground Truth Plus project portal to review the data labels.
Inspect labeled dataset quality
Now let’s dive into a video object tracking example using CBCL StreetScenes dataset.
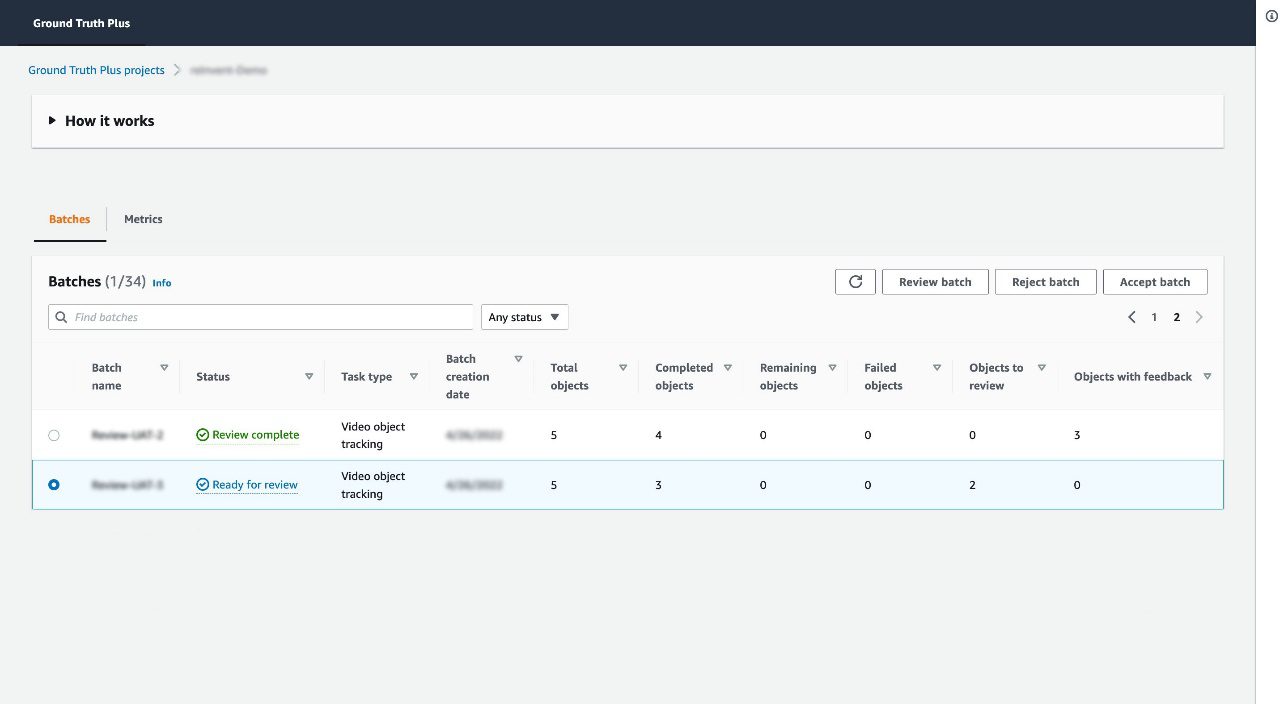
After the data in your batch has been labeled, the batch is marked as Ready for review.
Select the batch and choose Review batch. You’re redirected to the Review UI. You have the flexibility to choose a different sampling rate for each batch you review. For instance, in our example batch, we have a total of five videos. You can specify if you want to review only a subset of these five videos or all of them.
Now let’s look at the different functionalities within the Review UI that will help you in inspecting the quality of the labeled dataset at a faster pace, and providing feedback on the quality:
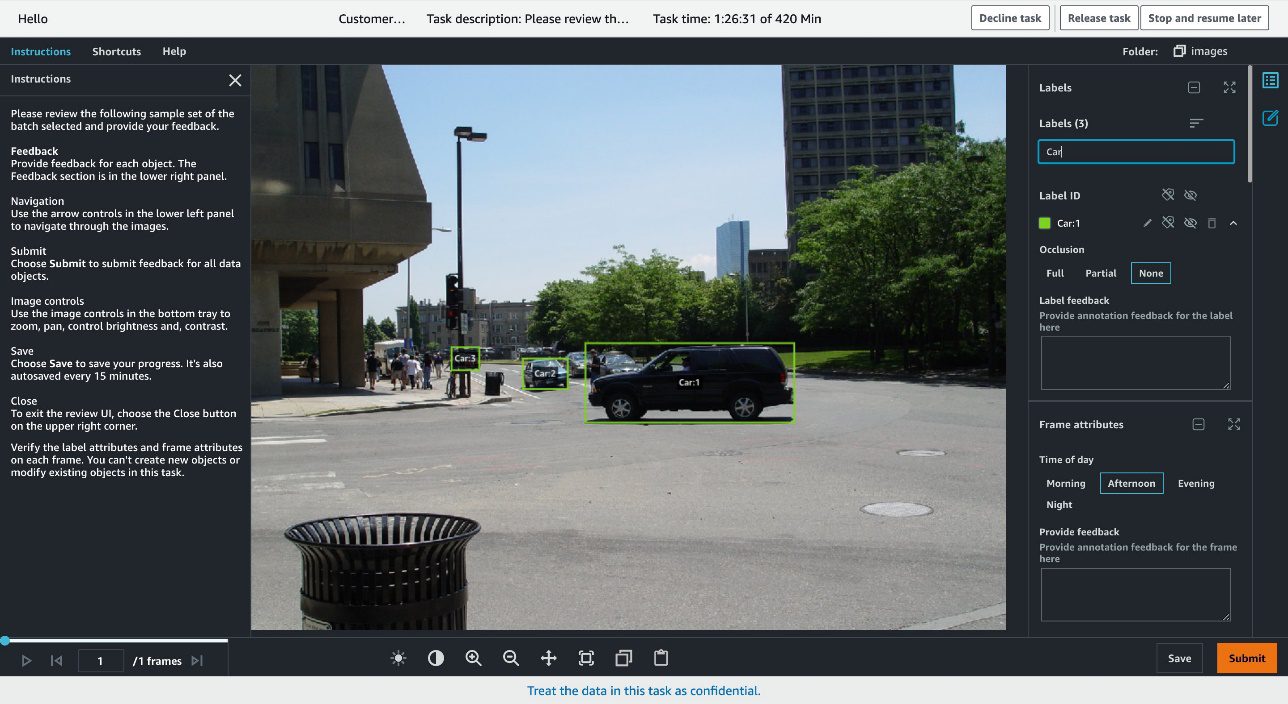
- Filter the labels based on label category – Within the Review UI, in the right-hand pane, you can filter the labels based on their label category. This feature comes in handy when there are multiple label categories (for example,
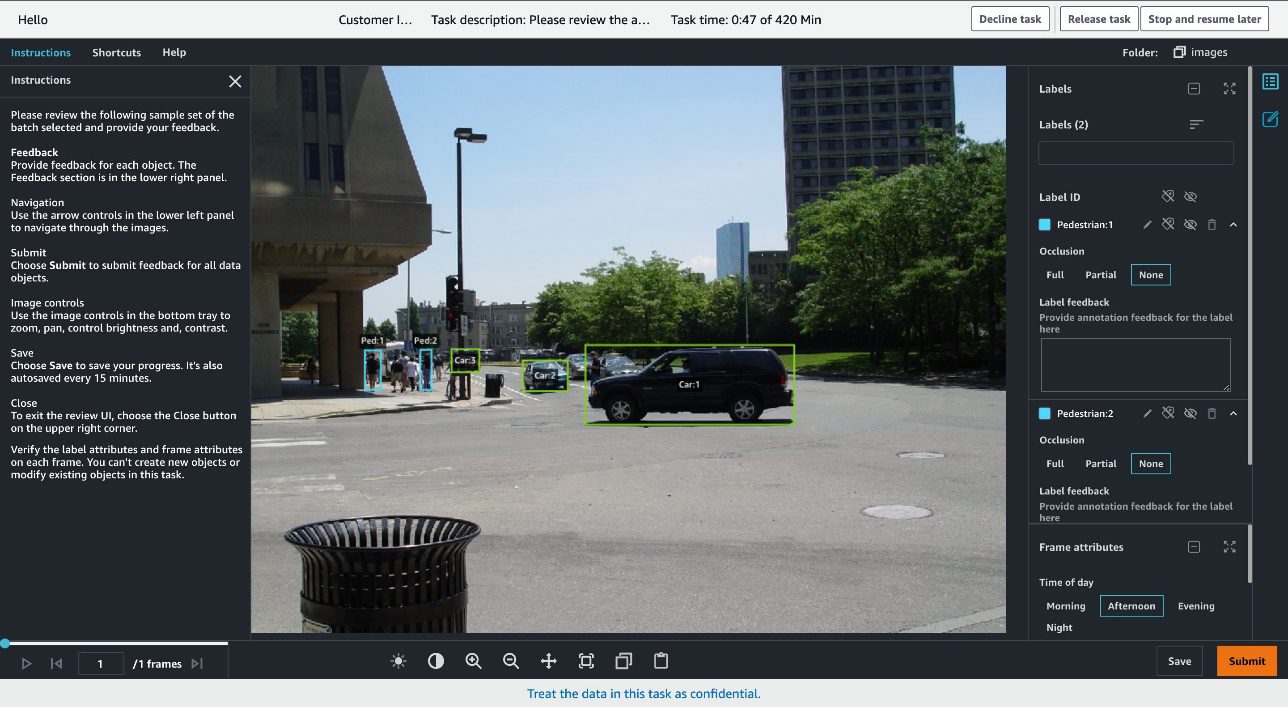
Vehicles,Pedestrians, andPoles) in a dense dataset object, and you want to view labels for one label category at a time. For example, let’s focus on theCarlabel category. Enter theCarlabel category in the right pane to filter for all annotations of only typeCar. The following screenshots show the Review UI view before and after applying the filter.


- Overlay associated annotated attribute values – Each label can be assigned attributes to be annotated. For example, for the label category
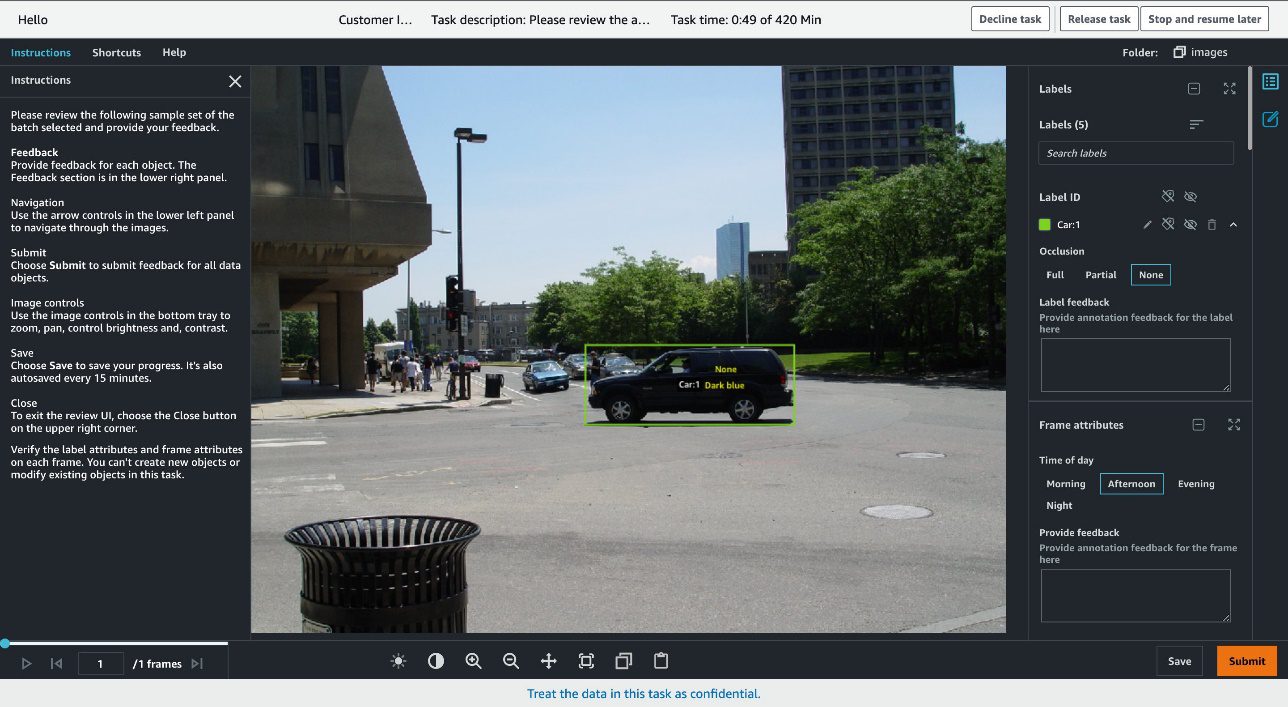
Car, say you want to ask the workers to also annotate theColorandOcclusionattributes for each label instance. When you load the Review UI, you will see the corresponding attributes under each label instance on the right pane. But what if you want to see these attribute annotations directly on the image instead? You select the labelCar:1, and to overlay the attribute annotations forCar:1, you press Ctrl+A.
Now you will see the annotationDark Bluefor theColorattribute and annotationNonefor theOcclusionattribute directly displayed on the image next to theCar:1bounding box. Now you can easily verify thatCar:1was marked asDark Blue, with no occlusion just from looking at the image instead of having to locateCar:1on the right pane to see the attribute annotations.

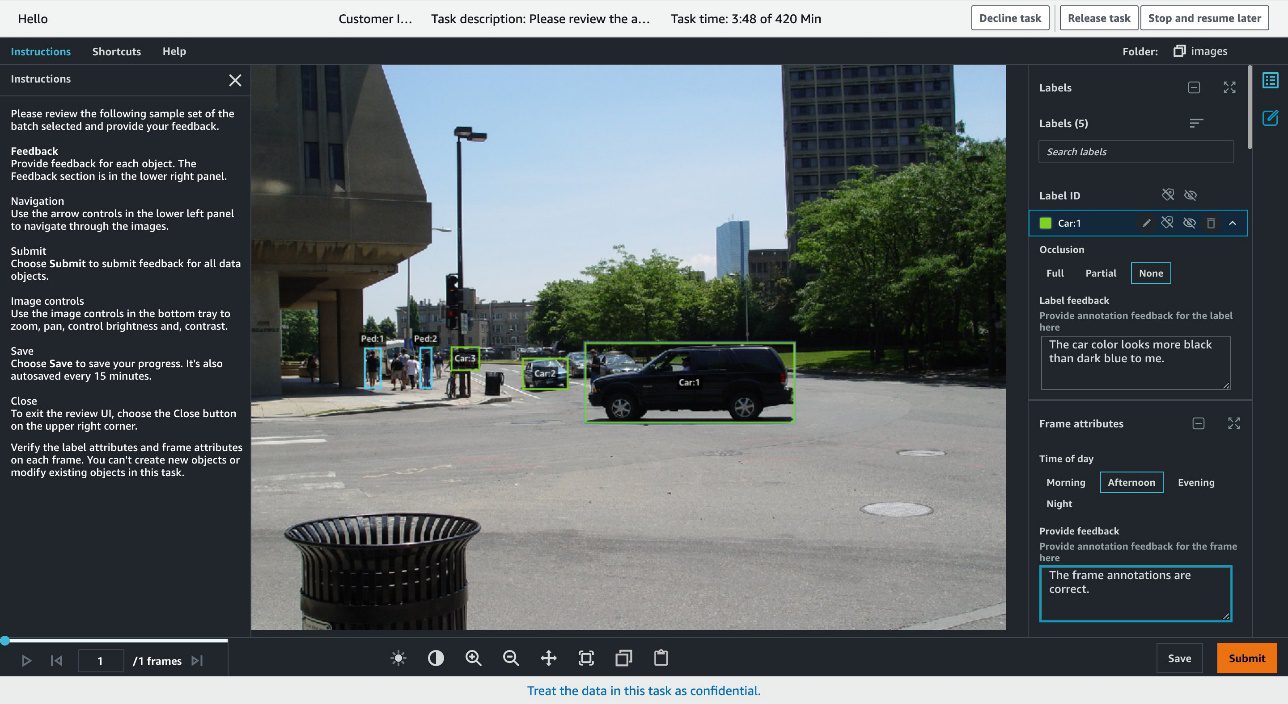
- Leave feedback at the label level – For each label, you can leave feedback at the label level in that label’s Label feedback free string attribute. For example, in this image,
Car:1looks more black than dark blue. You can relay this discrepancy as feedback forCar:1using the Label feedback field to track the comment to that label on that frame. Our internal quality control team will review this feedback and introduce changes to the annotation process and label policies, and train the annotators as required.

- Leave feedback at the frame level – Similarly, for each frame, you can leave feedback at the frame level under that frame’s Frame feedback free string attribute. In this case, the annotations for
CarandPedestrianclasses look correct and well implemented in this frame. You can relay this positive feedback using the Provide feedback field, and your comment is linked to this frame.


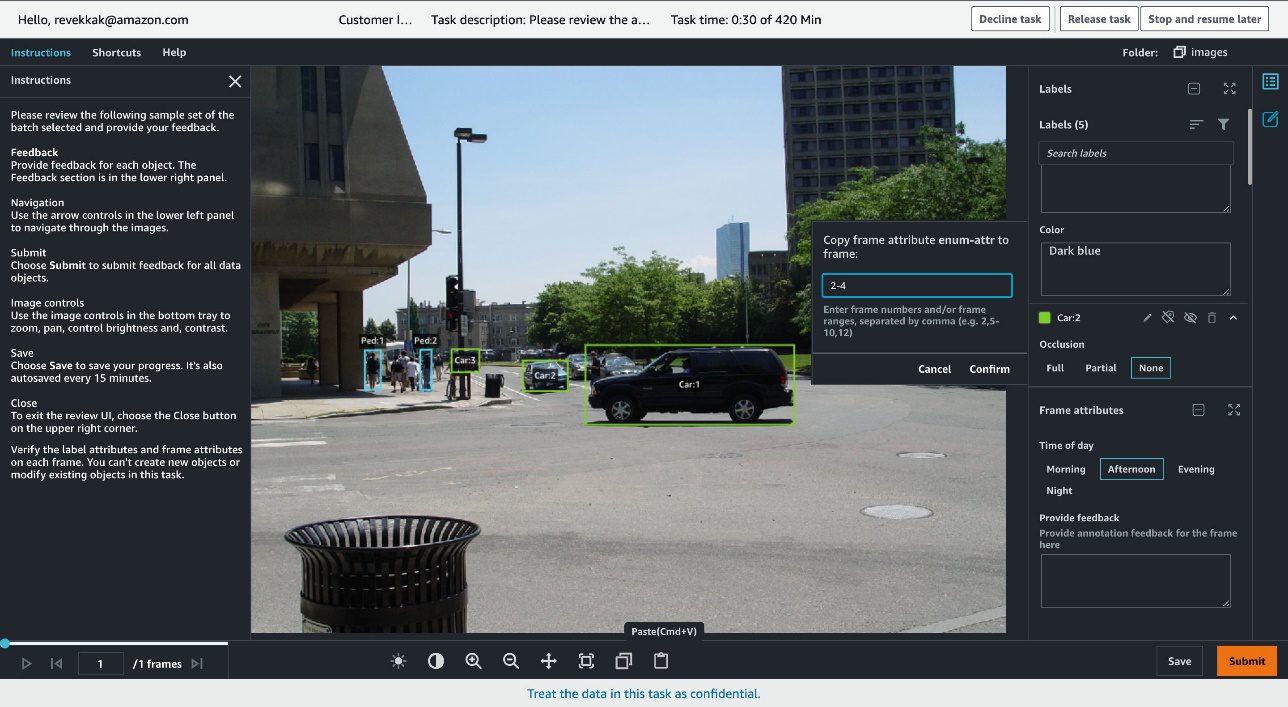
- Copy the annotation feedback to other frames – You can copy both label-level and frame-level feedback to other frames if you right-click that attribute. This feature is useful when you want to duplicate the same feedback across frames for that label, or apply the same frame-level feedback to several frames. This feature allows you to quickly complete the inspection of data labels.

- Approve or reject each dataset object – For each dataset object you review, you have the option to either choose Approve if you’re satisfied with the annotations or choose Reject if you’re not satisfied and want those annotations reworked. When you choose Submit, you’re presented with the option to approve or reject the video you just reviewed. In either case, you can provide additional commentary:
- If you choose Approve, the commentary is optional.


- If you choose Reject, commentary is required and we suggest providing detailed feedback. Your feedback will be reviewed by a dedicated Ground Truth Plus quality control team, who will take corrective actions to avoid similar mistakes in subsequent videos.


- If you choose Approve, the commentary is optional.
After you submit the video with your feedback, you’re redirected back to the project detail page in the project portal, where you can view the number of rejected objects under the Rejected objects column and the error rate, which is calculated as the number of accepted objects out of reviewed objects under the Acceptance rate column for each batch in your project. For example, for batch 1 in the following screenshot, the acceptance rate is 80% because four objects were accepted out of the five reviewed objects.
Conclusion
A high-quality training dataset is critical for achieving your ML initiatives. With Ground Truth Plus, you now have an enhanced built-in Review UI tool that removes the undifferentiated heavy lifting associated with building custom tools to review the quality of the labeled dataset. This post walked you through how to set up a project team and use the new built-in features of the Review UI tool. Visit the Ground Truth Plus console to get started.
As always, AWS welcomes feedback. Please submit any comments or questions.
About the Author


Tags: Archive


Leave a Reply