Prepare data at scale in Amazon SageMaker Studio using serverless AWS Glue interactive sessions
Amazon SageMaker Studio is the first fully integrated development environment (IDE) for machine learning (ML). It provides a single, web-based visual interface where you can perform all ML development steps, including preparing data and building, training, and deploying models.
AWS Glue is a serverless data integration service that makes it easy to discover, prepare, and combine data for analytics, ML, and application development. AWS Glue enables you to seamlessly collect, transform, cleanse, and prepare data for storage in your data lakes and data pipelines using a variety of capabilities, including built-in transforms.
Data engineers and data scientists can now interactively prepare data at scale using their Studio notebook’s built-in integration with serverless Spark sessions managed by AWS Glue. Starting in seconds and automatically stopping compute when idle, AWS Glue interactive sessions provide an on-demand, highly-scalable, serverless Spark backend to achieve scalable data preparation within Studio. Notable benefits of using AWS Glue interactive sessions on Studio notebooks include:
- No clusters to provision or manage
- No idle clusters to pay for
- No up-front configuration required
- No resource contention for the same development environment
- The exact same serverless Spark runtime and platform as AWS Glue extract, transform, and load (ETL) jobs
In this post, we show you how to prepare data at scale in Studio using serverless AWS Glue interactive sessions.
Solution overview
To implement this solution, you complete the following high-level steps:
- Update your AWS Identity and Access Management (IAM) role permissions.
- Launch an AWS Glue interactive session kernel.
- Configure your interactive session.
- Customize your interactive session and run a scalable data preparation workload.
Update your IAM role permissions
To start, you need to update your Studio user’s IAM execution role with the required permissions. For detailed instructions, refer to Permissions for Glue interactive sessions in SageMaker Studio.
You first add the managed policies to your execution role:
- On the IAM console, choose Roles in the navigation pane.
- Find the Studio execution role that you will use, and choose the role name to go to the role summary page.
- On the Permissions tab, on the Add Permissions menu, choose Attach policies.
- Select the managed policies
AmazonSageMakerFullAccessandAwsGlueSessionUserRestrictedServiceRole - Choose Attach policies.
The summary page shows your newly-added managed policies.Now you add a custom policy and attach it to your execution role. - On the Add Permissions menu, choose Create inline policy.
- On the JSON tab, enter the following policy:
- Modify your role’s trust relationship:
Launch an AWS Glue interactive session kernel
If you already have existing users within your Studio domain, you may need to have them shut down and restart their Jupyter Server to pick up the new notebook kernel images.
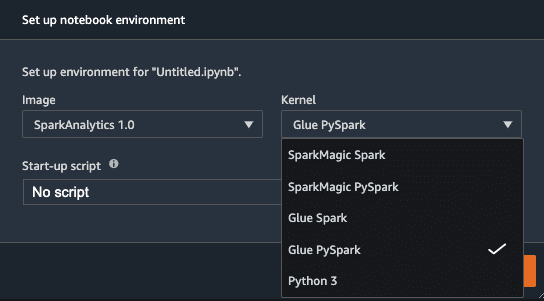
Upon reloading, you can create a new Studio notebook and select your preferred kernel. The built-in SparkAnalytics 1.0 image should now be available, and you can choose your preferred AWS Glue kernel (Glue Scala Spark or Glue PySpark).
Configure your interactive session
You can easily configure your AWS Glue interactive session with notebook cell magics prior to initialization. Magics are small commands prefixed with % at the start of Jupyter cells that provide shortcuts to control the environment. In AWS Glue interactive sessions, magics are used for all configuration needs, including:
- %region – The AWS Region in which to initialize a session. The default is the Studio Region.
- %iam_role – The IAM role ARN to run your session with. The default is the user’s SageMaker execution role.
- %worker_type – The AWS Glue worker type. The default is standard.
- %number_of_workers – The number of workers that are allocated when a job runs. The default is five.
- %idle_timeout – The number of minutes of inactivity after which a session will time out. The default is 2,880 minutes.
- %additional_python_modules – A comma-separated list of additional Python modules to include in your cluster. This can be from PyPi or Amazon Simple Storage Service (Amazon S3).
- %%configure – A JSON-formatted dictionary consisting of AWS Glue-specific configuration parameters for a session.
For a comprehensive list of configurable magic parameters for this kernel, use the %help magic within your notebook.
Your AWS Glue interactive session will not start until the first non-magic cell is run.
Customize your interactive session and run a data preparation workload
As an example, the following notebook cells show how you can customize your AWS Glue interactive session and run a scalable data preparation workload. In this example, we perform an ETL task to aggregate air quality data for a given city, grouping by the hour of the day.
We configure our session to save our Spark logs to an S3 bucket for real-time debugging, which we see later in this post. Be sure that the iam_role that is running your AWS Glue session has write access to the specified S3 bucket.
Next, we load our dataset directly from Amazon S3. Alternatively, you could load data using your AWS Glue Data Catalog.
Finally, we write our transformed dataset to an output bucket location that we defined:
After you’ve completed your work, you can end your AWS Glue interactive session immediately by simply shutting down the Studio notebook kernel, or you could use the %stop_session magic.
Debugging and Spark UI
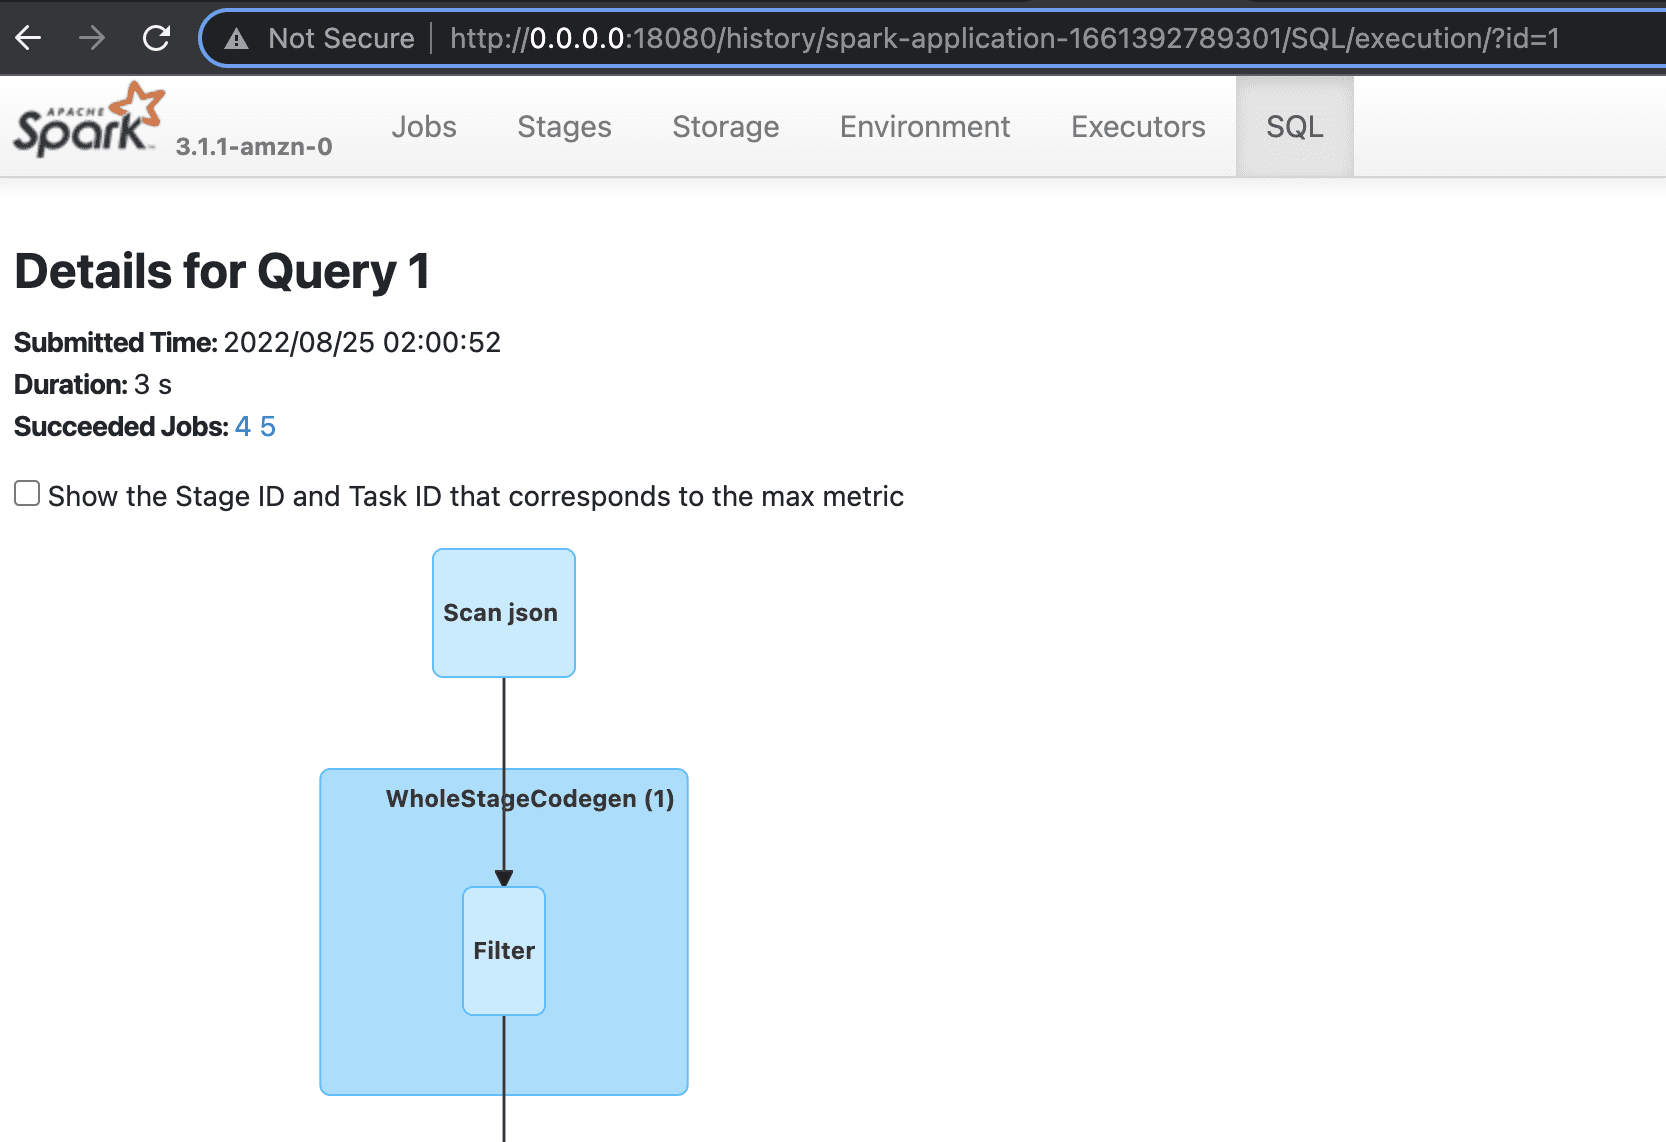
In the preceding example, we specified the ”--enable-spark-ui”: “true” argument along with a "--spark-event-logs-path": location. This configures our AWS Glue session to record the sessions logs so that we can utilize a Spark UI to monitor and debug our AWS Glue job in real time.
For the process for launching and reading those Spark logs, refer to Launching the Spark history server. In the following screenshot, we’ve launched a local Docker container that has permission to read the S3 bucket the contains our logs. Optionally, you could host an Amazon Elastic Compute Cloud (Amazon EC2) instance to do this, as described in the preceding linked documentation.
Pricing
When you use AWS Glue interactive sessions on Studio notebooks, you’re charged separately for resource usage on AWS Glue and Studio notebooks.
AWS charges for AWS Glue interactive sessions based on how long the session is active and the number of Data Processing Units (DPUs) used. You’re charged an hourly rate for the number of DPUs used to run your workloads, billed in increments of 1 second. AWS Glue interactive sessions assign a default of 5 DPUs and require a minimum of 2 DPUs. There is also a 1-minute minimum billing duration for each interactive session. To see the AWS Glue rates and pricing examples, or to estimate your costs using the AWS Pricing Calculator, see AWS Glue pricing.
Your Studio notebook runs on an EC2 instance and you’re charged for the instance type you choose, based on the duration of use. Studio assigns you a default EC2 instance type of ml-t3-medium when you select the SparkAnalytics image and associated kernel. You can change the instance type of your Studio notebook to suit your workload. For information about SageMaker Studio pricing, see Amazon SageMaker Pricing.
Conclusion
The native integration of Studio notebooks with AWS Glue interactive sessions facilitates seamless and scalable serverless data preparation for data scientists and data engineers. We encourage you to try out this new functionality in Studio!
See Prepare Data using AWS Glue Interactive Sessions for more information.
About the authors
 Sean Morgan is a Senior ML Solutions Architect at AWS. He has experience in the semiconductor and academic research fields, and uses his experience to help customers reach their goals on AWS. In his free time Sean is an activate open source contributor/maintainer and is the special interest group lead for TensorFlow Addons.
 Sumedha Swamy is a Principal Product Manager at Amazon Web Services. He leads SageMaker Studio team to build it into the IDE of choice for interactive data science and data engineering workflows. He has spent the past 15 years building customer-obsessed consumer and enterprise products using Machine Learning. In his free time he likes photographing the amazing geology of the American Southwest.
Tags: Archive


Leave a Reply