Explaining Amazon SageMaker Autopilot models with SHAP
Machine learning (ML) models have long been considered black boxes because predictions from these models are hard to interpret. However, recently, several frameworks aiming at explaining ML models were proposed. Model interpretation can be divided into local and global explanations. A local explanation considers a single sample and answers questions like “Why does the model predict that Customer A will stop using the product?” or “Why did the ML system refuse John Doe a loan?” Another interesting question is “What should John Doe change in order to get the loan approved?” In contrast, global explanations aim at explaining the model itself and answer questions like “Which features are important for prediction?” You can use local explanations to derive global explanations by averaging many samples. For further reading on interpretable ML, see the excellent book Interpretable Machine Learning by Christoph Molnar.
In this post, we demonstrate using the popular model interpretation framework SHAP for both local and global interpretation.
SHAP
SHAP is a game theoretic framework inspired by shapley values that provides local explanations for any model. SHAP has gained popularity in recent years, probably due to its strong theoretical basis. The SHAP package contains several algorithms that, when given a sample and model, derive the SHAP value for each of the model’s input features. The SHAP value of a feature represents its contribution to the model’s prediction.
To explain models built by Amazon SageMaker Autopilot, we use SHAP’s KernelExplainer, which is a black box explainer. KernelExplainer is robust and can explain any model, so can handle the complex feature processing of Amazon SageMaker Autopilot. KernelExplainer only requires that the model support an inference functionality that, when given a sample, returns the model’s prediction for that sample. The prediction is the predicted value for regression and the class probability for classification.
SHAP includes several other explainers, such as TreeExplainer and DeepExplainer, which are specific for decision forest and neural networks, respectively. These are not black box explainers and require knowledge of the model structure and trained params. TreeExplainer and DeepExplainer are limited and, as of this writing, can’t support any feature processing.
Creating a notebook instance
You can run the example code provided in this post. It’s recommended to run the code inside an Amazon SageMaker instance type of ml.m5.xlarge or larger to accelerate running time. To launch the notebook with the example code using Amazon SageMaker Studio, complete the following steps:
- Launch an Amazon SageMaker Studio instance.
- Open terminal and clone the GitHub repo:
git clone https://github.com/awslabs/amazon-sagemaker-examples.git - Open the notebook
autopilot/model-explainability/explaining_customer_churn_model.ipynb. - Use kernel
Python 3 (Data Science).
Setting up the required packages
In this post, we start with a model built by Amazon SageMaker Autopilot, which was already trained on a binary classification task. See the following code:
For instructions on creating and training an Amazon SageMaker Autopilot model, see Customer Churn Prediction with Amazon SageMaker Autopilot.
Install SHAP with the following code:
Initialize the plugin to make the plots interactive.
shap.initjs()
Creating an inference endpoint
Create an inference endpoint for the trained model built by Amazon SageMaker Autopilot. See the following code:
For classification response to work with SHAP we need the probability scores. This can be achieved by providing a list of keys for response content. The order of the keys will dictate the content order in the response. This parameter is not needed for regression.
Create the inference endpoint
You can skip this step if an endpoint with the argument inference_response_keys set as ['predicted_label', 'probability'] was already created.
Wrapping the Amazon SageMaker Autopilot endpoint with an estimator class
For ease of use, we wrap the inference endpoint with a custom estimator class. Two inference functions are provided: predict, which returns the numeric prediction value to be used for regression, and predict_proba, which returns the class probabilities to be used for classification. See the following code:
Create an instance of AutomlEstimator:
Data
In this notebook, we use the same dataset as used in the Customer Churn Prediction with Amazon SageMaker Autopilot GitHub repo. Follow the notebook in the GitHub repo to download the dataset if it was not previously downloaded.
Background data
KernelExplainer requires a sample of the data to be used as background data. KernelExplainer uses this data to simulate a feature being missing by replacing the feature value with a random value from the background. We use shap.sample to sample 50 rows from the dataset to be used as background data. Using more samples as background data produces more accurate results, but runtime increases. The clustering algorithms provided in SHAP only support numeric data. You can use a vector of zeros as background data to produce reasonable results.
Choosing background data is challenging. For more information, see AI Explanations Whitepaper and Runtime considerations.
Setting up KernelExplainer
Next, we create the KernelExplainer. Because it’s a black box explainer, KernelExplainer only requires a handle to the predict (or predict_proba) function and doesn’t require any other information about the model. For classification, it’s recommended to derive feature importance scores in the log-odds space because additivity is a more natural assumption there, so we use Logit. For regression, you should use Identity. See the following code:
The handle to predict_proba is passed to KernelExplainer since KernelSHAP requires the class probability:
By analyzing the background data, KernelExplainer provides us with explainer.expected_value, which is the model prediction with all features missing. Considering a customer for which we have no data at all (all features are missing), this should theoretically be the model prediction. See the following code:
Since expected_value is given in the log-odds space we convert it back to probability using expit which is the inverse function to logit
Local explanation with KernelExplainer
We use KernelExplainer to explain the prediction of a single sample, the first sample in the dataset. See the following code:
ManagedEndpoint will auto delete the endpoint after calculating the SHAP values. To disable auto delete, use ManagedEndpoint(ep_name, auto_delete=False)
The SHAP package includes many visualization tools. The following force_plot code provides a visualization for the SHAP values of a single sample. Since shap_values are provided in the log-odds space, we convert them back to the probability space by using Logit
The following visualization is the result.

From this plot, we learn that the most influential feature is VMail Message, which pushes the probability down by about 7%. VMail Message = 25 makes the probability 7% lower in comparison to the notion of that feature being missing. SHAP values don’t provide the information of how increasing or decreasing VMail Message affects prediction.
In many use cases, we’re interested only in the most influential features. By setting l1_reg='num_features(5)', SHAP provides non-zero scores for only the most influential five features:
The following visualization is the result.

KernelExplainer computation cost
KernelExplainer computation cost is dominated by the inference calls. To estimate SHAP values for a single sample, KernelExplainer calls the inference function twice: first with the sample unaugmented, and then with many randomly augmented instances of the sample. The number of augmented instances in our use case is 50 (number of samples in the background data) * 2088 (nsamples = 'auto') = 104,400. So, for this use case, the cost of running KernelExplainer for a single sample is roughly the cost of 104,400 inference calls.
Global explanation with KernelExplainer
Next, we use KernelExplainer to provide insight about the model as a whole. We do this by running KernelExplainer locally on 50 samples and aggregating the results:
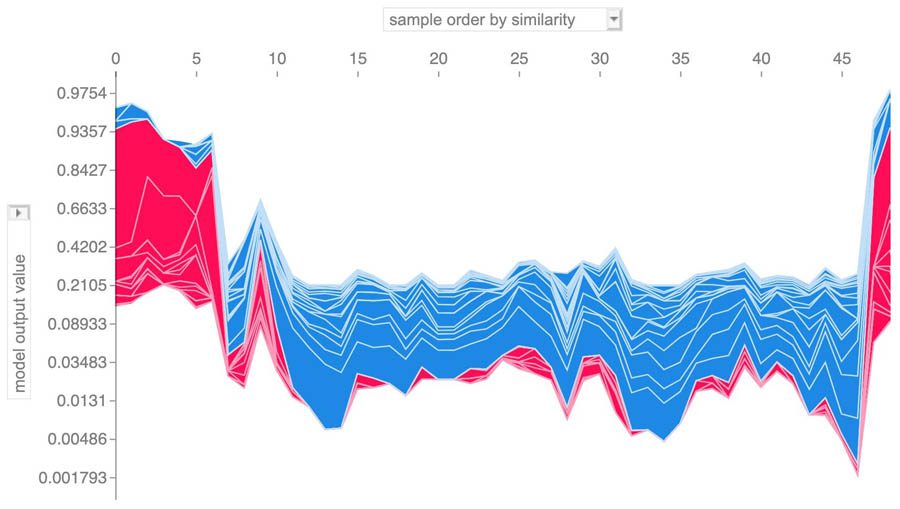
You can use force_plot to visualize SHAP values for many samples simultaneously, force_plot then rotates the plot of each sample by 90 degrees and stacks the plots horizontally. See the following code:
The resulting plot is interactive (in the notebook) and can be manually analyzed.

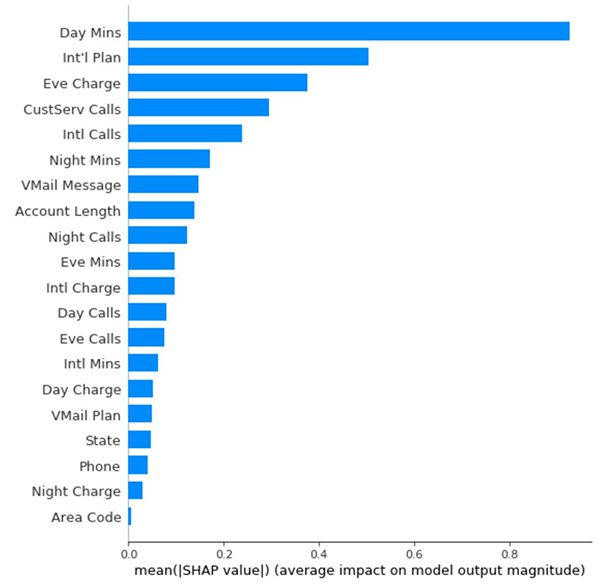
summary_plot is another visualization tool displaying the mean absolute value of the SHAP values for each feature using a bar plot. Currently, summary_plot doesn’t support link functions, so the SHAP values are presented in the log-odds space (and not the probability space). See the following code:
The following graph shows the results.

Conclusion
In this post, we demonstrated how to use KernelSHAP to explain models created by Amazon SageMaker Autopilot, both locally and globally. KernelExplainer is a robust black box explainer that requires only that the model support an inference functionality that, when given a sample, returns the model’s prediction for that sample. This inference functionality was provided by wrapping the Amazon SageMaker Autopilot inference endpoint with a custom estimator class.
For more information about Amazon SageMaker Autopilot, see Amazon SageMaker Autopilot.
To explore related features of Amazon SageMaker, see the following:
- ML Explainability with Amazon SageMaker Debugger
- Detecting and analyzing incorrect model predictions with Amazon SageMaker Model Monitor and Debugger
- Explaining Credit Decisions with Amazon SageMaker
About the Authors
 Yotam Elor is a Senior Applied Scientist at AWS Sagemaker. He works on Sagemaker Autopilot – AWS’s auto ML solution.
 Somnath Sarkar is a Software Engineer in the AWS SageMaker Autopilot team. He enjoys machine learning in general with focus in scalable and distributed systems.
Tags: Archive

Leave a Reply