Train machine learning models using Amazon Keyspaces as a data source
Many applications meant for industrial equipment maintenance, trade monitoring, fleet management, and route optimization are built using open-source Cassandra APIs and drivers to process data at high speeds and low latency. Managing Cassandra tables yourself can be time consuming and expensive. Amazon Keyspaces (for Apache Cassandra) lets you set up, secure, and scale Cassandra tables in the AWS Cloud without managing additional infrastructure.
In this post, we’ll walk you through AWS Services related to training machine learning (ML) models using Amazon Keyspaces at a high level, and provide step by step instructions for ingesting data from Amazon Keyspaces into Amazon SageMaker and training a model which can be used for a specific customer segmentation use case.
AWS has multiple services to help businesses implement ML processes in the cloud.
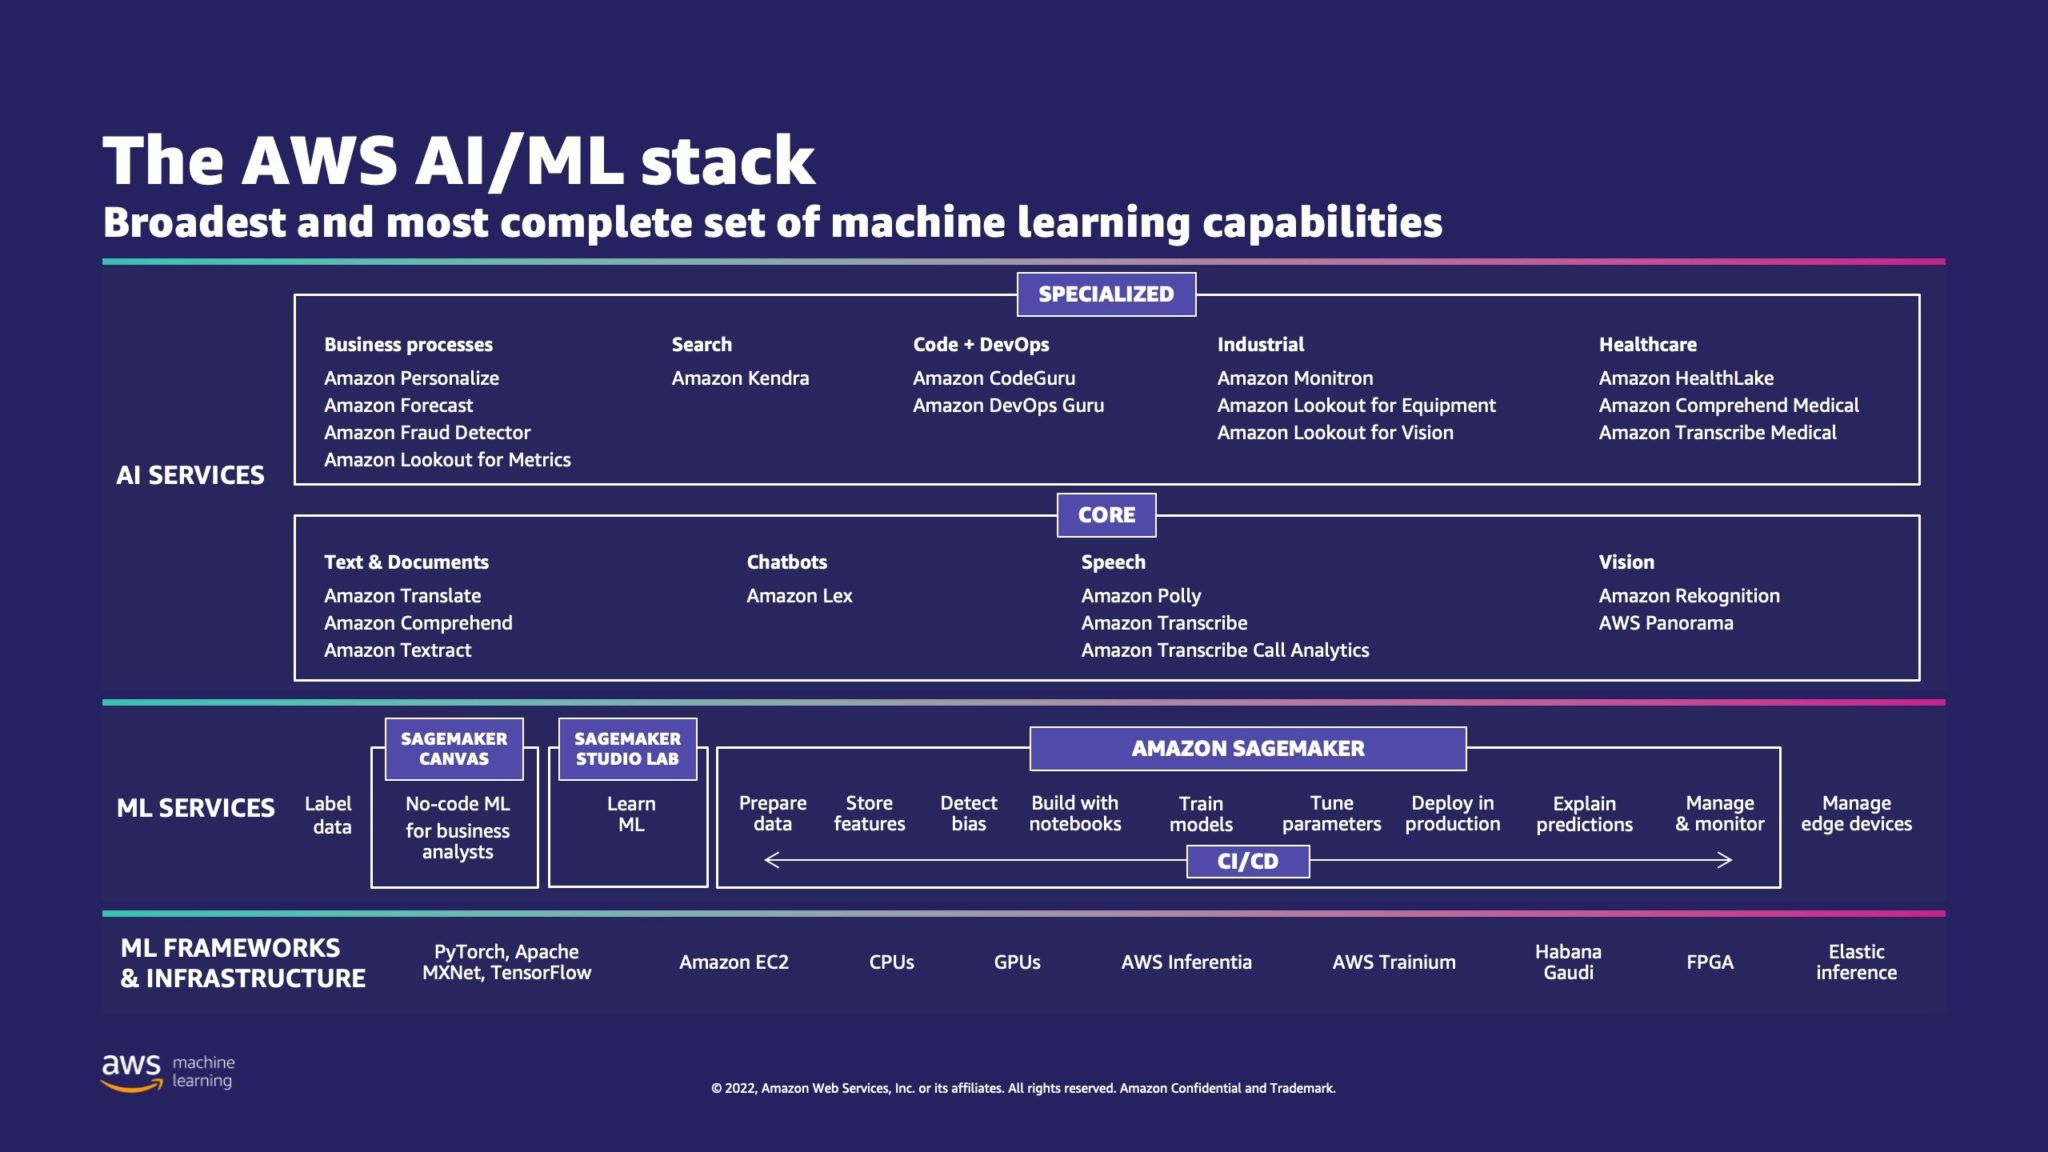
AWS ML Stack has three layers. In the middle layer is SageMaker, which provides developers, data scientists, and ML engineers with the ability to build, train, and deploy ML models at scale. It removes the complexity from each step of the ML workflow so that you can more easily deploy your ML use cases. This includes anything from predictive maintenance to computer vision to predict customer behaviors. Customers achieve up to 10 times improvement in data scientists’ productivity with SageMaker.
Apache Cassandra is a popular choice for read-heavy use cases with un-structured or semi-structured data. For example, a popular food delivery business estimates time of delivery, and a retail customer could persist frequently using product catalog information in the Apache Cassandra Database. Amazon Keyspaces is a scalable, highly available, and managed serverless Apache Cassandra–compatible database service. You don’t need to provision, patch, or manage servers, and you don’t need to install, maintain, or operate software. Tables can scale up and down automatically, and you only pay for the resources that you use. Amazon Keyspaces lets you you run your Cassandra workloads on AWS using the same Cassandra application code and developer tools that you use today.
SageMaker provides a suite of built-in algorithms to help data scientists and ML practitioners get started training and deploying ML models quickly. In this post, we’ll show you how a retail customer can use customer purchase history in the Keyspaces Database and target different customer segments for marketing campaigns.
K-means is an unsupervised learning algorithm. It attempts to find discrete groupings within data, where members of a group are as similar as possible to one another and as different as possible from members of other groups. You define the attributes that you want the algorithm to use to determine similarity. SageMaker uses a modified version of the web-scale k-means clustering algorithm. As compared with the original version of the algorithm, the version used by SageMaker is more accurate. However, like the original algorithm, it scales to massive datasets and delivers improvements in training time.
Solution overview
The instructions assume that you would be using SageMaker Studio to run the code. The associated code has been shared on AWS Sample GitHub. Following the instructions in the lab, you can do the following:
- Install necessary dependencies.
- Connect to Amazon Keyspaces, create a Table, and ingest sample data.
- Build a classification ML model using the data in Amazon Keyspaces.
- Explore model results.
- Clean up newly created resources.
Once complete, you’ll have integrated SageMaker with Amazon Keyspaces to train ML models as shown in the following image.
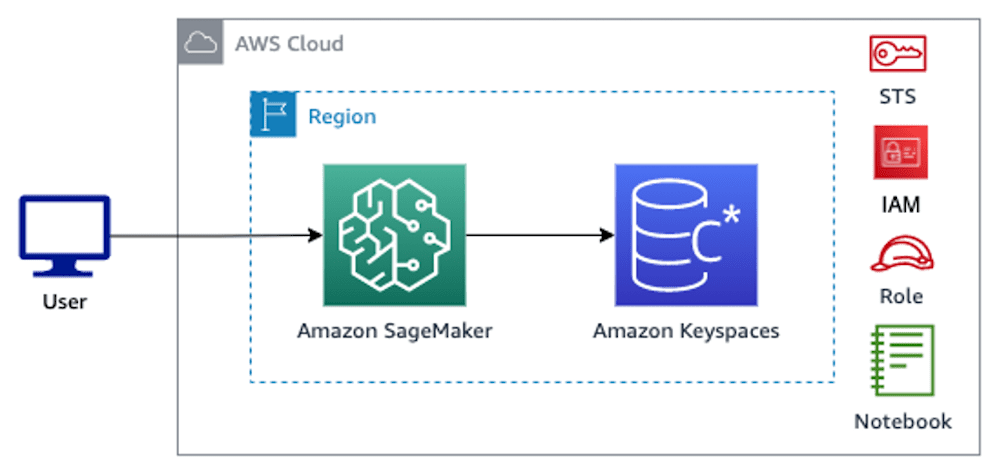
Now you can follow the step-by-step instructions in this post to ingest raw data stored in Amazon Keyspaces using SageMaker and the data thus retrieved for ML processing.
Prerequisites
First, Navigate to SageMaker.
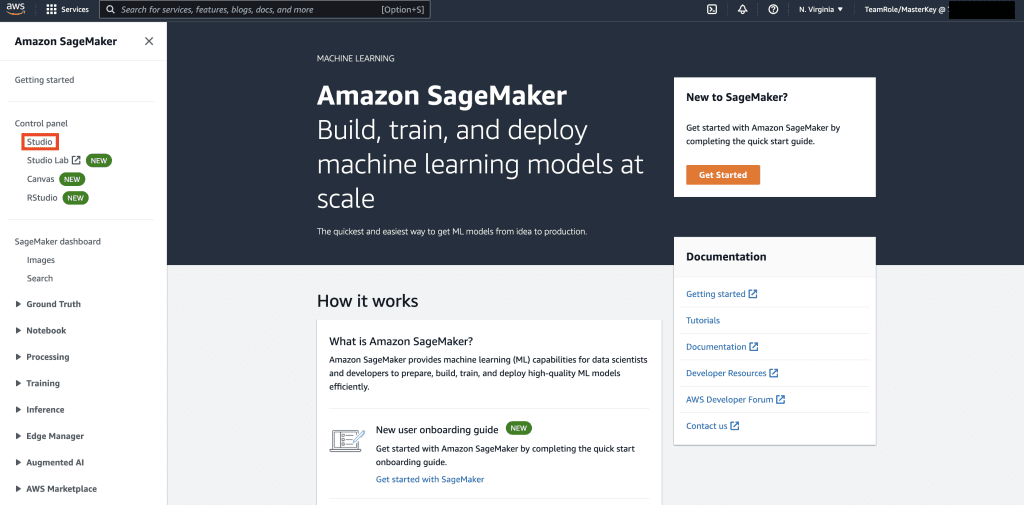
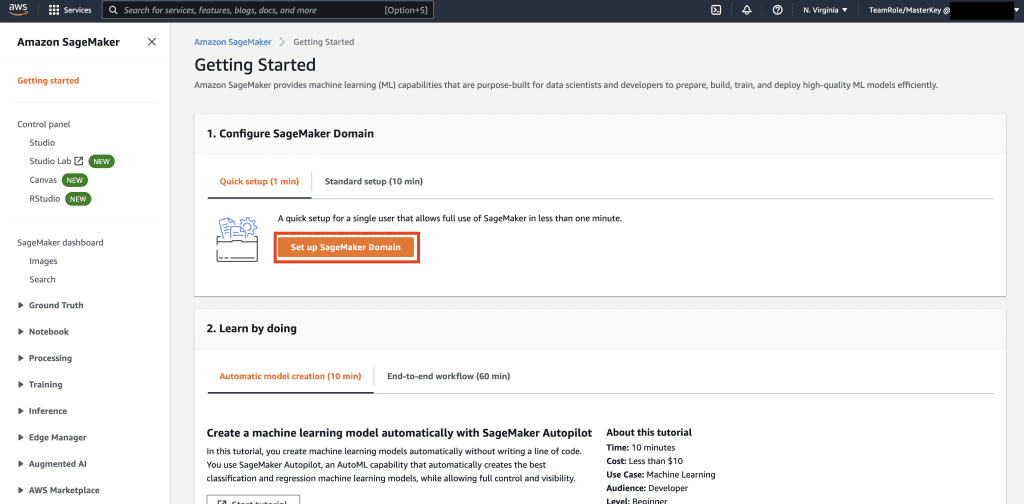
Next, if this is the first time that you’re using SageMaker, select Get Started.
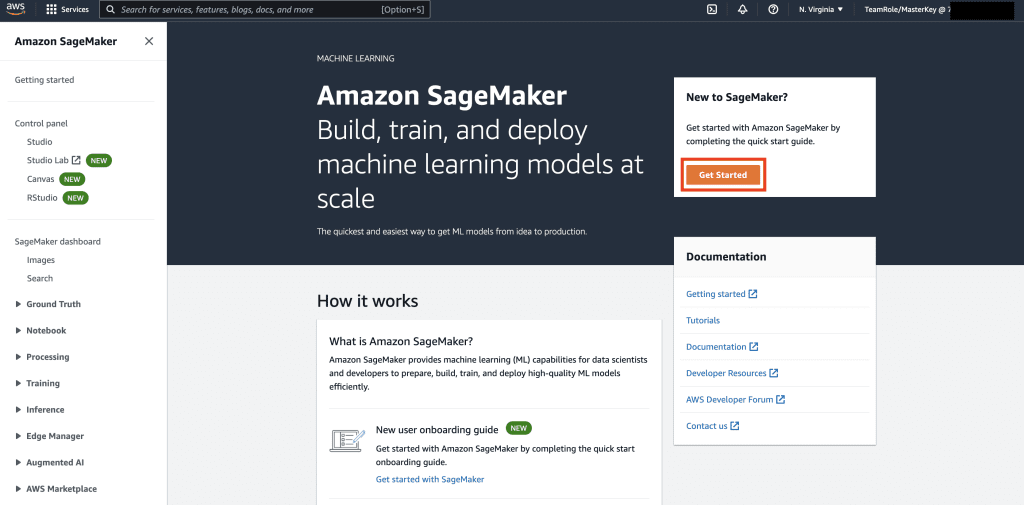
Next, select Setup up SageMaker Domain.
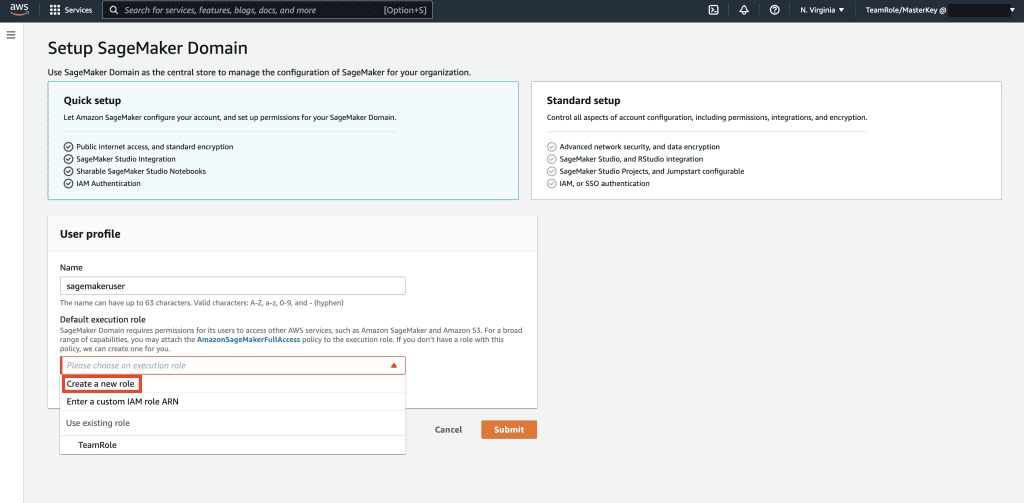
Next, create a new user profile with Name – sagemakeruser, and select Create New Role in the Default Execution Role sub section.
Next, in the screen that pops up, select any Amazon Simple Storage Service (Amazon S3) bucket, and select Create role.
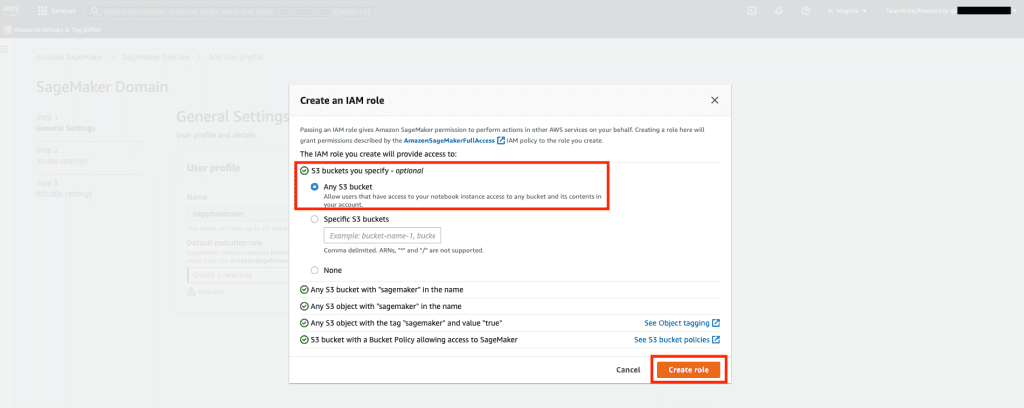
This role will be used in the following steps to allow SageMaker to access Keyspaces Table using temporary credentials from the role. This eliminates the need to store a username and password in the notebook.
Next, retrieve the role associated with the sagemakeruser that was created in the previous step from the summary section.
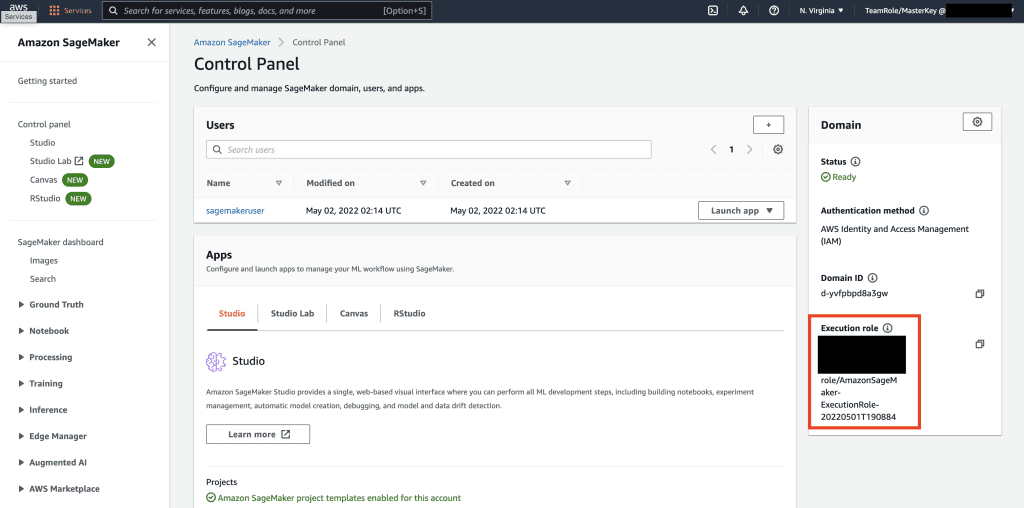
Then, navigate to the AWS Console and look up AWS Identity and Access Management (IAM). Within IAM, navigate to Roles. Within Roles, search for the execution role identified in the previous step.
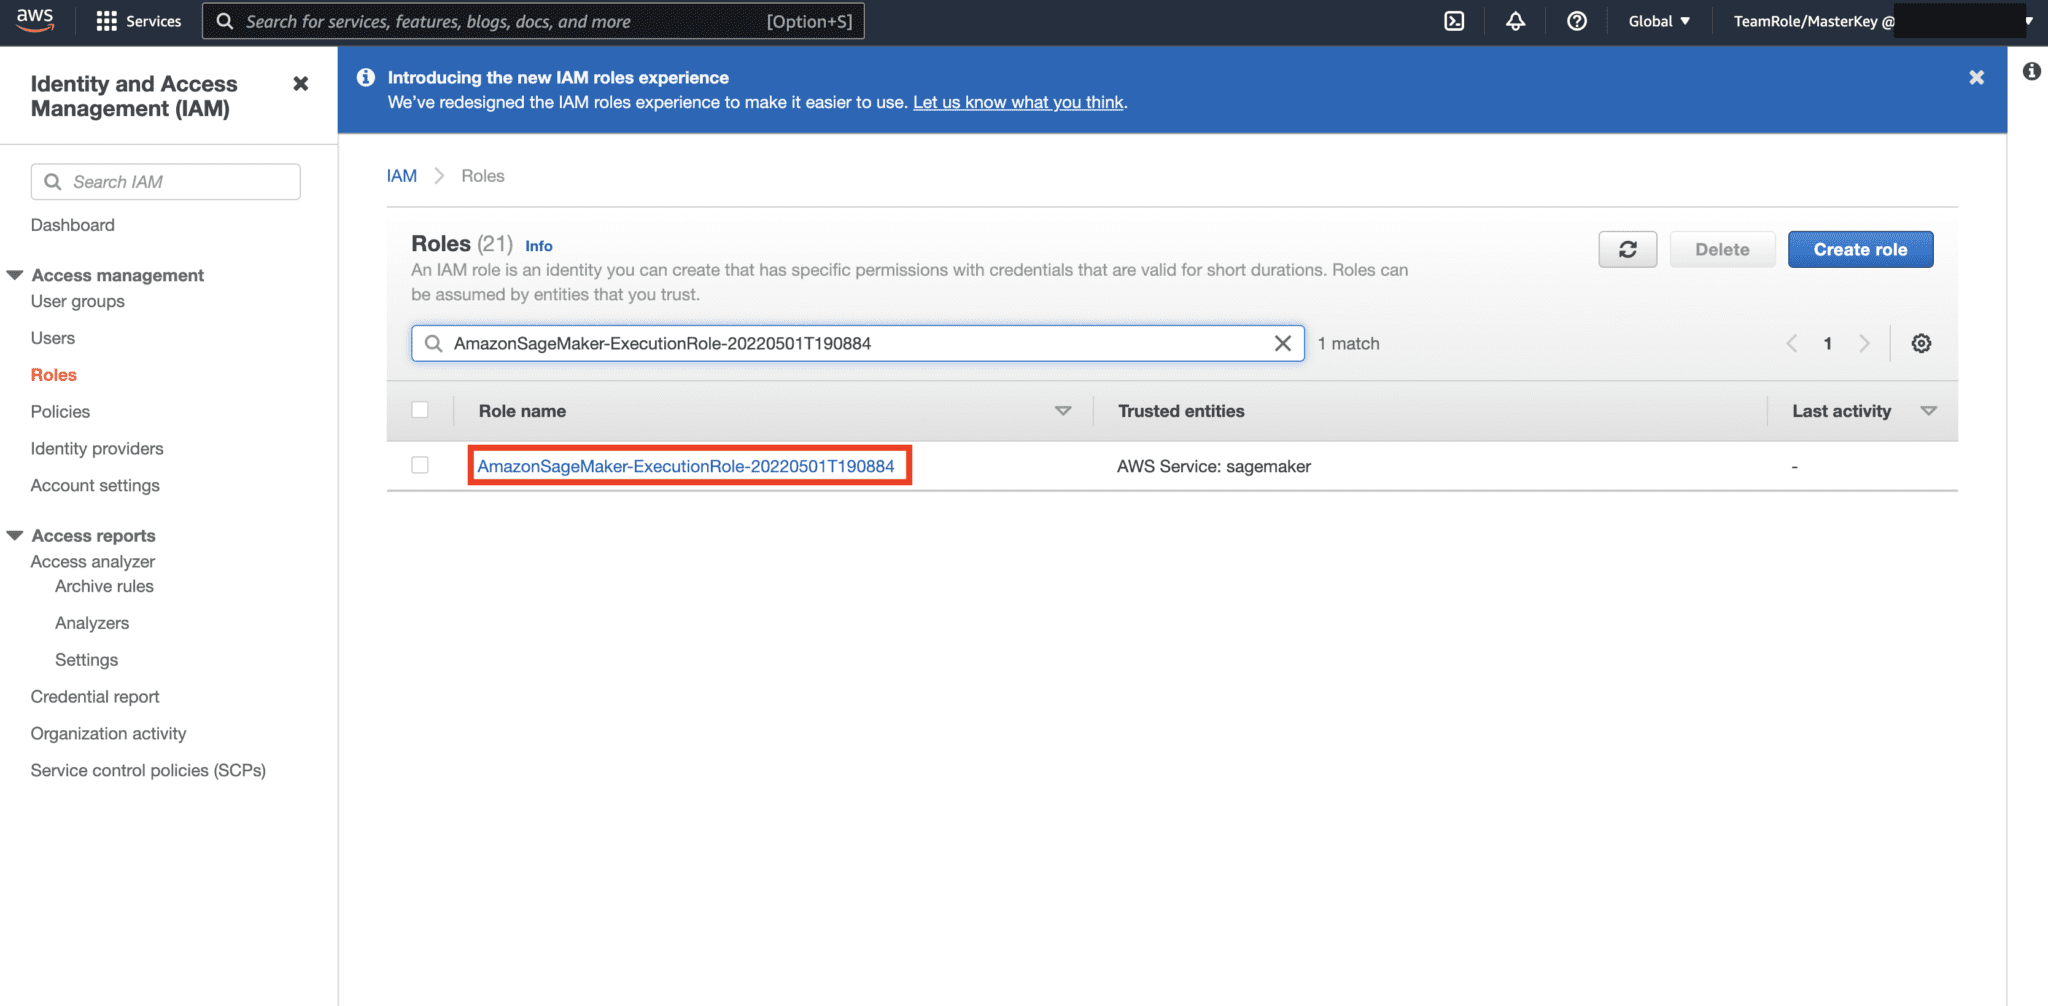
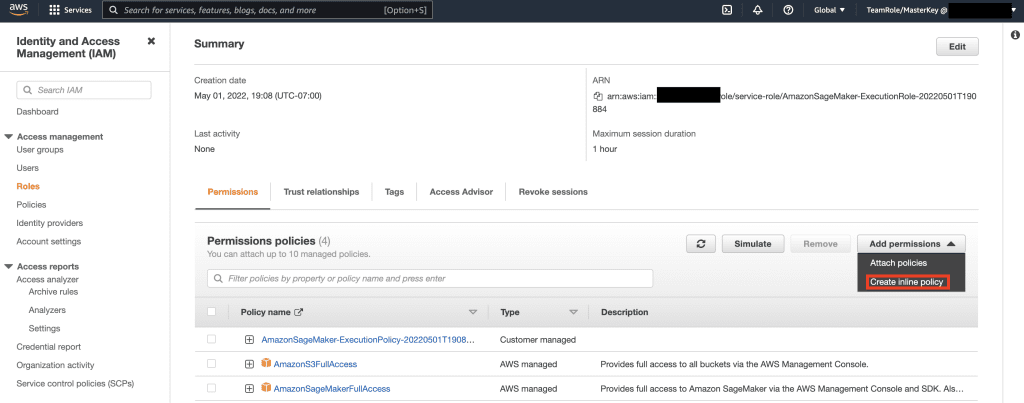
Next, select the role identified in the previous step and select Add Permissions. In the drop down that appears, select Create Inline Policy. SageMaker lets you provide a granular level of access that restricts what actions a user/application can perform based on business requirements.
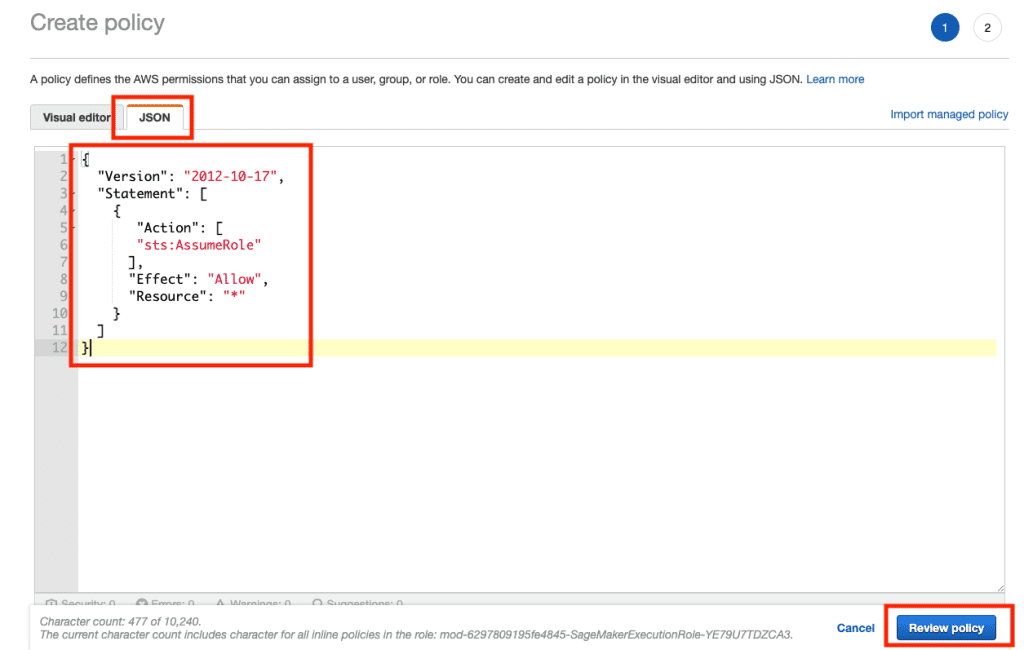
Then, select the JSON tab and copy the policy from the Note section of Github page. This policy allows the SageMaker notebook to connect to Keyspaces and retrieve data for further processing.
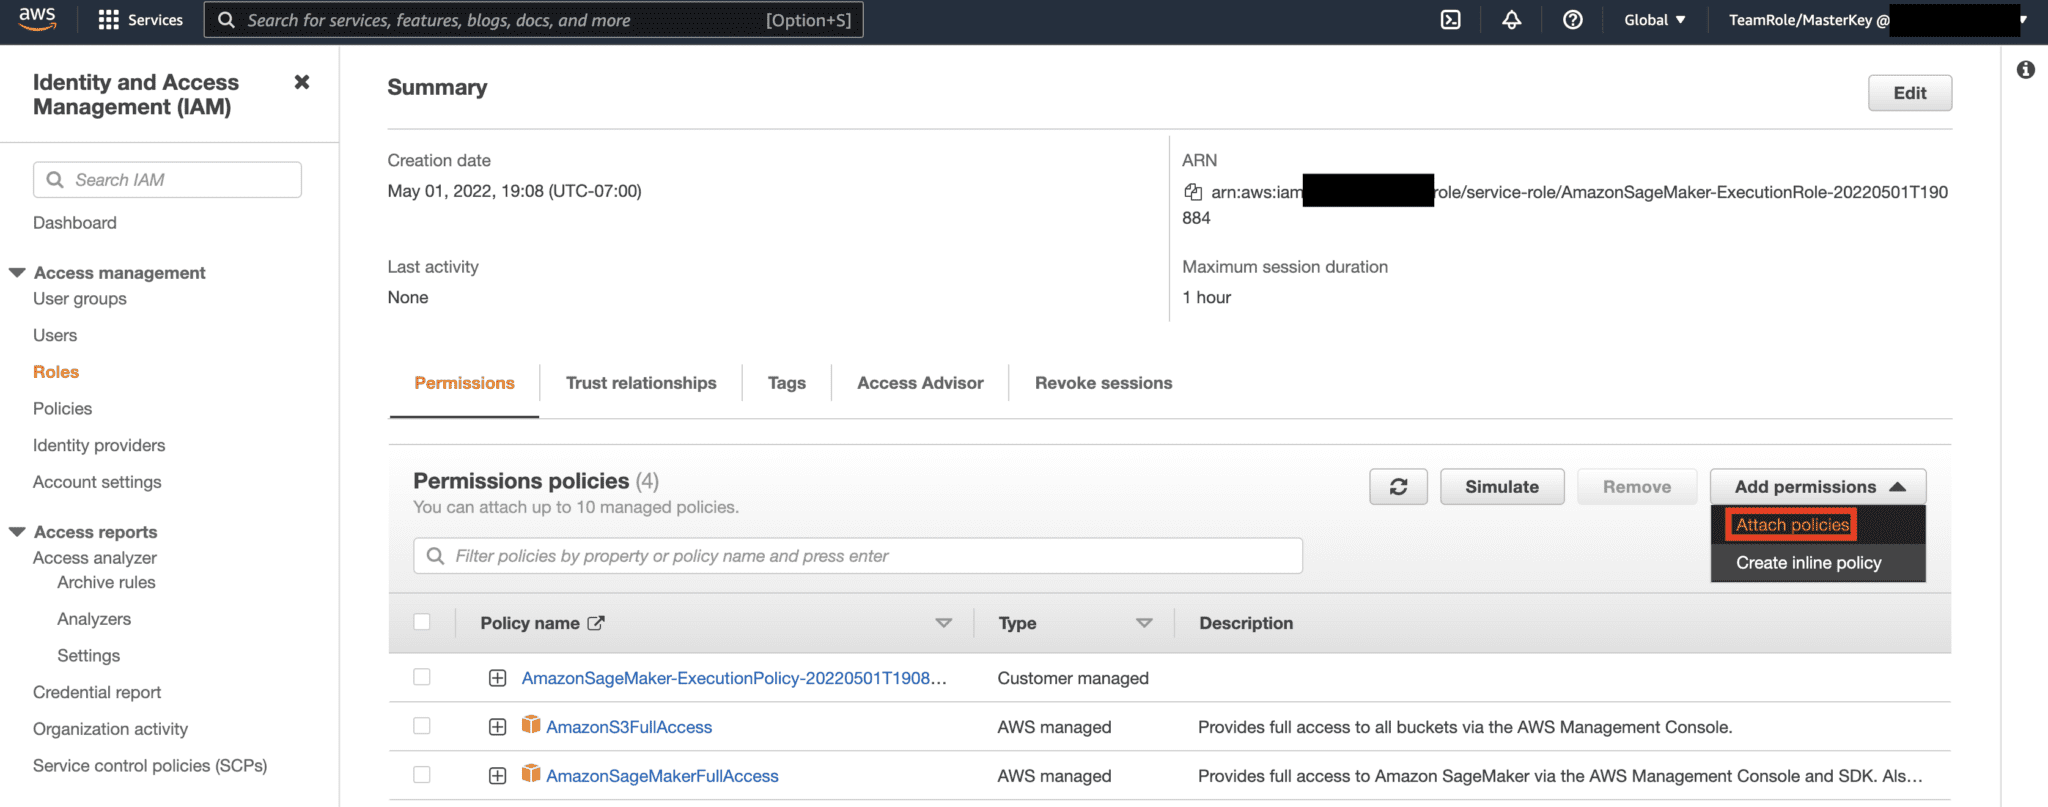
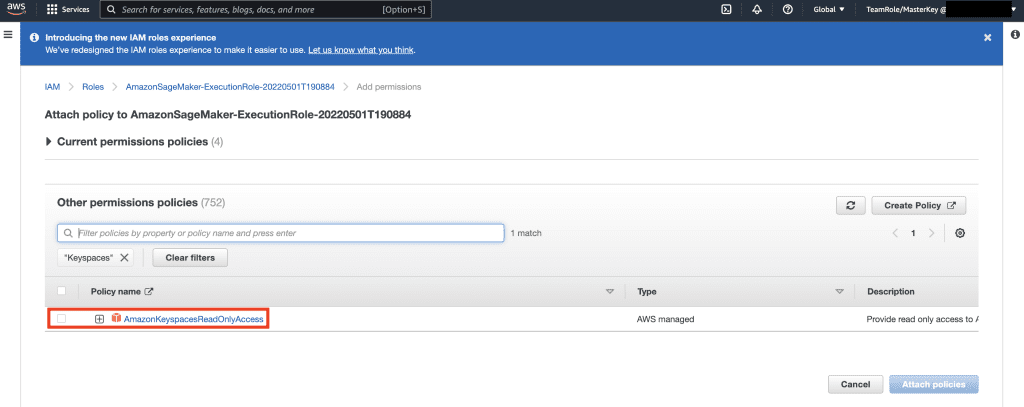
Then, select Add permissions again and from the drop down, and select Attach Policy.
Lookup AmazonKeyspacesFullAccess policy, and select the checkbox next to the matching result, and select Attach Policies.
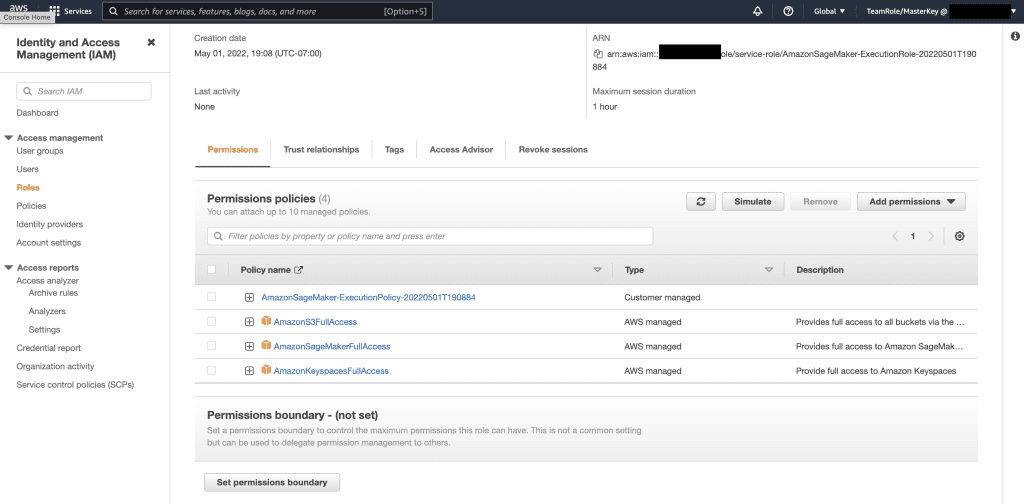
Verify that the permissions policies section includes AmazonS3FullAccess, AmazonSageMakerFullAccess, AmazonKeyspacesFullAccess, as well as the newly added inline policy.
Next, navigate to SageMaker Studio using the AWS Console and select the SageMaker Studio. Once there, select Launch App and select Studio.

Notebook walkthrough
The preferred way to connect to Keyspaces from SageMaker Notebook is by using AWS Signature Version 4 process (SigV4) based Temporary Credentials for authentication. In this scenario, we do NOT need to generate or store Keyspaces credentials and can use the credentials to authenticate with the SigV4 plugin. Temporary security credentials consist of an access key ID and a secret access key. However, they also include a security token that indicates when the credentials expire. In this post, we’ll create an IAM role and generate temporary security credentials.
First, we install a driver (cassandra-sigv4). This driver enables you to add authentication information to your API requests using the AWS Signature Version 4 Process (SigV4). Using the plugin, you can provide users and applications with short-term credentials to access Amazon Keyspaces (for Apache Cassandra) using IAM users and roles. Following this, you’ll import a required certificate along with additional package dependencies. In the end, you will allow the notebook to assume the role to talk to Keyspaces.
Next, connect to Amazon Keyspaces and read systems data from Keyspaces into Pandas DataFrame to validate the connection.

Next, prepare the data for training on the raw data set. In the python notebook associated with this post, use a retail data set downloaded from here, and process it. Our business objective given the data set is to cluster the customers using a specific metric call RFM. The RFM model is based on three quantitative factors:
- Recency: How recently a customer has made a purchase.
- Frequency: How often a customer makes a purchase.
- Monetary Value: How much money a customer spends on purchases.
RFM analysis numerically ranks a customer in each of these three categories, generally on a scale of 1 to 5 (the higher the number, the better the result). The “best” customer would receive a top score in every category. We’ll use pandas’s Quantile-based discretization function (qcut). It will help discretize values into equal-sized buckets based or based on sample quantiles.
In this example, we use CQL to read records from the Keyspace table. In some ML use-cases, you may need to read the same data from the same Keyspaces table multiple times. In this case, we would recommend that you save your data into an Amazon S3 bucket to avoid incurring additional costs reading from Amazon Keyspaces. Depending on your scenario, you may also use Amazon EMR to ingest a very large Amazon S3 file into SageMaker.
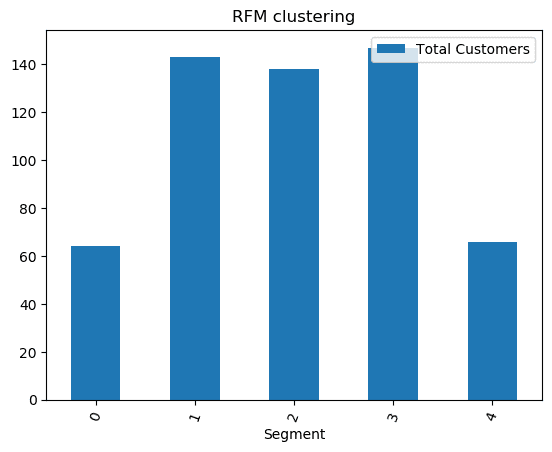
Next, we train an ML model using the KMeans algorithm and make sure that the clusters are created. In this particular scenario, you would see that the created clusters are printed, showing that the customers in the raw data set have been grouped together based on various attributes in the data set. This cluster information can be used for targeted marketing campaigns.
(Optional) Next, we save the customer segments that have been identified by the ML model back to an Amazon Keyspaces table for targeted marketing. A batch job could read this data and run targeted campaigns to customers in specific segments.
Finally, we clean up the resources created during this tutorial to avoid incurring additional charges.
It may take a few seconds to a minute to complete the deletion of keyspace and tables. When you delete a keyspace, the keyspace and all of its tables are deleted and you stop accruing charges from them.
Conclusion
This post showed you how to ingest customer data from Amazon Keyspaces into SageMaker and train a clustering model that allowed you to segment customers. You could use this information for targeted marketing, thus greatly improving your business KPI. To learn more about Amazon Keyspaces, review the following resources:
- Train Machine Learning Models using Amazon Keyspaces as a Data Source (SageMaker Notebook)
- Connect to Amazon Keyspaces from your desktop using IntelliJ, PyCharm, or DataGrip IDEs
- CQL Language Reference for Amazon Keyspaces (for Apache Cassandra)
- How to set up command-line access to Amazon Keyspaces (for Apache Cassandra) by using the new developer toolkit Docker image
- Identity and Access Management for Amazon Keyspaces (for Apache Cassandra)
- Connecting to Amazon Keyspaces from SageMaker with service-specific credentials
- Recency, Frequency, Monetary Value (RFM)
- Kaggle code reference
About the Authors
 Vadim Lyakhovich is a Senior Solutions Architect at AWS in the San Francisco Bay Area helping customers migrate to AWS. He is working with organizations ranging from large enterprises to small startups to support their innovations. He is also helping customers to architect scalable, secure, and cost-effective solutions on AWS.
 Parth Patel is a Solutions Architect at AWS in the San Francisco Bay Area. Parth guides customers to accelerate their journey to cloud and help them adopt AWS cloud successfully. He focuses on ML and Application Modernization.
 Ram Pathangi is a Solutions Architect at AWS in the San Francisco Bay Area. He has helped customers in Agriculture, Insurance, Banking, Retail, Health Care & Life Sciences, Hospitality, and Hi-Tech verticals to run their business successfully on AWS cloud. He specializes in Databases, Analytics and ML.
Tags: Archive

Leave a Reply