Move Amazon SageMaker Autopilot ML models from experimentation to production using Amazon SageMaker Pipelines
Amazon SageMaker Autopilot automatically builds, trains, and tunes the best custom machine learning (ML) models based on your data. It’s an automated machine learning (AutoML) solution that eliminates the heavy lifting of handwritten ML models that requires ML expertise. Data scientists need to only provide a tabular dataset and select the target column to predict, and Autopilot automatically infers the problem type, performs data preprocessing and feature engineering, selects the algorithms and training mode, and explores different configurations to find the best ML model. Then you can directly deploy the model to an Amazon SageMaker endpoint or iterate on the recommended solutions to further improve the model quality.
Although Autopilot eliminates the heavy lifting of building ML models, MLOps engineers still have to create, automate, and manage end-to-end ML workflows. Amazon SageMaker Pipelines helps you automate the different steps of the ML lifecycle, including data preprocessing, training, tuning and evaluating ML models, and deploying them.
In this post, we show how to create an end-to-end ML workflow to train and evaluate an Autopilot generated ML model using Pipelines and register it in the SageMaker model registry. The ML model with the best performance can be deployed to a SageMaker endpoint.
Dataset overview
We use the publicly available hospital readmission dataset for diabetic patients to predict readmission of diabetic patients within 30 days after discharge. It is a sampled version of the “Diabetes 130-US hospitals for years 1999-2008 Data Set”. This is a multi-class classification problem because the readmission options are either < 30 if the patient is readmitted within 30 days, > 30 if the patient is readmitted after 30 days, or no for no record of readmission.
The dataset contains 50,000 rows and 15 columns. This includes demographic information about patients along with their hospital visit records and readmitted as the target column. The following table summarizes the column details.
| Column Name | Description |
| Race_Caucasian | Values: 0 for no, 1 for yes |
| Race_African_American | Values: 0 for no, 1 for yes |
| Race_Hispanic | Values: 0 for no, 1 for yes |
| Race_Asian | Values: 0 for no, 1 for yes |
| Race_Other | Values: 0 for no, 1 for yes |
| Age | 0–100 age range |
| Time in Hospital | Number of days between admission and discharge |
| Number of lab procedures | Number of lab tests performed during the encounter |
| Number of medications | Number of distinct generic names administered during the encounter |
| Number of emergency visits | Number of emergency visits of the patient in the year preceding the encounter |
| Number of inpatient visits | Number of inpatient visits of the patient in the year preceding the encounter |
| Number of diagnoses | Number of diagnoses entered to the system |
| Change of medications | Indicates if there was a change in diabetic medications (either dosage or generic name); values: 0 and 1 |
| Diabetic medications | Indicates if there was any diabetic medication prescribed; values: 0 for no changes in prescription and 1 for change in prescription |
| Readmitted | Days to inpatient readmission; values: <30 if the patient was readmitted in less than 30 days, >30 if the patient was readmitted in more than 30 days, and no for no record of readmission |
Solution overview
We use Pipelines in Amazon SageMaker Studio to orchestrate different pipeline steps required to train an Autopilot model. An Autopilot experiment is created and run using the AWS SDKs as described in this post. Autopilot training jobs start their own dedicated SageMaker backend processes, and dedicated SageMaker API calls are required to start new training jobs, monitor training job statuses, and invoke trained Autopilot models.
The following are the steps required for this end-to-end Autopilot training process:
- Create an Autopilot training job.
- Monitor the training job status.
- Evaluate performance of the trained model on a test dataset.
- Register the model in the model registry.

SageMaker pipeline steps
When the registered model meets the expected performance requirements after a manual review, you can deploy the model to a SageMaker endpoint using a standalone deployment script.
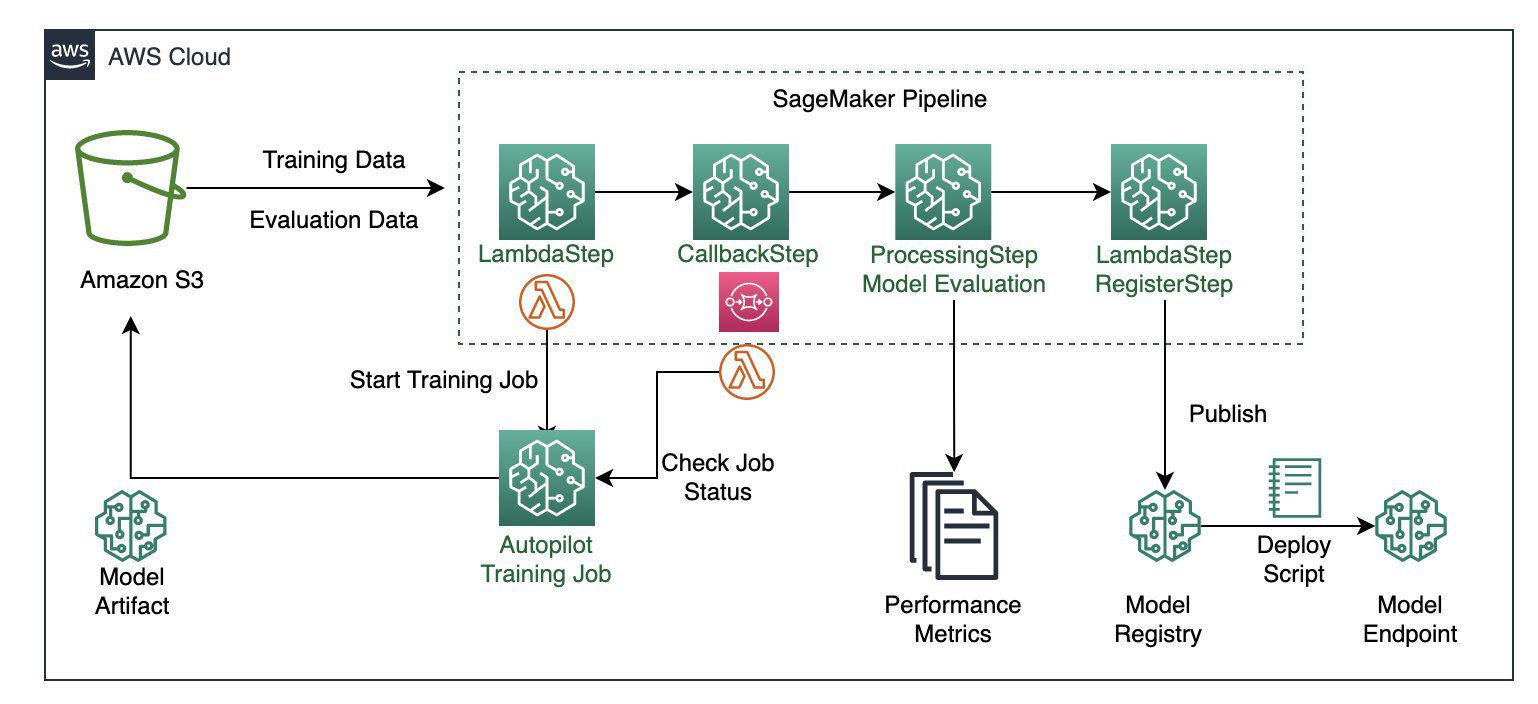
The following architecture diagram illustrates the different pipeline steps necessary to package all the steps in a reproducible, automated, and scalable Autopilot training pipeline. Each step is responsible for a specific task in the workflow:
- An AWS Lambda function starts the Autopilot training job.
- A Callback step continuously monitors that job status.
- When the training job status is complete, we use a SageMaker processing job to evaluate the model’s performance.
- Finally, we use another Lambda function to register the ML model and the performance metrics to the SageMaker model registry.
The data files are read from the Amazon Simple Storage Service (Amazon S3) bucket and the pipeline steps are called sequentially.

Architecture diagram of the SageMaker pipeline
In the following sections, we review the code and discuss the components of each step. To deploy the solution, reference the GitHub repo, which provides step-by-step instructions for implementing an Autopilot MLOps workflow using Pipelines.
Prerequisites
For this walkthrough, complete the following prerequisite steps:
- Set up an AWS account.
- Create a Studio environment.
- Create two AWS Identity and Access Management (IAM) roles:
LambdaExecutionRoleandSageMakerExecutionRole, with permissions as outlined in the SageMaker notebook. The managed policies should be scoped down further for improved security. For instructions, refer to Creating a role to delegate permissions to an IAM user. - On the Studio console, upload the code from the GitHub repo.
- Open the SageMaker notebook
autopilot_pipelines_demo_notebook.ipynband run the cells under Get dataset to download the data and upload it to your S3 bucket.- Download the data and unzip it to a folder named data:
- Split the data into train-val and test files and upload them to your S3 bucket. The train-val file is automatically split into training and validation datasets by Autopilot. The test file is split into two separate files: one file without the target column and another file with only the target column.
When the dataset is ready to use, we can now set up Pipelines to establish a repeatable process to build and train custom ML models using Autopilot. We use Boto3 and the SageMaker SDK to launch, track, and evaluate the AutoML jobs in an automated fashion.
Define the pipeline steps
In this section, we walk you through setting up the four steps in the pipeline.
Start the Autopilot job
This pipeline step uses a Lambda step, which runs a serverless Lambda function. We use a Lambda step because the API call to Autopilot is lightweight. Lambda functions are serverless and well suited for this task. For more information about Lambda steps, refer to Use a SageMaker Pipeline Lambda step for lightweight model deployments. The Lambda function in the start_autopilot_job.py script creates an Autopilot job.
We use the Boto3 Autopilot API call create_auto_ml_job to specify the Autopilot job configuration, with the following parameters:
- AutoMLJobName – The Autopilot job name.
- InputDataConfig – The training data, data location in Amazon S3, and S3 data type with valid values such as
S3Prefix,ManifestFile, andAugmentedManifestFile. - OutputDataConfig – The S3 output path where artifacts from the AutoML job are stored.
- ProblemType – The problem type (
MulticlassClassificationfor our use case). - AutoMLJobObjective –
F1macrois our objective metric for our use case. - AutoMLJobConfig – The training mode is specified here. We use the newly released ensemble training mode powered by AutoGluon.
See the following code:
Check Autopilot job status
A Callback step helps us keep track of the status of the Autopilot training job.
The step repeatedly keeps track of the training job status by using a separate Lambda function in check_autopilot_job_status.py until its completion.
The Callback step places a token in an Amazon Simple Queue Service (Amazon SQS) queue that triggers a Lambda function to check the training job status:
- If the job is still running, the Lambda function raises an exception and the message is placed back into the SQS queue
- If the job is complete, the Lambda function sends a success message back to the
Callbackstep and the pipeline continues with the next step
We use a combination of a Callback step and a Lambda function. There is an alternate option of using a SageMaker processing job instead.
Evaluate the best Autopilot model
The SageMaker processing step launches a SageMaker batch transform job to evaluate the trained Autopilot model against an evaluation dataset (the test set that was saved to the S3 bucket) and generates the performance metrics evaluation report and model explainability metrics. The evaluation script takes the Autopilot job name as an input argument and launches the batch transform job.
When the batch transform job is complete, we get output predictions for the test set. The output predictions are compared to the actual (ground truth) labels using Scikit-learn metrics functions. We evaluate our results based on the F1 score, precision, and recall. The performance metrics are saved to a JSON file, which is referenced when registering the model in the subsequent step.
Register the Autopilot model
We use another Lambda step, in which the Lambda function in register_autopilot_job.py registers the Autopilot model to the SageMaker model registry using the evaluation report obtained in the previous SageMaker processing step. A Lambda step is used here for cost efficiency and latency.
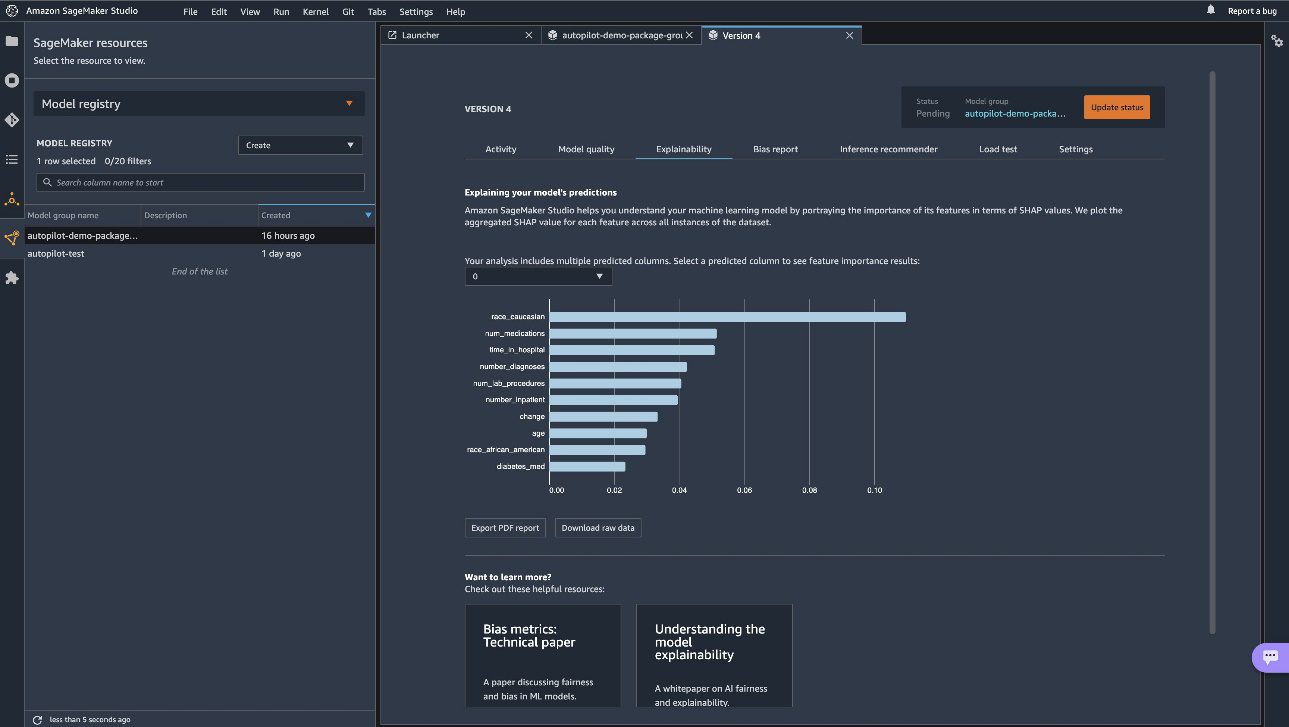
At this point, we have successfully registered our new Autopilot model to the SageMaker model registry. You can view the new model on Studio by choosing Model registry on the SageMaker resources menu and opening autopilot-demo-package. Choose any version of a training job to view the objective metrics under Model quality.

You can use the explainability report on the Explainability tab to understand your model’s predictions.

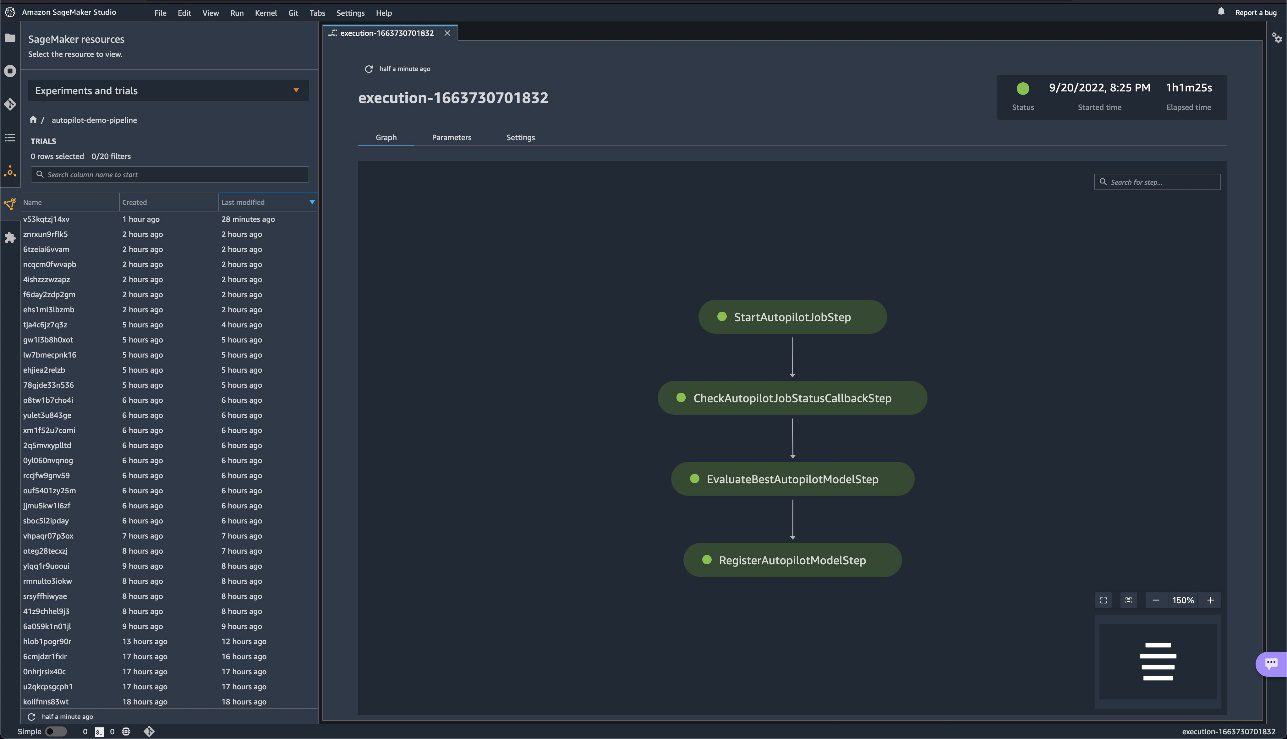
To view the experiments run for each model created, navigate to the Experiments and trials page. Choose (right-click) one of the listed experiments and choose Describe AutoML job to view the model leaderboard.

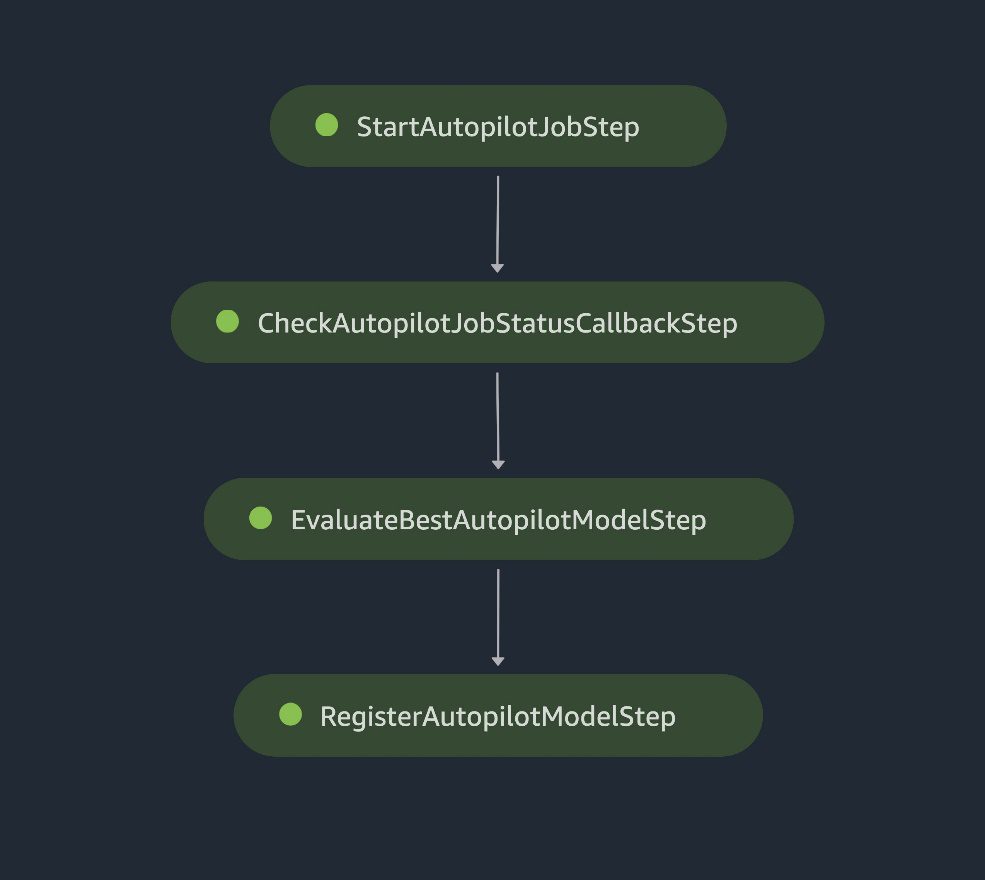
To view the pipeline steps on the Experiments and trials page, choose (right-click) the experiment and choose Open pipeline details.

Create and run the pipeline
After we define the pipeline steps, we combine them into a SageMaker pipeline. The steps are run sequentially. The pipeline runs all of the steps for an AutoML job, using Autopilot for training, model evaluation, and model registration. See the following code:
Deploy the model
After we have manually reviewed the ML model’s performance, we can deploy our newly created model to a SageMaker endpoint. For this, we can run the cell in the notebook that creates the model endpoint using the model configuration saved in the SageMaker model registry.
Note that this script is shared for demonstration purposes, but it’s recommended to follow a more robust CI/CD pipeline for production deployment. For more information, refer to Building, automating, managing, and scaling ML workflows using Amazon SageMaker Pipelines.
Conclusion
This post described an easy-to-use ML pipeline approach to automatically train tabular ML models (AutoML) using Autopilot, Pipelines, and Studio. AutoML improves ML practitioners’ efficiency, accelerating the path from ML experimentation to production without the need for extensive ML expertise. We outlined the respective pipeline steps needed for ML model creation, evaluation, and registration.
Get started by accessing the code on the GitHub repo to train and deploy your own custom AutoML models.
For more information on Pipelines and Autopilot, refer to Amazon SageMaker Pipelines and Automate model development with Amazon SageMaker Autopilot, respectively.
About the Authors
 Pierre de Malliard is a Full-Stack Data Scientist for AWS and is passionate about helping customers improve their business outcomes with machine learning. He has been building AI/ML solutions across the healthcare sector. He holds multiple AWS certifications. In his free time, Pierre enjoys backcountry skiing and spearfishing.
 Paavani Dua is an Applied Scientist in the AWS AI organization. At the Amazon ML Solutions Lab, she works with customers to solve their business problems using ML solutions. Outside of work, she enjoys hiking, reading, and baking.
 Marcelo Aberle is an ML Engineer in the AWS AI organization. He is leading MLOps efforts at the Amazon ML Solutions Lab, helping customers design and implement scalable ML systems. His mission is to guide customers on their enterprise ML journey and accelerate their ML path to production. He is an admirer of California nature and enjoys hiking and cycling around San Francisco.
Tags: Archive

Leave a Reply